


fns720
-
Posts
19 -
Joined
-
Last visited
Content Type
Forums
Events
3D Prints
Posts posted by fns720
-
-
Hi,
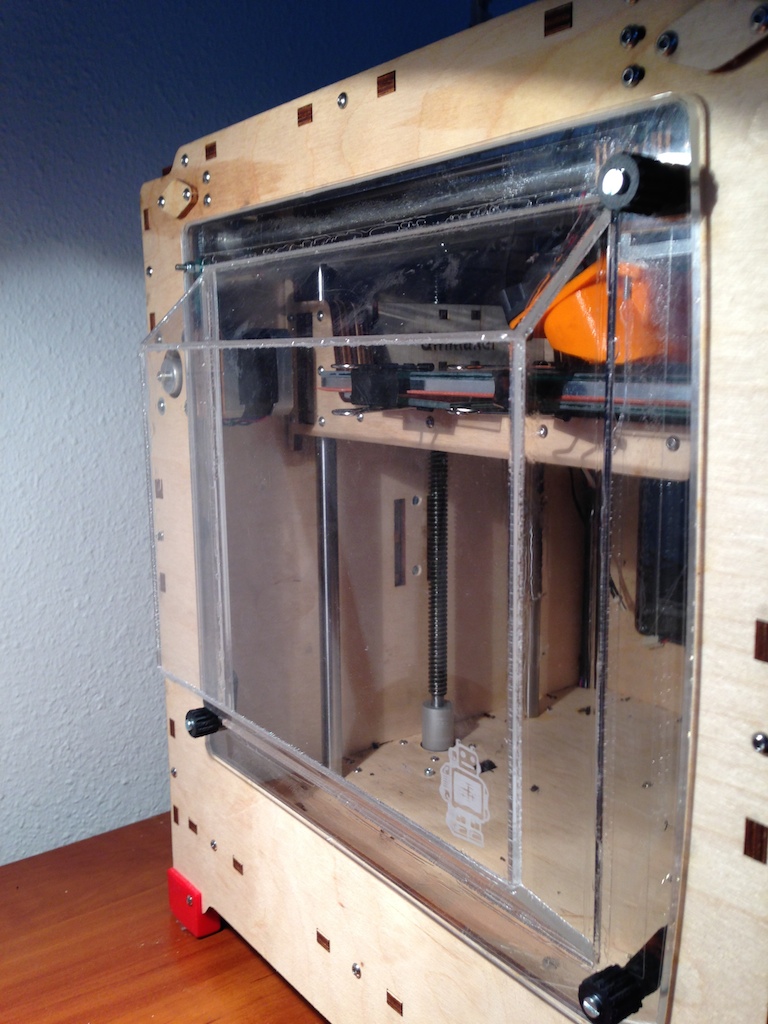
I have a DIY heated bed connected to my Ultimaker 1 which uses a 100k EPCOS thermistor. I'm using this setup for ages but suddenly the TEMP3 connection on Ultimaker 1's board had stopped reporting temperature values. I checked the heated bed thermistor and it is fine (I'm using and EPCOS 100k for the hotend temp detection and even if I connect my heated bed thermistor to TEMP1 it shows a proper value). I also measured the voltage on TEMP3 and it's also correct = 4.97 V.
I think something is wrong with the main board since neither the firmware nor the hardware parts are changed.
Do you have any idea what could cause this kind of error or how to troubleshoot further because I'm stucked?
-
Does anyone have part numbers for the connectors I need to make a cable to get the UBIS hooked up to the UMO board?
Ther are Micro-Fit 3.0 mm MOLEX connectors:
Plastic receptacle part: 43645-0200
Metal receptacle part: 43030-0007
Plastic in-line part: 43640-0201
Metal in-line part: 43031-0001
-
I'm waiting for GeckoTek's spring steel build plate - I hope the proximity sensors will work on that coated steel plate. Meanwhile I updated the UBIS hotend mount design with a TL-Q5MC1 attachment: https://www.youmagine.com/designs/ubisxultimaker-printhead-with-double-sided-45-fan-tl-q5mc1-proximity-sensor-mount
-
In case if you'd like to use UBIS for ABS print: I added two big massive 45° fan mounts to Nick's UBIS carriage and uploaded the model to https://www.youmagine.com/designs/ubisxultimaker-printhead-with-double-sided-45-fan-mount. ABS requires moderate cooling. I'm using two 40 mm fans and they are running on 65% power.
-
After several months of fighting with ABS on Ultimaker original I think I found another source of the ABS layer bonding problem. I started to print couple of really small objects - the "needles" on this picture are ~5.5 mm thick, the length of the objects are ~25 mm:
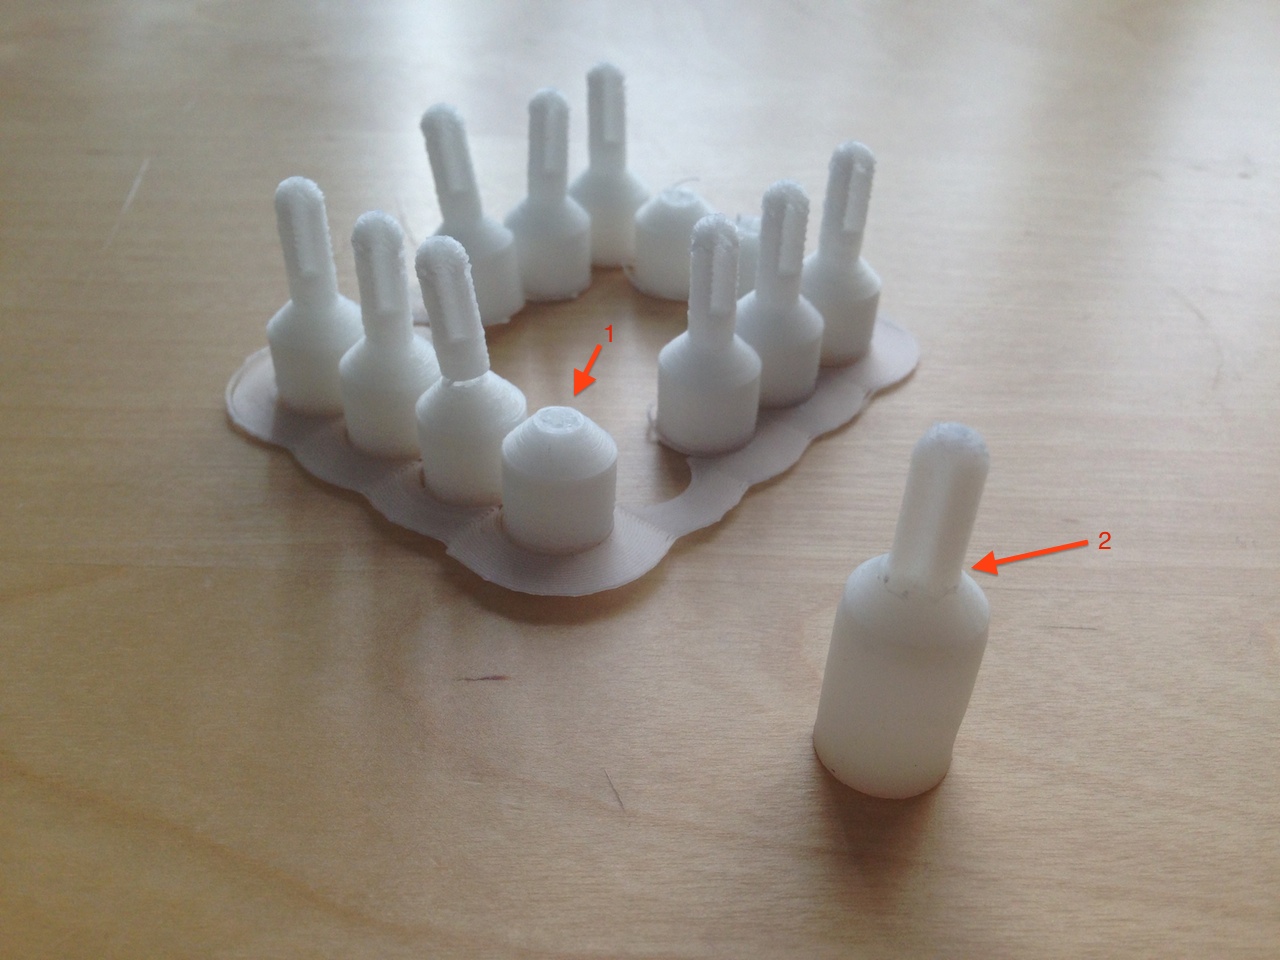
If I printed a single one with my usual settings, the entire object is strong and I almost couldn't break the needle from it by hand (item 2). But as soon as I start printing multiple of them the needles become too weak - some of them can break during the removal from the heated bed (item 1).
This time, due to the shape of this object, the only difference between the two prints was the usage of the retraction. For a single object there's no need to retract the plastic but in case of multiple objects the printer retracts a lot. Interestingly this retraction weakens the objects at the needles only - the wider bottom parts are still strong enough although they are ~12 mm wide and they have an M8 thread in their bottom.
Do you have any experience with recommended ABS retraction settings? I don't want to switch it off completely because the result will be a stringy mess.
-
Guys,
I found the holy grail of printbeds: it's the PEI plastic. Here's a sample image - it's a 5 cm tall, relatively thin object from ABS, printed on a heated bed which was covered my a 2 mm PEI sheet:
You won't need stinky ABS juice or hairspray anymore. You can order it from reprapsource. It seems expensive but I think it worth every penny to print ABS without kapton/juice/hairspray.
-
It was not a good idea to block the direct air flow - I made some pictures to demonstrate the difference. The object lies on its back now but it was printed in a standing position (it's a phone cradle).
Direct (unblocked) airflow - a smaller problem on the inner edge:
Direct (unblocked airflow) - the same small annoyance from the other side, all the other parts are more or less acceptable:
Blocked airflow - disgusting back side:
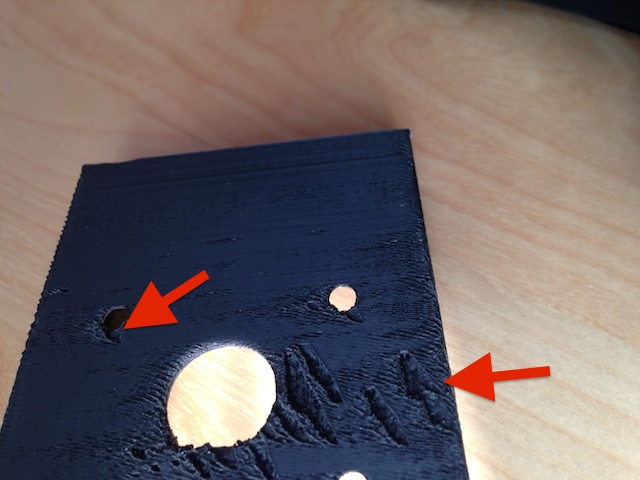
Blocked airflow - ugly edges, bad "pillowing":
-
@tsp42: you gave me an idea
 I'll push a piece of sponge into the fan to spread the air and will run a testprint during the night.
 -
@tsp42: I didn't, the fan blows directly to the bottom. I mounted the fan using http://www.thingiverse.com/thing:21182.
-
@MadOverlord: this fan mount looks nice, I'll try it out. Do you print ABS with this config?
-
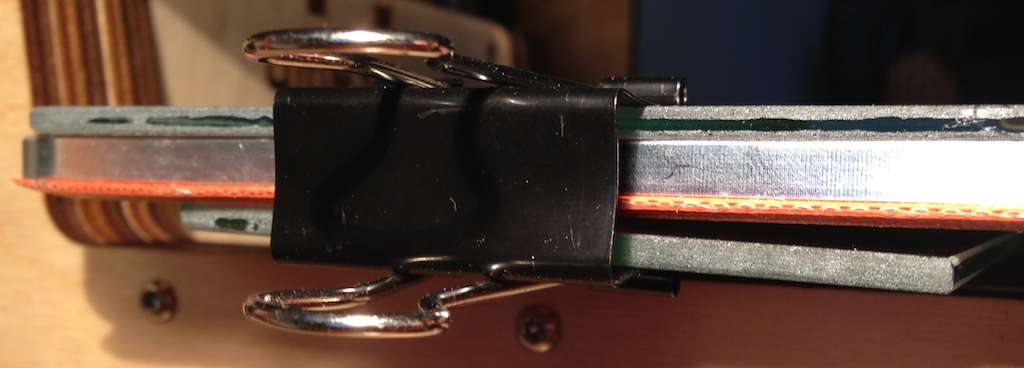
@Duesentrieb: my heated bed looks like a sandwitch: I'm using QU-BD's silicone heater with a 4 mm alu plate and a 3mm plain glass on top of it. ALU plate is just to mount the entire thing on Ultimaker's Z stage and to spread the heat evenly. I did not want to glue the heater to the bottom of the alu plate so I'm using two pieces of 3 mm glass stripes on the very bottom to hold them together by using a regular binder (I need two pieces of glass to hold the bottom because there's a bump in the middle of the heating pad where the wires come out). Here's how it looks:
This silicone heater is quite fast.
I'm using concentrated ABS juice on top of the glass plate and with brim it works (it's still not enough for thinner objects without brim although I made a very concentrated juice). I did not want to add expensive & vulnerable kapton tape on top of the glass.
I used almost a kg of ABS with very few success. First I tried to print objects without fan and completely opened sides, than with closed sides but opened top and finally with completely closed sides & bottom (=chamber). I also tried to print by using the crossflow fan, with 40%, 50%, 100% speeds, with opened top and closed top - no luck at all.
If the crossflow fan is on the layers simply does not bond together: the object looks absolutely fine but if you try to break it it breaks quite easily.
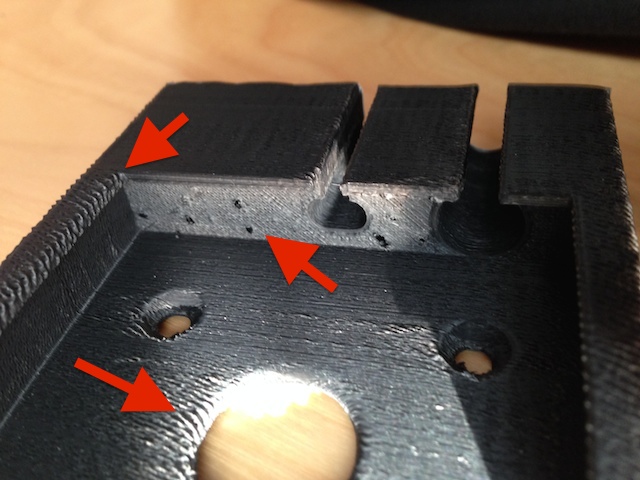
Without the fan the objects are rigid enough but sometimes the edges became ugly - look at the edges of that hex polygon inside:
I think printing with ABS definiately needs some level of cooling - even if it is not too much.
I' thinking about designing a temprary small fan mount (for stock 40mm fan) for this printer if I would like to print ABS.
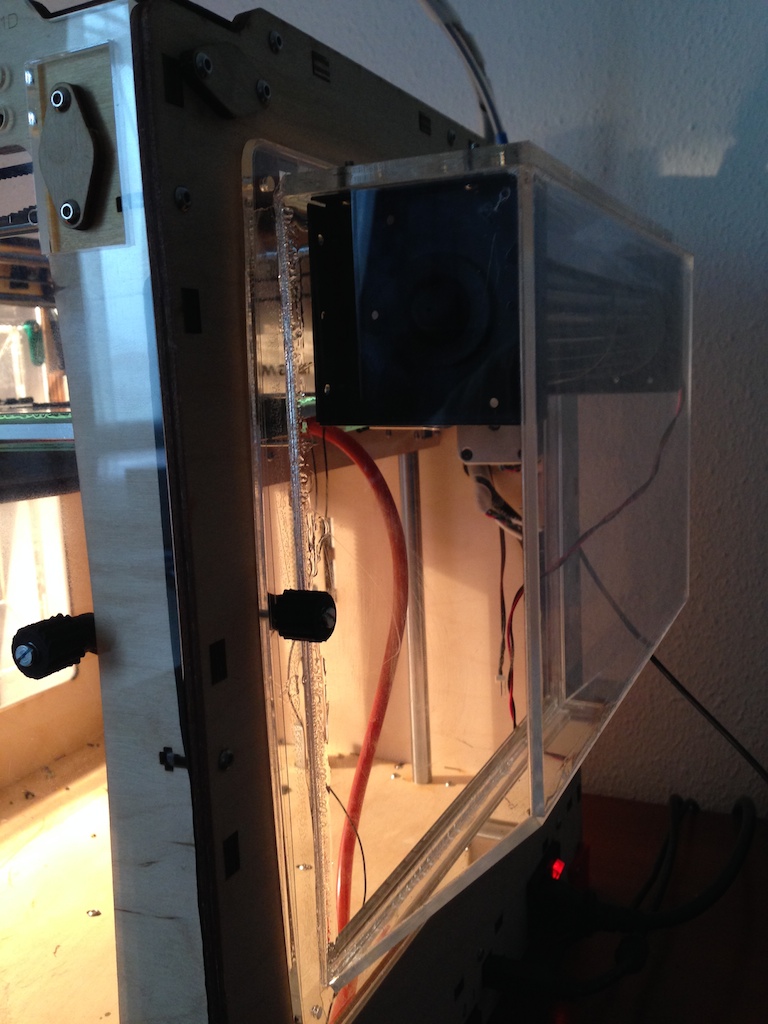
For the crossflow topic: I asked a laser cutting company to glue an acrylic box for me which holds the crossflow fan too - here they are.
The left side which just directs the air:
Right side with the crossflow fan:
-
Thanks Philip. I tried with 40/50% fan speed but the result is too brittle. I'm trying now with 5/15% and will tell you the results.
-
I asked printrbot about UBIS hotend availability and they put 3 items on stock this morning. One more hotend left in their webshop - hurry!
-
Thanks a lot @illuminarti, that's the problem - the Z axis starts to jam around a certain level. I have to fix this.
-
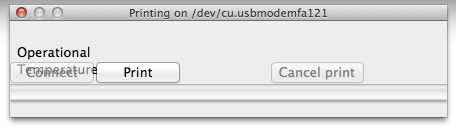
14.02 RC5, OS X 10.9.2, Print with USB dialog:
-
I made an object with Autodesk Fusion 360 and I tried to print it on my Ultimaker 1 using Cura 14.01 for OS X. After ~1.5 hours of print Cura just stopped moving the bed along the Z axis. The printhead tried to print the rest of the object but it just ruined it due to the lack of the Z axis movement.
I stopped the printing and retried - same effect, from the same layer. I do not know the reason so I thought it might be a good idea to collect all the infos I have from this issue and ask your advice.
STL file: http://fns.hu/bug/Cura/iPhone5%20car%20dock/iPhone%205%20car%20mount.stl
Generated GCODE (by Cura 14.01): http://fns.hu/bug/Cura/iPhone5%20car%20dock/iPhone%205%20car%20mount.gcode
Error log from Cura print window's Temp tab: http://fns.hu/bug/Cura/iPhone5%20car%20dock/iPhone%205%20car%20mount%20errors.log
After I loaded the object into Cura I turned it 90 degrees along the X axis (using the green rotator circle).
Any comments are welcome.
-
Cool, this is for E3D not originally designed for bowden. In the other version the push-fit screws directly in the heatsink.
Yes, I know, I just ordered the bowdenless version therefore I made the changed design.
-
Added on thingiverse.
Based on your design I made a new mount which contains a thread for pneumatic fitting: http://www.thingiverse.com/thing:147115
 I'll push a piece of sponge into the fan to spread the air and will run a testprint during the night.
Fusion 360: free for hobbyists
in Design for Additive Manufacturing
Posted · Edited by Guest
I 'm using Fusion 360 since it became available on Mac. I was so happy when I read Autodesk will provide this great tool to hobbists for free. At that time Fusion 360's pricing statement page (http://fusion360.autodesk.com/pricing#) looked like this:
Unfortunately after a year Fusion 360 asked me to install an update and after this release it did not let me in. When I started the application this dialog appeared:
So if I wanted to access all my previous designs I had to "explore options":
Where is the option to continue freely as a hobbist?
I'm a software developer and a 3dprint fanatic but I don't earn any income from my designs.
At that time I was very disappointed that the free option just gone.
This story happened to me on 24th of January, 2015. I could not do anything else than to pay in order to continue working on my designs.
Please Kevin let us know what to do exactly to use / continue using Fusion 360 freely for personal purposes.