


chiz
-
Posts
33 -
Joined
-
Last visited
Content Type
Forums
Events
3D Prints
Posts posted by chiz
-
-
Hi everyone esp. to tinkergnome,
First of all, I want to thank @tinkergnome for the great work he's been doing for the community!
So, I've upgraded my UM2+ from stock to v17.10.1. After successful firmware upgrade, I get the dreaded "X/Y switch broken" issue. I searched and found out that the stock firmware messes up the EEPROM and one has to do a factory reset first. So I went back to stock, did a factory reset in the printer, did not complete the steps and immediately re-uploaded the v17.10.1 firmware. Still, I'm getting the "switch broken" issue.
Not sure if factory reset has to happen "after" the upgrade but I can't do that since the moment I reboot from v17.10.1 I'm immediately taken to default reset routine and I can't bypass it causing the error to occur even before I can access the menu. Any help is much appreciated.
-
harmenschippers said:
Also I have this issue...

I couldn't find an answer in this thread. Is there a solution for this problem?
1This is the same issue I have that I refer to as below:
Issue: X rod crashes to the parked hotend (not yet solved)

I also haven't come around resolving this. Curious to know the solution as well.
-
hmmm... Considering they're only N42 (as the page says and not N52), they're pretty impressive for their holding power.
Anyways, yes I ensured that the poles are opposite. I even ensured that the magnet pairs touch each other completely while making sure there's the "air gap" between the head and the coupler.
I did do a dry run with the bowden only and without the filament yet. But with the combined bowden+filament, it has become more stiff. I bought a replacement bowden that I've been using on my UMO and has not failed me so far. They're less transparent than what Ultimaker supplies but they're more slippery and less stiff. The tube comes 5ft long so I'll cut the tube slightly longer than stock so it will bend easier.
-
I'm actually wondering how I'll be able to measure the magnet's pulling force just to be sure. Here's the link to the N52 magnets I bought:
http://www.ebay.com/itm/162027521920?_trksid=p2057872.m2749.l2649&ssPageName=STRK%3AMEBIDX%3AIT
-
@chiz, Can you make a picture or video, showing the rear right corner issue?
Here. (Sorry for the awkward angle. We are moving in a few days and we have boxes with address in the background so I had to rotate the printer preventing the boxes to in the video.)
And here's how I mounted the adjustable feeder holder. I even trimmed the bottom screw portion to maximize the angle.
[attachment=46958:name]Will probably get back with fixing this issue once we are done with the relocation. Sadly, after I have the Mark2 mod done, I now need to knock down the printer for the move.
-
Today, I have replaced the head with a new one (printed using Polymaker PC-MAX) with a new set of magnets that's suppose to be N52 rated. Personally, I don't see any difference from the previous magnets that I used. I've also replaced the feeder with the adjustable version. However, my 2nd hotend still falls off when the printhead goes near the extruder (rear right of the frame). I guess I'll be needing a longer bowden tube, or perhaps a less stiffer replacement.
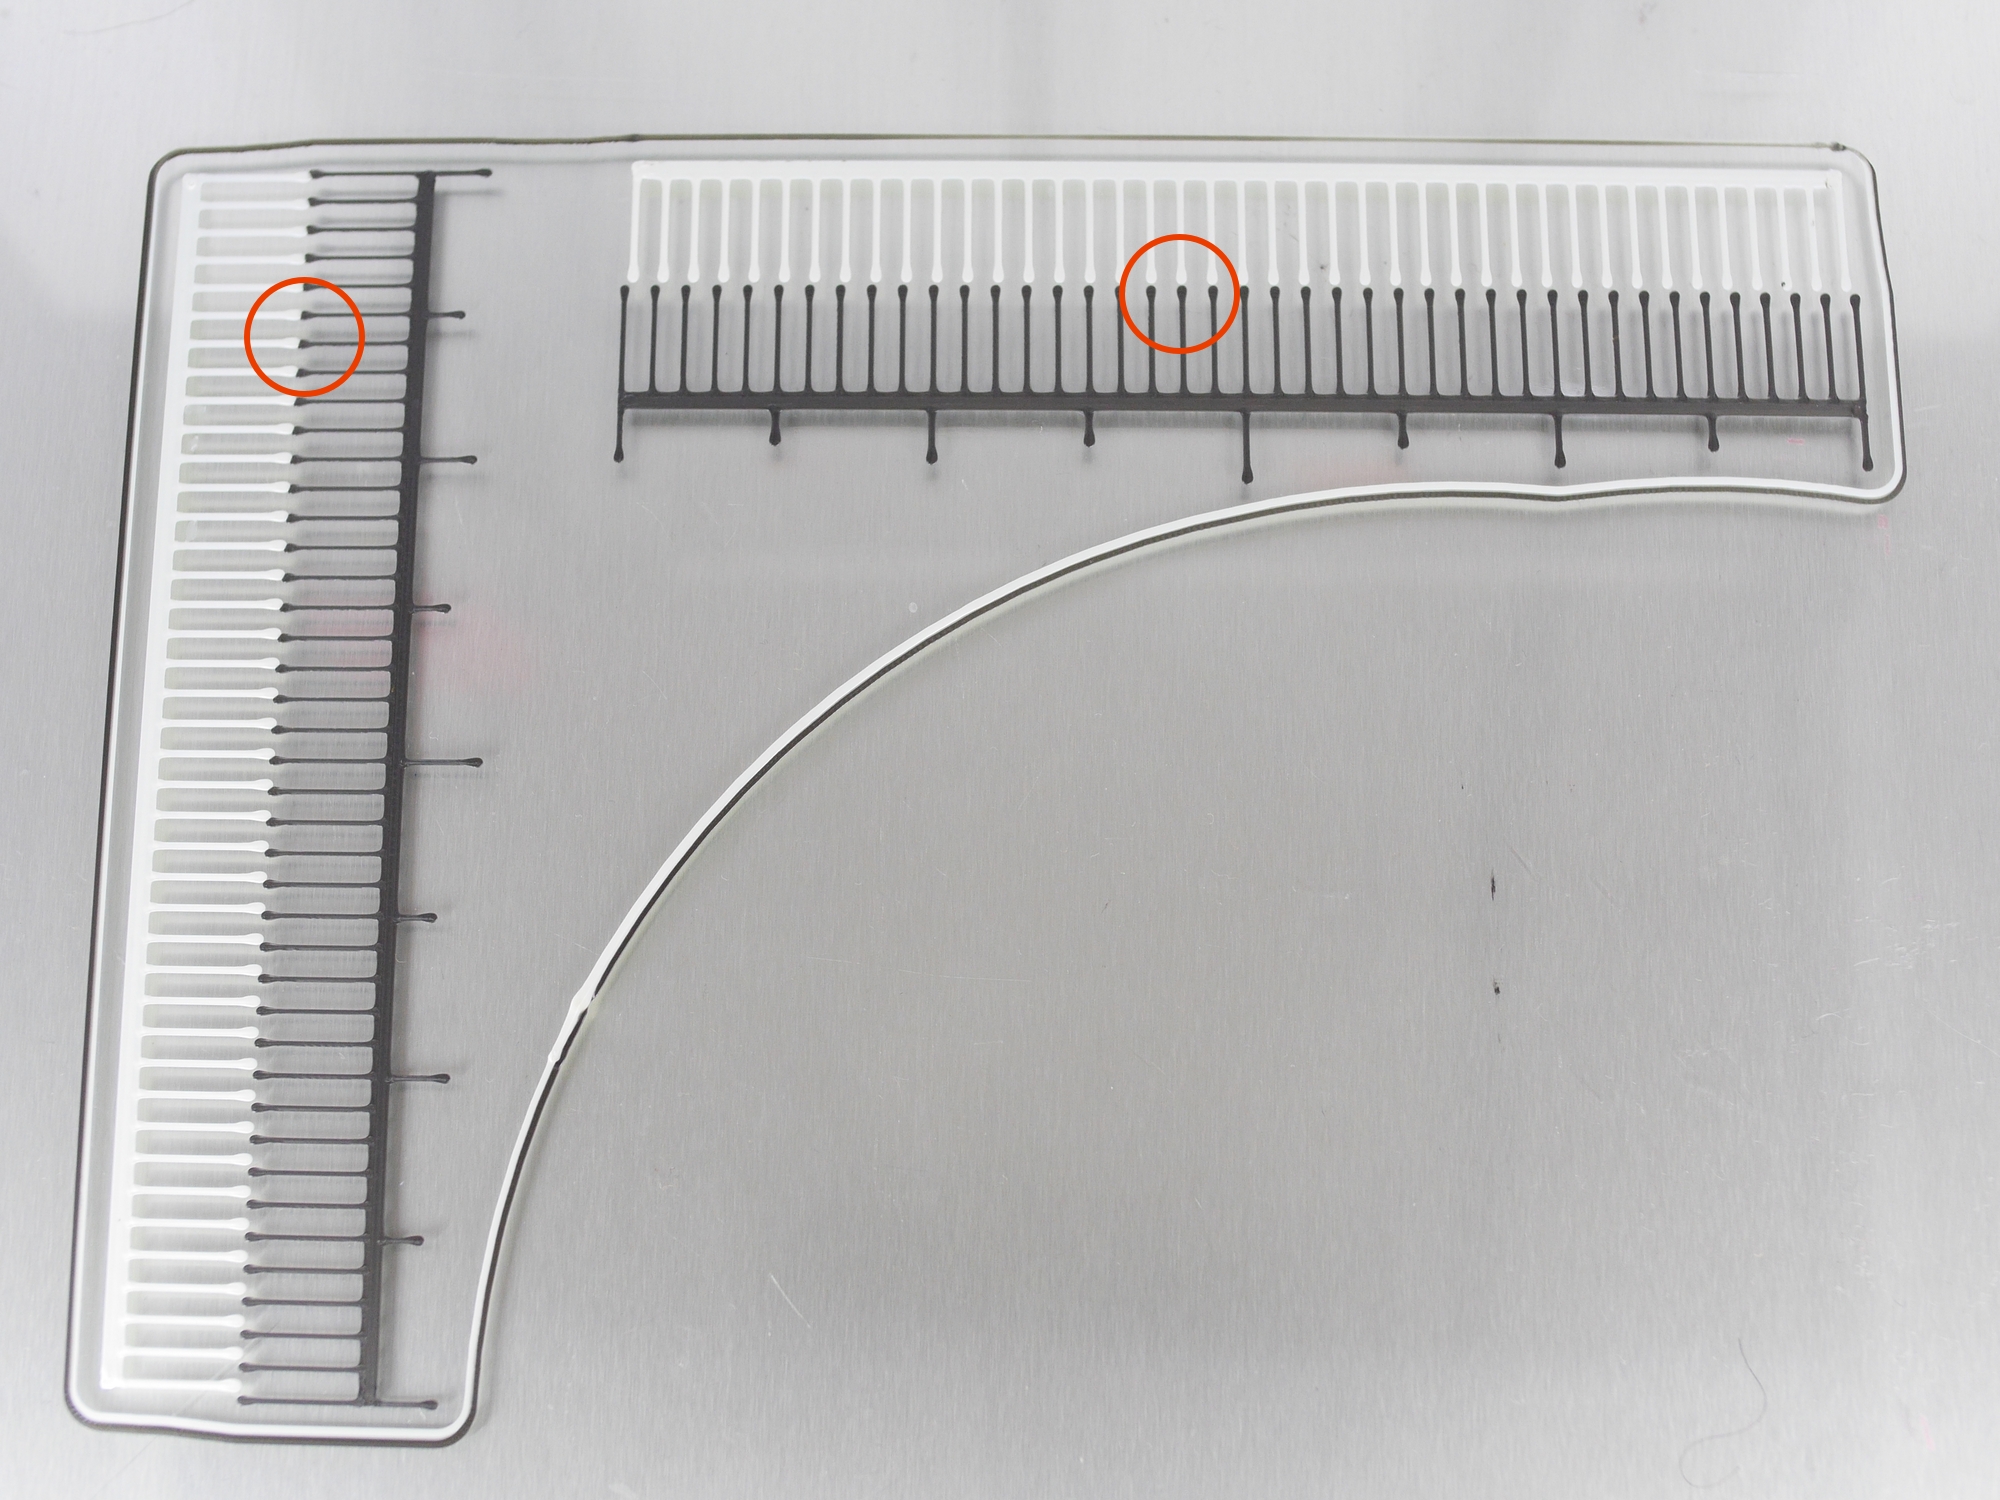
Anyways, I calibrate the hotends by eye as I don't pretty much get how calibration works as described in the calibration section in the Mark2 documentation site. I get that the calibration gcode is sort of a "ruler" but I don't get which number I should be keying in the extruder offset. How does -2 value for X corresponds to the circled line in the pic?
-
I held off printing and testing dual extrusion for the moment as I print a new set of coupling and head (using Polymaker PC-MAX). I noticed however that even if I'm using only one extruder, the 2nd extruder, though parked most of the time, still heats up to 80°. Is there a way to turn the 2nd extruder off completely?
Also, can anyone direct me to where I can download the Mart2Tweaks plugin? Tried the forums and google-ing but no dice.
-
While everyone is probably working on the bugs and without a cheat sheet yet, I thought of compiling the following to help those who may encounter the same issues as they implement Mark2 on their UM2+. Feel free to edit if I misstated anything.
Issue: 2nd hotend falls off when printhead goes to the back of the build plate
This issue may be due to one or more of the following:
1. weak magnets - You might have used a lower rated magnet, e.g., N35, rather than N52 magnets.
Solution: Replace the magnets.
Question to dev/proj team: During Mark2 development, was it considered making a feeder design that would freely swing as the bowden tube moves? Do you think it would work as an alternative solution to the weak magnets issue?
2. bowden tube too stiff or not long enough - We want a nice smooth curve on the bowden tube that is long enough to bend with less force. Compared to longer bowden tube, a shorter bowden tube, during bending will have greater force and would push away the attached 2nd hotend causing it to fall off the rod.
Solution: Get a longer bowden tube or replace the fixed feeder mount with the adjustable mount version.Issue: Extruder alignments are way off
Solution: In the printer control panel, go to Advanced -> Dual Extrusion -> Extruder Offset and set the values to something like X=18.20 and Y=-24.95. Select to keep the values.
Issue: 1st Hotend causes belt rattle noise when picking up the parked nozzle
Solution: The printhead may be crashing to the parked hotend while picking up the 2nd hotend. Consider adjusting the docking position. In the printer control panel, go to Advanced -> Docking Position. Adjust the X and Y values. Refer to the Calibration section in the Mark2 documentation for the correct position of the heads relative to the magnets.
Also, adjust the wiping position. In the printer control panel, go to Advanced -> Dual Extrusion -> Wipe Position and set the Y value to something like 40mm.Issue: Head moving to front left corner causing belt rattle/noise
Solution: In Cura, under Travel settings, set Layer Start X to 100 and Layer Start Y to 50 for both extruder tabs.
Issue: During wiping, 1st hotend's right fan shroud crashes to 2nd hotend's fan shroud
Solution: Adjust the start sequence. In your Cura installation folder, (usually C:\Program Files\Cura 2.5\resources\definitions), edit the Mark2_for_Ultimaker2.def.json using Notepad (or your preferred .json code editor) and look for the string move to the first head. You should be able to find something like the code below:; move to the first head\\nG0 X120 Y25 F9000;
Change the X to a lower value, e.g., X115
Issue: X rod crashes to the parked hotend (not yet solved)
-
 5
5
-
-
@foehnsturm/@ultiarjan: So I edited the json file directly and adjusted X to 115. It did provide some clearance between the fans. However, with the 1st hotend out of the way, now it's the X rod that's squeezing the parked hotend and causes belt jitter/rattle. Weird thing though is that no matter what value I set to Y, it will not move the X rod farther from the parked head. I tried both small and extreme values such as Y=20, Y=0, Y=30 and Y=50 but it will not stop the X rod from hitting/squeezing the parked hotend.

-
It's not during docking but during priming. This is after the 2nd hotend has extruded some material, then it gets docked. Then before the 1st extruder extrudes some material, it will move to the front center hitting the parked hotend. See pic below.

-
1
-
-
@navigator: Yup, I noticed that the "Store" button actually saves the settings even after the machine is turned off
Issues Solved
Setting the Layer Start X and Y values solved the "front left corner travel" issue. Was able to successfully print the dual color traffic cone below (printed at 60% scale):
I think that the calibration page on the documentation should be updated to first set the Extruder Offset X and Y *before* printing the calibration ruler/grid. This ensures that others in the future will not encounter the issues the early modders experienced. Also important to note as well is setting the Start Layer X and Y in Cura.

While I still have to dial in my offsets and fix some ooze issues with the hotends, I can say that I've successfully implemented the Mark2 mod. I can't thank enough everyone involved on this project. :)I can now join the ranks of the the first few successful Mark2 modders.
(others feel free to add yourself to the list)
@TheFox: Are you done with your Mark2 mod?
One last thing: I've noticed that my 1st hotend would crash to the parked 2nd hotend when it's wiping and I can't solve it even if I set the wiping coordinates farther from the front and more to the left. The 1st hotend will always move to front center slightly crashing to the parked hotend. Is this something that's firmware-specific behavior?
-
1
-
-
Thanks, @MarcoUbtz! I did notice after backtracking the tread that it was @foehnsturm who suggested the layer start settings.
Btw, if you don't mind... Can you tell me how to activate the Mart2Tweaks plugin? I can't find it in the list in Cura and in the Mark2 github repo. I also don't see the "settings" icon as you're showing in this Cura screenshot below:

-
@tinkergnome: I got the extra head from someone who purchased an extruder upgrade kit to upgrade to UM2+. Replaced the fan shroud and everything else is stock UM2+. Feeder mounted at the back using the fixed extruder mount. I'm considering printing the adjustable version instead.
@foehnsturm: Unless the current github files are still not updated. I've just cloned/download the repo yesterday.
Rattling/Crashing Noise Solved
I solved the rattling/crashing noise and aligned the prints by copying @navigator's extruder offset settings (X 18.20 Y -24.95). See pic attached. Thanks @navigator!
Btw, are these settings something that can be permanently stored to the machine? I noticed that it gets reset the moment the machine is turned off.

New Issue: Head moving to front left corner
I noticed the same thing that @MarcoUbtz reported. The printhead goes to the front left after the 2nd pass/layer causing the 1st hotend to crash against the front panel. This causes the printhead to get out of alignment. Will try @MarcoUbtz' solution to solve for this extra printhead travel.

-
Pretty much complete with the mod but I'm not having the best of luck to properly calibrate the hotends.
Docking works perfectly. I can switch hotends successfully. However, I suspect that I've gotten weak magnets (though its description says they're N52) which causes the 2nd hotend to fall during quick change while printing. Also, I hear ratlling noise the first time the 2nd hotend is picked up. I'm unable to determine the cause yet. I'll describe below hoping someone may be able to help.
Below are what I notice when printing dual material:
1. 2nd hotend is picked up.
2. Axis moves to front center and causes rattling noise as if the 1st hotend is squeezing the 2nd hotend against the front panel. (I'm not sure)
3. 2nd hotend extrudes material. Then moves to the left and cuts the extruded material. No issue here.
4. 1st hotend extrudes material. Same, no issue.
5. Attempts to quickly park 2nd hotend misses the slot and 2nd hotend is dropped. Perhaps due to the squeezing/noise prior to this.
6. 1st hotend moves to front center banging to the pard 2nd hotend
7. Attempts to get the 2nd extruder but fails since the head is way off the parked 2nd hotend
8. I manually attach the 2nd hotend to help continue the printing but 2nd hotend prints way too off the expected area to print.
When the hotends are closest to the back panel, the bowden pushes the 2nd hotend and gets detached. I had to hold the 2nd hotend just to continue printing. Either I may have gotten a dud N52 or my bowden tubes are too stiff.
I've attached pics to show how off the hotends print. This is the calibration print.

Trying to print the 2-color traffic cone:

-
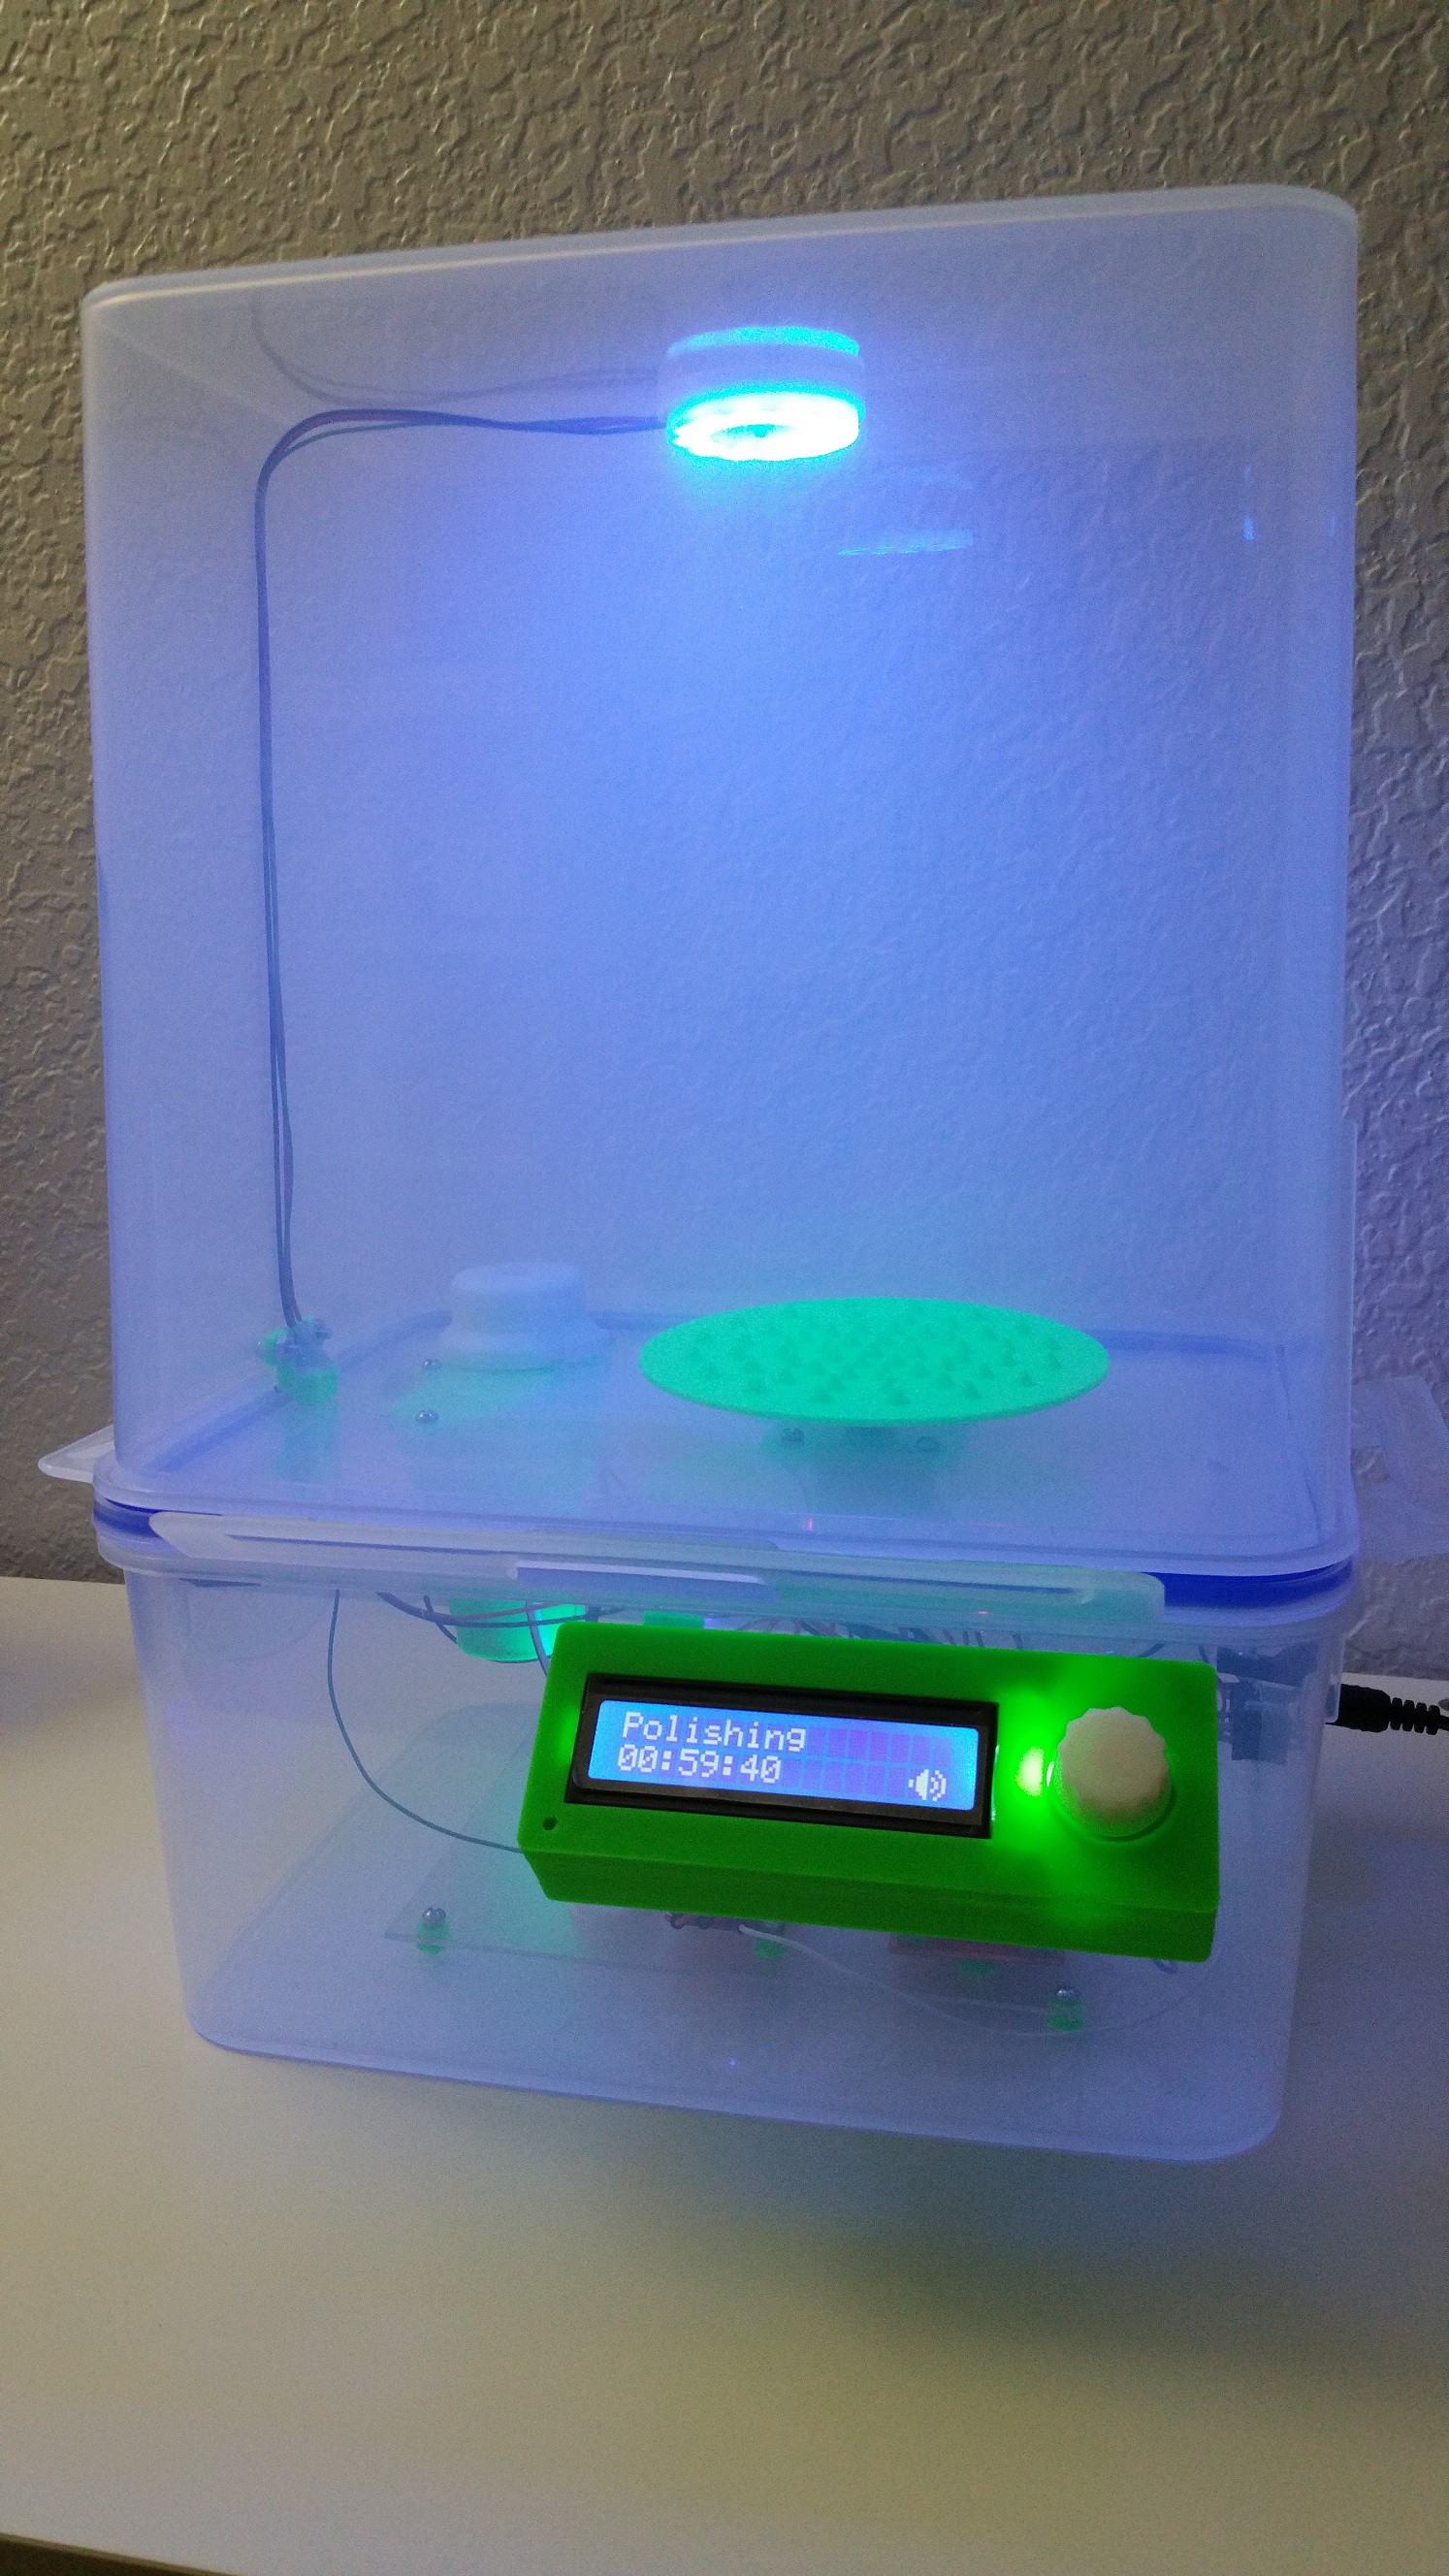
Yes, this is more of a chemical reaction of the material to a solvent. This contraption uses an ultrasonic mister that does not heat up the solvent to produce mist that would crawl even into small crevices. Actually even the underside of the pokeball was smoothened by the mist!
Also, with the machine, I just put the part in the platform, set the timer, start polishing and leave it until it's done. With a polishing wheel, one has to actively work on the part from start to finish.
Polysmooth is PVB which uses alcohol for solvent. ABS uses acetone as solvent. As long as the correct solvent is used to melt the material, it should work. Just ensure the solvent will not melt the exposed material in the chamber. For this reason I used regular PLA for the printed parts but I'm using Polysmooth and alcohol for my polished parts.
-
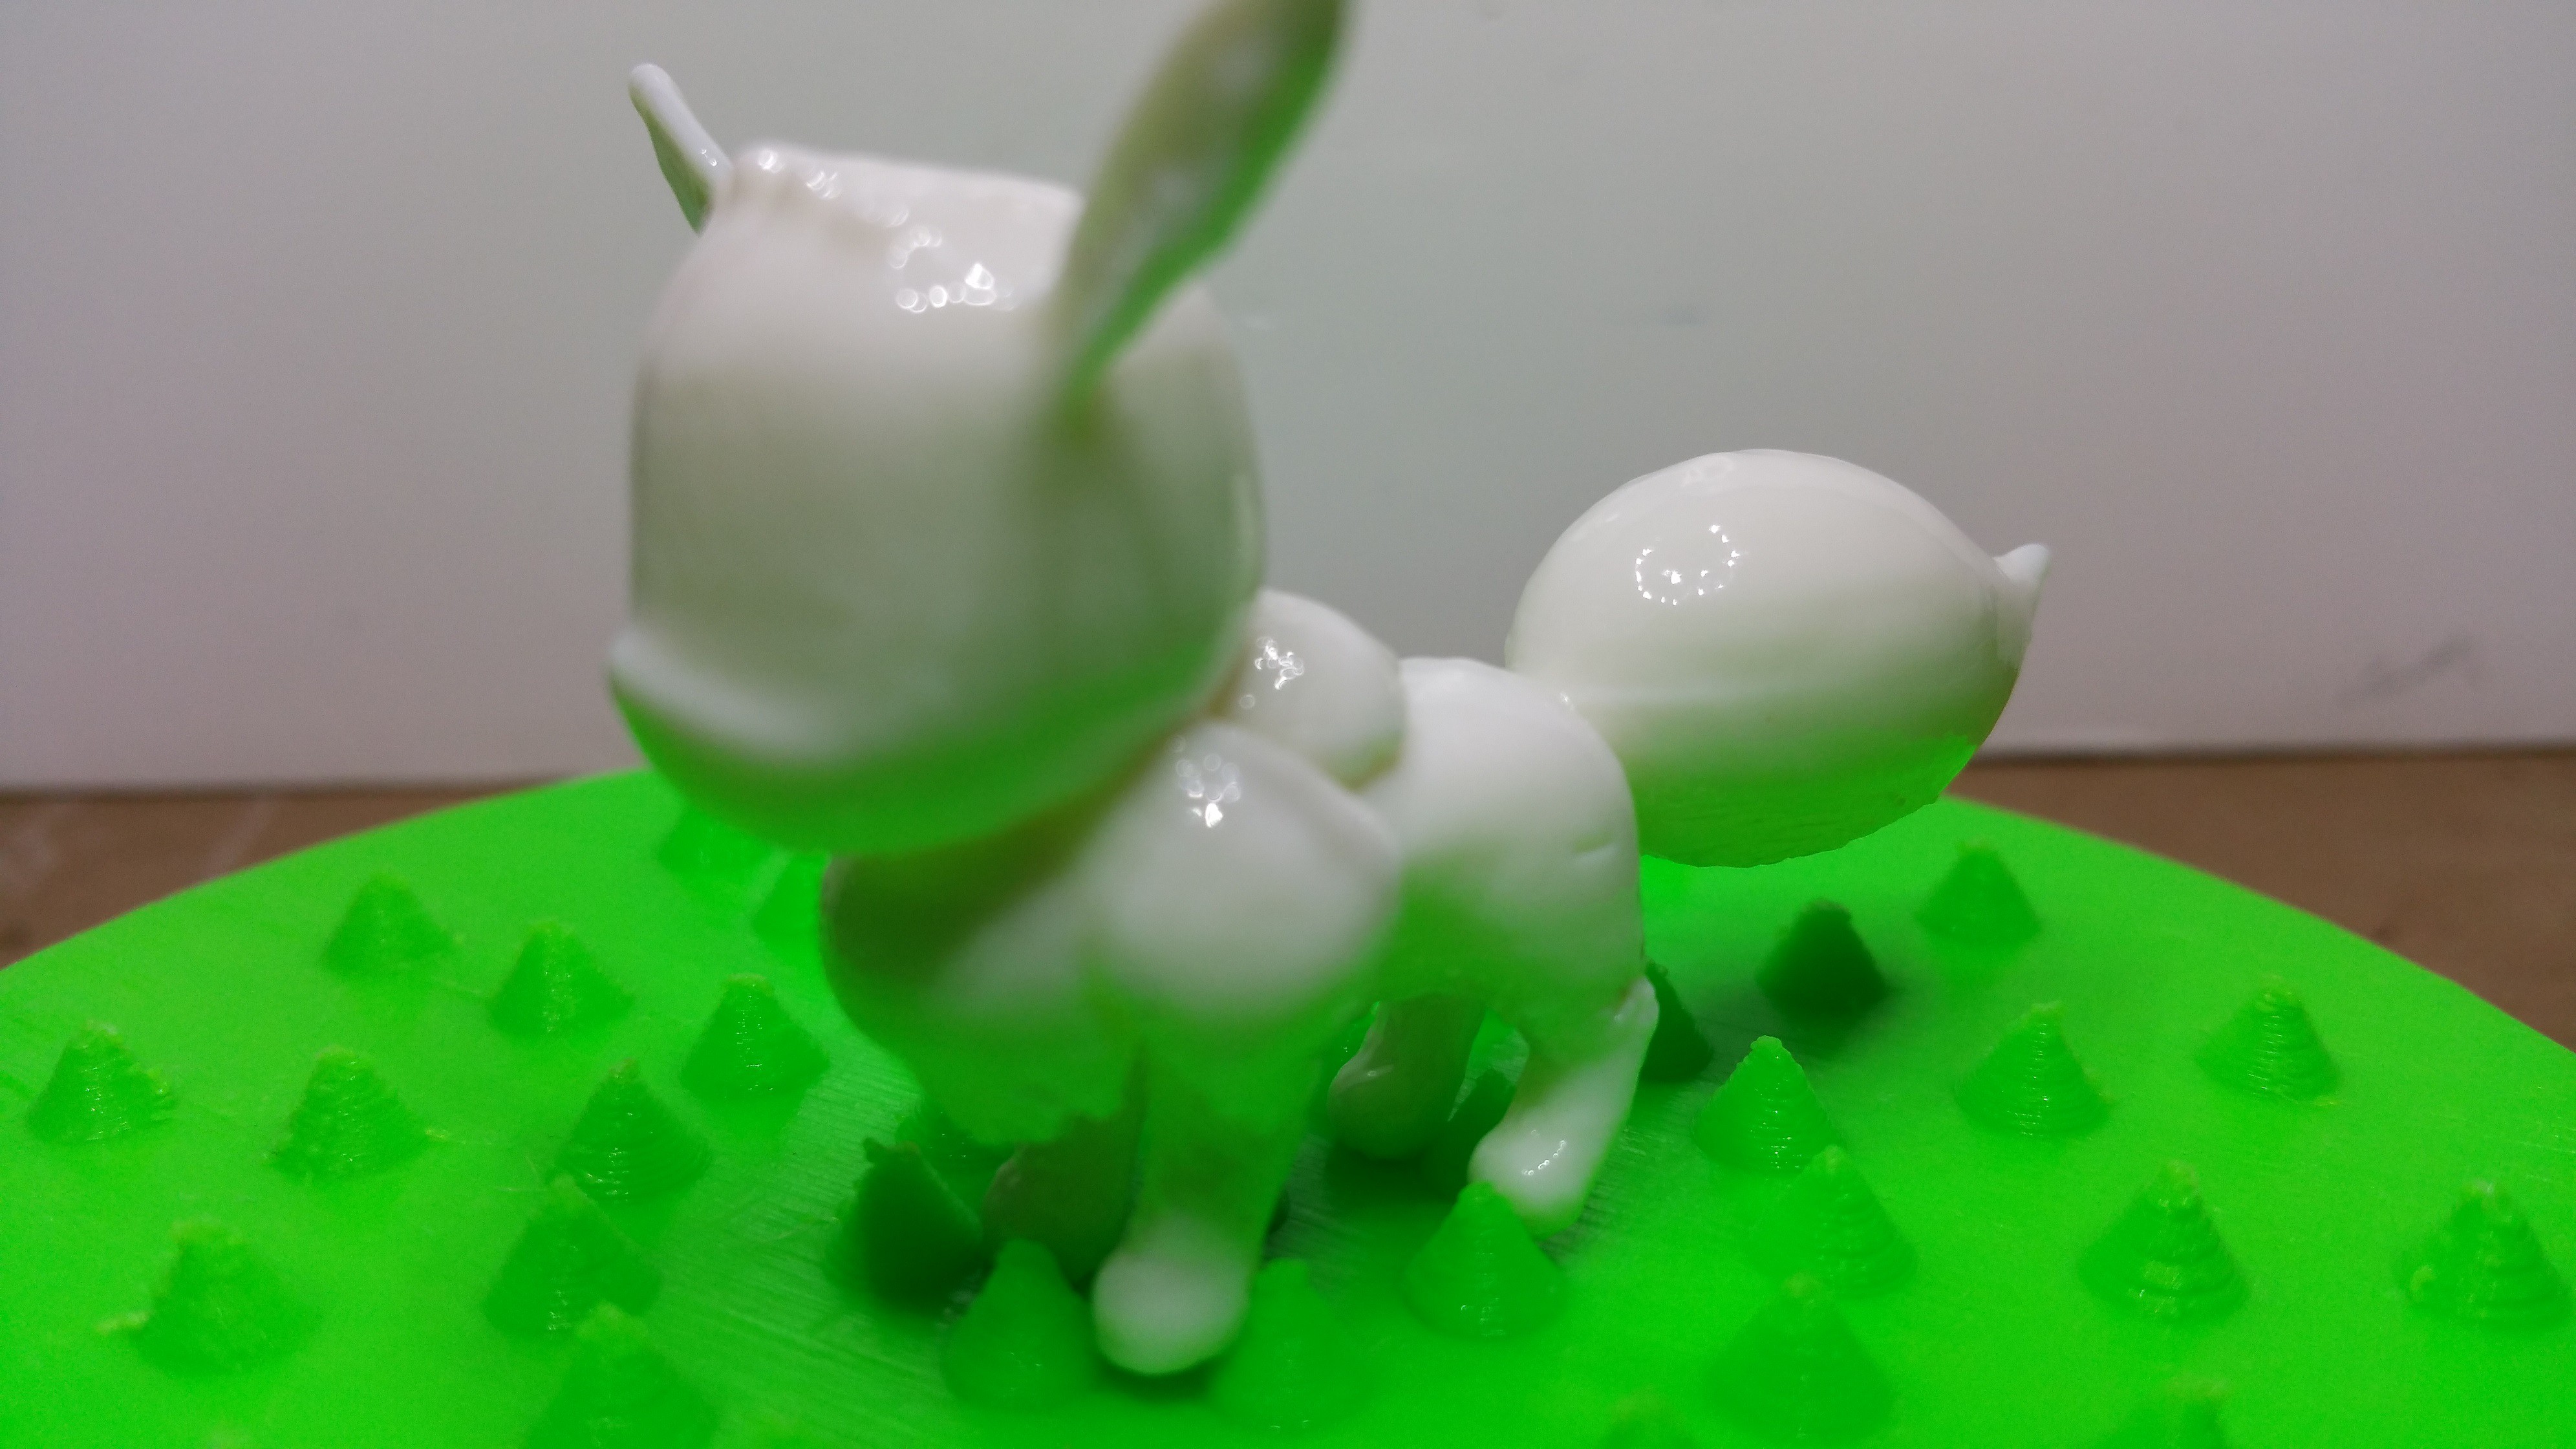
New parts polished:
Before and after polishing:

Showing the glossy/reflective finish:

-
As for me, I got the docking and print head parts printed ready for my UM2+ to arrive so I can start tinkering with it.
Just checking.... "or my UM2+ to arrive" I hope you don't mean you're waiting on a NEW um2+ to arrive? Did you read the latest Ultimaker 2's are MISSING THE 5th DRIVER so you can not control the 2th extruder?
It's mentioned on the site and in the BOM, but just thought I notice it again to be clear. ultimaker can not give an exact moment they changed the electronics, but roughly on machines from end 2016 - 2017 you should check if you still have the 5th driver on the main board.
Thanks for letting me know.
I'm not aware about this recent change and just read the thread. Definitely not good especially that I've already invested time and money on the project. Oh well, it is what it is. I still have my hopes high though as the UM2+ I've purchased is a slightly used one that's recently purchased. The original owner cannot confirm whether the EX2 driver is present or not since he's not a tinkerer and has left the electronics untouched.
I'm thinking that should the board lacked the driver, and since I have no experience in using low-temp solder and soldering surface-mounted components in general, perhaps I'll just buy a "replacement" UM2+ board that has the chip soldered already and not risk shorting/damaging the original board.
-
Just to show how polished one can achieve using Polysmooth...
Pokeball before and after polishing:
To show how reflective the polished finish is, I've taken a picture of the same pokeball beside a dual-colored traffic cone and some nuts and bolts. One can clearly see the nut in the reflection.
-
1
-
-
Thanks, @neotko/@kmanstudios
-
Congrats, @RudydG!
I think you're officially the first end user who has successfully implemented the Mark2.

As for me, I got the docking and print head parts printed ready for my UM2+ to arrive so I can start tinkering with it.
-
1
-
-
do you see any problem in make. it large as the ultimaker building plate with z 200mm?
Maximum size possible is 6"x6"x7" (LxWxH) as you need to allow some space between the part for the mist to travel around the chamber.
I source out the parts from China:also the probem that i m in germany and all parts a not here...
www.banggood.com
The only difference I see between isopropyl and ethanol is the latter smells better. I tried both as well as 70% and 91% and they both work fine. The advantage with 90% and above is that it polishes faster than 70%, i.e., 40mins vs. 60mins.then the question to ethanol 70% ? why? polymaker worte me, ethanol or isopropanal are the same, but i should go over 95%.... so i odert 99,9% isopropanol here
-
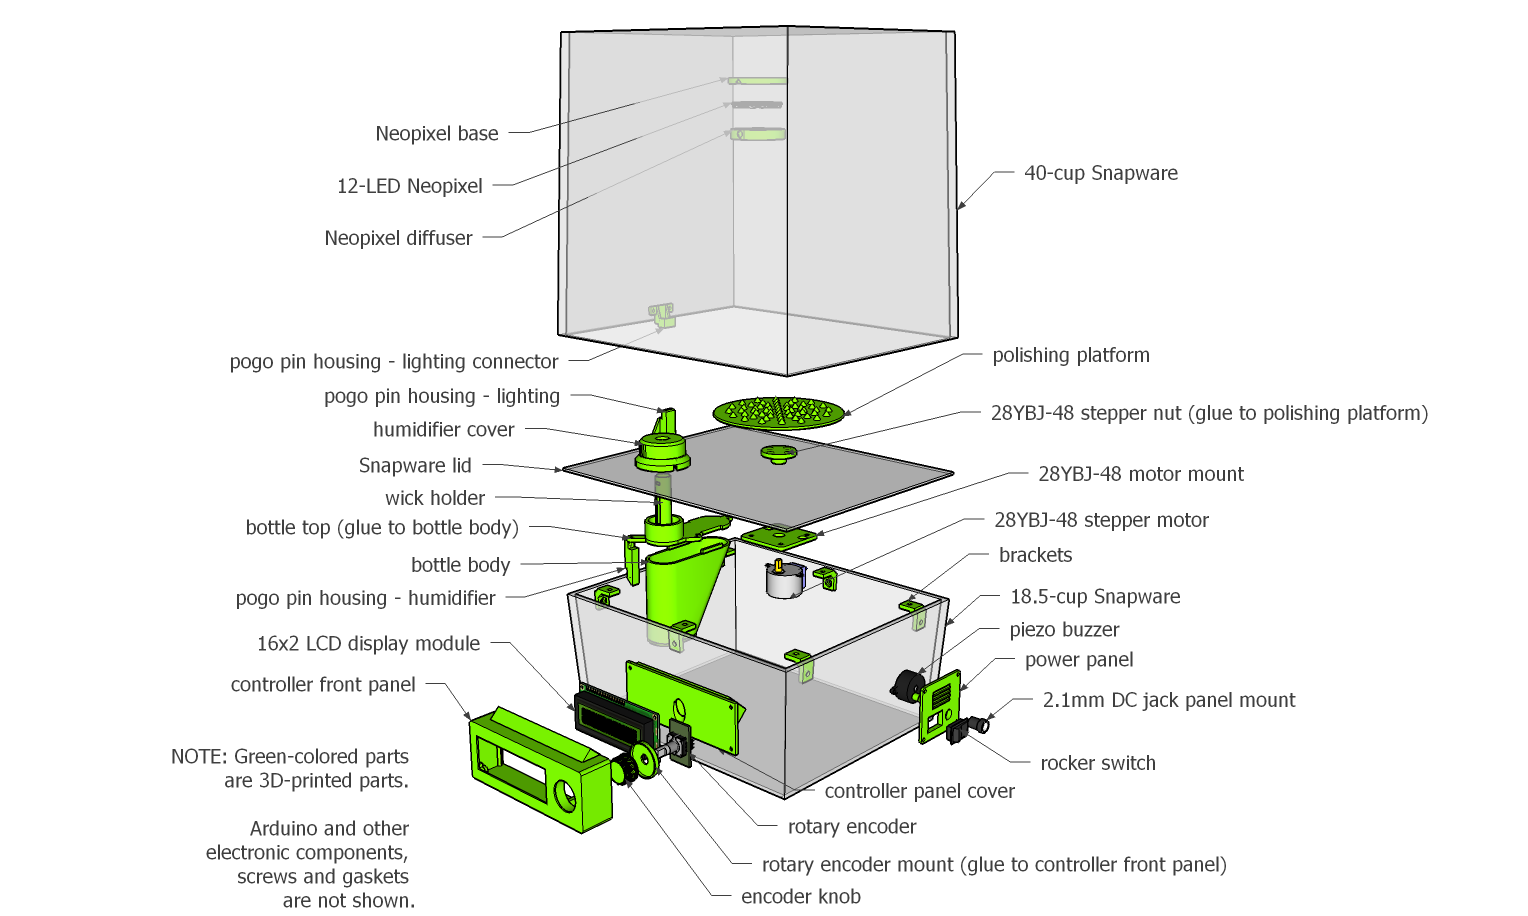
Thought I'd share this project to anyone here thinking of trying out Polymaker's Polysmooth but on the fence whether to get the Polysher or not. I've developed an alternative that is 1/4 the cost of the original machine.
Full details of the project are posted below:
1. hackaday
2. thingiverse
-
4
-
-
Great project!!
Is on my list, wanted to buy the (expensive) machine, but after seeing this, i will calculate the cost, and evaluate then ;-)
With 1/4 the price of the machine, this one's definitely cheaper! I have the BOM posted on the project site so anyone can source out the individual components.
really nice, but for me as person with no electric back ground, no idea how i shall do that,!
positiv is, that you can make a polysher like the hole building plate size!!!
Just some basic soldering will do. Besides, there's always a first time for everything!
Btw, I went ahead and started a topic dedicated to the project.
https://ultimaker.com/en/community/49187-diy-polishing-station
-
Donated! Thanks, @foehnsturm!Ok, I set up a paypal donate button. However there's one small issue. If I use my private accout, my email shows up during the process. This is something Paypal warns against because it could attract spam. To prevent this you can use a business account, which I did. But now Paypal displays my company's name "Föhnsturm ..." which people might find strange.
Anyway, I'll collect donatations and will talk to the developers about how to use/share them.
-
1
-


More information during print
in Firmware
Posted · Edited by chiz
Yup, it's the first run wizard. Ok, I'll try it and let you know what happens. Thanks a lot!
Update:
You're right! I need to complete the first run wizard first. After installing custom firmware, I was able to modify the print area settings. Thanks again!