


uit
-
Posts
20 -
Joined
-
Last visited
uit's Achievements
14
Reputation
-
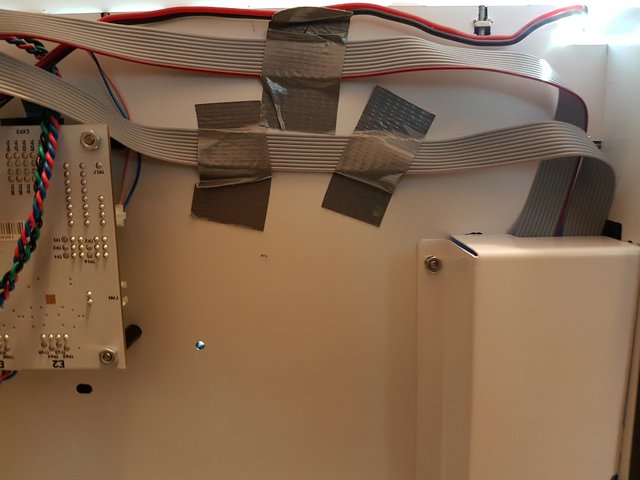
so, I'm glad now, that I was babysitting the printer... suddenly (i assume) there was a Z=0-movement - I've hit the power switch a millisecond before my glass plate was shredded. I've printed this model maybe 50 times (this specific gcode maybe 10 times), with no issues other than the Heater Error (which is why I changed to TinkerGnome's Firmware for the PID-Settings [alternative Fan-Shrouds] ) regarding the ribbon cable placement see this photo I can NOT recommend to seperate these 2 ribbon-cables to fix the issue of unpredictable movements on TinkerGnome's Firmware V16.08.02 Maybe @tinkergnome could set up an experimental branch of his FW with the old SD-Library for testing, because this was the suspicious part in other threads than this one?

-
I've cut the shrinking tube and the mesh cover (carefully with scissors), seperated the cables so that they are running in parallel (not on top of each other; 'bout 2cm apart from each other) and fixated them on the bottom plate with gaffa. printer is running, so i can not take a photo at the moment. ...and to the bad news unfortunately: I'm in an 17hour print, and 5 minutes ago I had a single random travel to X0 again (print continues, but surface isn't perfect anymore and again I lost trust and I'm babysitting the rest of the print-time) :(
-
I ran into the same issues when installing tinkergnome's firmware V16.08.2 unexpected and unpredictable moves in X, Y and even small Z-hops. I also had a "Remove Material" triggered randomly while printing a model. So I rearranged the 2 ribbon cables from them mainboard to the SDcardReader and OLED that there is some distance between the cables. Problems solved, printed many hours without any issues!

-

Version 1.0
2,520 downloads
printed on Ultimaker2-A39sliced with Cura 15.02.1 (UltiGCode)optimized with Curator 0.1.0.1model: https://www.youmagine.com/designs/plactron-vase-delta------------------------------------------------------------988 Layers0,2mm Layer Height0,8mm Wall Thickness0,8mm Bottom/Top Thickness0,2mm Initial Layer Thickness----------------------------------------0% Infill0 Retractions0 Layers with Support----------------------------------------30mm/s Print Speed80mm/s Travel Speed20mm/s Bottom Layer Speed30mm/s Infill Speed----------------------------------------Filament: Innofil3D PLA color (2.85mm)----------------------------------------235°C Temperature66°C Bed Temperature7,00 Meters printed -

Version 1.0
2,134 downloads
PLActron vase delta - #01 -
you can not use the Spiralize-Function (in expert settings/black magic), because Cura is slicing it for a single perimeter und tries to extrude a 5mm thick outer wall with one single line (which is continously moving in z+), so it wants to extrude way too much material and you will get immediate clicks. best shell thickness i get by spiralizing is 0.8mm at a layer height of 0.1mm so mnis' way to go would be to turn off spiralizing and go for 5mm wall thickness (better aim for 4.8 or 5.2 as its a multiple of your nozzle size and your material flow stays at 100%) at 0% infill.
-
this week i tried to print in old PLA. it was my first batch of generic PLA, about 18 month old. I stored it dark and in airtight plastic bags with silica inside. over this time period its diameter from ~3mm to >3.10mm. it's quite brittle and i have to print a few degrees hotter than "fresh" PLA, around 225-230° sometimes even up to 240° depending on the model and detailing. it tends to carbonize much faster when the flow of material is stuck and when the diameter is going quite over 3mm it gets delicate with the original bowden tube. I use this old PLA mainly for spiralizing vases which is quite ok if you get the parameters in the right window.
-
servus Daniel, auch ich tippe auf die Schraubklemme am Mainboard.
-
Spirit, thanks for your input on this thread, looks like you were able to deal with your issue by applying this workaround. regarding the feet I already printed spacers and levelled the chassis to my table, so that it is at least standing an all of its feet and is not wobbling and moving around, but it had next to no effect to my bed-levelling-issues. your second part of the fix, which involves the spacer is actually the same approach as the washer/nut-combination under my left-rear-side, which made this trouble corner less unusable. but i cannot get my rear-right corner to the right level. the tolerances are too high, so that the levelling-screws are to short to compensate. furthermore the bed seems to be under tension, and I don't think this tension mixes up very nice with the hot/cold cycles and the mechanical movement of the bed. it is what it is - a messy workaround. Nearly a year ago, i ordered an UM2 because I don't want to mess around with basic calibration and tweaking on an Ultimaker Original. I wanted a well calibrated, "plug and play"-type of printer as promoted. The first Support Ticket I openend on this specific Issue was December 16th 2013. between this date and today there was a lot of Support-Ticketing, documenting, narrowing down the issues to the bent chassis, assuring I get a new Printer, some hotfixes from my side and even a repair by ultimaker which made this specific issue worse. All I wanted was to print architectural models, which have a base size of 20x16 cm to 20x20cm which has driven my decision to an UM2. Since 9 months I'm trying and failing, including 2 superclogged nozzles related to the bedlevelling, days of wasted time, effort and money.
-
hello everyone, maybe this picture is worth a thousand words (buildplate is levelled as best i could) @timelapse: my bolts are exactly the same and not lifting the glass plate
-
a short status update on my side: I made a "workaround" by putting a nut under the heated bed, pressing the heated bed with the glass-plate a little bit up on my lowest corner. you can see this on the second photo of my last post () so i can increase my printable area a little bit. problem is that there is a thermal coupling now via the nuts, so the bed takes a little bit longer to warm up and energy is wasted, and it's no final solution at all. sadly I'm still not able to use the whole building plate. so no large prints for me. I have an open support ticket (#UHK-927-78261) regarding this issue, but I have not heard from support since July 17th
-
@gr5 thank you for your time to reply the box seemed to be okay, maybe a subtile smell of elephants, but next to no surface scratches. inside the box, everything was in place. first thing i noticed when assembling was that the included filament guide wasn't fitting into its suposed hole, cause the backplate seems too thick. (but that would be very suspicious) my the chassis of my machine is definitely warped, it's sitting on 3 feet as you can see here: http://umforum.ultimaker.com/index.php?/topic/6050-um2-housing/&do=findComment&comment=60758 the initial layer thickness was 0.3mm at this print (layer height 0.1mm) I made another print with an initial layer thickness of 0.1mm. which you can see in this photo (collage for more detail - highres ) I used the distribution of error method on this print - it is the best I can get so my next option is twisting the frame or glass which i will skip for the moment. finally I tried a similar method to your paper warping idea, which is a nut right under the heated bed, to raise it a small amount. I hope you can imagine it with this photo (the smaller screws are from the left backside clamp) I did several loops of the bed-levelling-wizard, and I noticed a very slight change to the better (at least for the back left corner). Further trials tomorrow.
-
i don't know how I should measure it exactly, the thickness of the glassplate is constant as I my calipers tell me, i also orientated the glass plate 90 degrees and flipped it with the same results.
-
thanks for your replies, @nallath adjusting on the fly would be kinda hectic because you have to adjust the level back an forth everytime the head moves to one of the "trouble regions" and furthermore there are no relevant levelling screws for the level of these 2 corners @Didier Klein yes, something is way out of plane the glass-plate is flat (definitely) could be the L-shaped part which attaches the buildplate to the Z-rods could be a bent x-axis could be a bent chassis i can only see 3 relevant screws which are accessable without taking the frame apart... I#m aware of the levelling bugs, I tried the whole procedure in Cura 14.03 and 14.07, this issue is definitely Hardware-related. maybe I should try Chapter C3 (stabilize z-stage) from the assembly manual, but I#m not very motivated and talented doing that :( @Cez_etc thanks for the link, I will try this method in the evening, but I'm sceptic if it helps me in any way In fact i can print a perfect concentric circle but only in the middle of the bed and with a max diameter of ca. 6-7 cm, then I'm hitting my problem corners...
-
I am trying to level my bed. and I'm constantly failing to the point where I lose interest... I ran about 20 levelling cycles with varying every variable which i think has influence the correct levelling (glass plate orientation, heated/cool bed, heated/cool nozzle). the 3 points of the levelling wizard are levelled near to perfection by using 80g/mm²-paper. But no the rest, i have 2 troubling regions, where on one the nozzle is touching the glass and on the other the distance nozzle-glass is too far for the filament to stick I hope you can understand what I mean by looking at this print. model: Bed leveling test by imitation you can view this photo in higher resolution here as well as detailled photos of the corners left upper right upper left lower right lower center of course this issue leads to unprintable regions and limits the maximum printable size and amount of objects. problem region left upper - filament is not sticking to bed problem region right upper - feeder clicks - too much resistance pushing the filament out (good chances of clogging) any idea? is there a way to fix this Issue myself?


