


michaelvk
-
Posts
20 -
Joined
-
Last visited
Content Type
Forums
Events
3D Prints
Posts posted by michaelvk
-
-
I also want to experiment with a 0.25 nozzle,
can you tell anything about layer adhesion en printing times ?
The detail looks really sharp

I print everything at low speed and low temperature. Say inner wall at around 40 and outer at 18. Temperature is usually around 186 degrees and the bed set to 60. Layer adhesion seems fine, but these are small parts and fragile anyway. The only place where layer adhesion was a problem is with the barrels, where I set the infill too low.
-
I think I've seen this on twitter or something a while ago. Doesn't it also move like an actual rattle gun? This is such an impressive print!
Is it part of a bigger model?
Thank you!
I put it on instagram and twitter ages ago, but was persuaded to share it with the community here..
The thing is meant to be a stand alone model which will eventually be perched on it's pintle mount as found on a Chinook or Blackhawk door mount.
Here's a video of the bolt and delinker turning together..
-
Love it the detail is amazing .4 Nozzle ??
Thank you!
0.25 nozzle using Faberdashery Robot silver at around 186 degrees.
-
Colorfabb also recommend using buildtak..
-
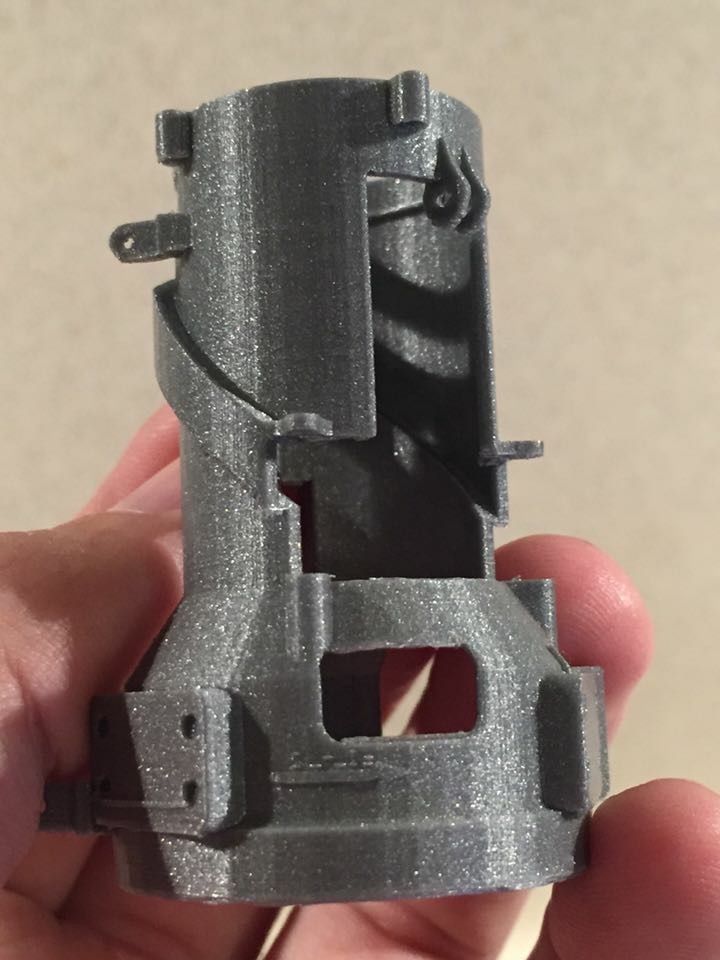
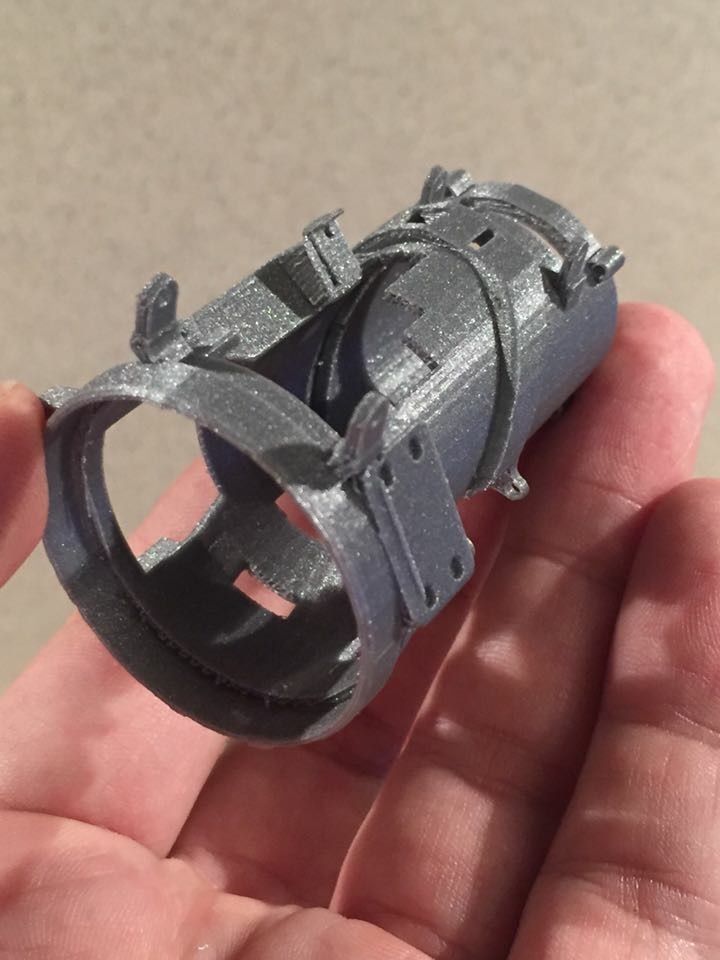
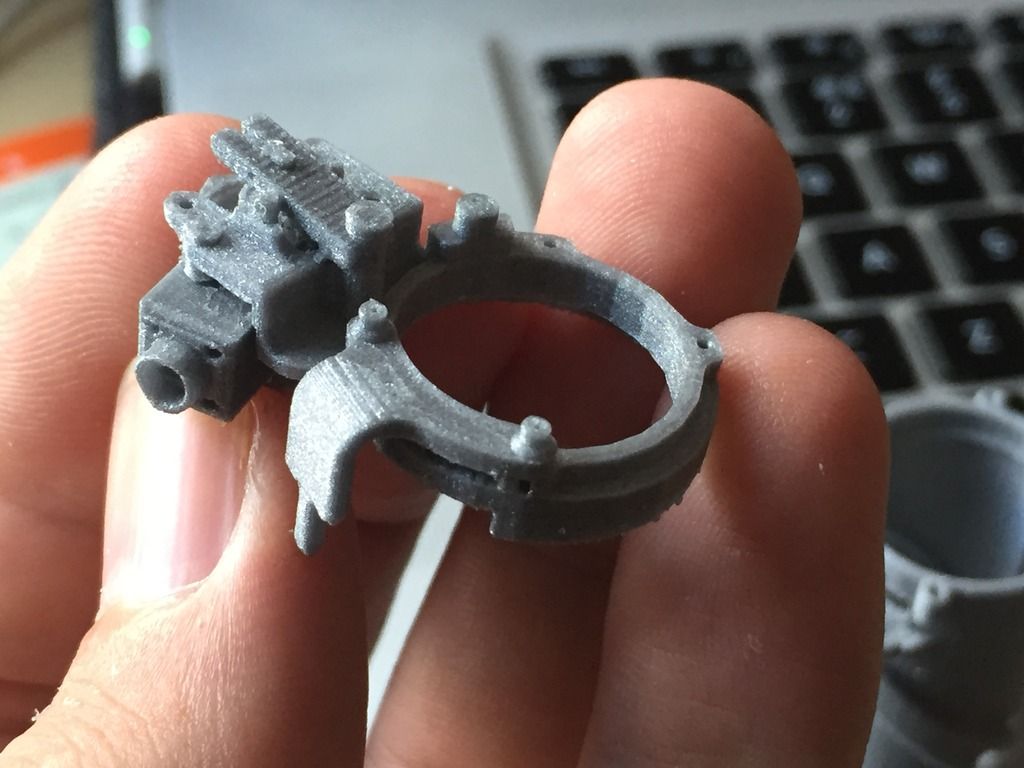
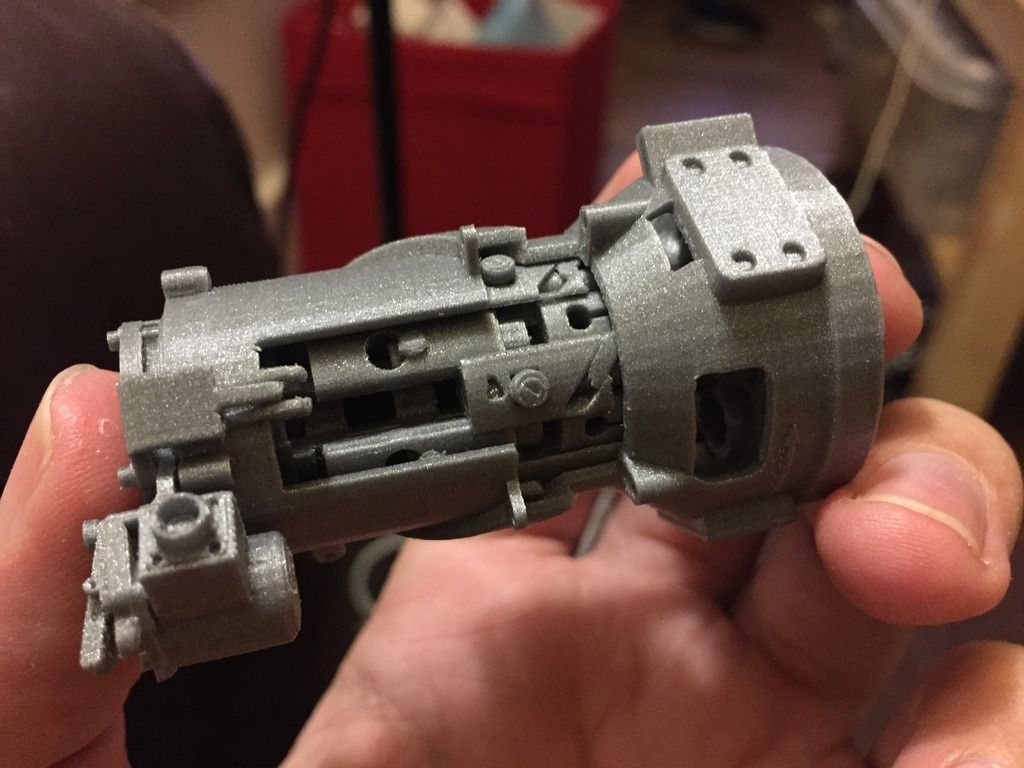
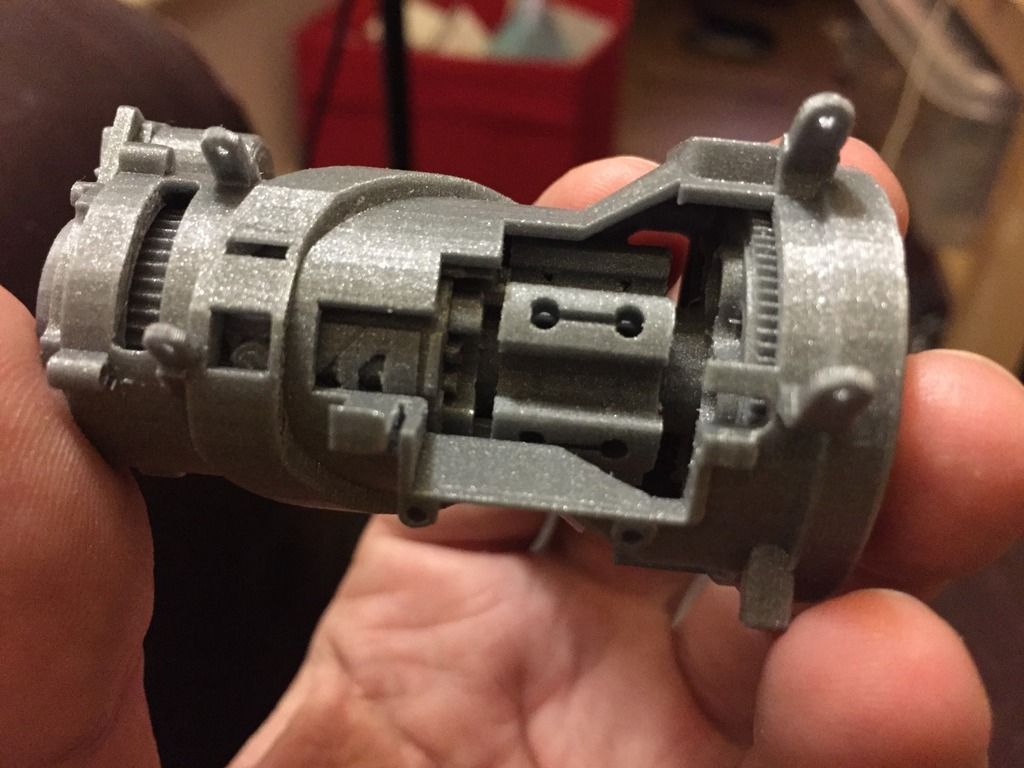
A few months ago I upgraded my Ultimaker 2 with the Olsson block, allowing me to produce finer detail with the .25mm nozzle. As a test project I decided to do a 1/4 scale minigun. I found one on 3D Warehouse (model therefor courtesy of a chap that goes by the name of Spoonkiller, link here: https://3dwarehouse.sketchup.com/user.html?id=0015491875973132162600283 ).. The model however needs a fair amount of work to make it printable.. The material I'm using is Faberdashery's robot silver PLA.
Anyway, the work so far:
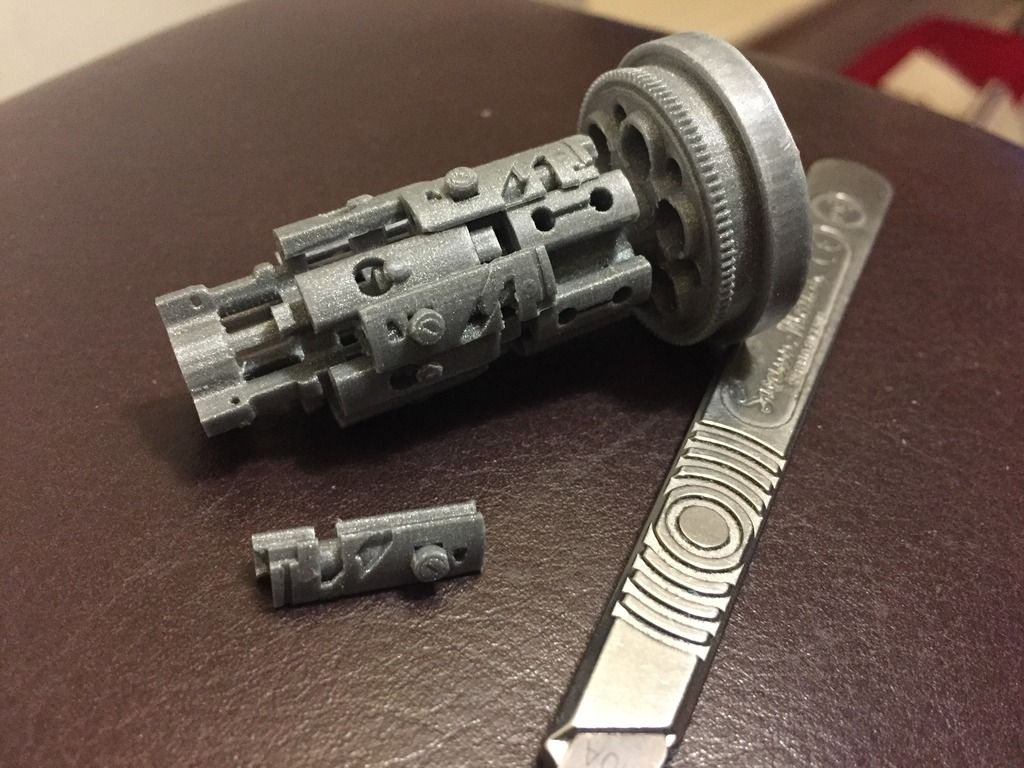
The main housing:

The clutch and delinker sprocket:
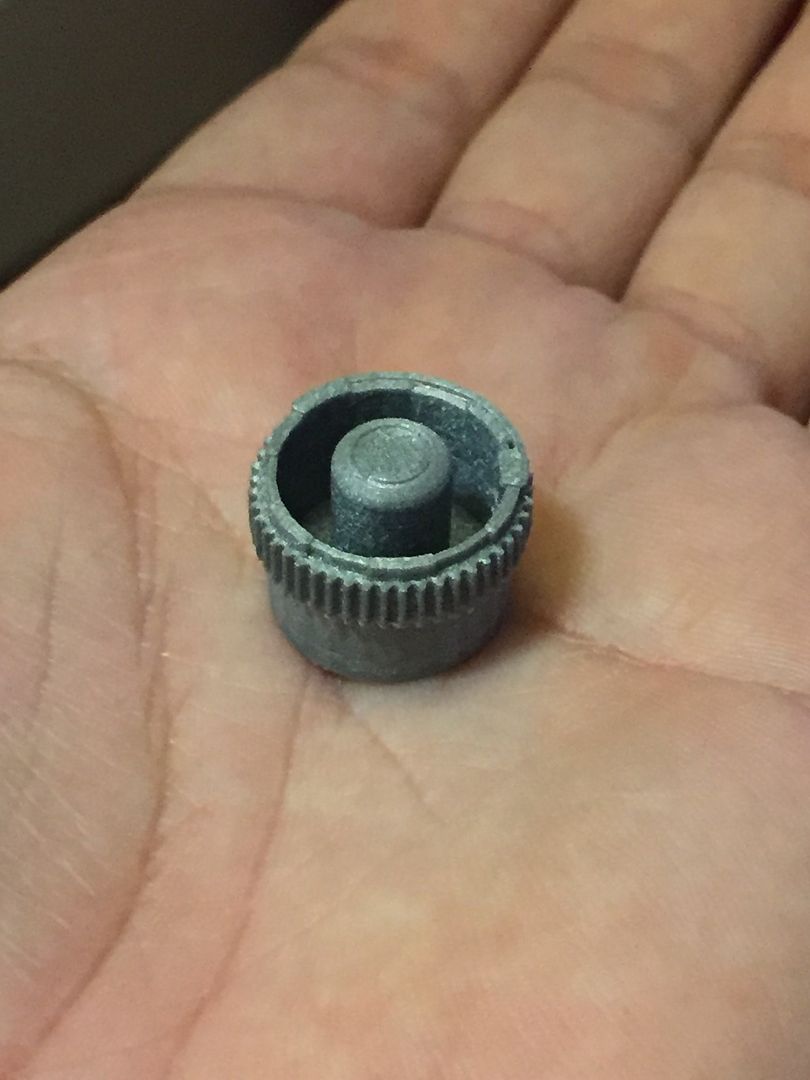
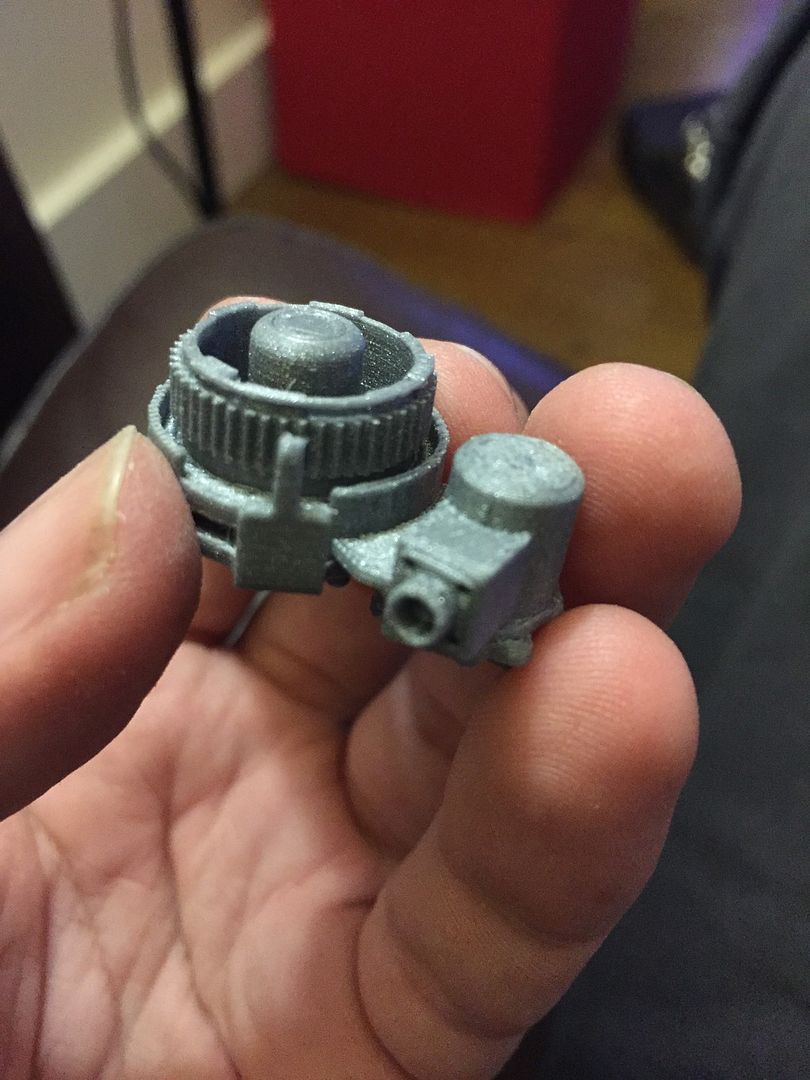
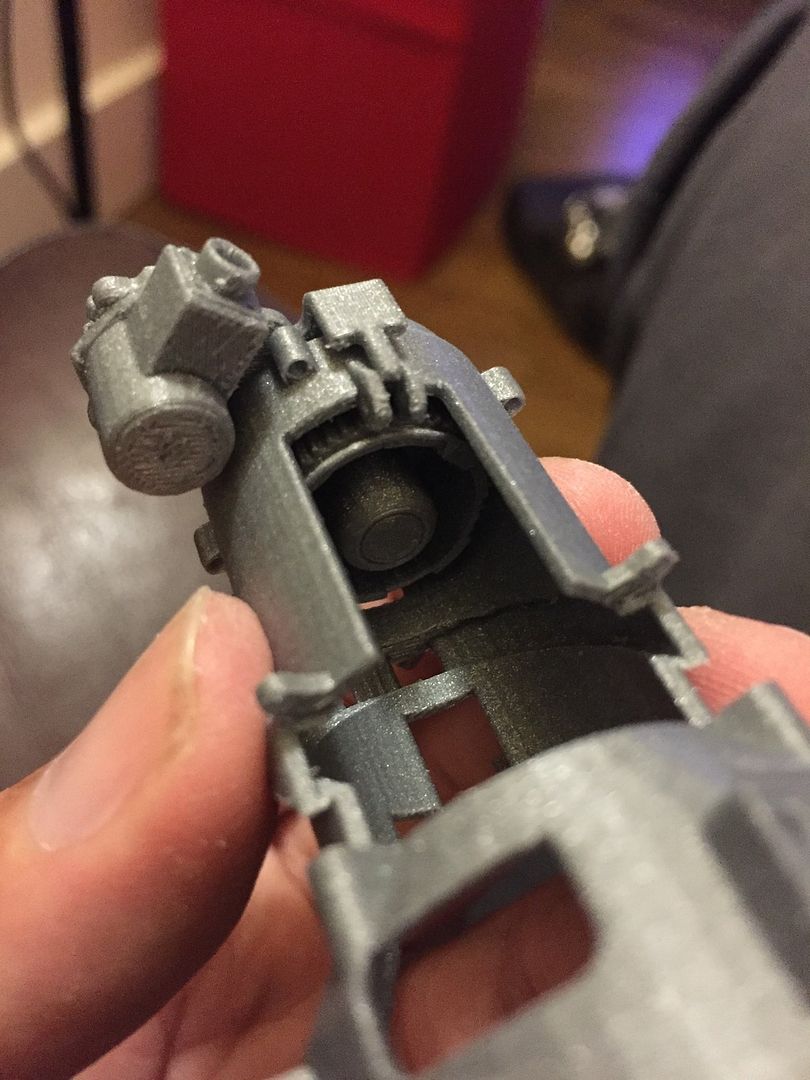
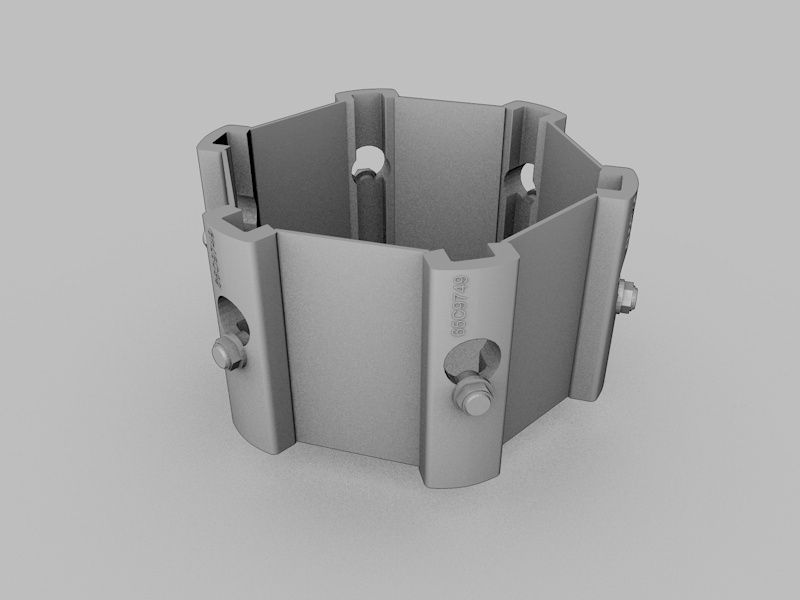
The rotor, with lightening holes as found on the titanium version.. This is the part that really started to pose some printing challenges.. That is until I started on the bolts and their guides:
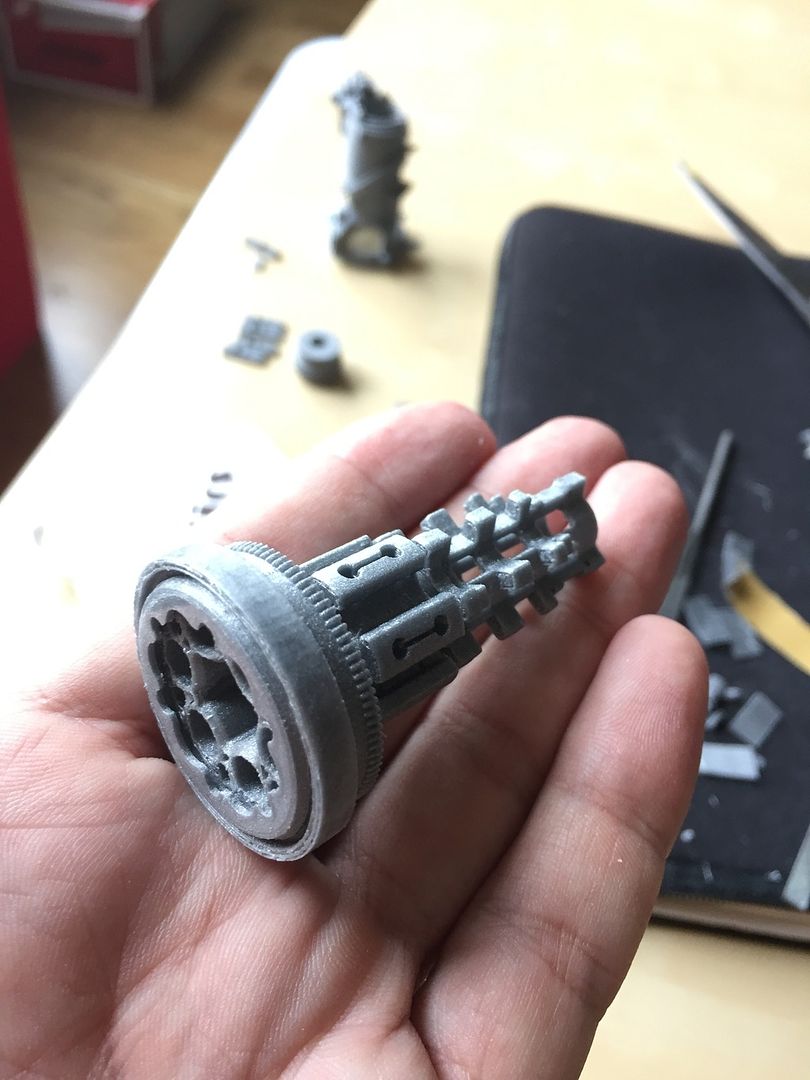
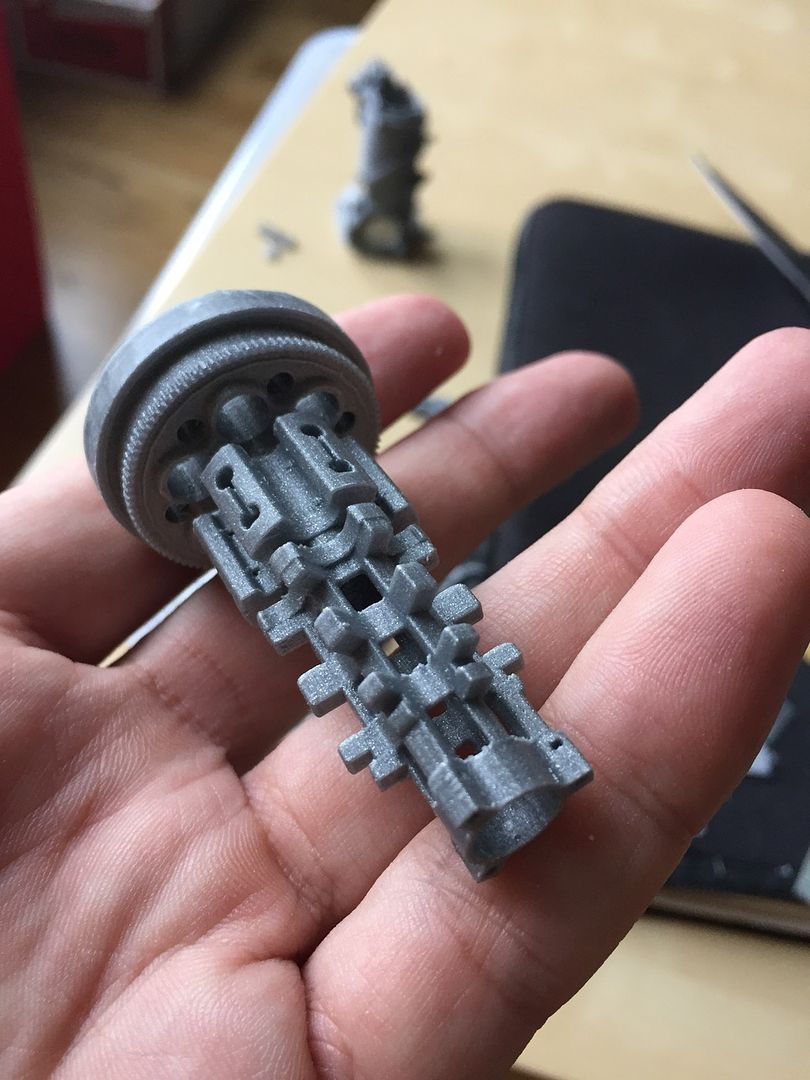
Bolt guide clamp.. I had to print these, as well as the bolts and feed chute links, on a web with five others:
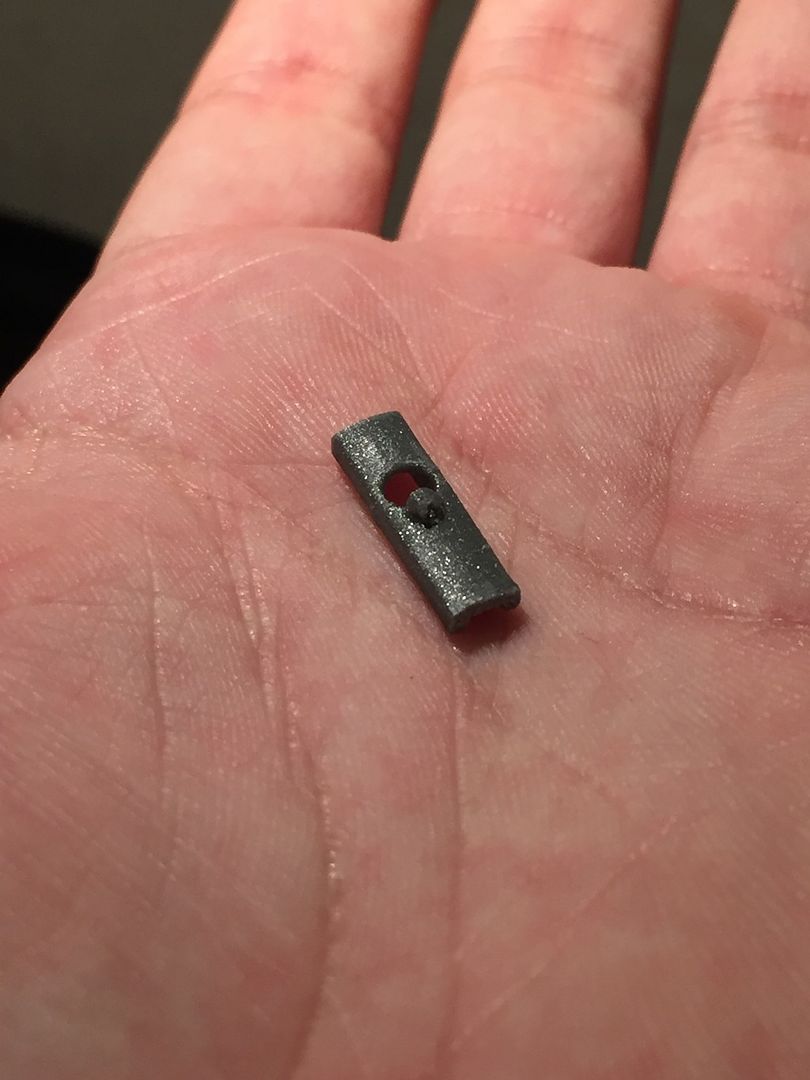
Printing the tiny parts separately would've resulted in less than optimal prints, parts falling over, too much heat concentrated on a small area.. So I added 0.3mm webs between the parts to keep the head moving and allow for the parts to keep cool and stable during printing..
I used the same principle for the bolts..
When rotated, the bolts follow the bolt track in the housing.. They're also installed like the real thing.
Firing position..
Retracted position..
Stay tuned for more!
-
 5
5
-
-
There it is! Thanks! (After over two years of using this thing you'd think I'd have learned by now..)
What threw me is that it didn't give the same issue in any of the other machine settings..
-
Here's a weird thing. I loaded a part into Cura 2.1.2 and it auto scaled it to 85%. The strange thing is that the part was only 65mm tall. I only noticed it was auto scaling (I've since turned that off) when I found the part to be a lot smaller than I thought it should be. I then scaled the part back to 100% (101 to compensate for shrinkage), and it then refused to slice. I double checked the part for hidden mesh, but there wasn't any. I then changed the machine from Ultimaker 2 regular to Extended and it was suddenly fine.
Having had a look in Cura 2.1.2 now, scaling an object, it appears the Ultimaker 2 machine settings don't support any object taller than 50mm.. I checked to see what would happen if I used 2+ settings and it seemed fine then. Is there anywhere I can amend this?
-
Weirdly my machine yanked the foam clean out of its casing and it's now in the bottom of the feed unit.. An internal dust filter, so to speak..
I may need to fish that out again, I think..
-
I arrived at work this morning to find a nice and tightly wound up spool of filament on one end, a 1/4 finished print on the other and a ground up bit in the middle.. Needless to say I was a bit miffed. This is in my opinion the only serious flaw in the standard UM2 setup. I'll be taking these tips to heart, as well as trimming the material to the appropriate length, plus 80cm, for any print I can't stick around long enough to babysit.
On the plus side, I think the few hours(?) of stress free turning may have actually done the filament feed some good.
-
Thanks! Although sadly, as it's for a TV show, you'll have to wait until April/May next year to see what it is..
-
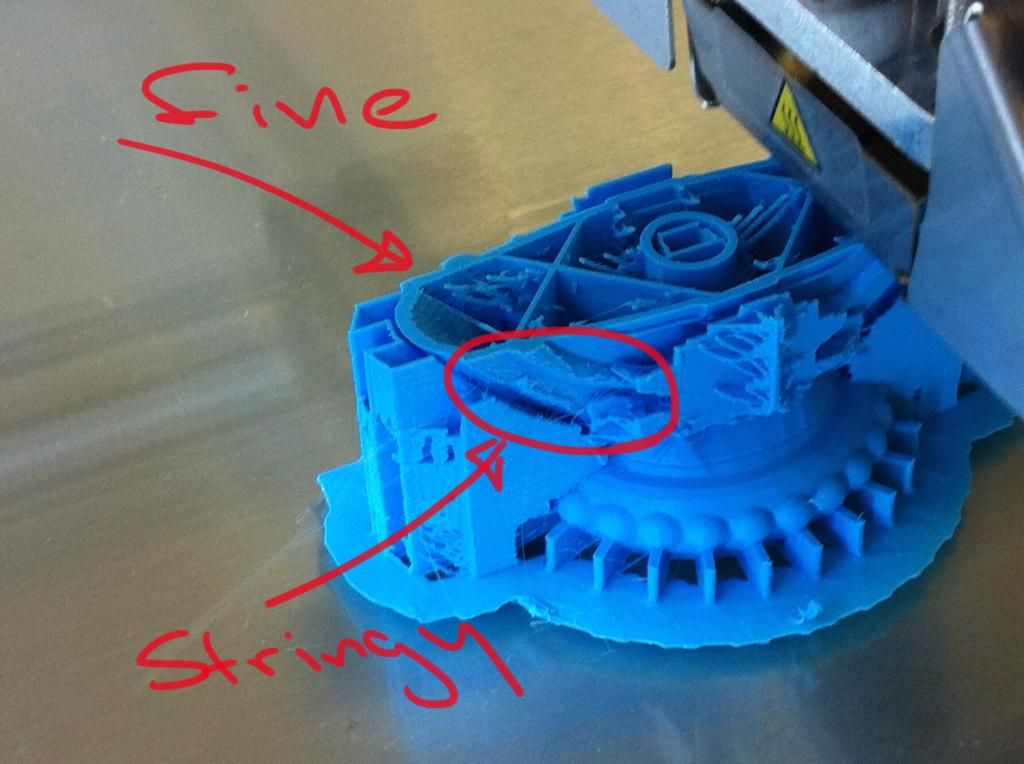
Actually the 'windswept' look was on that corner, as well as the corner diagonally on the other side, so fan or no fan, it was the same on both sides.
Either way, dropping the temperature 5 degrees helped a lot.
-
Easy does it was the key ultimately. Just lowering the temperature cleared it up immediately.
I'm sure I'll end up ruining the print in some novel way down the line though
-
It appears I answered my own question.. Temperature was a fraction too high.
-
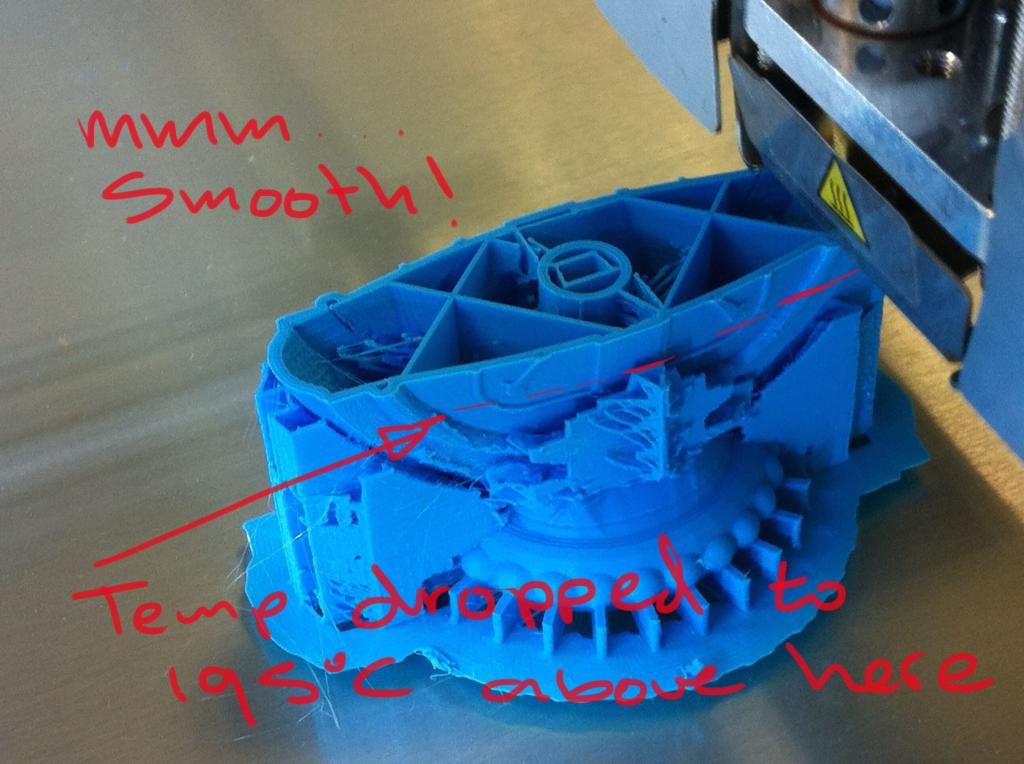
So here's an interesting one..
I'm printing a sword pommel for this gig I'm working on, and for some reason, on diametrically opposing corners, I'm getting this weird windswept (like ice in The day after tomorrow) effect on trailing edges. I figured it's a form of stringing, but can't understand why it only does it on those two corners.. It's by no means lost (the underlaying profile is intact, so there's no deformation), as it can be scraped/sanded back, but it still puzzles me.
I'm using Ultimaker's own (I've got some Colorfabb, but find UM PLA to be crisper in detail) PLA, currently printing at 20% speed and have dropped the temp from 200 to 195 degrees.
Any ideas, chaps?
-
Well, just went ahead and did it now. It went fine, printed the first layer a wee bit less than usual, but looks good, and didn't squish a pool of molten plastic around.
Excellent!
In future I shall also add pics..
-
Firmware version is 14.03 on the machine, Cura is 14.07..
The thing was printing fine this morning.. If a little high on the first layer (I could see the head was separated from the filament, not touching it at all. So I think a switching off and on again may have cleared its head a bit, ridding itself of whatever caused it to go superclose to the head for the first layers yesterday). Either way, I'll take the thing home with me this evening and have another go there, were I can focus on it a bit more.
Basically: I shouldn't have screwed around with it. But it's all a learning experience, eh?
Thanks again for the guidance!
-
Ah right.. So set zero to the glass itself. Won't that have a knock on effect for first layer thickness? I must say that the paper thickness does seem a little unscientific. But doesn't the machine then take that into account when it prints, by adding the thickness of the paper? Or does it keep that distance as a safety to keep it from hitting the glass? The thing I found weird is that it was like it was adding more than the thickness of said sheet of paper to compensate for that offset. The first layer and skirt went down transparently thin, despite a 0.3mm first layer height. There's also plenty of tension in the springs, albeit not the 13-odd mm gap like you've mentioned.
Currently it's printing fine, but I'll give this levelling method a go. I might take the thing home with me over the weekend and have a crack at it there. I'll let you know what happens.
Thanks very much for the very informative answer!
-
Just measured the thickness of the outline (skirt?).. A rather skinny 0.03mm
-
Hi all.
Had my UM2 a week now, very happy and impressed, and a weeks worth of printing little greeblies trouble free-ish (still getting the hang of making models for printing, instead of pictures..).
However..
I decided this morning to recalibrate the bed for some reason. Followed the same process as I did before, using a stack of card (and the second time a piece of 1mm plastic, measured on digital calipers). Now here's the weirdness. Despite using as accurate a measure as I could, the first layer, instead of 0.3mm, was squished paper thin on the bed, with the resultant following few layers ending up mushing around a pool of plastic as it filled in the base. I then recalibrated with a piece of plastic measuring 1.25mm. Same thing. I then resorted to dialling the bed back on the screws about 3/4 turn.
The head and bed were cold (enough), there may have been a microscopic grain on the head, but if anything that should push it away from the bed? I also made sure there was no pressure on the bed, i.e. when inserting the 1mm piece the bed wasn't pushed down on the springs. I used a model sliced in Cura this morning, as well as a model that I previously printed without issue. Both were sliced using the quickprint fine settings.
The subsequent layers are printing fine.. So far (4mm up an 8mm ring)..
Any thoughts chaps?


1:4 scale Dillon Aero M134D minigun
in What have you made
Posted
Man, that's AWSOME!!!!
How have you managed to get the parts modeled? I´m looking since month/years for minigun or gatling plans to make a 3D model, but without success...
Sorry about the late reply, it's been a while since I've been here..
I may have mentioned it before, but the model was found on 3D Warehouse, made by user thespoonkiller. The model isn't 3D printable and able to function out of the box, as the parts need tweaking for tolerances, but otherwise it's all there:
https://3dwarehouse.sketchup.com/user.html?id=0015491875973132162600283&nav=models