


tinkergnome
-
Posts
2,774 -
Joined
-
Last visited
-
Days Won
61
Content Type
Forums
Events
3D Prints
Posts posted by tinkergnome
-
-
22 hours ago, PatrickTri said:
In the attachment you will find the installed board.
OK, it needs VCC, Ground and a PWM-capable control pin with 5V logic.
The challenge is to modify the firmware for a 50Hz PWM frequency on a specific pin. If it is even possible - i dunno?

PWM frequency aside:
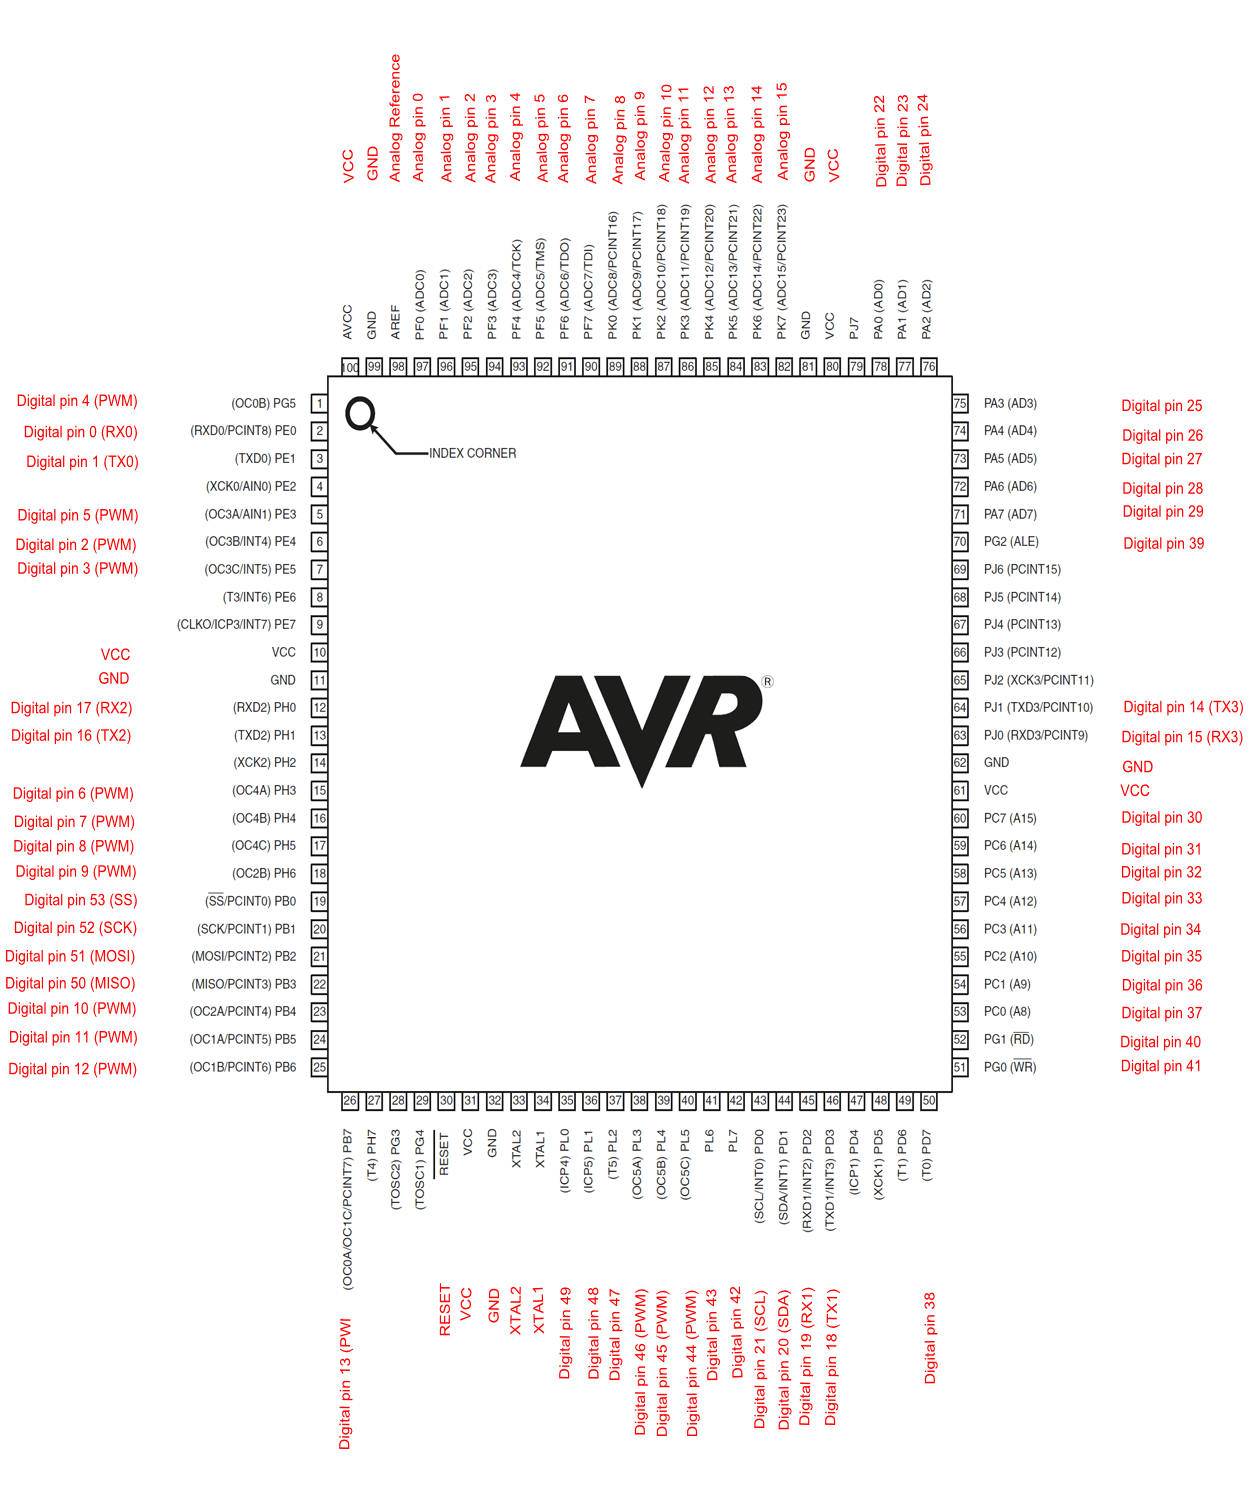
You'll find all three outputs side by side on header J26 (EXP3) (there are others - it's just a possibility i choose)


Marlin firmware uses digital pin numbers, so PB7 translates to pin 13.
That means the gcode looks like this (range for parameter S is 0..255 and would set the servo angle):
M42 P13 S128
Marlin gcode documentation - but keep in mind that Ultimaker firmware is based on the old Marlin 1.0
https://marlinfw.org/docs/gcode/M042.html
Arduino pin mapping:
https://docs.arduino.cc/static/ed4d33b86bac66d54959fbb186795a11/54c3a/PinMap2560big_Rev2.png
Good luck!
Edit (regarding the duty cycle and frequency problem):
There is builtin support for servos in Marlin. It's not enabled by default, you have to configure (and compile) it.
https://marlinfw.org/docs/configuration/configuration.html#servos
gcode M280 is meant to be used for servos:
https://marlinfw.org/docs/gcode/M280.html
M280 does not use pin numbers but the servo index instead- starting with index zero...
...so - don't forget to set the correct pin number for "SERVO0_PIN" in pins.h
I never used such things by myself - i'm sure you're able to figure out how this works!
-
9 hours ago, gr5 said:
are there gcodes that can set the percent for another fan like output? And what pins might be available on the UM2?
@PatrickTri - in case you don't know it yet - schematics are available here:
https://github.com/Ultimaker/Ultimaker2/tree/master/1091_Main_board_v2.1.1_(x1)
The question is - how much current is needed?
The "LED PWM" output is 24V - that's perhaps an option if the lights are not needed... and if it can handle the current?
Thats important - don't guess unless you're experienced in repairing smd components...
How does this slicing tool work?
There are some other Arduino pins available on the mainboard that can be used as an on/off trigger. But as @gr5 said - this would need some kind of amplifier board (relay / mosfet - whatever...) - maybe such a thing is already integrated in the tool?
Marlin firmware can set pin states with gcode M42. I think this alone will not fit the purpose, but who knows?
14 hours ago, PatrickTri said:The conversion to dual extruder will be done according to the instructions.
BTW: which conversion instructions are you referring to?
-
8 hours ago, BastelWastel said:
Ich würde den entsprechenden Code gerne im End-Script einfügen. Aber es ist nicht definiert, welches Tool am Ende aktiv ist.
Für Cura könntest Du ein Post-Processing-Skript entwickeln, welches den gcode analysiert, sich das aktuelle Tool dabei merkt, und am Ende die passenden Zeilen einfügt. Praktisch eine Kombination aus "Pause at height" und "Search and Replace" (oder so ähnlich...).
Ich denke, auf Dauer wirst Du aber nur glücklich, wenn sich die Firmware um solche Dinge kümmert.
Der Drucker sollte immer selbst wissen, welches Tool aktiv ist und kennt auch die aktuelle Position. Das gleiche gilt für den nötigen Ablauf zum Aufnehmen oder Absetzen eines beliebigen Tools. Ich würde das nicht abhängig von den Fähigkeiten eines bestimmten Slicers machen.
-
22 minutes ago, eXe said:
Deswegen bin ich so Ratlos wieso es einfach nicht mehr geht! Und er auf einmal die Füllung doppelt abfährt!
Nur um ganz sicher zu gehen - Du meinst das "Lücken zwischen Wänden füllen" - also die gelbe Linie in der Vorschau?
Vielleicht war da vorher nicht "Überall", sondern etwas anderes ausgewählt?
("Füllung" wäre orange - die ist hier nicht zu sehen)
Und: Cura-Version war vorher die gleiche?
-
3 hours ago, lukassvensson said:
It's only when I pause the printing midway through that I can't insert new material. Has anyone else experienced this, and is there a fix?
I'm pretty sure this is fixed in all firmware versions not older than 5 years. If the firmware on your printer is older... consider to update 🙂
(https://github.com/Ultimaker/Ultimaker2Marlin/pull/114)
-
17 hours ago, rad_spider said:
Unfortunately, my extruder motor is the only third party stepper motor in my machine. Due to my inability to remove the metallic gear of the old extruder from the original UM2 stepper motor. Instead, I installed a spare stepper motor I had for a Tenlog printer I plan to restore and probably sell. It's a large stepper, and I know little about it. Other then it's wiring.
Ok... that's another important thing to know.
Does the Tenlog printer also use 24V motors? Or is voltage not important for stepper motors? I'm not sure.
Be aware that steps/rev. is not the same for all stepper motors. The motor of the UM2 has 400 steps/rev. (0.9° per step), while the UM2+ uses a motor with 200 steps/rev. (1.8° per step).
Both are common values, but... what's the value for your replacement motor? This may be.... who knows...?
The value 311 (steps/mm) is only valid for a motor with 200 steps/rev. and 16x microstepping.
Is buying an UM2+ extruder motor an option? Your favourite Ultimaker reseller should be able to offer such things and it would rule out a lot of guesswork. Just saying...
-
311 is the correct number for x16 microstepping.
But I remember similar problems with interpolation on the extruder motor. Now i use it with x32 microstepping (no interpolation) and 622 steps/mm. Works much better.
In addition: 800mA is quite low if this are genuine Ultimaker motors. Consider to raise the current a bit for testing.
The same goes for the E0 speed settings. For example:
max. speed change: 5 mm/s
max. speed: 50 mm/s
Acceleration: 1000 mm/s²
Good luck!
-
Although M305 still seems to work - for RRF3 one should use M308 instead.
(according to the documentation here: https://docs.duet3d.com/en/User_manual/Reference/Gcodes)
Here's an example that seems pretty close to your setup:
https://forum.duet3d.com/topic/19386/pt100-sensor-and-daughter-board-issue
Out of curiosity: for which printer do you use the Duet Board?
-
Am UM3 ist das im "Tune"-Menü -> Extruder 1 oder 2 auswählen -> Change material
Wenn es im "Pause"-Zustand kein "Tune" gibt, dann eben erstmal wieder fortsetzen.
(nach Auswahl von "Change material" wird automatisch die Pause begonnen).
-
 1
1
-
-
Usually it's done with two separate models - one for each extruder - that are arranged with the "merge models" function.
For a single model one can make use of one or more "modifier meshes" to achieve the same, like described here:
BTW:
If you don't have an according modifier model at hand - you can "misuse" a support blocker for this purpose. Just add one to the model, change the type to "Cutting mesh", scale and position it to your likings and choose an extruder.
-
Maybe the "Linear Advanced" Plugin does not work with more than one extruder in this particular case?
2022-03-11 11:51:39,625 - ERROR - [MainThread] UM.Logger.logException [125]:   File "/Users/roanmurphy/Library/Application Support/cura/4.13/plugins/LinearAdvanceSettingPlugin/LinearAdvanceSettingPlugin/LinearAdvanceSettingPlugin.py", line 191, in _filterGcode
2022-03-11 11:51:39,627 - ERROR - [MainThread] UM.Logger.logException [125]:     if not apply_factor_per_feature[extruder_nr]:
2022-03-11 11:51:39,629 - ERROR - [MainThread] UM.Logger.logException [125]: KeyError: 0
-
1
-
-
13 hours ago, qmaker said:
SO now I am realizing that the Bed is not heating, which is why it is hanging.
In this case - read on (around) here:
-
First guess - while looking at the symptoms:
Check the material setting on the printer. Sounds like there's no material selected - or the stored settings are broken?
-
4 hours ago, Jdong1 said:
The second method that I tried is to go directly into the print settings and change the material dimeter there, but it doesn't show on my print settings. I have all my settings visible and can't find it. (I have also attached screenshots to show this)
One additional note:
Be aware that your first picture shows Ultimaker Cura, while the second picture shows a LuizBot "adoption" of an older Cura version. Consider the second one as a different piece of software especially modified for LuizBot printers.
-
 1
1
-
-
21 hours ago, JonGregory said:
I downloaded what I understand is the latest version of the firmware for UM2 : GitHub - Ultimaker/UM2.1-Firmware
Just to be sure that you are using the correct repository as the base: your link leads to the firmware for the UM2+ series.
For an UM2 (without "plus") it's this one:
https://github.com/Ultimaker/Ultimaker2Marlin
And be aware that there are separate git-branches for the different models. ("extended" and "go").
21 hours ago, JonGregory said:Looked for the M600 command in the configuration_adv.h file and uncommented the line that defines the FILAMENTCHANGEENABLE variable
I'm pretty sure the enclosing "ULTIPANEL" is not defined - that means your modification has no effect at all on the C pre-processor.
22 hours ago, JonGregory said:Hi all - I'm trying to enable the M600 command so that I can change filament using the post-processing script in Cura (4.13).
Sorry - but i have to ask.... why M600...?
The usual way for UM2 printers with Cura is the "Pause at Height" post-processing script. And then use the material change feature on the pause screen of the printer.
Is there any advantage by using M600 instead?
-
On 2/24/2022 at 8:03 PM, sandrap said:
The firmware on the printer is Jun 17 2016 13:12:55 Vers:_15.04.7-RC5ex
A different part of this puzzle is the firmware version.
I'm not aware that there ever was a "Cura 15.04.7 RC5", at least not released by Ultimaker?
But if exactly this firmware worked before... 🤷♂️
-
10 minutes ago, Princy557 said:
How do I get the parts, once printed, together?
Well... you can't.
These parts are obviously meant to be printed both together "in place" - in a single job.
That's the whole point - it's something that is only possible with 3D printing.
What's the source of the model - are there no instructions?
-
1 hour ago, Princy557 said:
how the heck do you get them to merge.
Can't find any reference to it
"How to merge models" - the second part here:
If you made the model - pay special attention to the highlighted "Note" - it's crucial.
-
Ich muss gestehen, ich hab es jetzt schon mindestens vier mal gelesen und bin immer noch am Rätseln, was jetzt eigentlich genau das Problem ist...? Drucker kann man doch in Cura so viele einrichten, wie man mag?
Bisher meine wahrscheinlichste Vermutung:
Du hast eine Projektdatei in Cura importiert, dabei aber (aus Versehen?) keine neue Drucker-Konfiguration erstellt, sondern eine vorhandene ersetzt? Und die eigentliche Frage ist, ob das irgendwie rückgängig gemacht werden kann? Geht es darum?
-
9 hours ago, Thatguy5544 said:
Cura successfully loads the data and sends it to the printer, but the printer does not seem to respond in any way... I also do not get any error message.
The log file(s) will probably reveal more details. If the printer refuses a print job the reason can be found in the log (usually).
I think there's a link on the printers "homepage" that shows some logging information.
Or save the log files to USB stick like explained on the support page:
https://support.ultimaker.com/hc/en-us/articles/360015583819-Save-log-files-to-USB
-
3 hours ago, gdog said:
They are (and were, at the time I took the screenshot), X=223, Y=223, Z=205. My measurement of the UM2 glass build plate is like 227 x 255, but it is definitely not square.
The glass plate is a bit larger than the area that is reachable by the printhead. Only the latter matters. Values for the buildvolume from your screenshot are correct for UM2-series and the standard printhead.
Hope that helps!
-
Ich glaube der Pfad in Cura ist "fix". Ich vermute es funktioniert andersherum - z.B. indem der Cura-Ordner durch einen symbolischen Link im jeweiligen "Sync"-Ordner eingebunden wird.
Für Windows und OneDrive z.B.:
https://www.tenforums.com/tutorials/92892-sync-any-folder-onedrive-windows-10-a.html
bzw.:
-
1
-
-
37 minutes ago, PeterMess said:
I would be really grateful for any informations (even though it seems to be super easy it just drives me crazy that I cannot make it) .
Well... creating models that are well suited for 3D-printing can be super easy with proper CAD software - but is quite hard in Blender (IMHO).
The easy part:
Normals of the inner walls are facing in the wrong direction. I think Cura can auto-correct this - but i think it's a good idea to correct this in Blender.
In "viewport overlays" one can enable "face orientation" to get a visualization in Blender. In edit mode the orientation can be changed with the functions in "Mesh -> Normals -> ..."

The more serious problem:
The bottom of the cylinder looks like it was added later, it overlaps with other parts. This has to be solved before it can be used for 3D printing.
One example - the tips of these triangles are somewhere inside the wall - this has to be changed:

The goal is one single ("watertight") outer shell without overlapping or missing geometry. And no extra "hidden" faces inside.
You didn't shared the .blend-file. Is the bottom a separate geometry? If so, remove it and simply close the cylinder at the bottom with loop cuts and the fill function.
-
1
-
-
9 minutes ago, Filmpalast said:
Super, danke dir, werde ich probieren. Schade, dass Cura keine Synchronisation hat.
Nach "synchronisieren" hast du nicht gefragt... 🙂
Wenn das besser passt, könnte man den Konfigurations-Ordner auch synchronisieren über die persönliche DropBox oder OneDrive (oder was es da sonst noch so gibt...). Die Idee ist nicht von mir:
5 minutes ago, Filmpalast said:muss für das Backup, vorher Cura löschen / bereinigen um nicht das alte und neue zu haben ?
Ich habe oben noch einen Link zum Cloud-Backup ergänzt. Mehr weiß ich darüber auch nicht, ich nutze das nicht. 🤷♂️


IM NEW TO THIS...HELP WITH RESIZING
in UltiMaker Academy
Posted
Welcome to the world of Cura 🙂
An STL-file does not contain color information at all (AFAIK). I think you are referring to the color scheme of the preview stage?
Because you're new to this: there's an (online) manual for Cura, so here are two links to start with:
The Ultimaker Cura workflow explained
How to scale models in Ultimaker Cura