


tinkergnome
-
Posts
2,774 -
Joined
-
Last visited
-
Days Won
61
Content Type
Forums
Events
3D Prints
Everything posted by tinkergnome
-
Da kommen mehrere Einstellungen in Frage. Ich würde zunächst mal schauen, ob unter "Experimental" alle Optionen für "Coasting" und "Wipe" ausgeschaltet sind. Das müsste der Standard sein, aber sicher ist sicher. Die Z-Seam Position hast Du wahrscheinlich fest vorgegeben? Deiner Beschreibung nach könnte es etwas zu tun haben mit der "Outer wall wipe distance" https://support.ultimaker.com/hc/en-us/articles/360012512340-Wall-settings
-

UM3 Invert extruder direction um3
tinkergnome replied to frankie_um3's topic in Third party products & modifications
I think these lines are from a different documentation. There's a separate installation guide for the UM3: https://support.bondtech.se/Guide/03.+QR+for+Ultimaker+3/14?lang=en But... The "QR Ultimaker 3 Kit" comes with its own stepper motors, there should be no need to change the rotation direction? If you use a different setup... the direction of stepper motors can usually be changed by swapping one pair of the four cables. -
The printer definition is called "Mark2 for Ultimaker2". It's still included in a default installation of Ultimaker Cura (as far as i can see). It uses gCode-flavor "Marlin"
-
Man ist doch nicht auf den Marketplace angewiesen, oder? Ich würde (in Cura) einfach mit dem ABS-Profil starten, evtl. die Drucktemperaturen etwas anpassen - kommt darauf an, was der Hersteller vom HIPS so vorschlägt. Wenn es um einen der oben genannten Drucker geht, dann am Drucker auch ABS auswählen und los gehts.
-
Question Ggode modification: Pause command acting strangely.
tinkergnome replied to stolowma's topic in UltiMaker Cura
Right - there's no need to rant. Creality printers are working great. Just replace electronics and firmware (Duet3D), all fans (Noctua), feeder (Bondtech) and hotend (E3D) - and you get a silent and reliable machine! 😛 -
Well, the firmware passed through a few iterations since the good old UM3, but here is a comprehensive description. And developer mode still works in the same manner:
-
Von "Creo" hab ich noch nie zuvor gehört, ich kann es deshalb nicht vergleichen... Eine kostenlose (und cloud-freihe) Möglichkeit ist FreecAD: https://www.freecadweb.org/
-
HELP How to stop Cura sending some command to USB COM3 port
tinkergnome replied to bunekus's topic in Other Languages
This should solve it:- 1 reply
-
- 1
-

-
I think you can't achieve this with (only) the fan settings. With the settings from above: - Cura starts with "Initial Fan Speed" at the first layer, and this setting is used for the first layer only - fan speed increases gradually on each subsequent layer until "regular Fan Speed" is reached at the layer that is configured as "Regular Fan Speed at Layer..." It's well explained in the manual: https://support.ultimaker.com/hc/en-us/articles/360012613199-Cooling-settings You want to change the regular fan speed (or other settings) at a certain height? -> Use a mesh modifier. That's the only way at the moment as far as i know. https://support.ultimaker.com/hc/en-us/articles/360013370140-How-to-adjust-print-settings-of-a-part-of-my-model-in-Ultimaker-Cura
-
One can use the API of the printer in a local network. The following topic contains a working example:
-
Welcome @IrvineCAGuy, this is a community forum - rich on content created by users of Ultimaker products - so... questions are always allowed 🙂 (there are only some simple rules to respect as always). If you have a need for spare parts or official support - you can contact a reseller of your country. There's a list here: https://ultimaker.com/resellers/ The general UM2 support pages (for the basics): https://support.ultimaker.com/hc/en-us/sections/360003504360-Ultimaker-2 for everything else - feel free to ask. Most of the time you'll get at least some hints or field reports back. Enjoy the forum!
-
Because you asked: "MarlinWitbox.hex" is included in the Cura firmware resources. It's there for ages and the comment says: ==MarlinWitbox== The MarlinWitbox.hex firmware is build from https://github.com/bq/Marlin and released under GPLv3 No more details though 🤷♂️
-
Das ist mit einem sogenannten "Cutting Mesh" möglich (einfach für den so markierten Bereich einen anderen Extruder auswählen). Hier ist die Möglichkeit beschrieben: https://support.ultimaker.com/hc/en-us/articles/360013370140-How-to-adjust-print-settings-of-a-part-of-my-model-in-Ultimaker-Cura
-
OK, warum die Temperaturen fachlich so definiert wurden, kann ich auch nicht sagen. 🤷♂️ Ich kann nur versuchen, es technisch nachzuvollziehen. Ich glaube hier müssen wir uns erstmal einigen, was ein "Profil" ist. In der Cura Programm-Oberfläche wird nur ein (kleiner) Teil der Einstellungen überhaupt angezeigt. Wenn ich von Profilen rede, meine ich immer die Konfigurationdateien im Programm-Ordner (bzw. im AppImage - je nach Betriebssystem). Da haben wir unterhalb von "resources" alles mögliche dabei: xml, json, cfg/text Cura baut sich beim Start einen kompletten Katalog aus diesen Dateien und angezeigt wird am Ende für die Druckparameter immer der Wert mit der höchsten Priorität. Material steht dabei ziemlich weit unten im Stapel, sehr oft ergibt sich deshalb durch die ausgewählte Kombination aus Drucker, Variante und Qualität einfach etwas anderes. Jede Ebene ist wie ein Formular, wo nur bestimmte Werte ausgefüllt sind und der Rest der Seite ist transparent. Davon liegen in einer festgelegten Reihenfolge viele Lagen übereinander. Dann schaut man von oben drauf- und voila - da hast Du die Setting-Leiste. Ob man von den unteren Lagen dann überhaupt noch etwas sehen kann, hängt eben stark davon ab, was alles darübergelegt wurde... Schau mal z.B. hier rein: [...]\resources\materials\generic_pla.xml.fdm_material Dann wirst Du sehen, das es im Materialprofil für "Generic PLA" nicht nur eine allgemeine Standby-Temperatur gibt, sondern das es darin auch "Spezialisierungen" für bestimmte Drucker und Düsendurchmesser geben kann. Damit fängt es schonmal an... Was dann in der Settingleiste davon noch zu sehen ist, hängt aber außerdem vom darübergelegten "quality" - Profil ab. Für "Generic PLA", "Normal"-Auflösung und "Ultimaker 3" wäre das dann dieses hier: [...]\resources\quality\ultimaker3\um3_aa0.4_PLA_Normal_Quality.inst.cfg Das "quality"-Profil hat eine höhere Priorität und gewinnt immer! 🙂 (*) In diesem Beispiel (und für praktisch alle Ultimaker-Drucker) ist es deshalb völlig "wurscht", was als Standby-Temperatur im Materialprofil steht. Für Ultimaker-Drucker würde ich deshalb das hier auch unterschreiben...: Es muss aber halt nicht für jede Drucker / Nozzle / Material - Kombination ein spezialisiertes Profil geben. Die Einstellungen aus der Material-Datei kommen dann zum Tragen, wenn die "quality"-Datei (*) für die ausgewählte Kombination aus Drucker und Material keine Angaben dazu enthält. Ein Beispiel für PLA wäre diese Kombination hier: [...]\resources\quality\tronxy\tronxy_0.2_PLA_extra.inst.cfg (*) ja, ich weiß, es wird nicht immer das "quality" - Profil gewinnen. Es kommen dafür auch "variants", "intent" und "extruders" in Frage... (und wahrscheinlich noch ein paar andere). Aber irgendwo muss man anfangen, sonst wird man ja verrückt... 🙂 Ich hoffe, es hilft trotzdem, das Rätsel zu lösen - es steckt eine einfache Logik in diesem Stapel-System!
-
Das ist zwar der falsche Thread - aber trotzdem noch ein paar Gedanken dazu...: zu 2. Bei einem "single"-Druck stehen im gcode-Header keine Angaben zum ungenutzten Extruder drin. Also kann die "Level"-Temperatur gar nicht aus dem gcode entnommen werden. Und... "Level Buildplate" kann auch direkt am Drucker gestartet werden, komplett unabhängig von Druckaufträgen. Für diesen Schritt ist nur interessant, welches Material beim "laden" am Drucker ausgewählt wurde (manuell oder per NFC), da bin ich ziemlich sicher. zu 4. Ich benutze das "Active-Leveling" nicht, aber wenn das Material aus dem deaktivierten Extruder entfernt ist (mit "unload material"), dann sollte der während der Messung auch kalt bleiben (oder hat sich das geändert...?)
-
Damit Du nicht immer rätseln musst - das ist ganz gut dokumentiert. Sämtliche Druck-Einstellungen in Cura stammen aus einem Stapel mit einer ganzen Reihe von Schichten. In jeder "höheren" Schicht kann der "weiter unten" festgelegte Wert manipuliert (mit Berechnungs-Formeln) oder komplett überschrieben werden. Und der Wert, der jeweils oben ankommt, wird in der (seitlichen) Liste angezeigt und dann auch für den Druck verwendet. Wenn man nicht vorhat, eigene Drucker- und "quality"-Profile zu entwerfen, ist letzteres auch das einzige, was man braucht. Das ganze System ist einigermassen komplex - aber auch sehr flexibel. Es muss auch nicht jede einzelne "Schicht" existieren - "Intent"-Profile gibt es z.B. nur für die neueren Ultimaker-Drucker. Wen es interessiert: hier ist beschrieben, wie der ganze Stapel aufgebaut ist: https://github.com/Ultimaker/Cura/wiki/Profiles-&-Settings
-
A possible solution to PVA nightmares or a non starter !
tinkergnome replied to Rharrison's topic in UltiMaker Cura
With Cura - the "support interface" can be used to achieve this. Basically - "Enable Support Interface" and use the PVA-Extruder only for this specific part of the support - something like this: A link with some more pictures: https://mathgrrl.com/hacktastic/2018/03/dissolvable-support-interface-is-all-you-need/ Edit: it was not ignored, quite the contrary - it's a common practice nowadays.
-
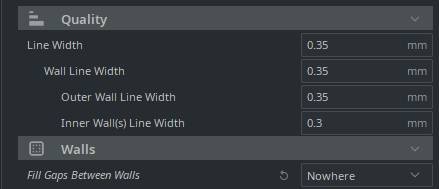
The setting is called "Fill Gaps Between Walls". That's the "small [yellow] strip" in preview. Set it to "Nowhere". Yes, choose proper values for "Outer Wall Line Width" and "Inner Wall(s) Line Width". The goal is an even number of lines without gap. That's all.
-
Frage Düsentemperatur beim automatischen Leveln einstellen
tinkergnome replied to Haeder's topic in Deutsch
Ich vermute stark, der Drucker entnimmt dem gcode-Header nur die Material-ID (EXTRUDER_TRAIN.0.MATERIAL.GUID) und verwendet dann die Temperatur, die in seiner eigenen (Material-) Konfiguration hinterlegt ist. Die Drucker-Konfiguration sollte sich automatisch mit den Material-Profilen in Cura synchronisieren, wenn der Drucker in Cura verbunden ist - und wenn ich das Prinzip richtig verstanden habe... (das betrifft nur die Material-Profile - nicht die Druck-Profile) Vielleicht ist das eine Möglichkeit, die Temperatur anzupassen. Die Material-Einstellungen im Drucker kann man sich zur Kontrolle auch mit der REST-API herunterladen. -
Can't turn on the heatsink cooling fan via the command line
tinkergnome replied to bassamanator's topic in Firmware
It is (perhaps) still possible to set the pin state manually with gcode M42 - if you figure out the pin number that refers to "FAN2_PIN" https://marlinfw.org/docs/gcode/M042.html -
Problems with cura not printing some of my model
tinkergnome replied to JOMS's topic in UltiMaker Cura
It does not work because the model has no wall thickness at all. It's a non-manifold geometry and therefor cannot exist in the so-called "real world". 🙂 I don't know the software you use, but you should read about how to create manifold geometry for 3D-printing. For example: https://www.sculpteo.com/en/3d-learning-hub/create-3d-file/fix-non-manifold-geometry/
-
Because you don't mention it and the router is new: Be aware that the printer can't connect to a wifi that works in the 5GHz band. You need to setup a wifi channel at 2.4GHz for Ultimaker printers. In addition: Printer is obviously a bit picky about the name of the wifi (SSID):
-
That said... I'm not sure, but you can perhaps achieve something with the "expansion" settings. Perhaps in combination with the scale tool... dunno. It's no replacement for a proper CAD application, but it's at least ...something 🤷♂️

-
Yes - as i said - the geometry of the part is defined by the loaded model. Cura does not change this. What you probably call a "box with walls" can also be seen as "cuboid with a cavity"... The term "wall" has a different meaning in Cura. Think of a "wall" in Cura as the shell around the given model. Or translate "wall thickness" to "horizontal shell thickness" if you want. It's easier to see for models without cavities but the principle stays the same:

-
Cura slices multiple horizontal surfaces into one surface
tinkergnome replied to laurabrightmoon7's topic in UltiMaker Cura
a brief instruction: - check the normals (first learn about the SketchUp concept of "front" and "back" surfaces) - in SketchUp "dark gray" indicates the back side of a face - reverse all faces that are not displayed in white (context-click and select "Reverse Faces")


