


neotko
-
Posts
4,788 -
Joined
-
Last visited
-
Days Won
94
Content Type
Forums
Events
3D Prints
Posts posted by neotko
-
-
Anyone knows if this make sense?
I been having a big problem with my 1.75 mod, it's that the bowden keep being pushed out from the head.
So I though that the tension that the filament was putting was too much for the long bowden because, well that 67 bowden it's designed for 2.85mm filament.
So I did a simply rule of three and that gives me 41cm.
Also I choosed to print a new bowden clamp from youimagine, changed so I could fit my spare pushfit.
The weird think it's that now the bowden hasn't move not even a milimiter, it stays put (so far 3hour print). Maybe it's just luck, but seems to work...
So.. Does it make sense?
-
IRobertI that video deserves a big thanks! Seems I forgot a lot of washers

-
I would love a forum part with people offering their services to sell led kits, fan kits, side/front doors, modded power supply, etc etc etc. Ofc this opens the problem of people complaining to others of their products didn't work. If someone with skills offer their mounted solutions (or ready to mount) and they point to ebay then the problem of people getting angry to others might disappear since ebay has all the tools to follow up the sells/payments.
I just have the felling that there are too much that can be done, but unless you google for it you don't find it, a forum with different users doing stuff, would be really cool.
-
@Conny sorry to bother again, but... What glue you used to stick the ptfe to the ultimaker bowden? I have try 3 different ones I could find without any success, the force it's too strong and they end unplugging from one or the other side. I have order a special ptfe glue to try... Thanks!
-
Hola, muy buenas! Un nuevo usuario de ultimaker por aquí. Yo me la he comprado en imakr totalmente montada. Lo bueno es que te resuelven ellos las dudas técnicas bastante rápido (en ingles claro). Me pillé la umo+ y la tengo funcionando desde hace dos semanas, muy buena impresora la verdad.
La mia la he modificado para 1.75mm de filamento, pero creo que cuando acabe con las pilas que tengo de filamento volveré a ponerlo como estaba, he tenido problemas de los más raros, y ademas hay pocas cosas fáciles de hacer para ponerlo bien. Ayer por ejemplo casi sale disparado el bowden que le puse (6mm 2mm) por que el sistema de sujeción de la ultimaker está diseñado para un bowden ligeramente mayor y ahora estoy viendo como hacer para meter una válvula sin tener que ponerme a hacer nuevos agujeros y tal. Imprimir imprimo, pero claramente lo mejor es no toquetear demasiado algo que lleva años de desarrollo.
Total, aquí un nuevo usuario de ultimaker en madrid.
Saludos!
-
Hi,
After almost a month reading the forums and checking the many addons that can be printed, installed, cut&pasted on the printer, I was wondering about this idea.
Maybe, just maybe, Ultimaker (the company) could do a Beauty Shop, with a curated selection of the top of the top modifications.
I mean.. Imagine you buy an Assembled UMO+ (like me) but you don't have time to put some 'angel ring led lights' or a full strips of leds so you can see what you are printing on the night.
This way, you could go to the Ultimaker Beauty Shop and buy a easy-totally-soldered-led ring, that you could place on your board. You know, like a 'pimp-my-ultimaker' shop. You could get fancy extra electronics that you would only need to print the image they point you to.
I know you can find the molex, do some soldering (I did it) but that takes time and I'm sure even when we love to have a machine that can be mod so much, sometimes I'm sure someone would love to just 'buy' and plug.
I'm sure there are other cool stuff that could be sold on a beauty-pimp-my-3d-printer shop. Maybe a full rasperi totally prepared so you can print via wifi, or a solution of wifi+camera doing auto shots and being uploaded to a personal gallery to follow up that long long prints (on high quality off, this is a really fast machine). Or maybe Sliding doors that one can put on the sides and make the printer more 'dust' protected.
There are toons of this solutions ready to be 'diy' by many great ultimakers, but, do you really have the time to get some wood laser cut, assemble the stuff, buy the screws, etc etc? Well I'm sure not everyone can spend hours tuning this beautiful printer.
So this is my idea. It would rock to have people that do solutions for other users, and that they could sell them to others. This way the guy that loves to do a diy can make a penny.
I bet Ultimaker don't have resources to do this atm, but probable we could have a forum where others offer their services and charge for the labor? Don't know.
What I do know it's that it would rock to go ultimaker and check on 'pimp-my-ultimaker' (not this name offff course) and get a led kit that I could just stick and plug... Or maybe that beautyfull heater block that some guy made for the UM2 that can use E3D nozzles...
Cheers =)
-


Hi. After 6h print I got some shifting on X and Y. I'm not sure how tofix it.
Ofc I have read all the info about and seems that could be the little belts of the x y motor. The other 4 belts have good tension. How can I tight that little belts? Do I need to unscrew the motors in order to push them down?
Sorry but I got my UMO+ assembled so I don't know the little how-to-does.
Thanks!
I printed with 'Fast' settings on Cura and only edited the filament diameter (1.75mm and the shell thickness 1.2mm). At the hour 2 I changed the print speed to 125% from the ulticontroller.
(I selected 1.75mm filament cos I use that filament with other mods to support it and works fine)
-
Yesterday finally finished mounting the IRobertI feeder on my UMo+. So far (only printed the robot) all works great. I'm using it to load 1.75 filament. I used a MK7 on the motor and 104,6 esteps (If i remember correctly). So far perfect print with no underextrusion.
I had to put a plastic nut so the bearing fits the screws I had and used a M10 tap to use my pneumatics on the bowden (I could have modified the 3d to make it easier but I had all dismantled). The youimagine um1 holder I had to 'cut' so my screws work.
It's there any speedtest outthere for 1.75 filament? The gcodes i find are for 2.85
Btw great design IRobertI
-
-
Yesterday my printer started to do this sound. It's almost brand new, it's oiled and this sound doesn't repeat when I manually move the axis.
https://www.dropbox.com/s/1xvyxuhz7egzsr9/IMG_2836.MOV?dl=0
Anyone knows what's that high pitch squeaky sound?
I can't pinpoint the source, it's like it comes from within the hotend, not sure :S
The machine it's an UMO+ with only 20h of use, also it was sewing machine oiled when it arrived.
The only think I touched was the bowden, I have been printing with 1.75 (not now), and yesterday I went back to the original bowden and 2.85 white pla and then this sound started (edit: it started to sound loud but it did 'sound' a bit). Pryor this video, I had a print failed of 12h, the bowden did just 'blow' out of position. I did put everything back but the sound it's still there.
Btw I had this sound two days ago also when printing with 1.75 (other bowden and connection), so I'm really lost on 'what can that sound be?'...
Edit: The other think I touched on this machine it's that the wooden caps where not 'tight' and did became a bit woobly after a few hours printing, I asked Imakr (where I bough it and they assembled it) and they told me to tight them and I just did and they don't seem to wooble for now.
-
Hi,
When using full mode on the forum with my iphone the images uploaded to the gallery are rotated 180 degrees.
Seems it's fixed or it just don't happens anymore. The last uploads where perfect. Thanks!
-
Today got my first problem, the extruder stop pushing filament. After a few seconds of not knowing what was happening I did check my 3mm/2mm ptfe that was inside the bowden and it went 'further' in than the normal bowden. It was inside the thermal insulator, something that sooner or latter was going to happen (because I didn't glue them).
Luckyly today arrived my new ptfe 6mm/2mm (it was hard to find on europe but a week ago found 2 shops that got it on stock). After meassuring the ptfe and cutting it (with a exacto knife, scissors bend the tube but the exacto did a clean cut).
So finally I'm printing again, I though was the extruder but it works like a charm.
Anyhow I have order a "MK7-compatible Drive gear 8MM shaft" that I plan to put on the M8 Drive bolt, this way (in theory) I wont need to ajust anything else, maybe the Esteps, but that will be a fight for another day
-
Well everything it's working fine now. I just pused a ptfe 3mm/2mm OD and left a bit out, enough so if pushed it fits, so the ptfe doesn't move once the bowden it's closed. So easy
The idea of using a printer feeder did fail miserably, not only the design has very big flaws (like it don't get's a nice grip to the printer or the BOM don't tell what to use to grab it to the printer, anyway I just used the one that comes with the printer, and men, that Ultimaker Original Feeder do work pushing 1.75 without any problem. I just got my first little robot at 0.060 and it just looks soooooo nice. The 1.75 conversion it's so easy I can't believe it.
This printer it's amazing, the quality it can do did blow my mind with ideas of stuff to print
Now I need to repair the X alignment, I just got my first failed print with the well documented problem 'Shifted layers'. I have tighten everything but after checking with a caliper, clearly there's a 0.50mm/1mm difference on the Y/X alignment. But because I don't have my calibration sticks... I'll try to print something at low quality and hopefully I will be able to align them for good.
Again, Ultimaker it's just amazing. Not only this community it's really active and there are some great 3d minds hovering around it, but also the printer does kick ass.
Now I have to wait for my Dual Extrusion Kit. Imakr did send it, but the pack didn't had one of most important parts, the full nozzle XD So I have the feeder, some wood parts, cable.. But no nozzle/isolator,etc.
Oh btw...
I did plug a 280W power supply, modifying the conector, and it just rocks. Now it has have enough power to move a small robot.
-
Thanks worked like a charm (after I was able to learn how to compile and bla bla)
-
One think... That github on my UMO+ made the Z went bananas, literally. After uploading that one (minor modification on configuration.h) the screen went blue, and when I did press the button the Z went straight down to hell (well it tryed)
So, that one don't seems to be the UMO+ firmware...
I was able to restore firmware with cura.
The firmware github that DID work, (screen working, and no Z banana) was:
https://github.com/Ultimaker/Marlin/tree/Marlin_UM_Original_Plus
This one loaded without problems (after removing some items from arduino as daid commented on others posts).
Edit: Well it loaded, but I have not tested if it prints XD Cheers
-
Hi,
I just modified my feeder so I could use 1.75mm, it's extruding pretty ok but in reverse... (the feeder isn't the one that comes with the printer).
So I have 2 questions for the experts out there...
To Invert the Extruder Motor, do i MUST compile a custom firmware?
And... If that's the case... What I need to edit on the firmware so the Extruder motors go inverted?
It's this on configuration_adv?
#define INVERT_E_STEP_PIN false
Thanks m(^o^)m
-
ôo ok.. I though that .. Mostly after reading a post you did loong ago?
If I can quote you...
Details on why the UMO+ and Dual kit won't work:
* Dual kit does not contain an extra PT100 for temperature measuements (UMO used a thermocouple)
* Dual kit contains a 19V 40W heater, while the UMO+ uses 24V
That for me, and sorry if I didn't got it right, means that the heater that it's for the UMO "won't" work on UMO+... But if that's not correct... Then I have wasted 34€ on a 24v heater...
-
Heater Cartridge for Ultimaker Original it's listed as
"This part is also included in the Hot End v2 bundle. This product is compatible with the Ultimaker Original and the Ultimaker Original+."
The specs "Heater Cartridge 18V 40WDelivery: 5-10 working days."
Ultimaker Original + uses 24v Heater Cartridge from Ultimaker 2
But the Heater Cartridge for UM2 says "ONLY compatible with the Ultimaker 2." and the specs are "24V 25W"
As far as I know, that info it's wrong. Correct me if I'm. Cheerss
-
If anyone need a HBK I have one (unopen brand new) but Im on Spain.
-
Problem it's that the x/y are visually out of alignment on my ultimaker so I can't print yet. I'm gonna make this weekend a simple alignment tool with lego (got like 2 boxes of technics)
Great info on the clamp, didn't saw that photo, that does clear thinks up
That microwave tensioner seems kinda cool, and neat the idea to be able to place more in the future using very little space.
Thanks a bunch!
-
Well maintly because the cash on opened and unopened 1.75 filaments.
The advantages, as far as I know, after searching for info on how to do it, seems to be that the amount of filament that's on the head it's less, so less mass on the nozzle, that should reduce the oozing. But probably the issue could be that the motor needs to move more to push the same amount of filament...
I really have very little idea XD
But the easyer way to do it, without gluing ptfe 3mm/2mmID, as far as I could find on internet, it's a buddas ptfe that it's 6mm/2mmID, this way, you don't glue stuff on the bowden, but also isn't easy to find.
So umm advantages... For me, lots of filaments (and the 'cool' ones like wood and colorfabb,formfutura, etc). Technical advantages, no real idea.
-
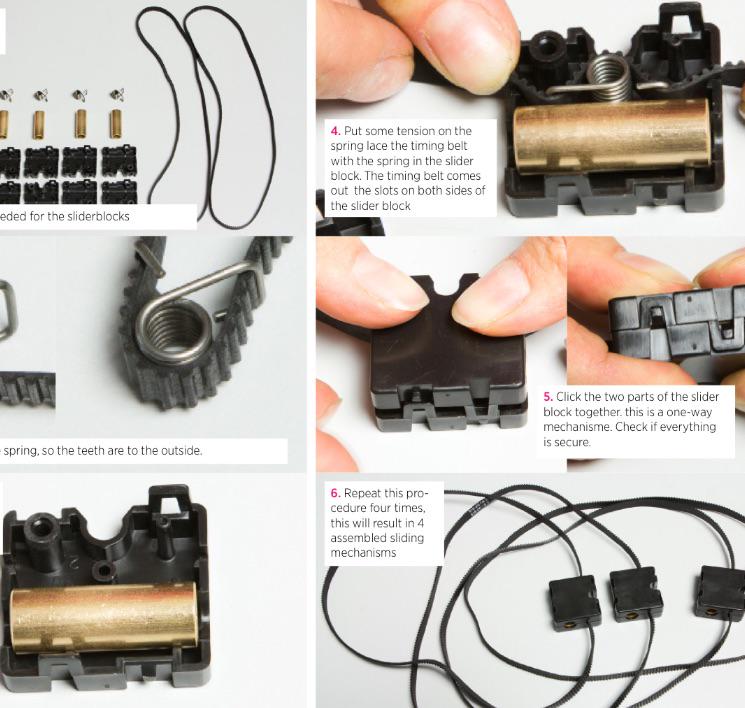
Ok I found the 'documentation' on that Timingbelt spring...
It's ofc, on somewhere else, on the Ultimaker 2 Assembly Manual
um2 assembly manual V1.1 _english.pdf
So I place them just outside like any other tensioner from youimagine or it's better to open everything?...
Btw if anyone can tell me where the Metal cable clamp goes...
-
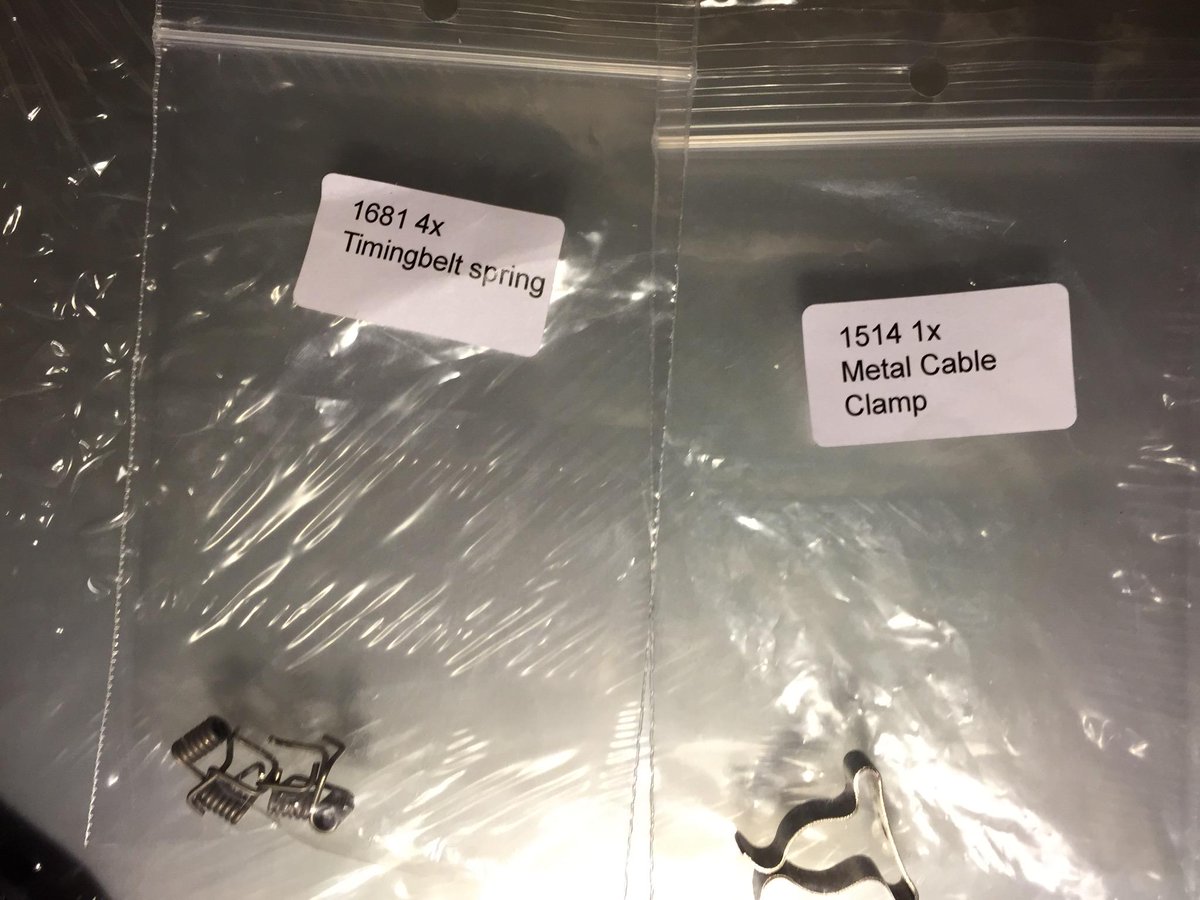
Hi I just got my UMO+ from Imakr (assembled) and they left me 2 bags with items. The 'timing belt spring 1681 x4' and other think.
Where exactly must I place it? Any photo for a bignoob like me?
Also. What is the 'Metal cable clamp 1514 x1'? And where does it go?
They forgot to put the calibration sticks that are used to align x/y so for now I can't print
Edit. Photo of the 2 little bags
-
Yeah. I just found a de shop with the um2 heater on stock and also I bough a power supply from the same company that the UM2 stock (but other with 280W). Also a connector that the board uses so I can do a clean cut and plug. On specs the max amps on that connector (R7B but the real name it's KPPX-4P) are:
4 Position: 48V DC 7.5A Max. For All Pins
http://www.mouser.com/ds/2/222/KPPX-365228.pdf
That for me sounds like it can support a lot of powa

Changing lcd timeout
in UltiMaker Cura
Posted
Hi, I have an UMO+
I want to change the timeout, the lapse of time that it takes from 'doing nothing' to 'going back to the main screen of the menu' on the ulticontroller
I think I found the line of code that changes this?
ultralcd.h
#define LCD_TIMEOUT_TO_STATUS 15000
Its this what I need to adjust? And.. that 15000 are milliseconds?
Thanks!