


gudo
-
Posts
210 -
Joined
-
Last visited
-
Days Won
17
Content Type
Forums
Events
3D Prints
Posts posted by gudo
-
-
Oui, j'ai essayé avec des modèles téléchargés et cela ne fonctionne pas non plus...
D'où l'idée que cela venait peut être du firmware
Bonjour !
Peut être problème de bug sous Mac avec la version Cura 2.7.. !?
Charges la dernière ancienne version de Cura : 15.04.6 pour voir,
https://ultimaker.com/en/products/cura-software/list
cela permettra au moins d'écarter le firmware de la liste en cas ou ça ne marche toujours pas.
Et directement Print via USB cela donne quoi ? cela permettra de savoir également pour la carte SD ?
-
 1
1
-
-
It 's really a shame that Cura did not think to allow the Ironing application to specific layers during the print and not only on the last top layer which in many cases is not necessarily flat, as the sample here, or as thousand of others print models designs !?
I'm pretty sure the ironing is applied to every flat surface

you can see the thinner neosanding lines on both these flat surfaces on the same part
Hi catohagen !
Good point , you're right !
I apologize to Cura , it's smarter than I thought, as I did not see any layers options in Ironing's settings, I thought that by default it would concern only the final top layer of the print.
It works quite well, the result is not yet perfect time to practice more this feature and its settings !

-
1
-
-
Sure nilrog you're right ! I had thought to this too, it was just for discuss...

-
1
-
-
Hi !
without panels or additional cross reinfort tubes, despite a very tight corner junctions, with time any extruded aluminium structures would move as a 3D deformable trapezoid !

-
1
-
-
With all these mods, the only original part remaining is the frame...
So why not designing a frame as well so we can build the printer from scratch ?
Hi amedee
Yes it's what is planned for the final

-
3
-
-
Hey Gudo, very nice build!
I also like the way you solved the object cooling fans, I have to copy that
Anyone has ever tried UM Marlin on a corexy setup? ...I did a year ago. Transformed UM2 having corexy inside the frame, while using standard UM2 firmware. I did have some problems with "define Quick_Home". You should not use this option in combination with corexy.
I'm also thinkering on dockable um3 cores. Downside of using ultimainboard, is having only 2 heaters available (+build plate ofc). While using corexy, there should be many more cores inside...
Hi and thanks EdgE !
As it's very modular this cooling fan design could be applied to any print head system.
For the coreXY project I'm not yet at the firmware management stage but I think yet that there is a good alternative that is the Duet3D which could do the job without having too much headache !
neotko already uses it on its machine, it looks interesting !
-
1
-
-
Hi to all !
Mark2-Dual ZGE more and more tests.....
Cura 15.04.6 vs 2.7 version, with same basic print settings
old Cura 1h28
2.7version 1h49
here the result before post cleaning of the print test done it seems a bit better on the right with Cura 2.7 vs the left sliced with the old 15.04.5 version, better temperature control !
It 's really a shame that Cura did not think to allow the Ironing application to specific layers during the print and not only on the last top layer which in many cases is not necessarily flat, as the sample here, or as thousand of others print models designs !?

BTW thanks to Lara Steele the author of the dragon design dowloaded from Thingiverse, I just customized the round base.
-
4
-
-
@gudo can you add the "core version" files to the dropbox? like to have a look at them ... very tempted to give it a try.
Hi ultiarjan
Ofc I can! it's really worth to try, it will more reliable than the UM2 hot end
I 'm in updating the design files for improving more some details noticed when testing, just wait a few days, time to complete the folder, included step, bom etc....
-
2
-
-
Cool ! your UM 2Go takes a big head ! it's now it " the Big Brother " of the UM3

-
of course neotko ! The subject here is the Mark2 Dual ZGE, it was just an ad effect when the project is more advanced I think it will be necessary to open a post specially for that
-
1
-
-
neotko we are a winner team !
and in very soon , the UM XYcore system !
Yeahh! CoreXY UM system upgrade... Now that gonna be a fun ride!
the future to complete the whole UM heavy mod !
May be we will need a serious Main board to manage all this, a Duet3D for sample ?


-
3
-
-
Impressive! Well done...now I wish I had an UM2
You know...
New short belt pulleys (a-la um2 gt2 single dual pulley)
New Z endstop
New gudo-neotko-beyond slideblocks
Done

neotko we are a winner team !
and in very soon , the UM XYcore system !
-
4
-
-
Thanks to you all !
@ catohagen
I think Ultimaker should hire Gudo !Hummm!.... we are always more creative when we have small means and we can think more freely !
btw, today I tested an anti oozing device, it seems it works great, more long time print tests will confirm.
The device consists on the use of a 0.08mm very flexible metallic strip on which the noozle tip comes to rely at the docking postion, as after docking retractation there is no pressure, the very very light metal contact, less to 2 grs. pressure force on the nozzle tip, is enough to stop the eventual material dripping during the docked head standby, the metallic strip contributes also to cooling down a bit the nozzle tip temp. and its hight flexibility with light contact prevents tip erosion issue.


-
3
-
-
@gudo just need to say I'm as always impressed by your designs!! love it !!
Thanks much ! your appeciation rewards all efforts.
-
1
-
-
Hi to all !
Thank you neotko for the introduction, also thanks for the support and help of the entire Mark2 team, sorry for not mention all the names, you will easily recognize.
As you can see, the goal was to adapt the ZGE DD extruder to the Mark2 magnetic tool change, for reasons of room in order to install a Dual ZGE, it was necessary to review and modify the Mark2 magnetic tool change system , print heads and routing while respecting as closely as possible the the Original Mark2 operations.
It was necessary to install a second docking holder mirrored with the front right docking at the printer's left front, which necessitated modifying the magnetic tool change routing while retaining the possibility of exploiting the Mark2 firmware in almost its totality. This firmware tool change modification was realized, as usual with great success by Tinkergnome that I will never thank enough!
In order for the ZGE use, to retain the print head and to ensure a very sure clamping of it , a magnetic locking/unlocking lever system has been set up, the lever exploits the magnets force more as springs to stay mechanicaly in locking position, it’s impossible to remove the head without turning by hand or by the unlocker docking key the head locking lever, so the magnetic tool change, while staying very smooth, needs much less force to dock/undock with no risk of motor micro misstepping issues or anything else.
Also the fact of being able to dock the 2 heads, it has been logical to provide to that a single common cooling unit which stays attached to the gantry.
This has given some advantages such as, less loss of print aera and the same weight is always supported by the gantry, a same print speed could be set if the materials are identical to the 2 print heads…,
Print head Offset at less 0.5 mm tolerance
X : +/- 18mm
Y : +/- 0mm
Z : +/- 0mm
For all the rest the dual mode settings and operations are completely similar to the original Mark2
The result is quite satisfying, the Foehnsturm magnetic tool change really opens very interesting prospects and also for future the use possibilities of tools other than the FDM print head.
Sorry for having not made the system with the wellknown UM2 hot end, as I got 2 UM3cores thanks to neotko ,I was very curious to tested them, contrary to all the uncertainties, I can say that it works wonderfully ! . Anyway any decent hot end could work with the system under condition to make the appropriate hot end holder adaptation.


-
10
-
-
Un blower a tension équivalente génère plus de pression qu'un simple ventilo qui ne sert lui qu'à déplacer l'air.
Bonjour à tous !
pour faire court et confirmer les propos de darkdvd
surtout tout en étant plus efficaces c'est nettement moins encombrants

-
2
-
-
Here a printing result of a 2 colors tree frog by nervoussystem, it was sliced by Cura 15.04.6 with prime tower option
0.4mm layers at 50mm/s print speed, PLA material at 200° print temp
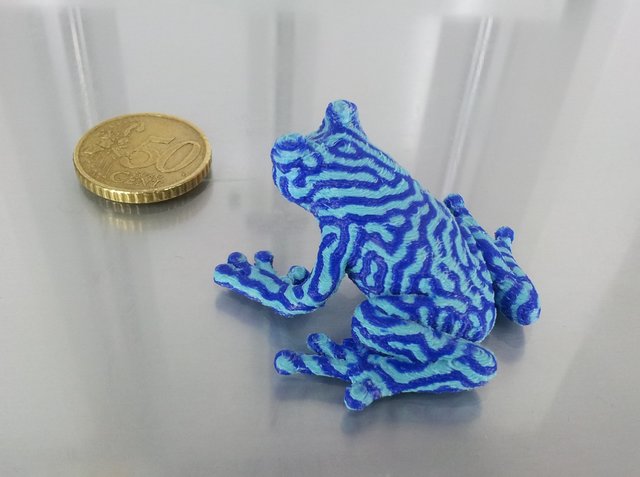
Looks like the light blue material was slightly too hot?
Hi !
Yes you have a good look, I thought so too!
200 ° is not so exaggerated for PLA Polymax ?
it's a old spool that I had in stock for a year, I think it has degraded and in addition, as the tool change sequences are very short, with the slight overshooting during this it oozed very easily.
-
sorry ! I wanted said
0.4 nozzle, 0.1layers
-
Here a printing result of a 2 colors tree frog by nervoussystem, it was sliced by Cura 15.04.6 with prime tower option
0.4mm layers at 50mm/s print speed, PLA material at 200° print temp
-
2
-
-
And about the printhead moving to the center of the bed before moving to the prime tower. did anyone find a solution for this? It's indeed annoying...
Hi to all !
Yes ! it's indeed very very annoying, it kills completely the prime tower interest.
I tried to apply the Mark2Tweaks.py pluging, it doesn't work for me, may be this could work for someone else ?
Dear Gudo,
i just tested S3D 4.0, and there, the head moves as it should. To the ooze shield, not the center of the printbed.
I also tested Cura (2.7.2 B), and even if i put the prime pillar in the center, and the print at the rear left position, it goes to the print BEFORE it goes to the prime pillar.
So i assume it is a Cura thing.
What software version, and what X and Y start positions do you use?
Hi RudydG
Yes it's a Cura thing !
It's interesting to know that could works fine with S3D, I use actualy Cura 15.04.6 and 2.6.2.
With the 15.04.6 version, the head moves directely to the prime pillar despite that this one is not on an ideal location, it's on left back side of the printing part, anyway it works better than with the 2.6.2 version with much less printing time !!
I use a customized XY start position from the middle front it's adapted to my ZGE direct drive use.
-
And about the printhead moving to the center of the bed before moving to the prime tower. did anyone find a solution for this? It's indeed annoying...
Hi to all !
Yes ! it's indeed very very annoying, it kills completely the prime tower interest.
I tried to apply the Mark2Tweaks.py pluging, it doesn't work for me, may be this could work for someone else ?
-
Hi to all !
Hi paul9 !
Have you tried calibrating the extruder to see how much your outing outI think bob-hepple is right,
Independently of the material diameter use,
The extruder Estep calibration was the first thing to do, it's easy to do if you use the Tinkergnome firmware. ( hightly recommanded)
If use the UM2+ Extruder , here the process
With the rotary button, clic on Tinker control board
Advanced
Preference
Motion settings
Axis steps mm
clic on E "nnn.nn" the value indicated (note this)
clic on it to change it by this new value : 341.62
do not forget to clic on "Store" before go back
Done !
This will be a good average base, (may be it will need to adjust a bit if use the Tom's guide process for sample)
Here the math formula
Esteps/mm = (Nr.motor steps rev * Nr.driver micro steps) * (Nr.big gear teeth / Nr.small gear teeth) / (effective grooved gear diameter * PI)
Extruder UM2+ - Nema 17-200-16 and 36T/11T reduction gears
Deep groove gear diameter 9.75mm
(200*16) * (36/11) / (9.75*3.1416) = 341.62
-
sorry for not having a better pic

-
wtf? What is that? Take that spring out. There shouldn't be a spring there. I think someone played a joke on you? Do you have a 3 year old who puts things in places?
Hi to all !
It's not a joke !
I don't own an UM3 but I had the opportunity to disassemble an UM3 print head
this spring exist, it serves to keep well in pressure the 2 level switch parts,
something goes wrong for the Orange_42 case, the spring went out from it position, For an unknown reason, I think it turned while screwing out through the hole ?
it will need to open the top head to reposition it under the condition that there is no level broken parts,
Without this spring the level switch would not "switch" perfectely.
-
2
-


problème d'impression "area out of printing"
in Français
Posted
petite précaution à prendre, à moins qu'elle le soit déjà par défaut, la carte SD doit être formatée FAT32