


yyh1002
-
Posts
95 -
Joined
-
Last visited
-
Days Won
7
Content Type
Forums
Events
3D Prints
Everything posted by yyh1002
-

DXU - Efficient Dual Extrusion Upgrade for UM2+
yyh1002 replied to yyh1002's topic in Third party products & modifications
Sorry I didn't see your comment earlier. You can use 2*4*1.5 PI insulator and the original 2+ feeder with 2*6.35 tube with DXU. In the BOM I try to list a generic link where possible. Only when the parts are very rear, I specifies the Taobao seller. All the parts from the taobao seller are very good quality, you can absolutely by all possible parts from them. I have the same question as burdickjp. Why do you need to replace the original heat break with the all threaded one? -
DXU - Efficient Dual Extrusion Upgrade for UM2+
yyh1002 replied to yyh1002's topic in Third party products & modifications
I asked the seller. PI insulator is still available. The stock from now on is 2*4*1.5, which also works with DXU. -
DXU - Efficient Dual Extrusion Upgrade for UM2+
yyh1002 replied to yyh1002's topic in Third party products & modifications
Thanks. Software side it works basically the same as Mark 2, hence similar CURA and E3D profiles. Nice post. The 1.75 hotend runs with a custom 6.35 OD 2 ID PTFE bowden tube, sold by the same Taobao seller. The major advantage of this PTFE hotend is that there is pretty much no chance of nozzle jam or clog for PLA even with frequent long retractions. With the PI insulator ring applied, the PTFE last much longer and can also handle high temp materials. As for using E3D heatbreak, the current heatsink probably won't be able to cool it down properly because the surface area is much smaller. You can consider trap a piece of 6.35 OD 3.2 ID or 5 OD 3 ID PTFE tube inside the heatsink. I think the 4*3 PTFE would deteriorate pretty quick due to thin wall thickness, and it is also too soft to hold up to the compression from filament. Making 1.75 and 2.85 hotend components swappable isn't all that necessary. You would need to make compromise on both sides to achieve that. I think it would be better to make two entire printheads with 12pin connector for quick swapping. That would be much less hustle, much more reliable and cost very little. -
DXU - Efficient Dual Extrusion Upgrade for UM2+
yyh1002 replied to yyh1002's topic in Third party products & modifications
Sorry, it was left out by accident. It's now there. -
DXU - Efficient Dual Extrusion Upgrade for UM2+
yyh1002 replied to yyh1002's topic in Third party products & modifications
Misalignment is one factor. IMO it is also because the short bearing is off center and the dock apply quite some force to the head during nozzle change. The force transfers to lateral load at the bearing. Looking at example applications of LM6 bearings, a single short bearing for one axis with such a thin rod really seem to be pushing the limit. Ultimaker did a good job getting it to work with their quality control. For individual tinkerers I would try to avoid this situation. -
DXU - Efficient Dual Extrusion Upgrade for UM2+
yyh1002 replied to yyh1002's topic in Third party products & modifications
You can totally try the existing version first. Short bearing should last at least several months. For the blower fan, 3015 works as good as 3510 thanks to more accurate duct aiming the nozzle and better fan shape. -
DXU - Efficient Dual Extrusion Upgrade for UM2+
yyh1002 replied to yyh1002's topic in Third party products & modifications
I pushed v1.5 update on GitHub. It is mainly to replace the 19mm short bearing with a long one for better reliability. Changes: 1. Both X and Y bearings are now both 35mm long, same as the original UM2 printhead. It is more stable and reliable. The previous 19mm Y bearing had a few downsides: only misumi sells ones with sufficient build quality, they wear faster than long bearing, etc. To make proper space for the long bearing, I had to increase the X offset of nozzles from 18mm to 19mm, and the housing from 35x35 to 38x38. This resulted in 2mm less X print area but it is well worth it. 2. New fan shroud design. Blower fan changed from 3015 to 3510. Homemade aluminium cover by soda can at the bottom. The fan shroud can be printed with lower temp materials such as modified PC (heat resistance of 90C). 3510 12v fan is easier to source with more consistent stock. For those of you who already bought the 3015 fans, there is still a fan shroud variant to use 3015 with v1.5. 3. Hotend fan changed from 2510 to 3010. Not really for performance improvement. 3010 5v is much easier to source and cheaper. 4. Lever dock is simplified with only one tab. This gives the lever freedom to sweep back at full speed, not limited by the travel speed of printhead. Nozzle 2 falls back to it's position with optimal momentum. 5. BOM is hence modified with the new fans and bearing. The hotend, spring and bolts stays the same. 6. Firmware update for v1.5 moved to dedicated repository. I may or may not update the assembly images because people can still figure out how to assemble v1.5 based on the original images. I'll upload the jig and instructions for making the aluminium bottom cover later.

-
DXU - Efficient Dual Extrusion Upgrade for UM2+
yyh1002 replied to yyh1002's topic in Third party products & modifications
Cheers Wow, that the best PEEK print quality I've ever seen. -
DXU - Efficient Dual Extrusion Upgrade for UM2+
yyh1002 replied to yyh1002's topic in Third party products & modifications
You can check out this post for the difference. Firmware 17.10.2 is for v1.1 update. 17.10.1 is the original. -
DXU - Efficient Dual Extrusion Upgrade for UM2+
yyh1002 replied to yyh1002's topic in Third party products & modifications
I only created the Z calibration model. The XY calibration model belongs to Mark2. -
DXU - Efficient Dual Extrusion Upgrade for UM2+
yyh1002 replied to yyh1002's topic in Third party products & modifications
Some recent timelapse and photos of DXU.

-
DXU - Efficient Dual Extrusion Upgrade for UM2+
yyh1002 replied to yyh1002's topic in Third party products & modifications
You are welcome. I updated the BOM with the specific options to avoid confusion. -
There is no fundamental difference with firmware. I changed a few things for the hardware and my preference. To name most of them here: 1. Movement for nozzle change is slightly different. 2. After switching nozzle, the head heat up next to the dock and go directly to print. It skips the move of going to front prime position. 3. Y reach and bed levelling position are no longer related to dock position. 4. Changed temperature tuning limit from 25 to 99. 5. Limit the filament forward speed by max feedrate setting.
-
DXU - Efficient Dual Extrusion Upgrade for UM2+
yyh1002 replied to yyh1002's topic in Third party products & modifications
Normally the seller is very responsive, something probably went wrong. Taobao is a local marketplace, unlike Aliexpress. Sellers ship items overseas through the Taobao's official parcel transfer service. Sellers normally don't directly sent international mail. It's possible that sometime the order is not placed correctly. If you would like to PM me your order number, I'm happy to check with the seller what's going on for you. -
DXU - Efficient Dual Extrusion Upgrade for UM2+
yyh1002 replied to yyh1002's topic in Third party products & modifications
I think you might need to swap the plywood sliding blocks with UM2 nylon blocks because the cross shaft on UMO is the other way around. No need to get the UM2+ extrusion upgrade. 90% of the parts on printhead are useless for this setup. -
Thanks! This is exacty what I need. I’ll see if I could get it to work. Web interface is handy to send prints, but if I stand in front of a print and something goes wrong, it’s not as quick to cancel on LCD.
-
Hi tinkergnome, I've recently started printing with Octoprint. I'm directly using web interface without touchUI and additional screen. The firmware works really well with all the tuning options in LCD. The only main options missing are abort and pause. I'm trying to be able to abort print from the LCD menu. I did some searching and it seems impossible to communicate back to Octoprint for these commands. But could there be a work around such as telling the printer to disconnect from Octoprint/USB so the printer act like abort print? Thanks a lot! Ryan
-
DXU - Efficient Dual Extrusion Upgrade for UM2+
yyh1002 replied to yyh1002's topic in Third party products & modifications
Congrats on being the first to make it from overseas!(except for me;)) -
DXU - Efficient Dual Extrusion Upgrade for UM2+
yyh1002 replied to yyh1002's topic in Third party products & modifications
I pushed some minor updates to the DXU as v1.1. 1. Moved the dock to the right back corner. If there is imperfection of dual print due to filament conditions, the marks will be on the back of model instead of front. So slightly better print outcome in some cases. The contact of lever and dock while doing bed levelling is gone. The dock liner for drilling is updated with a diagram of how to use it. 2. Added the link of PI insulator to BOM. PI insulator is to be installed between the PTFE tube and the nozzle. It allows printing of up to 290°C. 3. Filament fast forward speed now limited by max feedrate of E. Fast forward speed is now controlled by max feedrate in the menu instead of steps/s in firmware. It is more handy for switching to other stepper driver with lower steps/s limit, such as TMC2208.
-
DXU - Efficient Dual Extrusion Upgrade for UM2+
yyh1002 replied to yyh1002's topic in Third party products & modifications
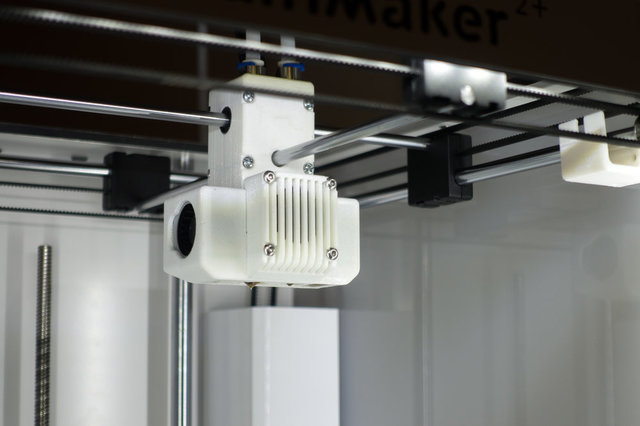
Very good observation. May I just correct one detail? The heatblock is not general 1.75 version of Olsson block. The orientation of male/female thread is reverse. It also has to be the specific heatblock from the heatsink seller. It's not the same as UM3. The following photo shows the original application of the heatsink:
-
DXU - Efficient Dual Extrusion Upgrade for UM2+
yyh1002 replied to yyh1002's topic in Third party products & modifications
Unfortunately the hotend is not sold anywhere else. You might be able to find the part cooling fan on alibaba.com. I imagine there could be order agents for taobao. -
DXU - Efficient Dual Extrusion Upgrade for UM2+
yyh1002 replied to yyh1002's topic in Third party products & modifications
It's not e3d. E3d has diameter of 22mm. This one is only 13 in diameter and also shorter in length, much more suitable for dual nozzle efficiency. -
DXU - Efficient Dual Extrusion Upgrade for UM2+
yyh1002 replied to yyh1002's topic in Third party products & modifications
It's flawless. I printed high temp, flexible, and standard filament and haven't had any problem. Plus the consumable is only a piece of 2x4 PTFE tube which makes maintenance pretty much free. -
DXU - Efficient Dual Extrusion Upgrade for UM2+
yyh1002 replied to yyh1002's topic in Third party products & modifications
Thanks. The .hex file is correct. Are you using Cura 3.4 to upload it? For some reason Cura 3.4 cannot upload custom firmware successfully. Earlier versions such as 3.1 works. I'm not sure which aluminum pieces your are referring to. You can find all the links in BOM. Thanks for the kind words ? There is no need to remove the head or hotend to change nozzle. It takes a plier to hold the heater block to unscrew and install the nozzle with hex socket wrench. I printed everything with unmodified PC at 280 °C with the same hotend. I added a PI ring between the nozzle and PTFE tube for heat resistance, similar to the one by 3D Solex. The lever parts were printed at 0.05 layer height. -
Hey guys, I would like to share a lever action dual extrusion solution I came up with for Ultimaker 2+. The approach is based on the great effort everyone put into Mark2 and Ultimaker 3. The print head holds two hot ends, which are originally to be installed on standard UM2 head for 1.75 filament. The right nozzle move up and down for nozzle swapping. This compact dual print head can achieve single extrusion print area of 220x223x205, and dual extrusion print area of 202x223x200. Video clips: Files and instructions available at: https://github.com/yyh1002/DXU Credits: Lever lifting mechanism is inspired by Ultimaker 3. The firmware is modified based on Mark2 version of Tinkergnome firmware by @tinkergnome. CURA profiles are modified based on the Mark2 profiles by @tinkergnome and @foehnsturm. Used Mark2Tweaks plugin for CURA by Krys Lawrence.


- 328 replies
-
- 17
-

-


