


Jake_Ding
-
Posts
8 -
Joined
-
Last visited
Jake_Ding's Achievements
0
Reputation
-
Hi guys, What is the definition of "skin" listed in the time specification down below? Why does it cost so much percentage of time? Is it normal? Thanks.


-
Hi gr5, You method works well for me! No strings,pits and the corner becomes smoother after smaller retraction and bigger travel speed. Could you tell me why does travel affect strings, blobs and pits? I curious about the reasons. Thanks, Jake

-
Hi gr5, Thanks a lot for your suggestions. I have set the retraction speed down to 1mm. The travel speed has been cranked up to 250mm/sec. I am gonna printed more this morning. Some guys said the initial layer speed should be lower but you suggested to printed with constant speed. What's the reason behind it? BTW, I saw many people suggested that the color dye will absorb water severely but the natural ABS is fine. I thought the little pits are caused by the evaporated moisture. Thanks again.
-
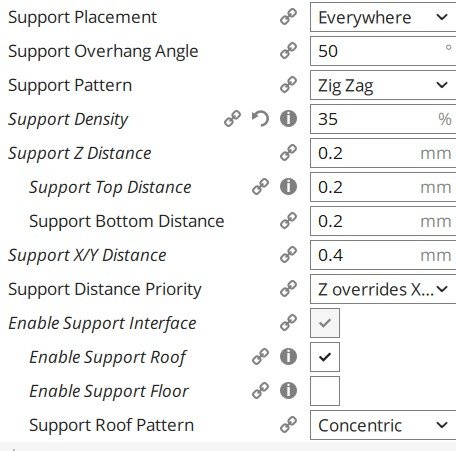
Hi guys, I recently printed with white-color ABS and black-color PLA. I found the parts always include pits and strings on the surface. You can see these defects in 'string and pits surface ABS. jpg' and 'string surface PLA. jpg' attached below. This phenomenon is especially obvious when printing with white ABS. The weird thing is the pits and string only show up at certain areas instead of the whole surface. Like in 'string and pits surface ABS. jpg', defects only show up on one side of wall. They don't show up on the bottom surface or other walls. The same is true for 'string surface PLA. jpg' in which string-like dents only show up around the bottom section of the part. 'string and pits surface ABS. jpg' 'string surface PLA. jpg' I also attached the 'simulation for hinge joint.jpg' generated from CURA's layer view. I tried to find the hints from it. The place where the strings exist isn't the place where each printing loop initiates but I observed the nozzle will move faster around that place in simulation. I don't know why the simulation doesn't render the nozzle with constant moving speed. 'simulation for hinge joint.jpg' My second question is I got rough edges like in 'rough edge ABS.jpg' and 'rough edge ABS 2.jpg' attached. The serrated edges in 'rough edge ABS.jpg' show up around all thin-walled vertical edges. On the other side, there is only one rough edge in 'rough edge ABS 2.jpg' as you can see. 'rough edge ABS.jpg' 'rough edge ABS 2.jpg' I also attached the 'simulation for end cap part.jpg' generated from CURA's layer view. I tried to find the hints from it. I found the rough edge is the beginning place for each printing loop. 'simulation for end cap part.jpg' For the hardware, I attach the 'ABS enclosure.jpg' here. I only use this DIY enclosure for ABS printing. The printer is Anet A8. \ 'ABS enclosure.jpg' For the CURA, the major settings for ABS are listed in 4 screenshots from 'CURA setting 1.jpg' to 'CURA setting 4.jpg'. Note that I always close the fan when printing with ABS. And I always printed multiple parts together to give enough ABS cooling time. If I printed with PLA, the settings would be similar but I would lower the nozzle temperature down to 170 degree and bed temperature down to 60 degree with the fan turning on. 'CURA setting 1.jpg' 'CURA setting 2.jpg' 'CURA setting 3.jpg' 'CURA setting 4.jpg' BTW, the ABS material has been dried out in oven under 175 Fahrenheit for 2.5 hours before printing. In conclusion, I can't find reasons why I got pits and strings on the surface. I also can't find the reason why I got rough edges on the parts. Could you give me some suggestions? Thanks, Jake


-
Same Cura setting with different quality
Jake_Ding replied to Jake_Ding's topic in Improve your 3D prints
Awesome explanation! I love this forum! The better methods to print smaller parts are listed as follows based on yellowshark and geert_2's suggestions: 1 lower printing temp (both excessive high or low temp will let the part deformed); 2 less layer height, like 0.1mm is better than 0.2mm (less material, less deformation); 3 slower printing speed (20~30mm/s except for the first layer); 4 print multiple parts or dummy parts (special designed to equalise cooling time) together to make sure the sufficient cooling time -
Same Cura setting with different quality
Jake_Ding replied to Jake_Ding's topic in Improve your 3D prints
Thanks for your comments! I will make a temp towel before I move on. -
Same Cura setting with different quality
Jake_Ding replied to Jake_Ding's topic in Improve your 3D prints
Thanks, yellowshark! The reason why I used 220 on the nozzle is because the lowest recommend temperature on that PLA spool is 210. I saw there are oozing/stringing inside of the small part, which means your suggestion is correct. I will lower the temperature to just above the under extrusion temp. I will also try to print two parts at the same time. Other setting are adjusted as you recommended. -
Hi guys, I was always happy to play with PLA on the Anet A8 until recently I printed some small parts in bad shape. As you see in the pictures, the bigger part(70mm length x 70mm width) has good quality but the small part with the same Cura setting( listed below ) gets some cracks and uneven surface. The major Cura settings are listed as follows: 1. layer height is 0.2mm; 2. wall thickness 0.8; 3. 100% infill density; 4. printing temperature is 220; 5. build plate temperature is 65; 6. printing speed is 30 and initial layer speed is 10; 7. regular fan speed is 70% and max is 90%. Could you help me find the reason why the smaller parts with the same Cura setting has bad quality? How to fix it? Thanks Jake


