


ultimaker_user
-
Posts
31 -
Joined
-
Last visited
Content Type
Forums
Events
3D Prints
Posts posted by ultimaker_user
-
-
Hi, I have used various 3D printers over the past ten years. I was in charge of two prototyping labs at universities. I have a Prusa i3MK3S but I am unsatisfied with its print quality and the amount of time required to tinker the machine which may or may not fix the issues. How is the S3 and S5? Are these more expensive machines better?
-
Thanks. When I checked this option, the check marks were already there. I guess I might have checked them few months ago. If I use adaptive layers, do values in Quality->Layer Height and Initial Layer Height have an effect on the prints? If I want only the first layer to be 0.2mm but the rest to start to have lower adaptive layers, what shall I do?
Besides this function, that what else can I do to make the prints smooth?
-
Hi, I printed a hemisphere but from about 2-3mm towards the top, it does not look smooth nor as uniform as the rest of the print. From what I know, adaptive layering is already set by default. Does Cura has other smooth functions? Could you please advice on how to make the top and the whole sphere perfectly around and smooth? Also, where is the Adaptive layers threshold? It seems to have disappeared. Thanks
-
Thank you. What happen when we reduce the Line Width? How come I also see burnt marks when reducing the Line Width to a value smaller than 0.4mm which is the size of my nozzle?
What is the best value for Line Width if I use a 0.4mm nozzle?
-
Hi, I have 100% infill in this square plate. Why Cura leaves a big vertical gap on the left? Is there a way to make it fills in the gap fully automatically?

-
Hi, usually I launch Cura. Then, File->Open File to open a 3mf file with the settings I use, make some modifications on the settings and/or STL and then save under a different filename. However, the top left of the Cura window still shows the original rather than the new name. Is this a bug?
For example, I launch Cura. Open a file called filename1 and make some modifications. Then, I go to File->Save Project to save it as filename2. However, the top left of the Cura window still shows that it is under filename1 rather than filename2.
-
Hi, why changing the Line Width caused burnt marks in the prints? Usually happen at an edge of a circular hole in the middle of the prints? I can see some extra thin filaments being deposited at one side of the hole and some of them got burnt.
-
Thank you
-
Thank you.
Sorry for the misunderstanding. I meant: underspeed for outline, underspeed for solid infill and underspeed for the support structure. It looks like Cura has no equivalent settings.
For the travel speed, the documentation does not say for which axes. If I want to set both X and Y axes to have the same speed but the Z axis has other speed, what can I do? I think Z speed is for hop speed only.
-
Thank you.
I had a look at the documentation of settings you provided but I cannot find the following parameters:
X, Y and Z axes movement speed
Underspeed for outline, solid infill and support structure
How do I set these in Cura?
-
Thank you. So Extrusion Width = Line Width = Nozzle diameter?
What is the different between setting the infill angle to be 45 degrees vs. -45 degrees? Currently I just put [45].
-
Hi, could you please let me know how to make the following settings in Simplyify3D in Cura?
1. Extrusion Width
2. Outline/Perimeter Shells. My nozzle diameter is 0.4mm. In one print, I want Outline/Perimeter Sheels to be 2 and the other print, I want it to be 4.
3. Infill Extrusion Width
4. Wipe Distance. I searched in Cura. It gave me Infill Wipe Distance and Outer Wall Wip Distance. Which one is Simplify3D's Wipe Distance?
Thank you
-
Once the print job finished, I took the object off the plate and took a photo of the bottom. The photos were parts of that surface.
-
They are neighboring parts of the same print. Viewed from the bottom.
-
I guess there are two issues. In these two photos taken from the base of the prints, there are gaps and holes between the lines and perimeters. You can see it clearly from the Preview screenshot.
In the bottom photo, some kind of visible irregular artifacts on it to ruin the lines.
Can I make the bottom of the print solid so I don't see these lines, gaps and artifacts?


-
Hi, the bottom of the print looks like the one shown in the Preview. Is there any good way to fill in those gaps and holes to make the bottom looks like solid? It feels solid when I touch it but it does not look solid due to those holes and gaps. Thank you

-
I just checked.
Under Combing Mode, I have "Not in Skin".
Max Comb Distancd with No Retract: 0 mm
Avoid Printed Parts When Traveling: Checked
Avoid Supports When Traveling: Unchecked
I have high standards. If I want nice looking surface, shall I have Combing Mode: Off?
-
Thank you. If I want to have different sets of settings for different filaments/projects, is exporting the profile the approach to use?
If after printing a STL file and I want to use the same settings on a different STL, will opening the second STL file and then deleting the original STL object under PREPARE allow me to use the same settings on the second STL object?
Before I created this thread, I followed the steps in the link you provided. Under Profile, I have the following tabs: Activate (dimmed), Create, Remove (dimmed), Rename (dimmed), Import, Export (dimmed). Is the correct procedure is that I have to first create a profile and give it a name. Then, Export is enable for me to choose to save the settings? Without creating a profile, the Export button is dimmed all the time.
-
Hi,
I am trying to store the settings I have been tweaking for days so that I can use it for different STL files. I read that I can do that by exporting profile.
However, under Settings->Preferences->Profile, there is no Manage Profiles option.
I see an Import and Export tabs but the Export tab is dimmed.
Form this thread, I double checked from Makerplace that I already have Cura Profile Reader enable.
https://github.com/Ultimaker/Cura/issues/4680
Please let me know how to save the settings to a file for future use. Thank you.
-
The kind of scar I am having is exactly the one shown in the open issue posted last year on Github.
https://github.com/Ultimaker/Cura/issues/6517
I did not have this issue when I used other slicers.
First I enabled Hop Z at 1mm and 2mm but the problem did not get resolved. Then, I enabled Z Hop Only Over Printed Parts. So, I have:
Z Hop Speed: 10mm/s
Z Hop When Retracted: Enabled
Z Hop Only Over Printed Parts: Enabled
Z Hop Height: 2mm
but it is still there.
-
After I disabled Compensate Wall Overlaps. The problem is solved. Thank you.
For the top with ironing, I have Top Bottom Line Direction changed from [] to [0]. Will it make the top surface weak? As the extruder is making parallel lines to form the surface, sometimes it created extra bits of straight lines (kind of like left over) above the top surface. What parameter should I change to eliminate it?
Also, I read that to eliminate scars on the top surface, I should enable Z hopping. I set it to 1mm. However, I still see one or two diagonal scars like before. I have Combing Mode: Not in Skin, Max Comb Distance with No Retract: 0 mm, Avoid Supports When Traveling: Unchecked. What else can I do to eliminate the scars?
-
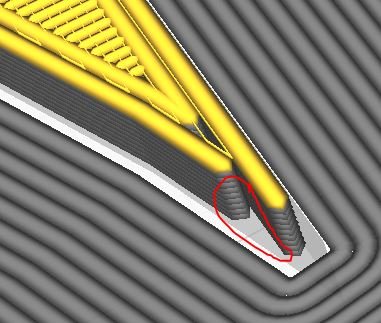
My main problem is that the sharp corner is not printed nor sliced properly. The printed one looks like the one in the preview. As you can see form the red highlighted corner, part of the yellow later is missing. It did not happen before as shown in "tip earlier on". I don't know what caused this missing bit and how to fix it. The tip shown in "tip earlier on" is much shaper. It is the one I want.

-
Thank you. I will disable coasting and try again. At least under Preview, the gaps on the brim are closed. However, I can still see some gaps/holes at the tips. Any way to fill it in perfectly?
If I am using a 0.4mm nozzle, can I set Line Width to less than 0.4mm to perhaps make the surface looks smoother?
I have scroll up to the last layer in Cura already. Why I cannot see the top surface? Is it supposed to look smooth at least on the screen? On the printed part, I also see vertical parallel lines so I wonder if this is also a surface. I have Top Surface Skin Line Direction set to [0, 90] from [] as I saw many ugly diagonal zig-zag patterns with gaps on the surface.
-
Hi, I have been printing the same thing all day by trying different variables and values. In the last print, it looked quite good but for strange reason, part of the tip was not printed. When I looked at Cura, I noticed that at the same position, the yellow part is also not shown (the area circled in red). I have some questions:
1. Is it true that if a part does not show up in preview, it will not be printed?
2. Why part of the tip (enclosed in red circle in the screenshot) was not printed? This is the first time I have this problem. In six other prints, the tip was printed perfectly.
3. Similar, why there is a big gap at all the brim lines (enclosed in blue) ? I think this is the first time I see this. How do I close them?
4. Under preview, is the top surface with yellow parallel vertical lines the top surface of the actual print?


Is there a Height Range Modifier feature in Cura?
in UltiMaker Cura
Posted
Hi, in Cura, is there an equivalent feature to PrusaSlicer's Height Range Modifier?
Prusa Knowledge Base | Modifiers (prusa3d.com)