EXEYE
-
Posts
10 -
Joined
-
Last visited
EXEYE's Achievements
0
Reputation
-
On the small boxes I did use 3D Builder to smooth the transition from the feet to the bottom surface, which helped keep them from breaking off. I never did figure out how to get the support to break off from the bottom cleanly, but I got good at cleaning them up with a Dremel tool and they're good enough. I've made enough of them for the time being. I've moved on to making boxes for the bigger parts cases. These are similar in dimensions to the small ones but are about twice as high. That makes the wall thickness more important. The little boxes have very thin walls which is pretty much ok, though it would be better if they were thicker. The bigger boxes seem to have even thinner walls, so that they very easily crack. I need to figure out how to make them thicker. I'm not sure what a "wall" is. Here I'm just using it in the conventional sense, as meaning the sides of the box (I'll use "sides" for this from now on). I don't know what Cura means by "wall". In particular, I don't know if the model specifies a thickness for the sides of the box, and if that means that Cura considers the sides as consisting of an inner wall and an outer wall. I've tried making the wall thickness very large, like 5mm, but still get very thin sides. Below is a picture of a partially-printed large box, with the measured thickness of the sides marked. The 1.44mm side is perfect. The 1.33mm side is too flexible and looks to have infill. The two 0.70mm sides are very thin and fragile. I've also attached a 3mf file used to print this partial box. What I need to know is whether there are settings that would give me the thicker walls I need, or whether the model needs to be changed. If so, I guess I'll have to study up on 3D Builder. Thanks! -jimc thick small half.3mf

-
I keep trying different settings trying to solve various problems, The most recent problem is serious curling especially at the feet. It mostly affects the support area and the feet. This is an example: I made some more changes and got a print that looked like a pile of spaghetti. So I decided my setting changes had gotten out of control, and reset everything except turning on the support back to the default. It seems to be printing ok except that the curling is bad and the feet aren't sticking to the baseplate. Here is the start of a print with the new settings. Note that the feet (in the corners) are just crumbs: I've replaced my baseplate with a Creality glass one. This has made it pretty easy to pop the finished prints off the baseplate but seems to have caused trouble getting the first layer to stick, especially where the feet are. Any thoughts? I'm sorry to keep bothering you with questions, but I do do a lot of searches for the problems I have and try the suggested fixes. The suggestions are often ambiguous, like "try raising or lowering the bed temperature". Your advice is usually pretty specific, and usually works. Thanks, as always... -jimc


-
Hi Greg, Yes that's what I've been doing, except for the 1/2-turn procedure, which I'll do from now on. Do you recommend a specific kind of Bowden tube? I replaced the stock one with this one: https://smile.amazon.com/dp/B09N7B8NKF?psc=1&ref=ppx_yo2ov_dt_b_product_details. As always, thanks for your help! -jimc
-
Ok, now I understand why USB isn't recommended. It's working well for me though (I think); I haven't had any M1 problems. I wonder why Octoprint/RPi works well; doesn't it connect via USB too? I installed MS 3D Builder (MS requires that it be installed through their "app store", and app store apps don't have a way to put a shortcut on the desktop. I found a way anyhow. I hate Microsoft -- I think they have a whole department devoted to making things difficult to use). I was able to (barely) use it to modify my box files so as to reinforce the feet a little. I have two new problems. I'm now trying to print a larger version of my yellow boxes, and it has pretty serious curling at the corners. I reduced the bed temperature to 40° per suggestions I found online but that seems to have made it worse. I'm not sure what to try next. My other problem is that my nozzle clogs after a few (3-6) hours of printing. That means I can usually print one copy of my 4-up small boxes or one of the medium boxes, but it will stop printing partway through the next thing I print. I've tinkered with a few things, primarily nozzle temperature, with nothing I've tried helping. Any suggestions? Thanks! -jimc
-
Thanks for the explanations! Yes I'm new at this. I'm printing small simple things that don't take particularly long, so the risk of my computer rebooting during a print is low, and the consequences minimal. But I am wondering if USB communication errors could be happening. USB is pretty robust, unlike things like RS-232, so the odds of errors getting through are near zero. I send a lot of stuff over USB and I've never seen a problem that could be attributed to communications errors. But I'll try using the SD card and see if it works better. Thanks a lot for the tip on 3D Builder. I will try it, even though MS apps are usually awful. I've been struggling with a bunch of problems but have been trying solutions I've found by searching. I had pretty bad stringing but seem to have solved that (I'm not sure how) and have been getting nozzle clogs very often. My latest try is the addition of a "filament filter" to hopefully keep dust and cat hair off the filament which may be causing the clogging. It's slow going and I've used up most of a roll of filament so far which has yielded maybe a half dozen useable boxes, but I do seem to be making progress. -jimc
-
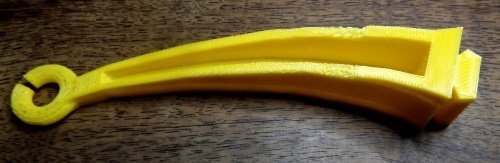
Hi Greg, I followed your instructions and got my old start/end code back. It's now printing the boxes pretty well. I'm also learning more about how Cura is intended to be used. I installed your program and it looks pretty nice. You've lost me on some of the terminology. What does PID stand for? What is a cooling profile? Why don't you print over USB? It works flawlessly from within Cura, and it's so much easier. You're right that those damn little feet usually break off. I glued one on, which took a half hour, but I'm sure I'll get better with practice. If I had a way to edit the stl file I could reinforce the feet by adding a fillet to where they attach to the box.. Maybe if I increased the infill to 100% it would make them stronger. The first layer of the support included a 10mm flat surface around the outside of the support, presumably to increase adhesion. but my problem isn't not enough adhesion but rather too much, so I turned it off. We'll see if that helps. I'm getting to a point where I can depend on it printing a box perfectly. Next I want to try printing them 4-up or 9-up, so it can run all day. -jimc
-
Greg, Thanks for the quick reply! I'm not using an SD card; I just have the printer hooked up through the USB port, which has worked well so far. I should probably try using the SD card to rule out the USB, but if the USB were flaky I'd expect random problems, not something repeatable. The support comes off easily if I put the spatula thing on it (between the feet) and give it a careful whack. I broke one of the feet off trying to get the box off the baseplate; next time I'll try on the support instead of the feet and see if that works. I'm very suspicious of your modified startup gcode. I guess I'll have to find a gcode reference manual and start figuring it out. Could this be a problem caused by my printer having newer firmware than yours? I've been a programmer working with CAD systems since 1972 (!) and over that very long period I've developed drivers for all sorts of devices, from pen plotters to laser printers to CNC milling machines. So gcode is going to be second nature for me. I'll keep you posted...
-
Hi Greg, You were right about needing a support (and about breaking off the little feet!). The attached picture shows an almost perfect box, aside from the missing foot. But I think I've figured out how to avoid that in the future... However I have a new problem that has me stumped. When I loaded your 3mf file and tried to print it, the printer moved to a position about 14mm above the build plate, tried to draw the purge line, then moved to the upper right corner of the build plate and started extruding filament very fast, faster than the feeder could feed. I tried everything I could think of (or find online) to overcome this, with no luck. Finally I deleted the cura folders in AppData to reset everything back to the defaults (why is there no way to do this from within Cura?), loaded the original stl file and manually set all the changed parameters, drew another support blocker, and it printed fine. Then I saved the project as a 3mf file, reloaded it, and tried to print another box. This time it did what yours did, but at a height of about 5mm. Then I reloaded yours and it did its thing at a Z of 14mm, as before. What this acts like is that saving (or loading) a model as a 3mf file corrupts it. Next I should try to figure out how to save the settings (a "Profile"?), reset everything again, and start from scratch, avoiding the save/load project stuff. But first I thought I'd ask you if you knew anything about this. I am using Cura 5.0.0. I've wasted spent enough time on this already today. Thanks again for all your help!

-
Thanks for the replies. I expected to get an email when someone replied which explains the long delay in my response. I replaced the extruder with an aluminum one, which did help eliminate the gaps. I also calibrated the steps/mm, which was way off. I haven't done your recommended fix for the Bowden tube, but will do so in the next day or so. I still have trouble with the bottom of the boxes I am trying to print. I've attached a picture of the bottom side of the print showing all the squiggles I get. There is also a picture of a box right side up, the way I am trying to print it. I've tried various settings and temperatures and nothing seems to make any difference. I've also created and attached the 3mf file per your instructions. Thank you very much for taking a look and for any suggestions you may have... CE3_hf_small.3mf


-
I'm very new to 3D printing (using an Ender 3) and am overwhelmed by all the lingo especially as used in the descriptions of settings. I'm trying to print things with significant overhangs and need to figure out what settings will improve print quality. Trial and error is impractical given the hundreds of settings and unlimited variations of settings, and the fact that it takes several hours to change something and do a test print. I've also found that I get different results each time I print something without changing settings. I suspect that some of my problems are related to filament feeding. I'm trying to print a guide for the filament which should help, and I've ordered a better feeder and a ball-bearing reel support, which should also help (if this is in fact part of the problem). The attached pictures show two prints. One is a small parts box, which I'm printing right side up. The pictures show two prints of the same item, upside down from the way it was printed. The bottom of the box is raised a couple of millimeters off the bed by four feet. This raised bottom is a mess. It seems to be being printed as infill. Shouldn't it start out as a solid surface? What setting changes might improve this print? The second set of pictures shows a filament support arm I am trying to make. The bottom is nice and smooth, but the top is very uneven, the "inside" has infill showing and there are gaps all over. Any suggestions as to how to improve this? I'm not looking for information that is already available; a link will do. But I've spent a lot of time searching and have yet to find anything that explains what might be going on. Thank you!