


Since is an UMO the atomic looks different since it has a longer heat zone, also the temp of the atomic looks like it could have need 5C less (so it doesn't stretch much).
Anyhow. I would check the upper part of the stomic pull to see if it has a groove, because it could show if the coupler was deformed, had a gap or stuff like that.
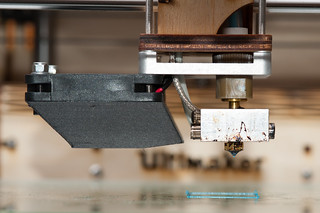
As for a good reference of how to attach the umo head check this image made by @gudo, since thr manual doesn't show properly how the structure internally looks.

I put this because most of the time I see a UMO user with problems is mostly because their barrel is not properly aligned or they tighten the x4 screws too much flattening the ptfe coupler too much (that shorts the life span pretty quickly since the tip deforms).
Also i must say that I broke in many different ways the umo head because lack of information. For example UM never did a good assembly guide of the head. Also, a good idea from @amedee is to add shims between the aluminum peek holder and the upper wood frame, that allows for a very good assembly without the issue of damaging the ptfe coupler, and also makes the whole head truly aligned and doesn't tilt. Maybe he can share a photo of his hotend, he has a perfectly ok setup. I can't since I changed all my 3 umo+ to um2+ heads.
-
 1
1


.thumb.jpeg.0b7a05eafc09add17b8338efde5852e9.jpeg)
Recommended Posts
printerfan 5
I have not been using the full enclosure the past 2 months because I've been using PLA and have had to meticulously watch the start of the print to make sure the initial layers were fine because I was experiencing a lot of failed prints due to underextrusion.
I'm not sure I understand what you mean by separation for the board? Are you asking if I raised the printer up to provide additional air to reach the electronics under the printer? If so yes, I have sound dampening feet attached to the printer that raises it by 1.5-2 inches.
I already disassembled the hotend, but I stupidly did not do an atomic pull before disassembly, so there is a ton of PLA in the barrel, so the hotend coupler is stuck to it... I am going to reassemble it and try to clear it out.
I took some pics of one of the atomic pulls. I've done lots of them, but this was the last one I did, but the features are fairly consistent with how the other atomic pulls looked as well. If you notice, one side of the pulled filament looks fine, smooth no burnt material and looks as if it perfectly mimics the internal aspect of the nozzle.
However, the other side has a gash/groove in it. Maybe this groove is caused by some lodged material. This groove is present in every atomic pull I have done. One thing I noticed was when I cleaned my gnarled bolt was that it looked like there were thin metal pieces attached to the filament... Not sure where those pieces came from, but I cleaned them off and cleaned out the bowden before printing again. Hopefully that is not in the nozzle.
Both pics are of same atomic pull.
This side looks fine.
This side has a gash/groove in it. (this groove has been in every atomic pull)

Edited by GuestLink to post
Share on other sites