Jump to content

Saying Hi and showing off my first functional print :)


GuyS

Recommended Posts

Posted · Saying Hi and showing off my first functional print :)

Hey everyone! I'm new here on the forum - as you can see by that Team Ultimaker badge to the right over there, I work at Ultimaker. I'm still a n00b, just started here two months ago as part of the marketing team. You might have seen my avatar on a blogpost here or there.

So quick intro, I'm an engineering dropout (both electrical and computer) turned online marketer. I'm new to the 3D printing scene, less so to the general geekery of making. Some examples of recent side projects are my DIY sous vide machine and my festival boomcase (boombox + suitcase = you get the idea). In the past few years I'd often seen Ultimakers over at friends who work in automotive, mechanical, or industrial design fields, and they absolutely loved them so that's what inspired me to apply here.

During my first week with a printer I went crazy, making the usual geeky stuff - lightsaber, Pikachu, R2-D2, Link, a Slytherin crest, etc etc etc. But fun as it was to decorate the house with that stuff, none of it was functional.

And then I had a bright idea.

I live in a shared house with two friends, and we have a landlord who does not believe in the concept of preventative maintenance. Or any, really. Which was not usually a huge problem, until a 'plumber' he hired to fix some leaky pipes managed to destroy our shower drain. Destroy it so badly, that he 'fixed' it by caulking the drainpipe directly to the remains of the trashed flange. With no functional trap left in the drain we had a direct line from our shower to the sewer. You can imagine the stench. Landlord then refused to do anything, because the house is so old that replacing the drain would mean replacing the original granite floor in the entire bathroom.

foto1.thumb.jpg.27b9cc87eb13f543487de471cf5d49ca.jpg

But now, armed with my Ultimaker, I figured I should be able to fix this.

I started by doing some caulkwork of my own: I jammed a short piece of PVC pipe into the drain and caulked it in place. That was going to be the new bottom end of my trap.

foto2.thumb.jpg.ed219124be3e3ac630ef158fd2fe7cc5.jpgfoto3.thumb.jpg.f19236585d3bf1da17b68d54380830f5.jpg

Yes that's hideous, but please note that I never said I was good at doing any repairs myself ;). Anyways, I went to tinkercad and started designing. A flat cylinder with some boxes cut out of it, combined with a hollow cylinder - and my drain cover was done!

foto4.thumb.jpg.3488a6d4c875b133b7ac70dc686994bd.jpg

The hollow cylinder would be the top end of the trap so water gets locked in between the 3D printed drain cover and the PVC pipe, cutting off the foul air from the sewer. It took a few iterations to get the design right - first my size measurements were way off, then my walls were too thin and it wasn't watertight, then I cracked one during my first pressure test (i.e. i accidentally stepped on it), and then I overextended the cylinder and water wouldn't drain fast enough so I flooded the bathroom.

foto5.thumb.jpg.5d37d308c8a06b4dc88861636fc9a280.jpg

But version 5 was good enough to keep using. And now we've been able to enjoy a bathroom that smells like rainbows and unicorns (well, it's all relative) again for the first time in a year!

foto6.thumb.jpg.43c6b9fa36fbc781a4207b6578cf4d5e.jpg

We're 3 weeks in now and it's working absolutely fine. I'm going to print my design in ABS next, because I think that it's theoretically possible to get the water in the shower hot enough that it could deform my PLA print. But apart from that, I'd say my first functional 3D print was a great success :D

TL;DR: Engineering dropout designs and prints a drain cover and is quite pleased with himself. Tuition well spent.

foto1.thumb.jpg.27b9cc87eb13f543487de471cf5d49ca.jpg

foto2.thumb.jpg.ed219124be3e3ac630ef158fd2fe7cc5.jpg

foto3.thumb.jpg.f19236585d3bf1da17b68d54380830f5.jpg

foto4.thumb.jpg.3488a6d4c875b133b7ac70dc686994bd.jpg

foto5.thumb.jpg.5d37d308c8a06b4dc88861636fc9a280.jpg

foto6.thumb.jpg.43c6b9fa36fbc781a4207b6578cf4d5e.jpg

  • Like 5
Link to post
Share on other sites

Posted · Saying Hi and showing off my first functional print :)

@GuyS great use of a printer - and especially for your first use! - leave it as PLA and see what happens - it is way hardier than most people think and if you are running the shower that hot ....

to stop it cracking just thicken up the outer ring and the inner ring and possibly the top - you will get to a point where it is mechancally strong - I hang off PLA handles (chin-up) that I have designed on a daily basis (they are now 2 years old) - it is really strong stuff!

  • Like 1
Link to post
Share on other sites

Posted · Saying Hi and showing off my first functional print :)

Thanks @jameshs! My final version did have a thicker ring and top and survived my 'stepping on it' test :)

I was worried about the PLA because it has a glass transition temp of 60-65 C, and I think the boiler in our house heats up to 60. So if I were cleaning and not mixing in cold water, that could start the PLA deforming...

  • Link to post
    Share on other sites

    Posted · Saying Hi and showing off my first functional print :)

    Nice practical use of your printer @GuyS (without the capital S it's guys? :D)

    Welcome aboard @GuyS, you joined a great premium brand in the 3D-print industry.

    Feel free to share any upcoming products with us if you need any feedback before launching. ;):p (we won't tell anyone)

    • Like 3
    Link to post
    Share on other sites

    Posted · Saying Hi and showing off my first functional print :)


    @rigs So far I've only printed with Ultimaker PLA - I can 'borrow' that from the office stock... ;) I'll try to get my hands on some Colorfabb to play around with!

  • Link to post
    Share on other sites

    Posted · Saying Hi and showing off my first functional print :)

    Thanks @jameshs! My final version did have a thicker ring and top and survived my 'stepping on it' test :)

    I was worried about the PLA because it has a glass transition temp of 60-65 C, and I think the boiler in our house heats up to 60. So if I were cleaning and not mixing in cold water, that could start the PLA deforming...

    but with that huge heat sink around it you should be fine ..... but it would be interesting to know if you get a saggy drain :)

  • Link to post
    Share on other sites

    Posted · Saying Hi and showing off my first functional print :)

    I was curious how that would stand up to hot shower water over time.

    Nice to meet another friendly face from Team Ultimaker.

    You printed R2-D2? How big?

  • Link to post
    Share on other sites

    Posted · Saying Hi and showing off my first functional print :)

    Oh, that's right @jameshs, I didn't think about the granite floor being a huge heat sink. Good point!

    Thanks @LePaul - I only have an Ultimaker 2 Go right now so R2 didn't become very big :)

    IMG_0128.thumb.JPG.77ee1a4bfb549d133ab20ba364372b50.JPG

    IMG_0129.thumb.JPG.8755e3b1eae32abdd6c7c072b3b931b4.JPG

    Took me more than an hour to cleanly remove all the support; after printing it was just one straight blob down to the buildplate. I probably should've sliced him up into pieces and then put the parts together afterwards instead of printing the entire model in place with support, but it was a good learning experience :)

    IMG_0127.thumb.JPG.19428cc60a070b8495d652d818f12622.JPG

    For an un-tuned, straight out of the box printer I thought the print looked damn fine though.

    IMG_0128.thumb.JPG.77ee1a4bfb549d133ab20ba364372b50.JPG

    IMG_0129.thumb.JPG.8755e3b1eae32abdd6c7c072b3b931b4.JPG

    IMG_0127.thumb.JPG.19428cc60a070b8495d652d818f12622.JPG

    • Like 1
    Link to post
    Share on other sites

    Posted · Saying Hi and showing off my first functional print :)

    I've seen that one printed a few times, will all the details R2 has, it can be a challenge.

    The Form Labs resin printer does a good job on it too

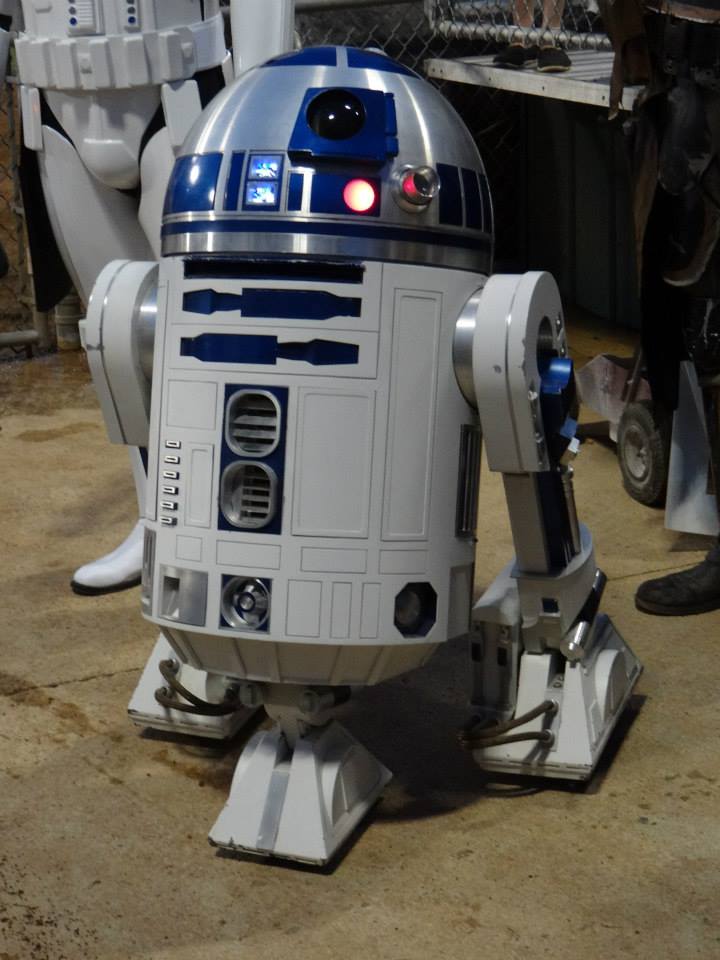
    I spent a long time building the full size version :)

    • Like 2
    Link to post
    Share on other sites

    Posted (edited) · Saying Hi and showing off my first functional print :)


    @LePaul, your R2D2 looks very cool! I'm officially jealous now, really! :D

    Edited by Guest
  • Link to post
    Share on other sites

    Posted · Saying Hi and showing off my first functional print :)

    Thanks!

    Been working on cutting down on the weight, 3D printing some of the detail pieces you see in the body. The second R2-D2 (who can have just one?) is also heavy due to the mechanism inside to lift/retract the middle foot and transition to drive mode.

    The 3D printed R2 he made is tough to print. I wonder how it would look if someone scaled it up a bit? Maybe I'll try :)

  • Link to post
    Share on other sites

    Posted (edited) · Saying Hi and showing off my first functional print :)


    @LePaul Omfg. Do want. Do you have a build topic on your R2 anywhere? I have so many friends I need to show that to.

    Edited by Guest
  • Link to post
    Share on other sites

    Posted (edited) · Saying Hi and showing off my first functional print :)

    @LePaul Omfg. Do want. Do you have a build topic on your R2 anywhere? I have so many friends I need to show that to.


    I put all my R2 building (charity work, construction and upgrade work) on my Paul's R2-D2 Facebook page     Plenty of albums are there where you can see how much work an R2 is.  We do a lot of charity work and patient visits, so R2 has racked up a lot of miles over the past 6 years.

    Edited by Guest
  • Link to post
    Share on other sites

    Create an account or sign in to comment

    You need to be a member in order to leave a comment

    Create an account

    Sign up for a new account in our community. It's easy!

    Register a new account

    Sign in

    Already have an account? Sign in here.

    Sign In Now
    • Our picks

      • UltiMaker Cura 5.7 stable released
        Cura 5.7 is here and it brings a handy new workflow improvement when using Thingiverse and Cura together, as well as additional capabilities for Method series printers, and a powerful way of sharing print settings using new printer-agnostic project files! Read on to find out about all of these improvements and more. 
         
          • Like
        • 18 replies
      • S-Line Firmware 8.3.0 was released Nov. 20th on the "Latest" firmware branch.
        (Sorry, was out of office when this released)

        This update is for...
        All UltiMaker S series  
        New features
         
        Temperature status. During print preparation, the temperatures of the print cores and build plate will be shown on the display. This gives a better indication of the progress and remaining wait time. Save log files in paused state. It is now possible to save the printer's log files to USB if the currently active print job is paused. Previously, the Dump logs to USB option was only enabled if the printer was in idle state. Confirm print removal via Digital Factory. If the printer is connected to the Digital Factory, it is now possible to confirm the removal of a previous print job via the Digital Factory interface. This is useful in situations where the build plate is clear, but the operator forgot to select Confirm removal on the printer’s display. Visit this page for more information about this feature.
          • Like
        • 0 replies
    ×
    ×
    • Create New...