Jump to content

"How to ..?" single shell open face


claus

Recommended Posts

Posted · "How to ..?" single shell open face

Hi!

To print "vase-like" single-shell bodies in CURA the recommendet method is to draw a solid body and use the following settings

infill = 0

wall-thickness = nozzle-diameter

Black Magic = spiral

This works excellent and gives really beautiful single shell hollow bodies. e.g. like this

24839142wh.jpg

Wall thickness really is exactly nozzle diameter.

But what if the body has no "closed" surface. Think about if above's hollow body in the end should be the lamp-shade for a wall-lamp.

e.g. something like that

24839119zk.jpg

So far I couldn't find a single settings in CURA which gave a result with wall-thickness=nozzle-diameter.

Faking with diamter-size, using all kind of "black magic" settings.

I always endet with a wall-thickness of aproxximately twice the nozzle-diamter.

Cura always slizes for two shell-layers.

Or the slicing result is missing many segments.

And I found no way to apply the "full body and infill=0" method on such a body.

OK you can always cut open the results of the first picture with a knife in the end.

But this is a very brute force and dumb method.

I hate it!

That's why I would like to consult the experts:

-> Is there a possibility to get such a body printed with wall-thickness=nozzle-diameter

-> which methodology/settings do you recommend

  • Link to post
    Share on other sites

    Posted · "How to ..?" single shell open face

    Sadly I don't have the solution but I'd like to achieve the same. Spiralize is a hack and not very reliable. But I think spiralize absolutely needs a closed surface to draw a loop while changing the z-height. So your model might just not be compatible with it.


    AFAIK Cura always creates a closed loop (or: two passes) on a wall. It should work with Cura if you design the walls slightly thicker than the nozzle diameter (>=0.5mm).

    Or "lie" about the nozzle diameter in Cura (define it smaller then it is).

    I'm not sure if there are other slicers that work different?

  • Link to post
    Share on other sites

    Posted · "How to ..?" single shell open face

    @ NicoLinux & Tinkergnome

    Thank's for your reply.

    I played a lot with " cheating"  nozzle-size vs. wall-thickness , but as you also have noticed, this is far away from being straight forward and relyable.

    It really depends on the specific geometry of the "single layer surface"  itself, and also how you place it on the print-table.

    I really couldn't find a systematic approach: in some cases designing a slightly  thicker wall helped. In others cheating the nozzle size wider or smaller. And in some cases nothing helped!

    After having done lot's of investigations in the specific forums,  I think that 3D-printing of free-face-objects with only one- layer-thickness confronts us with a basic  limitation of nowaday's slicers.

    You can find questions and discussions about this topic for all of today's slicers. But none seems to offer a solution.

    They really "assume" or "request" a closed loop or do two passes on a wall.

    And this few extra µm should be no problem in most of the applications.

    But as soon as transparency /translucency or spring-stiffness are the main desing goals it's really essential to get this single layer (skinny) walls.

    OK maybe in a 0.4mm-nozzle-world we could agree to live with the limitations of two passes per wall and go for a .25mm nozzle and end up with a 0.5mm walls.

    But do we really want to pay this extra price in print -time?

    And what if your application requires a .25mm wall? Are there nozzles with less than 0.25mm available out there? I don't know?

    What really would help here could be a  little enhancement in the spiral-function or an add-on extra "black-magic" tool/feature ... something like "spiral-open surface" .

    With basic spiral you design a full body, skip top & bottom & infill and the slizer will spiral around the outer surface of the full-body. You end up with a beautiful single layer shell print of what once was a full body.

    But in the case of single layer surfaces  there already is no top & bottom and no fill.  

    So how should the slizer find a path around. It has to go back and forward. Pretty clear why the recent implementation works the way it does.

    But why not let the slizer start at one end of the single-shell-layer and when it reaches the open end of this layer do a retract, followed by an empty move back to the beginnig, and during all of this gradually increase "z" like in spiral.

    Just a spiral which allows for empty moves in between one spiral pass around!

    Here a quick sketch, to ilustrate the basic idea again ( ... sorry for the poor quality!)

    24864010vd.jpg

    In theory this straight forward solution looks pretty  easy ... but for sure the "detail is the devil".

    But isn't this something worth thinking about.

    ... or maybe the experts (like daid) already thought this through and have an explanation why this doesn't work.

    Would be interesting to know!

    NicoLinux .. What do you think?

  • Link to post
    Share on other sites

    Posted · "How to ..?" single shell open face

    I assume the problem lies within the spiralize feature. It is super nice when it works but the devs might not see it as that important. I guess your idea would work, but since it is a pretty niche feature, it won't be implemented/fixed soon.

  • Link to post
    Share on other sites

    Posted · "How to ..?" single shell open face

    ... I guess your idea would work, but since it is a pretty niche feature, it won't be implemented/fixed soon.


    During my internet-search I got the impression that many users are looking for such a feature.

    And wouldn't this be a "unique selling point" (alleinstellungsmerkmal) for CURA if it offered a smart solution for this applications?

  • Link to post
    Share on other sites

    Posted · "How to ..?" single shell open face

    I don't know. For vases it works pretty well and I guess that's the main use for spiralize now.

  • Link to post
    Share on other sites

    Posted · "How to ..?" single shell open face

    I mean I really don't insist on implementing his with spiralize - this was just an idea.

    But it would be really great if a slizer in the end would be capable of really slizing x-y-structures drawn with width=nozzle-size.

  • Link to post
    Share on other sites

    Posted · "How to ..?" single shell open face

    Yep I agree, this would be useful. Maybe it would help if you would compile a list of real life objects where this setting is needed.

  • Link to post
    Share on other sites

    Posted · "How to ..?" single shell open face

    A quick brainstorming:


    • a bigger lampshade splitted up in printable sub-components always ends up in freeform surfaces; for this application transparency /translucency of single shell is essential (single shell Thaulman-BluPrint or BioFila-silk really looks gorgeos)
    • ultralight body parts for RC-Models e.g. fenders, bonnets, wing-parts, etc.
    • flat-springs for vibration damping of mechanical components; e.g. suspension brackets
    • dust/moistur-seal electronic casing, with some sections printed single wall to allow shine-through of LED


    to be continued ...

  • Link to post
    Share on other sites

    Posted · "How to ..?" single shell open face

    This sounds like a great improvement :) Put it in the Cura section so that the developers see it and can comment on it.

  • Link to post
    Share on other sites

    Posted · "How to ..?" single shell open face

    I also talked about having the possibility to use single layer drawings, to draw your own support structure or open parts kinds of problems.

    Maybe this could help with your problem, you will have to have a solid, so you can print with spiralize, and cut the unusable part away,

    this way you can draw the solid, and you know where to cut, and leave a nice clean edge.

    print%20cut%201.jpg

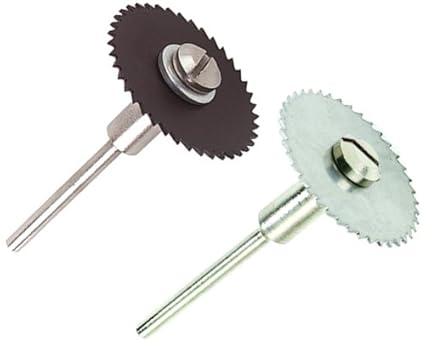
    I always cut, with one of these, they are very thin, and leave a pretty clean edge.

    413f7N4fD3L._SX425_.jpg

    • Like 1
    Link to post
    Share on other sites

    Posted · "How to ..?" single shell open face

    It may be useless info but if you want support material only in specific places as cura just puts loads under ALL of the overhangs sometimes even when not needed, then just include a polygon with 0 thickness to the base and no support will be placed there. Its not quite drawing your support, but more like drawing where you dont want it.

    • Like 2
    Link to post
    Share on other sites

    Posted · "How to ..?" single shell open face

    I too would love this feature to be available. I am using my printer to print RC yacht hulls, and the spiralize feature produces wonderful sections, but the issue comes when there is an access hatch or similar to be included int he hull and the spiralize function does not cope. Then I go to a "standard" sort of print and cannot get even close tot he same print quality with it.

    I hope the developers see this as an option that could be utilised and make it available at some stage (pretty please)

  • Link to post
    Share on other sites

    Create an account or sign in to comment

    You need to be a member in order to leave a comment

    Create an account

    Sign up for a new account in our community. It's easy!

    Register a new account

    Sign in

    Already have an account? Sign in here.

    Sign In Now
    • Our picks

      • UltiMaker Cura 5.7 stable released
        Cura 5.7 is here and it brings a handy new workflow improvement when using Thingiverse and Cura together, as well as additional capabilities for Method series printers, and a powerful way of sharing print settings using new printer-agnostic project files! Read on to find out about all of these improvements and more. 
         
          • Like
        • 18 replies
      • S-Line Firmware 8.3.0 was released Nov. 20th on the "Latest" firmware branch.
        (Sorry, was out of office when this released)

        This update is for...
        All UltiMaker S series  
        New features
         
        Temperature status. During print preparation, the temperatures of the print cores and build plate will be shown on the display. This gives a better indication of the progress and remaining wait time. Save log files in paused state. It is now possible to save the printer's log files to USB if the currently active print job is paused. Previously, the Dump logs to USB option was only enabled if the printer was in idle state. Confirm print removal via Digital Factory. If the printer is connected to the Digital Factory, it is now possible to confirm the removal of a previous print job via the Digital Factory interface. This is useful in situations where the build plate is clear, but the operator forgot to select Confirm removal on the printer’s display. Visit this page for more information about this feature.
          • Like
        • 0 replies
    ×
    ×
    • Create New...