

I dont know if this helps, but please compare your drive bolt to this picture.
Regards
C.


I dont know if this helps, but please compare your drive bolt to this picture.
Regards
C.
@ Mastory
Feed calibration has been left to the feault i've not hnaged it since getting the machine.
PLA : which came with the ultimaker. i believe its the 2.8mm
at 260* the pla flows through with no issue when fed by hand.
I'm based in East anglia in the UK
@snowygrouch My bolt is the same as in the picture. the pla is lined up to that exact point as desribed.
So far. my Support Ticket hasn't been looked at. I'm pretty damn well disapointed in this machine and this company. i'm going to send it back, i have wasted so much time and effort on it, it cannot do what is claimed and if it can.. well i don't see any help from Ultimaking ltd.
I'm extremely disapointed in Ultimaking ltd.
OK well as you are boxing it up, you can indulge me by perhaps giving some more info...
1) Has it sucessfully printed ANYTHING yet...even the first few layers correctly for example ?
Or h
as it just been grinding the filament constantly with NO sign of sucessful printing ?
2) Please quickly open one of the GCODE text files in Wordpad or whatever and copy paste a chunk of the first few dozen lines which will include a line M92 E865.888
I your case the number "865.888" might be different, but its the M92 E... we are interested in as the correct line
to look at.
3) have a look at this video and compare the speed of the big gearwheel on the extruder to how your own behaves when you are trying to print. I am talking about the speed of rotation specifically here. (go to 50 seconds in)
4) A good basic "santiy checker" for the extruder knurled bolt and spring force is this:
a) Load in the filament as usual
b Attach the spring lever on the back of the extruder as you have been doing
c) Grip the filament by hand firmly below the extruder as it feeds up into it.
d) Try to tear the filament out the extruder by hand.
If you can pull the filament back through the extruder (WITHOUT THE EXTRUDER WHEEL TURNING) by hand
this will tell you that your problem is with filament clamping force.
When its optimal you should JUST be able to pull it back through when you REALLY pull hard. When I say pull it back through, I mean you are dragging it over the knurling and tearing it up.
Be a bit careful with this test, because if the filament is already a continual piece thats been heated up and cooled down in the hotend, when you are pulling on it, it will be "welded" into the hotend....so do this test with the hotend at printing temperature so you know this isnt happening.
If you answer all the above, then cannot find any useful feedback for us here on the forum from the above test...THEN by all means do whatever you want and send it back !
But not before, you will be SO gutted as probably someone on the forum will buy it off you for way less than you paid...
then fix it in about 30mins flat and get printing. Its probably very very fixable, but its difficult to solve this stuff without
having ever had it printing...because you dont know what you are looking for.
You are most welcome to skype call me by webcam, and we can look together at the machine and if we cannot
fix it in one evening I will eat my hat !
Calum.douglas42 is my Skype name.
C.
PS> Final thing to check....there should be a black plastic ring that is pressed onto the ball bearing in the extruder rear hinge with the spring and so on...do you have that installed ?
Or is it just the steel ball bearing pressing the filament onto the knurling ?
I've had one Full suscessful print since the build in october. since then theres been a ton of failings. it will print a few layers and the trouble starts.
;TYPE:CUSTOM
M92 E865.888000
M109 S220.000000
;Sliced C:UsersJoeDownloadsHeavy SKULLCAP.stl at: Mon 11 Mar 2013 13:18:37
;Basic settings: Layer height: 0.3 Walls: 0.6 Fill: 0
;Print time: 2:19
;Filament used: 8.61m 73.44g
;Filament cost: Unknown
I'm at work right now and i'll check the other parts later.. i'd almost be willing to mail you the machine at this point.
My Support ticket still hasn'teven been view by the support team... This is becoming a joke..
Hi Nether,
I am sorry to hear you are experiencing this level of frustration.
Your ticket was 'only' sent Sunday, and i hope you understand after a weekend we have a lot emails (both Sales and support) to go through based on activity. You would have received a reply today, but since there is a big discussion going on on this forum i will get back to you here instead.
I am also interested to hear if the tips Calum sent you made a difference.
If not, almost all tips have been suggested by now.
However, I still want to point out a few things:
Can you take out the teflon tube, and push some new/fresh filament through?
You should feel zero friction.
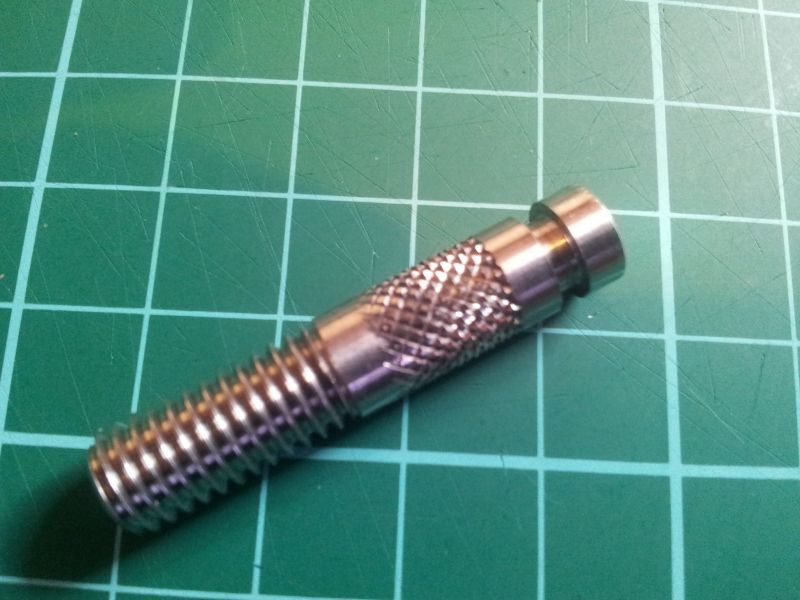
Can you take a close up picture of your drive bolt?
I have not encountered it before, but maybe the teeth are blunt.
If you leave the extruder drive open, are you able to make a print by pushing in the filament manually?
This should be possible if the problem is not your hot end. It will most likely not win a price, but you should have no signs of underextruding or problems in the flowrate.
If you would take out the extruder drive upgrade, and you would place the delrin wheel on the table.. are you able to
make the extruder drive upgrade move? Like push it in, what the spring is suppose to do?
Like illustrated on this picture: http://wiki.ultimaker.com/File:Eh8.jpg
I am looking forward on hearing from you, lets solve your issue!
Sander, while i agree i did send me email on sunday having a "normal,medium,high,urgent,critical,emergency" priority seems to be rendered redundant, But lets move on.
Now i'm back i will be going through Calum's suggestions, failing that i will move on to Sanders suggestions.
Failing this a member emailed me with another solution.
If all these fail. i will be sending my Ultimaker back.
Stil, fingers crossed. Update soon
@ Alexander
No, I fixed my problems the way I described in my earlier reply. The original poster in this thread is still having troubles, though.
Fixing mine was trial and error with the washers to finally get the knurled bolt lined up perfectly with the filament. I noticed my washers were all slightly different thicknesses, so I combined two thinner washers on one side of the big gear and two thicker on the other side of the gear. That ended up putting the filament on the best part of my knurled shaft. In my case, I also had the spring too tight, at first. That's why I loosened that screw completely until it barely caught in the nut threads. Then, I slowly increased the spring pressure until the filament started moving. I gave it only a tiny extra quarter turn beyond the spot where it just started moving. So, it's not gripping the filament tight enough to crush it.
The only "trick" is to eyeball the shaft through the gap and line up the best part of the shaft exactly where the filament is going to go through. Then use the washers to fix it in that spot without moving it.
Just a quick add.
Ultimaker could make this drive system a lot more fool-proof during assembly by just knurling the entire shaft properly instead of a tiny band at one end of it. It should be science to assemble this thing, not a black art.
While I'm making suggestions (that nobody at the company will read, :wink: ) I'd also like to suggest that the electronics be enclosed in a shielded enclosure so that interference from other stuff in the same room doesn't ruin prints. The printer has no robustness. It is a delicate flower thrown completely off by even the slightest changes in heat, humidity, or EMF fields.
Edit: I have read it! 
@ Nether, Thank you. I am looking forward hearing about your findings.
Even if they don't hold the solution, if they would point us to the part that is causing these issues we are already halfway there and close to solving your issues, and we can find a proper solution for you.
Thank you for your time, have a good day!
I'm just gonna answer this very simply as i've slept maybe 8 hours since sunday night.
Teflon tube - cleaned. no friction
Drive bolt set up.
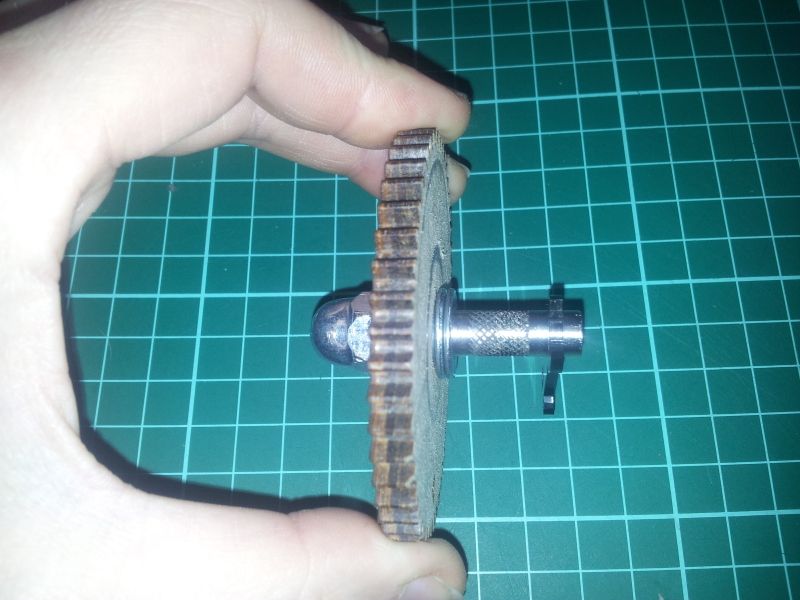
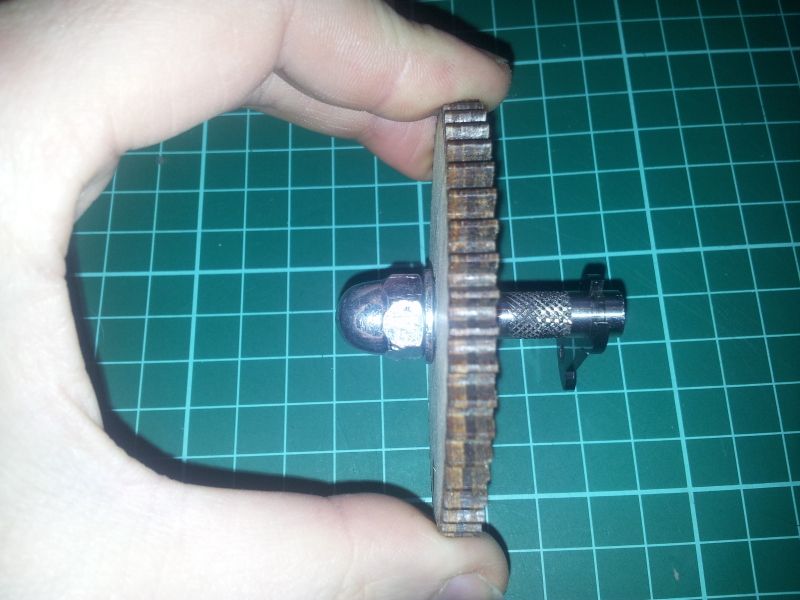
Drive blot close up :
Will update again shortly
Where does the ground plastic appear on your hobbed bolt knurling? Is it on the far "good" side? I suspect that your hobbed bolt installation could be optimized further, but agree with others that it's not your root cause. Like Joergen, I am puzzled by the wood damage. Too much pressure can also cause filament grinding and might be consistent with the wood damage. Are you sure there is some "spring action" in the operating position? LIke many people here, I've successfully run the old and new extruder feeders and the new one is very forgiving. Nonetheless, dimensional / positional problems with the black rubbing block in the old feeder created too much pressure in my original feeder and had to be corrected before it would stop grinding filament. The new spring-loaded bearing is set and forget!
My post in the old forum on the position of the knurling contained many photos. I will not entirely duplicate my efforts again here. On my machine, it was impossible to position the very BEST knurling in the middle of the filament "channel" without modifying the hobbed bolt. By widening the 2mm slot to 4mm on my lathe, the clip position was shifted outward on the bolt and the bolt knurling shifted in the channel in the direction of the big wheel. This put the deepest, fully peaked diamonds in the middle of the filament channel.
The number of washers required varies with the position of the bearings and the positions of the big wheel and locking castle nut on the hobbed bolt. I pressed the bearings fully into their pockets in the wood (the only dimensionally stable position for them). I use one washer under the locking castle nut and three washers between the big wheel and the contact point on the bearing (the washer diameter is small enough fit inside the bearing recess) but my bearing is pressed all the way in. leaving part of the recess, and I have shifted the bolt 2mm too, requiring more spacers.


The best knurling is on the side nearest the slot in the bolt (the slot for the black clip). The knurling becomes progressively worse in the other direction. From one of my posts in the old forum (http://umforum.ultimaker.com/index.php?/topic/1272-extruder-drive-cannot-push-filament-through-hot-end/page-2&do=findComment&comment=9119):
"Zoom into this photo and inspect the diamonds on the right edge of the drive bolt image. Notice that only the top six diamonds are fully pointed, cut deeply, and "good." Widening the slot on my lathe enabled me to position only good knurling in the filament channel. This mod was motivated by Joergen's older drive bolt, which has much more aggressive knurling than these new drive bolts.
Hi Nether,
Thank you for the update. If i am not mistaken a few suggestions from Calum, me and now also Calin are still open.
Will you get back on these once you caught up on your sleep? 
The drive bolt looks alright.
I am looking forward on hearing about your findings,
Have a nice day.
Hello everyone.
Well from everyones suggestions and having tried everything.
here was on last ditch attempts.
The last week, i dismantled the machine down to every last piece down to every last bolt and screw.
pened the Wiki and started from scratch.
Allow me to just saying, when i received my kit - the wiki instructions were..lacking. Greatly.
Whilst its nice to have upgraded parts included .. with no instructions or notice it can be. worrying, stressful and frustrating.
So this time around, now the wiki was.. well lets call it Up to date.
So far So good. i am doing several test printers. the PLA is currently not being chewed.
There have been some Serial error issues where the printer has just upped and stopped printing. but so far so good.
So in closing. I don't know still, what the issue was or if it will come back.
he knurled bolt - the pla was always going on the right section. that i made sure of.
Thank you everyone for your help and input. - Fingers crossed this never happens again.

ArunC posted a topic in UltiMaker Cura,

.thumb.jpeg.0b7a05eafc09add17b8338efde5852e9.jpeg)
Dustin posted a topic in Firmware,


Recommended Posts
mastory 44
Nether,
It looks to me like the extruder bolt isn't positioned with the deepest part of the teeth on the filament. I can't tell because in the picture, the filament is in the way.Sorry, it looks like you corrected this. Can you take a sharp closeup photo of the drive bolt out of the machine to see if it looks up to spec?What is the diameter of the filament you are attempting to use? It should be no larger than 3.05mm(.120"). A bit undersized is better. Measure it before any teeth marks are added, and measure it in more than one direction and in more than one place.
Under normal conditions, there should be almost no restriction (or none at all) in the bowden tube when loading filament. Do you feel any binding or resistance when you insert new filament? To be sure, use a piece that has no teeth marks. When the filament is on the high side of the diameter tolerance, feed marks can make the filament diameter functionaly larger and this can cause feed resistance. This can be exacerbated by over tensioning.
With your hot end at 230 or higher, can you extrude filament by hand (and with out the feeder engaged) with a little force? If everything is clean and free like it should be, you should be able to push filament thru the hot end with a couple pounds of force. Depending on this simple test, you can tell better where to look for the source of the problem.
I don't see any pics of the item you printed, and I haven't seen where anyone has considered the idea that maybe your extruder is over feeding and causing the filament chewing. Did you calipbrate the feed? and/or what is you M92 E__ value? I am not running the stock extruder but I think its normally something like M92 E862 if memory serves me for the stock set-up. Someone else should verify that number.
Are you sure that the filament you have is PLA, and not ABS? Does it smell sweet or acrid when it melts?
Where are you located? Maybe there is someone nearby that might be willing to take a look in person.
I hope not to send you on a wild goose chase. When troubleshooting anything, you have to start with the basics, and don't assume anything without direct observation. Be patient and we can help you get rolling.
Matt
Link to post
Share on other sites