
Thanks @Smithy.
I just resolved in this moment. Strange but I redid the manual bed leveling and now print start correctly.
Edited by Gio26

Thanks @Smithy.
I just resolved in this moment. Strange but I redid the manual bed leveling and now print start correctly.
Edited by Gio26
Autolevel can be nice but I recommend manual level. Use the calibration card. Then once print starts I often change it a little bit by turning the 3 screws an equal amount to move the glass up or down depending.
You want it squished well or the part won't stick well. If you squish too well it's hard to get the part off (if it squishes until transparent then that's too much).
===
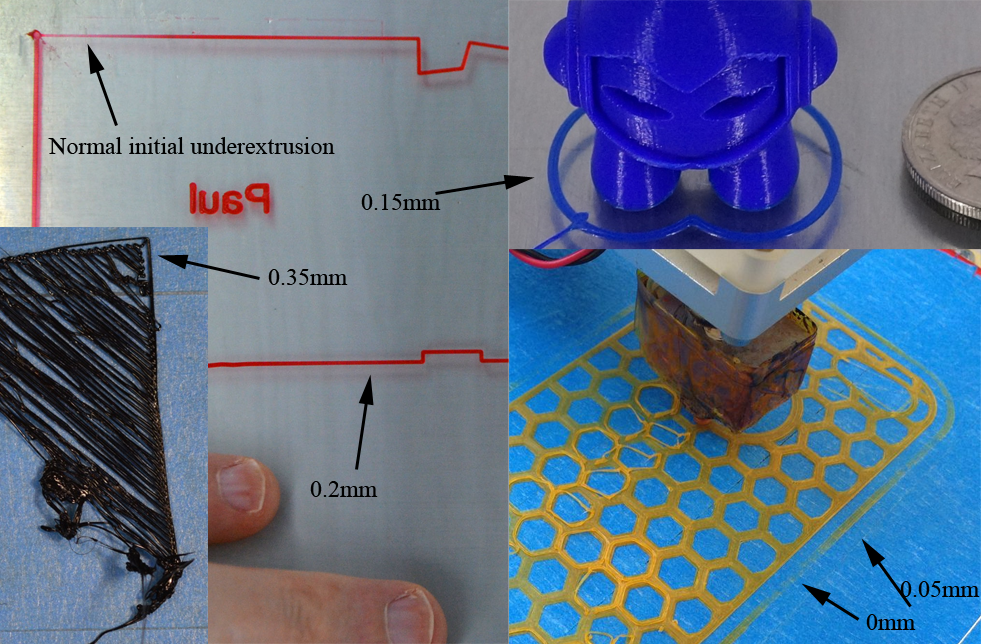
Examples of how bottom layer should look. These pictures are from the internet mostly and I am just guessing that the bottom layer height for all of these is 0.3mm (cura defaults to 0.3 or 0.27 depending). The numbers below indicate my best guess as to how far the nozzle was from the bed (again assuming .3mm is nominal).
The yellow one is a bit too squished but at least the part WILL NEVER COME LOOSE! lol. Danger is it might pull up glass when you try to get the print off.
The blue one is about perfect if you want it to stick really well. This is my goal squishiness.
The red one is okay for small prints but for large prints they may come loose. This is typical if you use the calibration card or auto level.
The black one is leveled much too high above the bed.
I aim for red or blue depending on my goals.
If I want it to stick better I squish a little more. If I don't want the bottom layer to have a tiny brim I usually just set initial horizontal expansion to -0.2 or so but sometimes I instead go with what you see in red below. For example if I'm printing tiny gear teeth, initial horizontal expansion of -0.2 will ruin them so I might go with -0.1 I.H.E. and level like the red one.
I usually adjust the 3 screws (BY EQUAL AMOUNTS) at the start of every print although once it's perfect I don't have to touch leveling for months.
Thanks a lot gr5.
Today I had the same problem.
Yesterday I put my new bed glass, did manual and active leveling then printed some objects, then I turned off printer and go to bed. ?
Today I started the print with automatic leveling. The printer checked the leveling and then the print started by sliding the nozzle onto the glass.
I redid the manual leveling and it was correct. I redo the active leveling and relaunch the print. Now works.
Ok the active leveling is not always better to use but I do not understand if fails the active leveling or z rises beyond what it should or I did something wrong.
Thanks you all.

ArunC posted a topic in UltiMaker Cura,

.thumb.jpeg.0b7a05eafc09add17b8338efde5852e9.jpeg)
Dustin posted a topic in Firmware,

Recommended Posts
Smithy 1,144
I also have sometimes strange behaviors after aborting a print. I don't know why, but when I have to abort, I say that I want not to retry, turn the printer off and on again, and resend the file from Cura to the printer.
If this also does not help, then your nozzle could be clogged. So you have to do a hot/cold pull (see the manual for instructions) or even easier try another print core.
Link to post
Share on other sites