


UM says once per year, but depends how often you print and if your print abrasive materials as well. But you could also try to print on the other print core, just as a test.

First thing to do is decide if it's the feeder or not. Best way to do that is to make sure it can pull about 5kg of force. Put the filament half way down the bowden and hang 2-4kg of weight on the filament and then do "move filament" from the menu.
CAUSES FOR UNDEREXTRUSION ON UM3 AND HOW TO TEST FOR THEM AND REMEDY THEM
As far as underextrusion causes - there's just so damn many. none of the issues seem to cause more than 20% of problems so you need to know the top 5 issues to cover 75% of the possibilities and 1/4 people still won't have the right issue. Some of the top issues:
1) Print slower and hotter! Here are top recommended speeds for .2mm layers (twice as fast for .1mm layers) and .4mm nozzle:
20mm/sec at 200C
30mm/sec at 210C
40mm/sec at 225C
50mm/sec at 240C
The printer can do double these speeds but with huge difficulty and usually with a loss in part quality due to underextrusion. Different colors print best at quite different temperatures and due to imperfect temp sensors, some printers print 10C cool so use these values as an initial starting guideline and if you are still underextruding try raising the temp. But don't go over 240C with PLA.
Note that your "print speed" may be 40mm/sec but it may be printing infill at 80mm/sec so CHECK ALL SPEEDS.
2) Line Width larger than nozzle. In cura 3.X search in settings for all line widths. If any of them are larger than the nozzle diameter this can cause underextrusion. There are 8 of these in cura 3.2.1.
3) Curved filament at end of spool - if you are past half way on spool, try a fresh spool as a test.
4) curved angle feeding into feeder - put the filament on the floor -makes a MASSIVE difference.
5) Bad core. Try a different core. It could be clogged, or something more complex like the temp sensor in the core.
5a) clogged nozzle - the number one most suspected problem of course. Sometimes a grain of sand gets in there but that's more obvious (it just won't print). Atomic method (cold pull) is the cure - from the menu do a few cold pulls. The result should be filament that is the exact shape of the interior of the nozzle including the tiny passage to the tip of the nozzle. If it doesn't look like that you need to pull at a colder temperature. You can do it manually instead of through the menu if it's not working right but learn through the menu initially. 95C is roughly the correct "cold" temperature for PLA. Higher temps for other filaments. Simpler cold pull (3dsolex cores only - doesn't work on ultimaker cores because you can't remove the nozzle): https://www.youtube.com/watch?v=u07m3HTNyEg
5b) Temp Sensor bad - even the good ones vary by +/- 5C and bad ones can be any amount off - they usually read high and a working sensor can (rarely) fail high slowly over time. Meaning the sensor thinks you are at 220C but actually you are at 170C. At 170C the plastic is so viscous it can barely get out of the nozzle. You can verify your temp sensor using this simple video at youtube - on you tube search for this: mrZbX-SfftU
6) feeder spring issues - too tight, too loose. You want the tension such that you can clearly see the diamond pattern biting into the filament. You want to see at least 2 columns of diamonds. 4 columns is too much. You usually want the tension in the center.
7) Other feeder issues, one of the nuts holding UM2 and UM3 together often interferes with the feeder motor tilting it enough so that it still works but not very well. Other things that tilt the feeder motor, sleeve misaligned so it doesn't get a good grip. Gunk clogging the mechanism in there.
? Filament diameter too big - 3mm is too much. 3mm filament is usually 2.85mm nominal or sometimes 2.9mm +/- .05. But some manufacturers (especially in china) make true 3.0mm filament with a tolerance of .1mm which is useless in an Ultimaker. It will print for a few meters and then clog so tight in the bowden you will have to remove the bowden from both ends to get the filament out. Throw that filament in the trash! It will save you weeks of pain
8b) Something wedged in with the filament. I was setting up 5 printers at once and ran filament change on all of them. One was slowly moving the filament through the tube and was almost to the head when I pushed the button and it sped up and ground the filament badly. I didn't think it was a problem and went ahead and printed something but there was a ground up spot followed by a flap of filament that got jammed in the bowden tube. Having the wedgebot (link below) helps you feel this with your hand by sliding the filament through the bowden a bit to see if it is stuck.
https://www.youmagine.com/designs/wedgebot-for-ultimaker2
9) Extruder mis calibrated. Maybe you changed equipment or a wire fell off. Try commanding the filament to move exactly 100mm and then measureing with a ruler that it moved 100mm within 10% accuracy. If not adjust the steps/mm (this is done by editing a json file on the UM3).
10) Z axis steps/mm. it's easier than you might think to double or half the Z axis movement as there is a jumper on the circuit board that can be added or removed. If the Z axis is moving 2X you will get 50% underextrusion. Your parts will also be 2X as tall.
11) Crimped bowden. At least one person had an issue where the bowden was crimped a bit too much at the feeder end although the printer worked fine when new it eventually got worse and had underextrusion on random layers. it's easy to pull the bowden out of the feeder end and examine it. Similar to 8b above - use the wedgebot to feel how much friction there is in the bowden.
12) Worn Bowden. After a lot of printing (or a little printing with abrasive filaments) the bowden resistance can be significant. It's easy to test by removing it completely from the machine and inserting some filament through it while one person holds it in the U shape. Preferably insert filament that has the pattern from the feeder and fight the movement by applying 2kg force on both ends at the same time and then seeing how much harder you have to push it on top of 1kg force. UM2 feeders can push with 5kg force. UM3 can push quite a bit more. 5kg is plenty.
13) Small nozzle. Rumor has it some of the .4mm nozzles are closer to .35mm. Not sure if this is actually true. I'm a bit skeptical but try a .6mm nozzle maybe. This shouldn't be a problem on the UM3 which has very good quality control but try a different core.
14) CF filament. The knurled sleeve in the extruder can get ground down smooth - particularly from carbon fill. 4 spools of CF will destroy not just nozzles but the knurled sleeve also. Look at it visually where the filament touches the "pyramids". Make sure the pyramids are sharp.
15) Hot feeder driver. I've seen a more recent problem in the forums (>=2015) where people's stepper drivers get too hot - this is mostly a problem with the Z axis but also with the feeder. The high temps means the driver appears to shut down for a well under a second - there is a temp sensor built into the driver chip. The solution from Ultimaker for the um2 is that they lowered all the currents to their stepper drivers in the newer firmware. Another solution is to remove the cover and use desk fan to get a tiny bit of air movement under there. This doesn't seem to be a problem on UM3 even though it's the exact same circuitry but they lowered the current in the firmware. But it's worth considering if air temp is 30C or hotter. It would probably happen only after printing for a while (air heats up slowly under the printer).
16) third fan broken. This tends to cause complete non-extrusion part way through a print. In the door of the head. You can hear it come on when cores get above 40C. Without this fan several things can go wrong. It can take a while as usually you also need several retractions to carry the heat upwards. There are a few failure mechanisms and I don't understand them all. One of them is probably that the molten PLA spreads out above the teflon and sticks to the metal in a core or fills the gap at the base of the bowden in UM2. Later it cools enough to keep the filament from moving up or down.
17) Spiralize/vase mode. This is a rarely used feature of Cura but you might have left it on by accident? In this mode the wall of your part is printed in a single pass. So if you have a .4mm core and the wall is .8mm thick it will try to over extrude by 2X. This is difficult to do and may instead lead to underextrusion.
18) too many retractions (this causes complete failure) - if you have too many retractions on the same piece of filament you can grind it to dust. 10 is usually safe. 20 is in the danger zone. 50 should guarantee failure. You can tell cura to limit retractions to 10 per a given spot of filament. Do this by setting "maximum retration count" to 10 and "minimum extrusion distance" to your retraction distance (4.5mm for UM2 and 6.5 for UM3).
19) Brittle filament. Espciallty with older PLA but even brand new pla can do this. If you unspool some (for example if it's in the bowden) for many hours (e.g. 10 hours) it can get extremely brittle and it can snap off into multiple pieces in the bowden. It's not obvious if you don't look for this. Then it starts printing just fine and at some point one of those pieces reaches the print head and gets hung up somewhere and the printer suddenly stops extruding for now apparent reason. This usually happens within the first meter of filament - once you get to printing the filament that was recently on the spool it should be fine from then on.
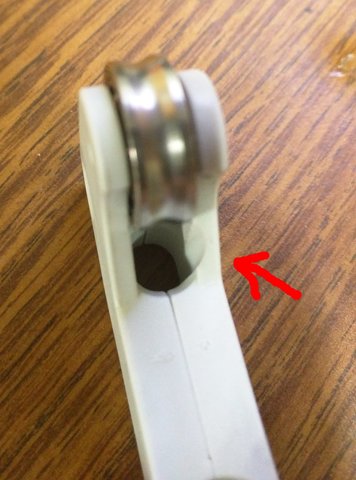
20) The "plus" feeder can have an issue where the filament doesn't sit properly for one print and it permanently damages the arm inside the feeder as shown by this photo - the hole is ground down asymetrically: http://gr5.org/plus_feeder_issue.jpg
-
Our picks
-

UltiMaker Cura 5.7 stable released
ArunC posted a topic in UltiMaker Cura,
Cura 5.7 is here and it brings a handy new workflow improvement when using Thingiverse and Cura together, as well as additional capabilities for Method series printers, and a powerful way of sharing print settings using new printer-agnostic project files! Read on to find out about all of these improvements and more.
-
-
- 16 replies
.thumb.jpeg.0b7a05eafc09add17b8338efde5852e9.jpeg)
Picked By
MariMakes, -
-
Release Notes: S-Line Firmware 8.3.0 (Latest)
Dustin posted a topic in Firmware,
S-Line Firmware 8.3.0 was released Nov. 20th on the "Latest" firmware branch.
(Sorry, was out of office when this released)
This update is for...
All UltiMaker S series
New features
Temperature status. During print preparation, the temperatures of the print cores and build plate will be shown on the display. This gives a better indication of the progress and remaining wait time. Save log files in paused state. It is now possible to save the printer's log files to USB if the currently active print job is paused. Previously, the Dump logs to USB option was only enabled if the printer was in idle state. Confirm print removal via Digital Factory. If the printer is connected to the Digital Factory, it is now possible to confirm the removal of a previous print job via the Digital Factory interface. This is useful in situations where the build plate is clear, but the operator forgot to select Confirm removal on the printer’s display. Visit this page for more information about this feature.-
-
- 0 replies
Picked By
MariMakes, -
-


.thumb.jpeg.0b7a05eafc09add17b8338efde5852e9.jpeg)
Recommended Posts
Smithy 1,144
This is underextrusion, so check your feeder and clean it.
How old is the printer? Because maybe your Bowden tubes are also end of life and need a replacement.
You could test it, if you print the same objects on the other print core, there you have another feeder, another tube and so on.
Link to post
Share on other sites
SQuicke 0
It's probably 2-3 years old now. How long do bowden tubes tend to last? I'll have a good clean out and check the feed gear and if this doesn't work i'll try replacing the bowden tubes. Thanks for the advice!
Link to post
Share on other sites