Jump to content

Are lines, zig-zag and concentric the only available options for surface?


ultimaker_user

Recommended Posts

Posted · Are lines, zig-zag and concentric the only available options for surface?

Hi, I have been trying the Ironing feature but I cannot find a good set of values to use. There are always some extra diagonal lines on the surface even I reduced the top surface print speed to 10mm/sec. Are lines, zig-zag and concentric the only other available options to choose for top and bottom surfaces? Are there any other surface patterns that I could use? SuperSlicer has about 9. 

  • Link to post
    Share on other sites

    Posted (edited) · Are lines, zig-zag and concentric the only available options for surface?

    Thank you. I will give it a try. 


    As for ironing, do you have any suggestions on how to improve the look? Two main issues:

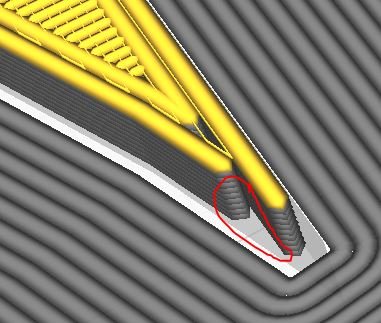
    1. Claws like diagonal lines on top of the top surface (it reminds me of A Nightmare on Elm Street).

    2. Some kind of extra bits (like very small crystalized bubbles) on the top surface.


    I tried:


    Flow 5, Speed 20, line width 0.2, top surface skin layer 2, infill 50%

    Flow 10, Speed 16.666, line width 0.1, top surface skin layer 2, infill 50%

    Flow 15, Speed 20, line width 0.2, top surface skin layer 2, infill 50%

    Flow 15, Speed 90, line width 0.2, top surface skin layer 2, infill 50%


    I got these values from YouTube or websites that show seemingly nice looking surfaces. Mine don't look like theirs.


    Edited by ultimaker_user
  • Link to post
    Share on other sites

    Posted · Are lines, zig-zag and concentric the only available options for surface?

    Sorry, I never really tried ironing.

    But you can also try to print as cool as possible, which gives normally a better finish.

  • Link to post
    Share on other sites

    Posted · Are lines, zig-zag and concentric the only available options for surface?

    I've printed PLA as cool as 175C.  That's about the limit for me personally.  Usually I print much hotter.


    Look for posts by "neotko" in this forum.  He is the expert on this feature and has gotten it to work better than anyone.  Anyone.  lol.   e.g. in google do:


    site:ultimaker.com neotko ironing


    Older posts will be more informative in this rare case.  He might have called it by something else?  I think he always called it "ironing".


    Also consider your nozzle tip.  What is the diameter of the "shoulder" (the flat part) and the diameter of the nozzle hole.  You should be able to set the ironing spacing based on that diameter.  Maybe 20% smaller?  Not sure.  See what neotko did.


    • Like 1
    Link to post
    Share on other sites

    Posted · Are lines, zig-zag and concentric the only available options for surface?

    continued (sorry for being two posts)


    It could be your results are worse than what you have seen on internet because of the shape of your nozzle tip.  Not all nozzles are the same.


    Usually you want as small as possible a shoulder but for ironing I'm not sure what is ideal.


    The only thing I remember from neotko regarding ultimaker defaults was that he though there should be some extrusion happening during the ironing.  Something like 10%.  I think he complained that early profiles defaulted to 0% in ironing.  I don't know what they are lately.

  • Link to post
    Share on other sites

    Posted · Are lines, zig-zag and concentric the only available options for surface?

    yes, I came across some posts by neotko.


    Another issue is the top surface showing zig-zag patterns even I have set combing to not in skin.

  • Link to post
    Share on other sites

    Posted (edited) · Are lines, zig-zag and concentric the only available options for surface?

    Hi, I have been printing the same thing all day by trying different variables and values. In the last print, it looked quite good but for strange reason, part of the tip was not printed. When I looked at Cura, I noticed that at the same position, the yellow part is also not shown (the area circled in red). I have some questions:


    1. Is it true that if a part does not show up in preview, it will not be printed?


    2. Why part of the tip (enclosed in red circle in the screenshot) was not printed? This is the first time I have this problem. In six other prints, the tip was printed perfectly.


    3. Similar, why there is a big gap at all the brim lines (enclosed in blue) ? I think this is the first time I see this. How do I close them?


    4. Under preview, is the top surface with yellow parallel vertical lines the top surface of the actual print?


    no filament at tip.JPG

    Edited by ultimaker_user
    To make it clear
  • Link to post
    Share on other sites

    Posted · Are lines, zig-zag and concentric the only available options for surface?
    6 minutes ago, ultimaker_user said:

    1. Is it true that if a part does not show up in preview, it will not be printed?

    Yes, except the reason why you see the gap (more later)


    6 minutes ago, ultimaker_user said:

    2. Why part of the tip (enclosed in red circle in the screenshot) was not printed? This is the first time I have this problem. In six other prints, the tip was printed perfectly.

    I guess it is the same reason why you see the gap in the brim (more later) 🙂


    7 minutes ago, ultimaker_user said:

    3. Similar, why there is a big gap at all the brim lines (enclosed in blue) ? I think this is the first time I see this. How do I close them?

    You have coasting enabled in Cura. With coasting the last part of a line is not extruded because it should use the pressure in the nozzle to print (extrude) the last few mm. I guess that is also the reason why you have the missing part at the tip.


    9 minutes ago, ultimaker_user said:

    . Under preview, is the top surface with yellow parallel vertical lines the top surface of the actual print?

    No if I understand you correctly, or not in your screenshot. To see the top surface you have to scroll up to the last layer. In Cura you can scroll though all layers.


    10 minutes ago, ultimaker_user said:

    I have been printing the same thing all day by trying different variables and values. In the last print, it looked quite good but for strange reason, part of the tip was not printed.

    A general advice, don't change too much settings, otherwise you will get confused and have no idea why. The default profiles in Cura are quite good and normally there no need to change more than a few settings. (like combing i.e.)

  • Link to post
    Share on other sites

    Posted (edited) · Are lines, zig-zag and concentric the only available options for surface?

    Thank you. I will disable coasting and try again. At least under Preview, the gaps on the brim are closed. However, I can still see some gaps/holes at the tips. Any way to fill it in perfectly?


    If I am using a 0.4mm nozzle, can I set Line Width to less than 0.4mm to perhaps make the surface looks smoother?


    I have scroll up to the last layer in Cura already. Why I cannot see the top surface? Is it supposed to look smooth at least on the screen? On the printed part, I also see vertical parallel lines so I wonder if this is also a surface. I have Top Surface Skin Line Direction set to [0, 90] from [] as I saw many ugly diagonal zig-zag patterns with gaps on the surface.


    Edited by ultimaker_user
  • Link to post
    Share on other sites

    Posted · Are lines, zig-zag and concentric the only available options for surface?

    You will always see parallel lines on the top surface, that's the way 3D printing works. With things like ironing you can reduce it a little bit, but you will never get out of the printer a smooth surface.


    2 minutes ago, ultimaker_user said:

    Why I cannot see the top surface?

    When you are at the top, then it is the top surface, I don't looks very different to anything else you see.


    4 minutes ago, ultimaker_user said:

    saw many ugly diagonal zig-zag patterns with gaps on the surface.

    I think it would be helpful when you post some pictures what you mean. Maybe you try to achieve something what is not possible. 

  • Link to post
    Share on other sites

    Posted (edited) · Are lines, zig-zag and concentric the only available options for surface?

    My main problem is that the sharp corner is not printed nor sliced properly. The printed one looks like the one in the preview. As you can see form the red highlighted corner, part of the yellow later is missing. It did not happen before as shown in "tip earlier on". I don't know what caused this missing bit and how to fix it. The tip shown in "tip earlier on" is much shaper. It is the one I want. 


    missing pointed corner.JPG

    tip earlier on.JPG

    Edited by ultimaker_user
  • Link to post
    Share on other sites

    Posted · Are lines, zig-zag and concentric the only available options for surface?

    I know what you mean and the reason is, that the line width is very small, therefore it is not printed by default. But there are several options, not sure which one is responsible for that, but try:


    Filter Out Tiny Gaps -> unchecked

    Compensate Wall Overlaps


    And this could also help, when you print the outer wall before inner wall:

    Outer before Inner Walls


    Can you upload your STL or project file here, then we can also check it.

    • Like 2
    Link to post
    Share on other sites

    Posted · Are lines, zig-zag and concentric the only available options for surface?

    After I disabled Compensate Wall Overlaps. The problem is solved. Thank you.


    For the top with ironing, I have Top Bottom Line Direction changed from [] to [0]. Will it make the top surface weak? As the extruder is making parallel lines to form the surface, sometimes it created extra bits of straight lines (kind of like left over) above the top surface. What parameter should I change to eliminate it?


    Also, I read that to eliminate scars on the top surface, I should enable Z hopping. I set it to 1mm. However, I still see one or two diagonal scars like before. I have Combing Mode: Not in Skin, Max Comb Distance with No Retract: 0 mm, Avoid Supports When Traveling: Unchecked. What else can I do to eliminate the scars?

  • Link to post
    Share on other sites

    Posted · Are lines, zig-zag and concentric the only available options for surface?
    47 minutes ago, ultimaker_user said:

    Will it make the top surface weak?

    I don't think so, you have some other layer below, to it is just the top layer.


    48 minutes ago, ultimaker_user said:

    Z hopping

    I don't think it will make the surface better, but try it. I never enable it.


    49 minutes ago, ultimaker_user said:

    What else can I do to eliminate the scars?

    Please post a picture of the model, it is hard to give advices without seeing to problem.

  • Link to post
    Share on other sites

    Posted · Are lines, zig-zag and concentric the only available options for surface?

    Unless you have a delta printer (google image search delta printer - it's not like a normal XYZ printer) then I would avoid ZHop.  If zhop is turned on then you need a really good quality z screw and z nut.  Otherwise you will get lots of horizontal layer lines in your print and your prints will be still pretty accurate but much more ugly.


    If for example you have a $50,000 printer with very high quality Z screw and Z nut then z hop is great.  Or if you have a delta printer which doesn't have a Z screw.


    You may be fine with zhop.  Especially if your printer is still new and the Z screw is very clean.  But in general I don't recommend it.

  • Link to post
    Share on other sites

    Posted · Are lines, zig-zag and concentric the only available options for surface?

    The kind of scar I am having is exactly the one shown in the open issue posted last year on Github.


    https://github.com/Ultimaker/Cura/issues/6517


    I did not have this issue when I used other slicers.


    First I enabled Hop Z at 1mm and 2mm but the problem did not get resolved. Then, I enabled Z Hop Only Over Printed Parts. So, I have:


    Z Hop Speed: 10mm/s

    Z Hop When Retracted: Enabled

    Z Hop Only Over Printed Parts: Enabled

    Z Hop Height: 2mm


    but it is still there. 

  • Link to post
    Share on other sites

    Posted · Are lines, zig-zag and concentric the only available options for surface?

    Oh!  A picture is worth a thousand words!!!!!!!!!


    Then disable combing.  At least in "skin".  Those are 2 combing moves in that photo on github.


    zhop only "hops" if you are doing a retraction.  There is no retraction in combing moves so it won't zhop for those.


    But if you disable combing moves you might not need ironing or zhop at all.  It depends how perfect you want your part.  Personally I have low standards and don't use ironing.


  • Link to post
    Share on other sites

    Posted · Are lines, zig-zag and concentric the only available options for surface?

    I just checked.


    Under Combing Mode, I have "Not in Skin".

    Max Comb Distancd with No Retract: 0 mm

    Avoid Printed Parts When Traveling: Checked

    Avoid Supports When Traveling: Unchecked


    I have high standards. If I want nice looking surface, shall I have Combing Mode: Off?


  • Link to post
    Share on other sites

    Posted · Are lines, zig-zag and concentric the only available options for surface?

    "not in skin" is best for high quality looking prints.


    When the nozzle is done with a line and needs to move to a new location that is a "non extruding move".  If it's possible to get to the new location without leaving the interior of the part then it can choose to do a combing move where it stays inside the part.


    For example if you are printing a thick cylinder and it wants to move to the opposite side of the cylinder it can zip over to the new spot the long way and it avoids creating any bumps on the outside of the part.  That's called a "combing move".  A non-combing move it would just go straight across the middle of the cylinder.


    Combing moves never do retraction so they always leak a little.  Non-combing moves do retract.


    The only time people tend to care about this is in "skin" where a combing move makes these lines on the top and bottom of surfaces.  If you disable combing for skin it will instead do a retract and not leave the mark.

  • Link to post
    Share on other sites

    Create an account or sign in to comment

    You need to be a member in order to leave a comment

    Create an account

    Sign up for a new account in our community. It's easy!

    Register a new account

    Sign in

    Already have an account? Sign in here.

    Sign In Now
    • Our picks

      • UltiMaker Cura 5.7 stable released
        Cura 5.7 is here and it brings a handy new workflow improvement when using Thingiverse and Cura together, as well as additional capabilities for Method series printers, and a powerful way of sharing print settings using new printer-agnostic project files! Read on to find out about all of these improvements and more. 
         
          • Like
        • 18 replies
      • S-Line Firmware 8.3.0 was released Nov. 20th on the "Latest" firmware branch.
        (Sorry, was out of office when this released)

        This update is for...
        All UltiMaker S series  
        New features
         
        Temperature status. During print preparation, the temperatures of the print cores and build plate will be shown on the display. This gives a better indication of the progress and remaining wait time. Save log files in paused state. It is now possible to save the printer's log files to USB if the currently active print job is paused. Previously, the Dump logs to USB option was only enabled if the printer was in idle state. Confirm print removal via Digital Factory. If the printer is connected to the Digital Factory, it is now possible to confirm the removal of a previous print job via the Digital Factory interface. This is useful in situations where the build plate is clear, but the operator forgot to select Confirm removal on the printer’s display. Visit this page for more information about this feature.
          • Like
        • 0 replies
    ×
    ×
    • Create New...