
foehnsturm 969
Cool! How is the air flow distribution over the duct width?

There is a slight "dead spot" in the middle as one would expect. I tried to come up with some way to duct some of the air from the sides towards the middle, without creating new dead spots, but went with "meh, screw, let's try it first". After testing it I'm considering going with two 90mm fans instead and run them slower. That should reduce noise and make for a more even spread of air.
I'm just flailing around in the dark here though, just trying stuff for fun 
Using the Cura infill to collimate the airflow is elegant; well done!
Exactly! If I would have to design a printer I would start with your idea. It's the most straightforward approach to provide an optimum thermal situation.
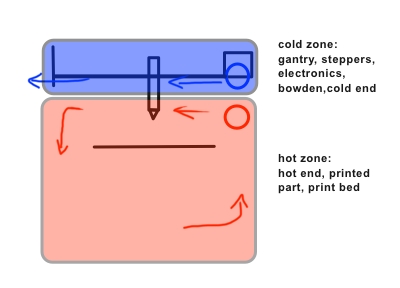
Great ideas with the separation of cold and hot air!
For this purpose, the newly announced iphone 5 add-on from FLIR might be useful - providing you guys have iphone 5s....
http://www.flir.com/flirone/explore/tech-specs.html
Android versions are coming later in 2014.
TheFLIR ONE goes up to 100 degrees Celsius which should be good enough for this purpose.
For experimenting with / troubleshooting hot-ends you need a "proper" thermal imager though and they are still quite expensive....
@foehnstrum, I'm glad you think the idea is worth a second look! I was thinking about it in the shower, which is were all my best ideas have been born.
@gadgetfreak nice find, I'm looking forward to the android version. Although my UM2 hasn't shipped, I'm still interested in implementing something like this for it. Although I am definitely interested in how well it performs out of the box without any modifications. I melted my old K-thermal probe for my multimeter in an old project, and ordered this bad boy as a replacement http://www.amazon.com/gp/product/B0084JQL1Q/ref=oh_details_o00_s00_i00?ie=UTF8&psc=1 with a really long probe http://www.amazon.com/gp/product/B00D8337YW/ref=oh_details_o00_s00_i01?ie=UTF8&psc=1 I figured this should help me take accurate point readings throughout the inside of the UM2 while making simultaneous comparisons to the outside.
I also snagged myself a small crossflow fan for testing purposes, this one measures about 1.75 inches thick and 5 inches long in its current housing; but the internals are all removable and I think I can redesign a more slim case if I can't squeeze it into the UM2 as is. Just got to wait until that printer ships!

Great ideas with the separation of cold and hot air!
For this purpose, the newly announced iphone 5 add-on from FLIR might be useful - providing you guys have iphone 5s....
http://www.flir.com/flirone/explore/tech-specs.html
Android versions are coming later in 2014.
TheFLIR ONE goes up to 100 degrees Celsius which should be good enough for this purpose.
For experimenting with / troubleshooting hot-ends you need a "proper" thermal imager though and they are still quite expensive....
Saw that one too. Might be a useful gadget (depends on the price). But be aware it shows only surface temperatures not the air temperature... some ntc measurement in parallel might not be the worst idea.
Cool that the iphone users will pay the engineering costs once more and the Android users will have the cheaper version... :wink: (I belong to the Androids...)
Exactly! If I would have to design a printer I would start with your idea. It's the most straightforward approach to provide an optimum thermal situation.
Has anyone rotated their printer 180 degrees so the device is upside down? I can see a few problems with this like bridging creating hanging bits that would hit the printer head. I ask because in some regards I think this would be the easiest way to retain the heat in the printer in the correct areas of the printer. Keeping cool air at the "bottom" of the printer separated from the hot air at the "top" as a function of the differences in their densities. Probably not worth the hassle though, but an interesting thought.
Is there any news yet about replacing the crossflow fan with axial fans?
I'd prefer using standard axial fans over crossflow, because crossflow fans are more difficult to get by, and afaik the Silverstone one is pretty noisy (heard that only second-handedly, some time ago when I was interested in making silent PC builds...).
Noise reduction is one of my primary goals for my next UM build, because the machine should be quiet enough to be able to run overnight in the living room. That's definetly not the case with the standard build - depending on how picky your family is and how clairaudient your apartment is (is "clairaudient" really a word that people know? Got that from the dictionary...).
Sorry, I haven't done any further tests yet, I've been distracted by other things.
I will testing this:

At one side you mount your axial fan. At the other side you have the outflow. I think ist ready at weekend.
I will testing this:
At one side you mount your axial fan. At the other side you have the outflow. I think ist ready at weekend.
If possible, add some centimeters to the round part (where the fan is mounted). The axial fan will show a bit more power. Well, actually, you will loose less power as the setup induces a really huge pressure drop. Don't be disappointed if you don't get any air out of the slit. At least you will certainly hear the fan... :wink:
you will loose less power as the setup induces a really huge pressure drop
I fear that... indeed.
The exhaust opening slot measured: 213x4 mm. The fan has a diameter of 56 mm. At the moment I print the last part. Then I will test it.
I do not know which air velocity is needed for effective cooling. You you have any values?
I think I have to experiment
Does it help to use an axial fan that claims to have a very high static pressure (such as the famed Noctua fans?).
I like the Noctua fans, but they are bloody expensive...
In the next days I will test my construction
The first test: It is easy to blow out a candle in a distance from 30 cm. The airflow seems to be very slim and laminar.
Whether it will be sufficient for an effective cooling I will see.
hello I have an ultimaker 1 with out hot bed.
I wandering what is the best betwee a cross flow fan and a double fan near the extruder?
do you know how to buy cheap fan and how to mount them with the conectic ?
thanks for the cross flow devlopement it look amasing
Does anyone know of an European reseller of the SilverStone FX121 Cross Flow fan or a similar fan in the same price range. I would really hate to have to pay an additional $52 for shipping+tax for a $26 fan.
Just ordered a cross flow fan at Conrad.
I think it is the same Markus and ballanux are useing. I am excited how this fan will improve print quality.
Regards,
Philip
Please keep us posted!
I'm too busy atm creating a needle test adapter for our latest product. So besides myself, my printer is also busy :(
But I want to join in asap creating a better cooling solution.
After two months printing I couldn't say anything negative about it. As a matter of principle, one could think that tiny parts might be a weakness (most of the airflow is "wasted") but even small pillars come out fine.
Hi!
Impressive - but there is another detail which looks interesting. :-)
Could you tell us a bit more about the suspension on the feeder side? :-)
What about noise compared with the original setup?
Does it help?
If you would count the original noise level as 100% and holding the extruder in your hand as 0%, I would say it's 25-33% (depending on how much you squeeze the dampers).
Very nice design!
Did you also rotate the feeder mechanism by 90°? I was looking to do that too because my printer will be placed on a very thin shelf soon...
Yes I did rotate it. It saves some space but not that much. Reason for me was to use the slot for the bowden fitting for holding the extruder.

ArunC posted a topic in UltiMaker Cura,
.thumb.jpeg.0b7a05eafc09add17b8338efde5852e9.jpeg)
Dustin posted a topic in Firmware,


Recommended Posts
Top Posters In This Topic
22
15
12
11
Popular Days
Jan 13
10
Mar 23
8
Mar 25
8
Jan 12
7
Top Posters In This Topic
jonnybischof 22 posts
foehnsturm 15 posts
neotko 12 posts
Dim3nsioneer 11 posts
Popular Days
Jan 13 2014
10 posts
Mar 23 2014
8 posts
Mar 25 2014
8 posts
Jan 12 2014
7 posts
IRobertI 520
No, this is for my UM1 which will be converted to the UBIS hotend to see if I can get some life back into it. But if I'm happy with the results (if I ever finish it) it's not impossible that I'll want to use it on the UM2 as well and start working towards that.
Link to post
Share on other sites