Jump to content

Recommended Posts

Posted · Heated Build Chamber WIP

Hi dear Ultimakers :c)

I have had my Ultimaker original now for just over a month. I am very pleased with it and I have to say the money was very well spent.

I am in the process of designing a heated build chamber that will double as a fume containment and extraction system. I have tried the ‘oven bag’ method and tried printing with 1.75mm ABS, no heated bed (yet) but got a good result by just heating the enclosed volume with a hair dryer.

But then there were the awful nasty fumes! So I decided to do something about it.

I introduce the Ultimaker Heated Chamber! Not a new idea, but I thought I’d have a go ;c)

Chamber02

The transparent nature of the material makes it hard to render ;c)


Chamber01


Locking clips

The design will be made in 6mm polycarbonate and utilises dog tooth edge joints with an ‘L’ section strip of polycarbonate fastened with M3 bolts, no ‘T’ slots as I think this method is much stronger. I have read good things about polycarbonate, very tough and with good heat resistance.

I will be having this laser cut and am planning to make a kit to sell. I have no experience of this and would really welcome feedback on how to go about doing this. I am completely new to the maker movement and am very excited to start contributing back to the community. Any advice on the do’s and don’ts regarding a small scale commercial project, but without upsetting anyone in the process would be most welcome :c)

Even though I would like to make a kit for people to buy, I will be releasing all the digital files to the community, again any advice on the different licenses would be great. The design is not quite finished yet but I will be posting updates as they happen.

Cheers :c)


  • Link to post
    Share on other sites

    Posted · Heated Build Chamber WIP

    The community (and also I'm sure Ultimaker) welcomes your modification. I think you might be required to post using the same license as UM posted with but I wouldn't worry about it too much. I recommend choosing the CC attribution with or without the non commercial addition. I'd probably skip that as then Ultimaker can't use it themselves. Please eventually post your design on youmagine.com also. Thingiverse has a click license when you signed up that gives them all rights to do whatever they want with anything you post there. Youmagine does not.

    Do you have a heated bed or are you going to use another heater (100 watt lightbulb?), or what?

    I found a heated bed to be sufficient for PLA. Are you going to print ABS?

    Most of the shrinkage/cooling issues happen from the glass temp to air temp if the model isn't done printing. So for PLA the glass temp is around 60C. For ABS the glass temp is around 100C.

    For PLA, heating the air from a typical room temp of 20C to 40C will cut the shrinkage and lifting forces by 2X. 50C even more. Any hotter than 50C is too close to the glass temp and you might have trouble printing.

    For ABS, raising the air temp from 20C to 40C will only reduce shrinkage/lifting by about 25%. So for ABS you might need to mount your steppers *outside* the frame. Although they get in the way, this is very easy to do and requires no drilling and no additional parts. The motor can be mounted outside the frame and the pulley sticks through the hole to the inside of the machine. The direction needs to be reversed which can be done by rebuilding the Marlin firmware. If you use robot fuzz it is trivial.


  • Link to post
    Share on other sites

    Posted · Heated Build Chamber WIP

    Hi again gr5, thanks again for helping me post the pictures :c)

    I had a feeling that thingiverse might have something like that. I think that Youmagine will be the way to go, and I intend to release all the files not just STL files.

    I will make sure to read up on the Creative Commons licences that you mention here. I'm not sure about which way to go, it will probably depend on how generous I'm feeling on the day ;c)

    I don't have a heated bed yet, but I will see how I get on with my very low tech hairdyer ;c) I do intend to get a heated bed but there are a few ways to go with this and I like to fully understand the pro's and con's first.

    I am going to be printing with ABS and later would like to try other materials too, Polycarbonate, Nylon and others. One thing at a time though.

    I have been reading up on the 'glass transition point' and this was part of the motivation for the build. My thinking was by heating the air in the chamber this might offer a more even heat distribution and therefore reduce non-homogenous distortions as the part is being printed. If you think about it the heated bed may be good at adhering the part to the plate, but the upper layers are cooling and contracting at a different rate. It’s all just about seeing what works best by experiment. I have read that the commercial FDM printers have the ambient air temp around 70C. This glass transition seems to be the critical thing to control.

    I had seen a post in here about mounting the motors outside and this also offers the option of direct drive, which I might do also. Great suggestion :c) However I think I would be simply changing the wiring, as for me this would be a permanent change.

    One of my design considerations is that no part of the Ultimaker will need to be cut or drilled, as I know some people really don’t like this.

    Many thanks, it’s great to be here finally :c)


  • Link to post
    Share on other sites

    Posted · Heated Build Chamber WIP

    I do intend to get a heated bed but there are a few ways to go with this and I like to fully understand the pro's and con's first.


    And ultimaker plans to sell a heated bed kit for the UM Original so you might want to wait.


    I have been reading up on the 'glass transition point' and this was part of the motivation for the build. My thinking was by heating the air in the chamber this might offer a more even heat distribution and therefore reduce non-homogenous distortions as the part is being printed.


    If you stick a piece of PLA filament in hot water right out of the microwave for 10 seconds, then remove and bend it you understand how it behaves in the 60C to 100C temperature range. This is way way below the melting point of 170 to 180C. But above the "glass temp". The shrinkage that happens from 220C to 100C happens almost instantly and causes the individual trace to shrink. So much that for ABS you have to overprint (there used to be a "packing density" in Cura that simply increased the flow ) by a few % (3%?).

    That shrinkage happens so fast that the position is correct the part itself doesn't deform - just the trace of PLA coming out the nozzle.

    From 100C to 70C there is probably some shrinkage of the whole layer occurring. But because it is above the glass temp, it is more of a thinning action than a shrinking action. However once it gets below glass temp (or a little above) then there starts to be stresses on the entire layer. The whole layer pulls itself tight inward. Putting stress on the layer below (which puts stress on the layer below that all the way down).

    By keeping the air in the 50-70C range you eliminate this. Of course when the part is done and you cool the entire part from around 50C to around 20C you get the entire part shrinking but it keeps it's shape. This last final shrinkage can be compensated for by building your models .3% larger.

    .3% is aprox the expected shrinkage from 50C to 20C.


  • Link to post
    Share on other sites

    Posted · Heated Build Chamber WIP

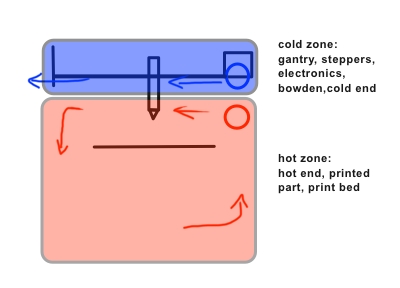
    Please keep one thing in mind. If you heat a chamber with an enclosed top to say 60°C for PLA, the bowden tube will get this warm as well. But you don't want to have the filament in the bowden near or above glass transition temp. This increases the risk for disastrous plugs in the tube. I already created one with a covered top before I started the crossflow fan approach. Ideally, you want a temperature distribution like that

    printer-schematics.jpg


  • Link to post
    Share on other sites

    Posted · Heated Build Chamber WIP

    Very important point, foehnsturm! :smile:

    So one possibility might be not to close sides and front completely but just up to the nozzle height. Maybe it doesn't even need a fan for the cold zone? Maybe forced convection by the hot zone fan and natural convection due to temperature difference is enough?

    What about a slit at the bottom where cold air could leave the box?


  • Link to post
    Share on other sites

    Posted · Heated Build Chamber WIP

    Hi everyone :c)

    Sorry I heven't replied to your posts, but I have been having broadband issues, but I have still been working on my designs.

    I will respond to your posts shortly and post my updates :c)

    Cheers.


  • Link to post
    Share on other sites

    Posted · Heated Build Chamber WIP

    To gr5


    And ultimaker plans to sell a heated bed kit for the UM Original so you might want to wait.


    Ahh I didn't know that, I might wait in that case.

    Thanks for the info about the glass transition point. When I printed my first attempts in ABS without any heating, just to see what happened, they all delaminated. I was expecting this, but it reinforces the fact that the shrinkage happens very quickly after the plastic leaves the nozzle. When I put my oven bags on and heated the air with the hairdryer the small part printed quite well and didn’t delaminate at all. So I guess that even heating at exactly the right temp is the key here. I had also thought about scaling the part up in the CAD software, wouldn’t it be nice if the software could model the shrinkage and adjust it, taking into account all the factors? This may be wishful thinking though.

    I am starting to understand the glass transition point better now, so thank you for all the info :c)

    To foehnsturm


    Please keep one thing in mind. If you heat a chamber with an enclosed top to say 60°C for PLA, the bowden tube will get this warm as well. But you don't want to have the filament in the bowden near or above glass transition temp. This increases the risk for disastrous plugs in the tube. I already created one with a covered top before I started the crossflow fan approach. Ideally, you want a temperature distribution like that


    I had been reading through the post about a cross flow approach around the time I started this project. I think it is a very interesting way to improve the printing quality and I am now thinking of somehow working this into my design. I like the simplicity of the design and that it is similar in many ways to a fan assisted oven ;c)

    However I had not thought of the issue you have pointed out here about the heating up of the Bowden tube :cO

    A rethink may be in order, thanks for pointing this important fact out to me. As you will see in the coming posts, I have already put an extractor fan at the back of the enclosure in the top left corner. My thinking was to create a small pressure difference, enough to allow air to come into the Ultimaker through all the small gaps and be vented outside through a tube to the trickle vent in the window. The ‘hot / cold zones’ is an excellent idea that has really got me thinking.

    To Dim3nsioneer


    So one possibility might be not to close sides and front completely but just up to the nozzle height. Maybe it doesn't even need a fan for the cold zone? Maybe forced convection by the hot zone fan and natural convection due to temperature difference is enough?


    I see your point here Dim3nsioneer, but I was wanting to control the airflow is such a way as to exhaust the fumes out, whilst keeping a consistant inside temperature. I was therefore wanting to enclose the printer as much as possible. However keeping the Bowden tube cool is still a problem :c/

    Cheers guys, updates to come, pending bad internet access :c)


  • Link to post
    Share on other sites

    Posted · Heated Build Chamber WIP

    However keeping the Bowden tube cool is still a problem :c/


    Only a problem for PLA.

    For PLA keep the tube at 40C or cooler. For ABS keep the tube at 90C or cooler.

    A heated chamber shouldn't really be needed for PLA. It's ABS that needs it. So enclosing the entire printer is fine. If you can heat the chamber to 70C you are well below the glass temp of ABS yet you will GREATLY reduce shrinkage issues.


  • Link to post
    Share on other sites

    Posted · Heated Build Chamber WIP

    I agree, a heated chamber is of course not a must for PLA.

    But very convenient. Having the cooling fan blowing air at 40-50°C completely eliminates the warping / corner lift-off / elephant foot issues with PLA. No more failed prints when the fan is switched on to early or to late.


  • Link to post
    Share on other sites

    Posted · Heated Build Chamber WIP

    Only a problem for PLA


    Ahh, not really though, I have found a way to keep the PLA well stuck down is to paint a mixture of PVA wood glue and water onto the stock acrylic build platform and then place a sheet of normal A4 paper in water and carfully lay it onto the platform. I then paint some more glue and water on the paper and let it dry. Works every time :c)

    As you say gr5, there is'nt the need for much heat for PLA. I managed to get the chamber up to about 45C with the hair dryer, but got a bit scared after that as the hair dryer was inside the chamber! I think small amount of heat for PLA may improve printing, if only to provide a consistant, repeatable environment.

    ABS on the other hand obviously likes the heat and again the repeatability and controlled environment is what I was wanting it for. So it looks like I don't need to rethink the design after all YAY!


    I agree, a heated chamber is of course not a must for PLA.

    But very convenient. Having the cooling fan blowing air at 40-50°C completely eliminates the warping / corner lift-off / elephant foot issues with PLA. No more failed prints when the fan is switched on to early or to late.


    Bonus! I think that having the chamber enclosed is generally a good idea. Although PLA is much more forgiving shrinkage wise, it is always better to control the variables where you can. This does lead on to another question I have though.

    How would I go about connecting a fan (or multiple fans) and indipendantly control the speed? Can I do this within Cura, or would I have to find some way of writing a little application? Further down the line I would like to be able to control the heating (heated build platform etc) and the fans programmatically. Suggestions would be very welcome.

    Cheers.

    P.S. Hoping to upload some pics later.


  • Link to post
    Share on other sites

    Posted · Heated Build Chamber WIP

    Ok here we go :-P


    Chamber back

    Back


    Chamber bottom

    Bottom, highlighted in blue to show that I have thought of people with dual extruders ;c)


    Vent Fitting

    Trickle vent fitting


    Vent Fitting section

    Trickle vent fitting section


    Trickle Vent

    The actual trickle vent, it doesn't look as grubby in real life (honest)


    Chamber fastening

    Chamber fastening


    Chamber exhaust

    Chamber exhaust, with fan

    So I am getting to the point where I will be able to start getting quotes for the polycarbonate, once I have finalised all the dimensions and holes etc. The vent fitting is quite large and needs to be printed in four parts. It took me ages to get to this point because I am learning Solidworks and doing everything the hard way, meaning getting it wrong and then fixing it instead of reading the manual ;c)

    Comments and criticisms most welcome.

    Thanks.


  • Link to post
    Share on other sites

    Posted · Heated Build Chamber WIP

    This is a great idea this is how our printer 1200es sst prints abs it doesn't have a heated bed though it uses a heated environment by using heated fans to heat the build envelope to 70oc and has abs beds and this is where I though the bed on the rev 1 would warp this happens a lot on thin acrylic when doing a large engraving that would be my only worry why not have a metal bed cut and wait for it to raise to temperature ?

  • Link to post
    Share on other sites

    Posted · Heated Build Chamber WIP

    Hi UniversalLSRS,

    Thank you for your post, I'm very jealous of your 1200es sst ;c)

    This was part of my thinking after reading about commercial FDM machines having around 70 heated chamber. I have also seen an interesting video where there is a transparent maybe 1mm sheet over the printing platform, where the guy just bends it and the printed part comes away really easily. I have been wondering what the material is for ages, will try to find the link.

    I have been thinking about aluminium or glass for the bed, but I want to get away from having to use tape in favor of something I can just paint on like wood glue and water, or the acetone ABS juce.

    Good point about the acrylic bed, I was afraid of distorting it at higher temperatures :c/

    Cheers.


  • Link to post
    Share on other sites

    Posted · Heated Build Chamber WIP

    I found a link that shows the transparent flexable sheet that sits on top of the print bed.

    Check out at about 2:48 into the video.


    Does anybody know what that material is?


  • Link to post
    Share on other sites

    Posted · Heated Build Chamber WIP

    Hi!

    I was thinking to do an almost exactly king of heat chamber, with translucid metracrilate and almost the same design.

    Finally to do some test i did id with har wood (a kind of dm wood) and the result are pretty good. I use an arduino and three lm15 temperature sensor to control the temperature.

    At the begining i used a hairdryer and a kind of "Trickle vent fitting" similar to the one you have done. The problem was the air flow in the hairdryer is too much and the air come out too hot so the "trickle vent" become soft and loose the form even with abs.

    Now i'm using this kind of air heater for room that has less air flow (no so fast as hairdryer) but much more heat and less noisy. It's working good.

    Witch king of heater are you planing to use?

    Cheers.

    Rai.


  • Link to post
    Share on other sites

    Posted · Heated Build Chamber WIP

    Hi Rai,

    Thanks for your reply, I must say, my idea is by no means original, but it's nice to know other people are building similar designs. I'm guessing that 'metracrilate' is perspex? The reason I chose polycarbonate was because of the streangth and heat resistance over perspex, but I think the cost will be higher, probably quite a lot ;c)

    I would be interested to know more about the temperature control setup you have.

    Regarding the trickle vent, this is the only way I can get the fumes out of the room, so it goes like this. The fan at the back of the chamber pushes air through a flexible tube up to the fitting that attaches to the trickle vent in the window. I will need to have a speed control on the fan so that I can be sure that all the fumes are vented outside, but not cool the chamber down too much.

    As for the heater, well it's a hair dryer for the moment. I want to test the effects of only using heated air in the chamber to begin with. I'm thinking that the 'air only' method may distribute heat more evenly over the printed part, and therfore lead to more uniform and minimised shrinkage. I don't know what heater to try next, it's a bit experimental ;c)

    What air temperature are you running at Rai?


  • Link to post
    Share on other sites

    Posted · Heated Build Chamber WIP

    Hi Again!

    Nice to know about policarbonate. Yes metacrilate is perpex, but i look for termal propereties and "termal conductivity coeficient" is 0.19 W/(k*m) for both, that means the isolation will no vary a lot, maybe it not compensate the price difference, or are you planing to use this one with air chamber? I mean i know policarbonate is better for sunny place and have more heat resistance but we are running at 60-70 degrees and the important thing is the termal isolation witch is the same for both (well 0.19-0.22 W/(k*m) at 23 degrees for policarbonate and 0.19 at 20 Cº for perperx, i've not found the variation with temperature, maybe at 70Cº there's a significant variation between both, i don't know.

    The control of temperature i use is really simple. It's an old arduino board with three lm35 temperature sensor. This sensor is linear so no table is needed (as for thermistor 100k used for the bed) it has .5 Cº precision so is more than ok. I put three of them (one at bed level (close to the ultimaker logo in the back of the bed) one on the head level (close to the hot end but far enough to don't be affected for the heat of the hot end it self) and the other one is free so i can move around to estimate the temperature gradient in the chamber. (i also put it in the lectronics to be sure the hot air is nor burning the board and it's on 45-48Cº, i hope is not too much for the board)

    Only one of them i use for a trigger (the one in the hot end, i guess as it is the closer one to the nozzle it's better for control the temperature closer to the extrusion). The trigger is set between 60 and 65ºC so the heater just turn on when is 60 or less degrees and turn off at 65, i control the heater with a relay. I thought about PID temperature control but i think it won't have lot of benefits.

    But now i'm thinking in the possibility of use the second extruder option to control the chamber, so i can set the tempeature with the ulticontroller without modify too much marlin firmware and without extra harware. Sure someone have done this. I mean put a thermistor with a 4k7 pullup resistor, same we use for the hot bed, but connect the relay for the heater and then in the ulticontroller the temperature of the second nozzle will be the chamber temperature. I'm not sure if i've explained my self well enough, tomorrow i will try that if i get a 100k thermistor. And then maybe is easy to modify the marlin firmware so the ulticontroller could show chamber temperature instead of nozzle2...

    has anyone done this set/mod?

    I have one question after read your post.

    Are the gases emited for the ABS very toxics? i have the printer in my workshop and i expend a lot of time there, i have no gases out as you mention and now i wonder is this gases, and the plastic smell after few hours printing is toxic... i mean, it's necessary this air exit?

    Because if you are heating air and then you are taking it out we will miss a lot of energy, and i wouldn't like to have an ultimaker within a heat chamber, within another box with fumes exit.... but i will do if it's necessary.

    Cheers.

    Rai.


  • Link to post
    Share on other sites

    Posted · Heated Build Chamber WIP

    Hi again!

    Finally I've got a thermistor and i put 4k7 pull up resistor on the temp2 sensor in the main board. I buid a marlin buider for a dual extrusion and now i select the chamber temperature with "Nozzel2 temperature" in ultimaker.

    The fact is PID temperature control is enable in the firmware and the relay is constantly turning on-off. It's working really good but i think is not good for the configuration being tuning on-off a the heater constantly.

    I think there's an option to disable PID controller. I going to open a new thread asking for that...

    Cheers.

    Rai.


  • Link to post
    Share on other sites

    Posted · Heated Build Chamber WIP

    Hi Rai,

    That is a lot of information! Regarding the thermal conductivity, if I understand correctly, you are saying that the insulating properties of both materials is similar? I was thinking that this would not really be an issuse to worry about because any heat loss through the material would easily be compesated by putting more power into the heater unit. In my case most of the heat loss would be going out of the window anyway ;c)

    Your temperature control system sounds great :c) there is still a lot of work for me to do after the chamber is built and I think an arduino will be on my bill of materials. I'm wonering if instead of a relay a viriable voltage? control could be driven somehow from the arduino. This is'nt really my area but that may be a way to get really accurate control of the temerature. I like that you have 3 temperature sensors. How are you controlling the arduino, I mean software wise? It would be nice if I could use the existing arduino in the ultimaker to drive the temperature control, as this would mean that I could keep it nice and tidy. I also like the idea of using the 2nd extruder as a temperatue sensor. Nice :c)

    Regarding the toxisity of the ABS fumes, well let me just say that the black filament I baught made me feel sick to my stomach and gave me an awful headache. It was one of the main reasons for building the chamber. I could go and do lots of reasearch, but I really dont need to. That stuff is toxic my body told me so ;c) To be fair though I did read that it can be the pigment in the ABS that is toxic, but I don't want to go through that experience again :c)

    Many thanks.


  • Link to post
    Share on other sites

    Posted · Heated Build Chamber WIP

    Hi again!

    Finally I've got a thermistor and i put 4k7 pull up resistor on the temp2 sensor in the main board. I buid a marlin buider for a dual extrusion and now i select the chamber temperature with "Nozzel2 temperature" in ultimaker.

    The fact is PID temperature control is enable in the firmware and the relay is constantly turning on-off. It's working really good but i think is not good for the configuration being tuning on-off a the heater constantly.

    I think there's an option to disable PID controller. I going to open a new thread asking for that..

    Ahh so you got it working, that's great :c)

    Just thinking that there may be a setting somwhere that controls the frequency of the relay switching, so your heater is not stressed as much.

    Cheers.


  • Link to post
    Share on other sites

    Posted · Heated Build Chamber WIP

    I have been thinking about your heated build chamber and it occurred to me that the side panels could be constructed from corrugated cardboard. Not only would this lower cost, but I believe that cardboard might be a better insulator than a sheet of plastic. A small piece of plastic in the front panel would still allow for viewing. The top could be made of cardboard attached to a frame of coat hanger wire with epoxy.


    If one so desired, a PLA, coat hanger wire, or ABS frame could be made to give the side panels more strength and hinges, for opening and closing.


  • Link to post
    Share on other sites

    Posted · Heated Build Chamber WIP

    Hi aviphysics,

    When I have finished the design of the chamber I will release the digital files on youmagine.com. But any system for enclosing the Ultimaker would benefit the printing process, I believe. I managed to get an internal temperature of maybe 45C by just using a hair dryer and some oven bags. This was with great big gaps all over the place ;c) However the hair dryer was probably kicking out 1800 watts! I know that this is not efficient but with a much more controlled airflow in and out of the chamber, I think that much less energy would be required.

    The majority of the energy will be escaping through air convection and not through the materials of the construction in my opinion. I think that you are probably right that cardboard might be a better heat insulator, but in my case, as I mentioned before, most of the heat will be going out of the window ;c) I am also using this project to learn how to use Solidworks and boy is that a learning curve!

    Maybe my next development could be a heat exchanger to get the heat back again ;c)

    I love that people can build some highly functional things with everyday objects. Please let me know how you get on :c)

    Thanks.


  • Link to post
    Share on other sites

    Posted · Heated Build Chamber WIP

    It seems to me like a hair dryer ought to be a really good heat source. 1200 W ought to be plenty. A toaster oven draws at most 1800 W (15 Amps at 120 V) and gets way hotter. A lot of toaster ovens don't even have good insulation.


    I think I would take a look at regulating the speed of the hair dryer fan and using some blue painter's tape to close some of the gaps that air is escaping from.

    As far as efficiency of the hair drying goes, you could attach the intake of the hair drying to the enclosure. You could then use a cover near the intake, like bbq grills have (see pic), to adjust the fresh air mix. Realistically, I don't think you need to intentionally add fresh air unless you do a really good job sealing the chamber.

    Am I correct in assuming that your window vent has its own fan, or is it just passive? I would think that with a heated build chamber, you wouldn't really want much air flow accept what was needed to distribute the heat. The flow through the window vent should be just enough to keep gasses from leaking into your workspace. A good way to check for negative pressure is a smoke wand toy. This is the one our safety techs use at work for checking air flow in hoods http://www.amazon.com/American-Science-Surplus-Wizard-Stick/dp/B000FIN0V8.

    9eGCaKt.jpg


  • Link to post
    Share on other sites

    Create an account or sign in to comment

    You need to be a member in order to leave a comment

    Create an account

    Sign up for a new account in our community. It's easy!

    Register a new account

    Sign in

    Already have an account? Sign in here.

    Sign In Now
    • Our picks

      • UltiMaker Cura 5.9 stable released!
        Here comes Cura 5.9 and in this stable release we have lots of material and printer profiles for UltiMaker printers, including the newly released Sketch Sprint. Additionally, scarf seams have been introduced alongside even more print settings and improvements.  Check out the rest of this article to find out the details on all of that and more
          • Like
        • 5 replies
      • Introducing the UltiMaker Factor 4
        We are happy to announce the next evolution in the UltiMaker 3D printer lineup: the UltiMaker Factor 4 industrial-grade 3D printer, designed to take manufacturing to new levels of efficiency and reliability. Factor 4 is an end-to-end 3D printing solution for light industrial applications
          • Heart
          • Thanks
          • Like
        • 4 replies
    ×
    ×
    • Create New...