


From his eyes can not hide, the enemy will be found! always and everywhere ... fast like lightning - scout "Mosquito" my author's toy

From his eyes can not hide, the enemy will be found! always and everywhere ... fast like lightning - scout "Mosquito" my author's toy
he will find your enemies! from dripping out of the ground .. and give on the ass ... combat robot "mole" my author's toy


@lennart, why would you print a figurine in XT? think PLA prints easier, its cheaper, and your going to paint it anyhow ..
Yeah, i only had that stuff laying around. I know 
I think I WANT ONE, AND I'M GOING TO HEADBUTT IT ALL DAY!! (I'm playing through ME3 again, after being disappointed by DA:I)
Is the model available somewhere?
Hey if you played ps3, we can do the multiplayer coop sometimes? I Really liked it ( and obviously put a lot of time there). if anyone else is up for it, let me know too;) ( been a while that i have played though.
From his eyes can not hide, the enemy will be found! always and everywhere ... fast like lightning - scout "Mosquito" my author's toy
NO WAY my ultimaker2 can print these!
Can you send me the gcode files? That way I can directly get your print settings!
Teach me master!
he will find your enemies! from dripping out of the ground .. and give on the ass ... combat robot "mole" my author's toy
mand these look SOOOO good!
Cheers!
NO WAY my ultimaker2 can print these!
Can you send me the gcode files? That way I can directly get your print settings!
Teach me master!
mand these look SOOOO good!
Cheers!
can - is only a printing layer 70 microns.

@ksn-arts: Amazing prints like always
...
Hey if you played ps3, we can do the multiplayer coop sometimes? I Really liked it ( and obviously put a lot of time there). if anyone else is up for it, let me know too;) ( been a while that i have played though.
...
PC guy, sorry :(
But still playing ME3 MP! (anyone) PM me if you want to add me on Origin
For those wondering where the gaming posts went, I split them off into a new thread instead. They were a bit off topic and it'll get more exposure that way I think
You can continue here: http://umforum.ultimaker.com/index.php?/topic/8424-join-the-ultimaker-steam-group/
For those wondering where the gaming posts went, I split them off into a new thread instead. They were a bit off topic and it'll get more exposure that way I think
You can continue here: http://umforum.ultimaker.com/index.php?/topic/8424-join-the-ultimaker-steam-group/
Thanks for the link!
Those are some amazing robots KSN! Are the stl files available?
Here is the latest Raptor 2.0 Beta, Fusion 360 Edition e-Nable hand I tested for them. Some really nice design changes in this one.

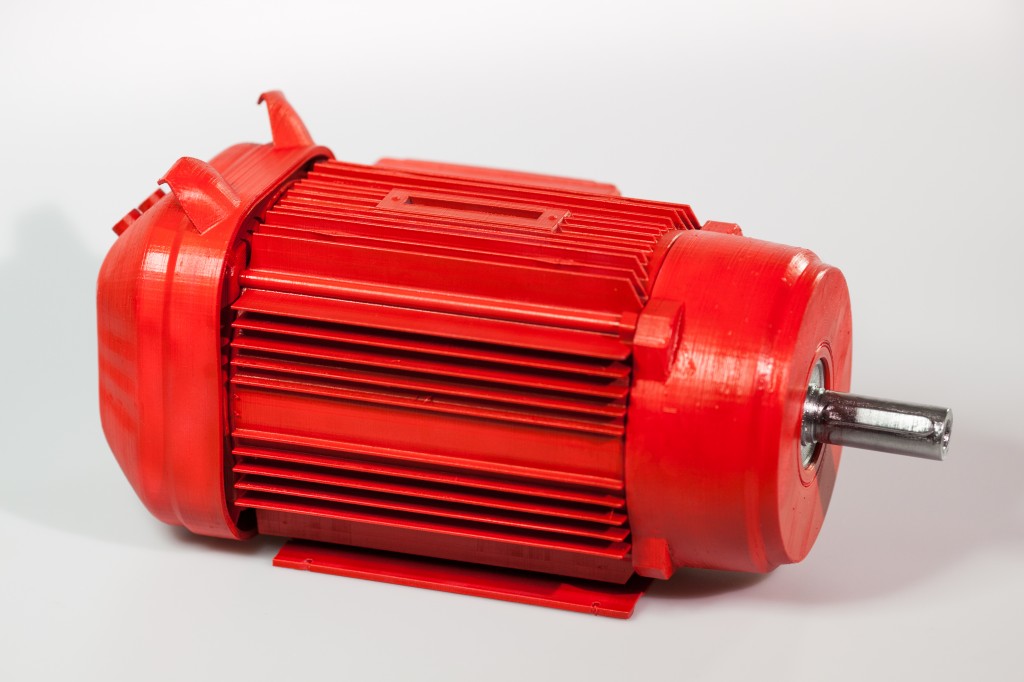
I made a piggy bank for a client based on their motors.
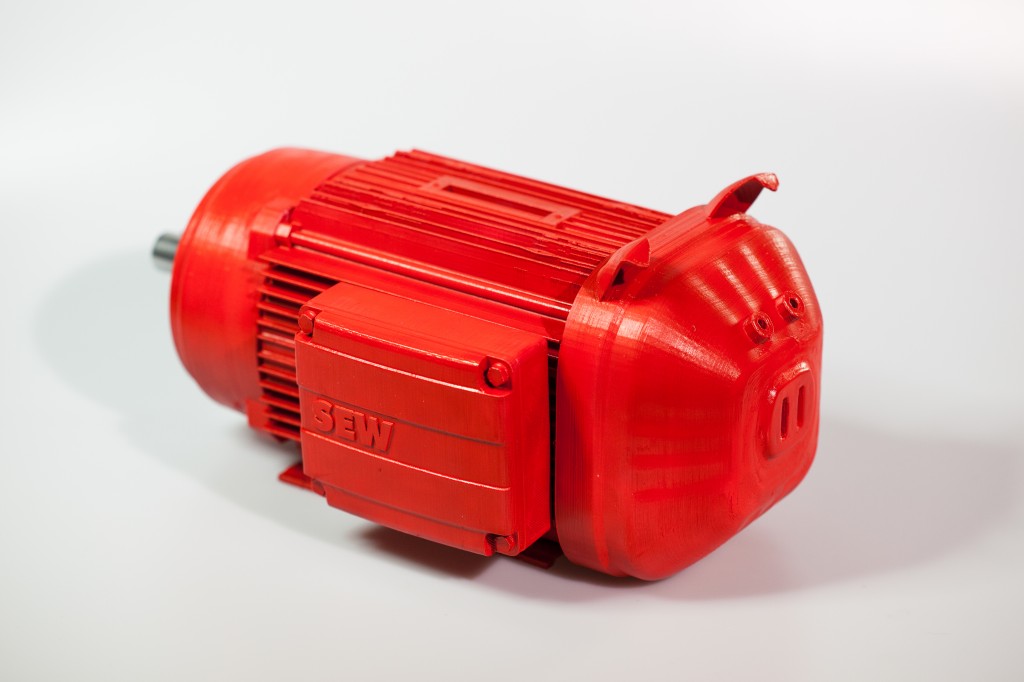
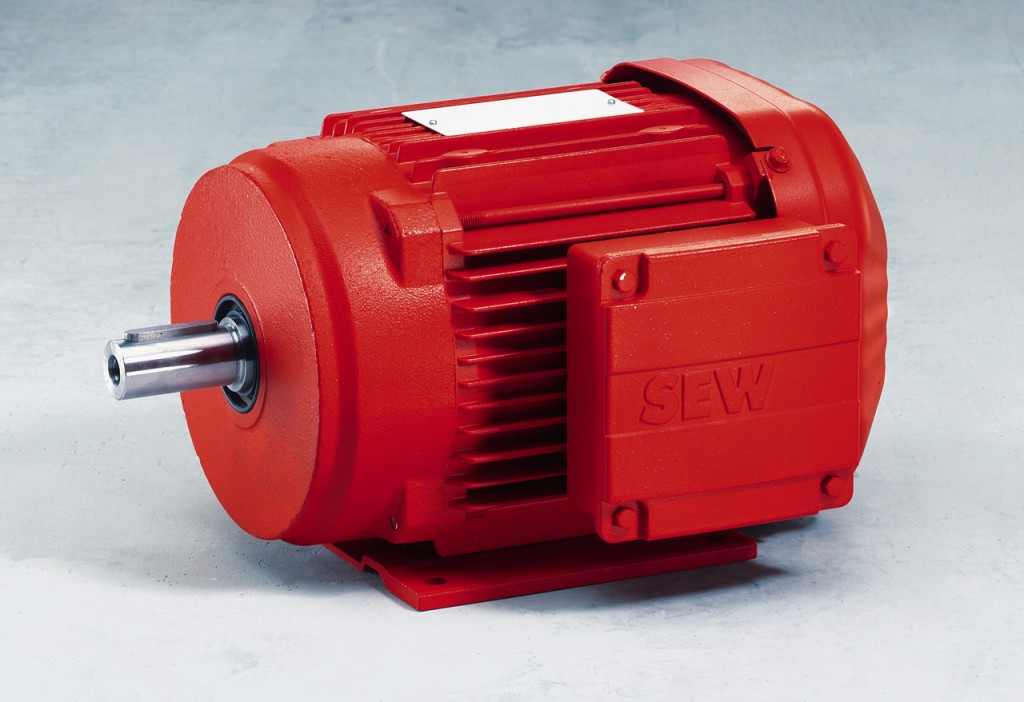
This is a product that it's based on
Printed in 5 parts and spraypainted red. Probably could have used a bit more cleanup though
I love it Valcrow! Is that just the spindle part from the motor in there?
Hahaaa... Great!!!! I like the SEW motors - nice products and this is a great idea from them... :-) hope this will be realized as giveaway to customers :-)
Top notch again Valcrow!
Really nice Valcrow!
Is it painted?
Thanks guys,
Yup it's painted, I made 2, the first one was printed in red, but then i ran out so I painted this one.
Posting something very unspectacular here...
Behold! A vase/cup thingy...


The story:
I recently went with the family to buy a Christmas tree and a christmas tree foot...
Upon returning home, I read the little pamplet that came with the tree, and see that placing the tree in water, will drastically improve the trees livespan, freshness and appearance, as well as make it much more fire proof...
I instantly go, pour some water into the bottom of the newly bought christmas tree foot, only to discover that it is NOT water tight... 3D printer to the rescue!
The print is 80 mm. diameter and 75 mm. tall, and fit perfectly inside the foot... Printed in PLA at 0.2mm layer height and 2.4 mm. shell (wanted to make sure it was water tight)...
Using a 0.6 mm. nozzle and something like 75 mm./s print speed, this took a few hours...
The funny thing is that I also posted this on facebook, and instantly got around 30 likes...
Either its the christmas spirit, or people really like when 3D printing is used to solve actual everyday problems and not just make more printer upgrades...
Anyways, my tree is now happy, and will hopefully last all through December.
Merry Christmas everybody!
Merry Christmas Tommy
That's great tommy! Mine was not so successful I printed one of those cool spiral vases. My parents put water in with a flower and started leaking immediately... Glad to hear yours was water tight enough for a tree!
That's great tommy! Mine was not so successful I printed one of those cool spiral vases. My parents put water in with a flower and started leaking immediately... Glad to hear yours was water tight enough for a tree!
As I said, I think the 4 x 0.6mm walls, and 2.4 mm bottom helped, I also printed quite hot (around 220 degrees) and with increased flow...
I think I had it easier than you by the fact that mine just had to go inside of a christmas tree foot ( it fit like a glove btw., which was such a great success feeling)..
Bottom line is it didn't have to be elegant or pretty in any way...
That's great tommy! Mine was not so successful I printed one of those cool spiral vases. My parents put water in with a flower and started leaking immediately... Glad to hear yours was water tight enough for a tree!
The trick to get a spiralized vase water tight is to overextrude using your flow settings.
F.e. you want to print a vase, using a 0.8 nozzle, with a wall thickness of 1.2 mm, you dont put a wall of 1.2 in Cura, but put a wall of f.e 1 mm + flow of 1.2 mm, that way the lines printing the bottom are 1 mm appart and not 1.2.
The other way is to seal the inside with PVC glue ....
Hi guys and girls
Technically this isn't my latest print (there's on page 75.
After a few problems with my UM2 (clocked nozzle, then I broke the temp sensor when trying to take the hot end off ...), I'm now printing ABS with decent results. Still some retraction/curling now and then but I tend to adjust my models and plan some extra material I can sand down.
Well here's what the wheelhouse on my model tug looks like (only lousy cellphone pics, boats are at my parents' and I hadn't my DSLR/tripod with me ...) :

The bigger tug is the "Odin". Wheelhouse was designed in SketchUp and printed in ABS.
There are actually four parts: the wheelhouse itself, two doors (with hinges) and the roof. Handrails on the roof are brass though.
ABS parts were brushed with acetone, then sanded and primed, sanded again, primed again, sanded again and finally painted.

The wheelhouse on the small tug is also 3D printed but the print was actually pretty bad (formfutura abs) and had to be rushed for an upcoming event. New wheelhouse is already printed and now has to be assembled.
Just as I was painting the wheelhouse for the Odin, my phone rang: I got an email from a fellow RC boat enthusiast who had the same problem as me: he was working on the same kit and the wheelhouse had gone missing. He had come across my web site where all of this is documented and asked whether I could give him my STL files so that he could have a new wheelhouse printed for his model. Nice timing ! At least I knew my model was good and fit !
Not my latest print, i did this a couple of months ago, it's a printed bird feeder:

Winter is coming :mrgreen: so i decided to put the feeder in place, this particular one is pretty cool because you put it on a window and you can watch the little birds coming to eat from inside. So i put it on the window and my wife took a pic of the visitors this morning, but it wasn't the kind of visitors we expected :mrgreen:


ArunC posted a topic in UltiMaker Cura,

.thumb.jpeg.0b7a05eafc09add17b8338efde5852e9.jpeg)
Dustin posted a topic in Firmware,


Recommended Posts
Top Posters In This Topic
362
282
221
179
Popular Days
Jan 5
30
May 12
26
Jan 13
23
May 1
22
Top Posters In This Topic
ian 362 posts
cloakfiend 282 posts
skint 221 posts
SandervG 179 posts
Popular Days
Jan 5 2014
30 posts
May 12 2014
26 posts
Jan 13 2014
23 posts
May 1 2014
22 posts
Popular Posts
kmanstudios
Took me forever to do this. And it is still rougher than I would have liked. 3D concept rendering: Finished piece:
kmanstudios
I just finished this. It was a multi-part print for ease of painting. Some of it I am not sure what happened...but hey, it is purty....And, I am unanimous in that ? Test Render Parts
gr5
Bath interferometers. I have made about 20 of these for people who use them to test their telescope mirrors. They are amazingly accurate and can do better than a $40,000 Zygo PSI optical tester. Th
Posted Images
lbeentjes 1
Quality is great! Looks amazing.
What settings did you use?
Link to post
Share on other sites