Jump to content

Post your latest print!


IRobertI

Recommended Posts

Posted · Post your latest print!

like any good designer.. i will kinda admit ;-) i did forget to model a connection for the M in the middle LOL

but the second print came out even NICER :-)

Plus its not for the christmas tree... a little gold necklace and I have some very nice gold ultimaker 2 BLINGO BLINGO..

Ian ;-)

star1.jpg


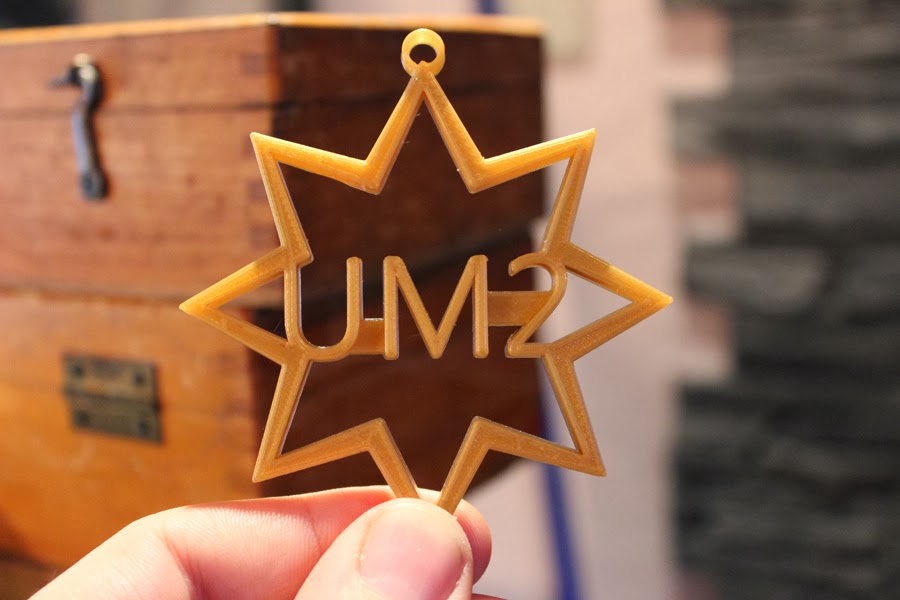
It looks like it is a 'late' ornament for your Christmas tree, but I wonder how you are going to keep the 'M' in place ;)


  • Link to post
    Share on other sites

    Posted · Post your latest print!

    I finally got around to testing the Meshmixer support. I went with the Voronoi D Tower by Dizingof. And after 50253 retractions, 2.1 million lines of Gcode and 10+ hours of print time here's the result.


    I have to say I really like this type of support for this type of print. It breaks away MUCH easier than traditional support and doesn't leave much behind. Of course the busy model helps hide the imperfections. The print could've been cleaner if I printed slower and with thinner layers. This was 0.15mm layers @ 50mm/s.


    Looks really nice, even at those settings. Anyone know if there is another support type that also uses some type of organic structures. It's a pretty neat idea, everything else uses a seemingly different variant of a straight forward approach. Thanks for the pics.


  • Link to post
    Share on other sites

    Posted · Post your latest print!

    After a couple of false starts, I successfully completed my dragon print using Meshmixer support. It turned out pretty much flawless - I'm absolutely delighted with the print quality.

    Broken Free

    The wings were very thin - as little as 0.45mm thick towards the back edges, so they are semi transparent, but they held up fine, even on the horizontal parts on top which printed without any appreciable roughness on the under-sides too, thanks to the Meshmixer supports.

    Dragon Wing


    I also did a quick video of the print, the process, and the finished product:


    [Edit: The cleaned up model, including a version with support, is now on http://www.thingiverse.com/thing:218026].


  • Link to post
    Share on other sites

    Posted · Post your latest print!

    Amazing, I'm really surprised it printed at all, especially the wings.


  • Link to post
    Share on other sites

    Posted · Post your latest print!

    Hi illuminarti...very very impressive print. I have been playing around with meshmixer support myself and found it difficult to get satisfying results. I was wondering if you could share some if your meshmixer settings like. threshold angle for support and density setting for the number if tips..and also tip diameter... I know from a blog you posted that you increased the post diameter to about 3mm but the rest leaves a lot if tinkering. Thanks in advance... Gr Cor

  • Link to post
    Share on other sites

    Posted · Post your latest print!

    Thanks, Cor. All of the settings I used are as shown in my http://www.extrudable.me/2013/12/28/meshmixer-2-0-best-newcomer-in-a-supporting-role/ on MeshMixer.


  • Link to post
    Share on other sites

    Posted · Post your latest print!

    Woah! Thanks for the good closeups in both the video and the pictures!! This think looks great, I'm really surprised to see how well the wings came out, the filament choice was a nice touch. From your experience do you think the Cura support structure algorithm results would have been equally good around the wings? Would it have stuck to the thin wing parts too much? Thanks again for documenting your experiences with Meshmixer, it seems to add a bit more utility to the Ultimaker and being free helps quite a bit.

    I spent a lot of time choosing a 3d printer and I'm glad I settled on this one, I'm very excited to receive mine to start honing my skills.


  • Link to post
    Share on other sites

    Posted · Post your latest print!

    Hi Iluminarti, i red your blog yesterday, but the settings i'm most interested in i (tip diameter and densitiy) i could not find.. due to some server error your blog seems unavailable at the moment.... but dont worry i also got pyrotechnic stuff to worry about tonight... :cool: ...

    Happy newyear in advance..... greetz from Holland


  • Link to post
    Share on other sites

    Posted · Post your latest print!

    Yes, the hosting company's entire infrastructure is down. But when it comes back, you'll see there's a screen shot in the post that lists all of the parameters I used in Meshmixer. The tip size was 1mm, iirc. I set density to 15. Supported overhangs of 17.5º or more, and had the max angle of the support columns be 60º.

    Happy New Year, indeed!


  • Link to post
    Share on other sites

    Posted · Post your latest print!

    The site looks like it's back up at last. :-)

    Aaron points out something interesting; the layer height was indeed set at 0.5mm. That would explain why I got such pointy supports on the initial auto-generated batch, lol - since it would have made the tips reach 5 layers at 0.5mm = 2.5mm each. It should have been set at 0.1mm, to match my intended print resolution.

    Since the supports get generated at STL meshes, and then sliced along with the rest of the print, it probably doesn't really matter. When I went back in later to add some more, I did set the layer height right, and I got much shorter, flatter tips. Both seemed to work just fine.


  • Link to post
    Share on other sites

    Posted · Post your latest print!

    Simply Amazing!


  • Link to post
    Share on other sites

    Posted · Post your latest print!

    Home 3d printing sure has come a long way since the crappy shot glasses of the early RepRaps huh? Very nice job there illuminarti :) I was a bit surprised at the colour choice at first but then it all made sense ;)


  • Link to post
    Share on other sites

    Posted · Post your latest print!

    here is the HOW IT WAS DONE video.. showing how we produced 683 chocolate pralines with 7 different unique home made flavours... using an ultimaker printer... liquid silicon... and a whole lot of chocolate :-)

    enjoy the little video guys... PS... turn on your speakers.. the music is cool i think :-)

    Ian

    http://www.yummyheads.blogspot.de/


  • Link to post
    Share on other sites

    Posted · Post your latest print!

    Haha, very cool. So much work must have gone into making those thing. And they will be gone faster than the UM travel speed :)

    How did you close off the bottom of the pralines? Or did the "infill" stick to the outer shell by itself?


  • Link to post
    Share on other sites

    Posted · Post your latest print!

    Xeno,

    your IPad Stand looks superb.

    One question: you mentioned the lighter and darker ares in the print using silver material. On the pics these areas look like steps. Are they or is this only an optical effect caused by the colour difference?

    thank you

    nudel


  • Link to post
    Share on other sites

    Posted · Post your latest print!

    Hi guys

    wanted to share my first prints, hot off the Ultimaker 2:

    Um2 test prints

    best

    porter


  • Link to post
    Share on other sites

    Posted · Post your latest print!


    illuminarti:

    What was that? that was very strange!? It was very weird! Peculiar! it was a kind of a good print, it was rather a perfect print, it was an INCREDIBLE print!

    Amazing job, I Love it! congratulations.


  • Link to post
    Share on other sites

    Posted · Post your latest print!

    printed part, silicon mold, part cold cast with 1:1 resin and iron powder.


    B rust

    mold


  • Link to post
    Share on other sites

    Posted · Post your latest print!

    it looks amazing... what is it ?

    Ian :-)


  • Link to post
    Share on other sites

    Posted · Post your latest print!

    Oh, it's just my logo... a lower case "b"


  • Link to post
    Share on other sites

    Posted · Post your latest print!

    Print Project : Team Church.

    I was really amazed and impressed with some of the recent Architectural designs that have been printed with the ultimaker 1 and ultimaker 2.

    So I sat down this morning in the office and decided to design a church.

    This design is called TEAM CHURCH and has its structural form based around a group of people holding together and helping each other hold the roof up.

    The design also has no single top point to the roof, so all members of this church are treated equally.

    As I want to design more unique and new 3d printable projects for 2014. this is going to be print project 2 for my new ultimaker 2 :smile:

    Should be a nice print when its finished :smile:

    Ian :smile:

    model file is now on youmagine !

    https://www.youmagine.com/designs/team-church

    teamchurch.jpg


  • Link to post
    Share on other sites

    Posted · Post your latest print!

    Braddock: amazing work, would be cool if you could share the process you used.

    did my first big print on the UM2 8hour, it was a character i design and models. wanted to see how the supports worked plus the fix horrible feature, as i modelled it in 3ds max and only intersected each part. the fix horrible feature set worked brilliantly (good job Daid), i tried this model on a makerbot2x and it made a mess of it. there is a few strange blemishes on the model any idea what caused them?

    piranha Man concept Art And model

    piranha Man support

    piranha Man

    piranha Man head

    best

    Porter


  • Link to post
    Share on other sites

    Create an account or sign in to comment

    You need to be a member in order to leave a comment

    Create an account

    Sign up for a new account in our community. It's easy!

    Register a new account

    Sign in

    Already have an account? Sign in here.

    Sign In Now

    • Our picks

      • UltiMaker Cura 5.7 stable released
        Cura 5.7 is here and it brings a handy new workflow improvement when using Thingiverse and Cura together, as well as additional capabilities for Method series printers, and a powerful way of sharing print settings using new printer-agnostic project files! Read on to find out about all of these improvements and more. 
         
          • Like
        • 18 replies
      • S-Line Firmware 8.3.0 was released Nov. 20th on the "Latest" firmware branch.
        (Sorry, was out of office when this released)

        This update is for...
        All UltiMaker S series  
        New features
         
        Temperature status. During print preparation, the temperatures of the print cores and build plate will be shown on the display. This gives a better indication of the progress and remaining wait time. Save log files in paused state. It is now possible to save the printer's log files to USB if the currently active print job is paused. Previously, the Dump logs to USB option was only enabled if the printer was in idle state. Confirm print removal via Digital Factory. If the printer is connected to the Digital Factory, it is now possible to confirm the removal of a previous print job via the Digital Factory interface. This is useful in situations where the build plate is clear, but the operator forgot to select Confirm removal on the printer’s display. Visit this page for more information about this feature.
          • Like
        • 0 replies
    ×
    ×
    • Create New...