Jump to content

Post your latest print!


IRobertI

Recommended Posts

Posted · Post your latest print!

Yeah, regarding the second fan, I've actually thought about cutting up the bracket. The "belly" under the nozzle is really blocking a lot of air I think. Removing all that metal and insulating the nozzle instead is what I've been pondering. It'll look ugly as hell and I'm a bit hesitant about cutting up the parts but... I dunno, still thinking about it :)


  • Link to post
    Share on other sites

    Posted · Post your latest print!

    I can take some encouragement form this statement. My homemade nozzle has a hot zone about 1/3-1/2 that of the UM1 standard nozzle and I think really good performance from a GeoHagen extruder. I'm thinking another factor working in favor of the UM2 is the dual cooling fans. I'm experimenting with compressed air for that and its working pretty well. Its early to tell.

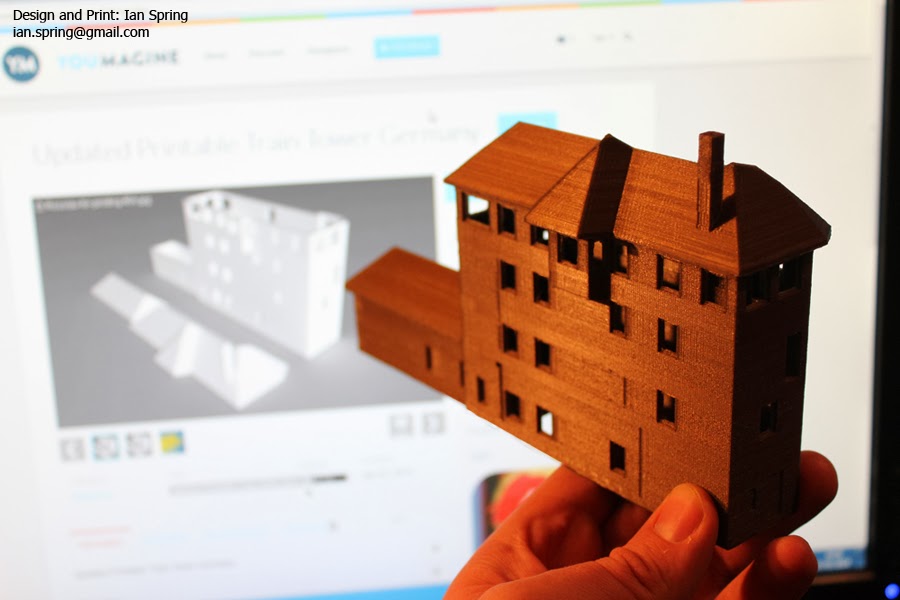
    Come on Ian, how did you get those teeth to print?

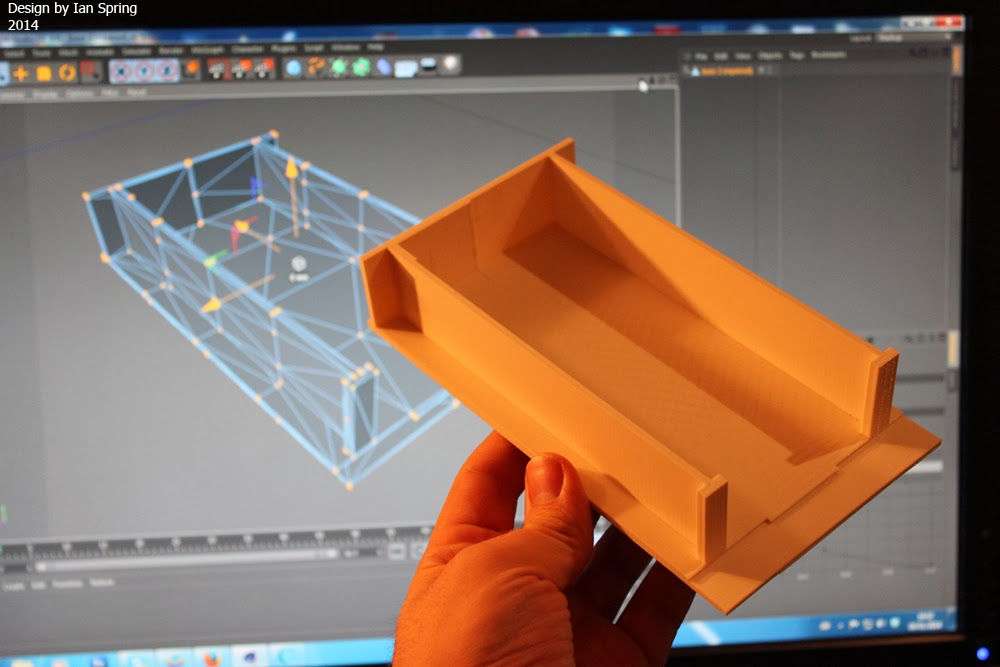
    I see now how the model was split turning the face vertical. The picture with the manually added supports suggests that it was all printed as one piece. Nice glue joint anyhow. How does it look straight on to the splice? Don't get me wrong, its really nice work


    mmm that was one single.. standing up print... no glue...no splitting... one piece... hand on bible for this one !! :-)


  • Link to post
    Share on other sites

    Posted · Post your latest print!

    Would be nice to know what all the excitement is about... :-P

    Everybody complimenting each other is hilarious to read.

    But almost without any pictures It feels like being the only one drinking soda in the bar :???:.

    Some more pictures or files would be welcome, to figure out what's going on here...


  • Link to post
    Share on other sites

    Posted · Post your latest print!

    Back on track... I find the best way to print overhangs is... not to print them.


    what glue do you use to stick these together? just regular old superglue?

    ACH! there is supposed to be that lovely picture of the blue scary doggy werewolf thingy!


  • Link to post
    Share on other sites

    Posted · Post your latest print!

    what glue do you use to stick these together? just regular old superglue?

    ACH! there is supposed to be that lovely picture of the blue scary doggy werewolf thingy!


    I used a glue called G-S Hypo cement, but regular super glue is fine.


  • Link to post
    Share on other sites

    Posted · Post your latest print!

    Something a bit more mundane perhaps than my recent prints... a very nice print, I think, but more a fabulous design - http://www.thingiverse.com/thing:219779:

    Emmett

    Another print-in-one-piece arrangement like his gear bearing, this printed great, and it works just fine with no clean up, and just a little initial torque to free the gears. The helical teeth keep all the parts locked together, although interestingly the three planetary gears can shift from a straight line to a more L-shaped arrangement without the teeth becoming unmeshed. See wikipedia for a description of http://en.wikipedia.org/wiki/Harmonic_drive. Darned clever stuff!!

    The input is the central sun gear; that drives the two planets to turn the thin, flexible spline gear against the fixed circular gear. The output is the thicker, fixed top end of the flexible part - the large protruding shaft at the back. Reduction ratio is 94.5 to 1.


  • Link to post
    Share on other sites

    Posted · Post your latest print!

    Another great looking print and photo! The explanation you gave was pretty good, but I wanted to see a video

    I love it, the creator posted his idea yesterday and two people have already printed it! Although one guy looks like he broke his, probably wasn't using a UM2.


  • Link to post
    Share on other sites

    Posted · Post your latest print!

    Something a bit more mundane perhaps than my recent prints... a very nice print, I think, but more a fabulous design - Emmett's Harmonic Drive:


    Another print-in-one-piece arrangement like his gear bearing, this printed great, and it works just fine with no clean up, and just a little initial torque to free the gears. The helical teeth keep all the parts locked together, although interestingly the three planetary gears can shift from a straight line to a more L-shaped arrangement without the teeth becoming unmeshed. See wikipedia for a description of Harmonic Drive principles. Darned clever stuff!!

    The input is the central sun gear; that drives the two planets to turn the thin, flexible spline gear against the fixed circular gear. The output is the thicker, fixed top end of the flexible part - the large protruding shaft at the back. Reduction ratio is 94.5 to 1.


    Amazing...

    Did you scale this one up?


  • Link to post
    Share on other sites

    Posted · Post your latest print!

    I scaled it up 12.5% because at the original size Cura wouldn't slice the flexible gear properly, and left lots of gaps.

    It worked fine at the larger size, but of course that also scaled up the hex driver slots in the input and output gears, making them too big to turn with a standard hex bit. So I improvised and wrapped some blue tape around the bit.

    The correct approach would have been to go in to the original OpenSCAD source and just define the walls to be slightly thicker.

  • Link to post
    Share on other sites

    Posted · Post your latest print!

    my latest print from yesterday.

    I have to add the comment... Now that I have an ultimaker2 printer... I simply clean up my models a little. gcode it up with cura... click print and know that when it finishes... its 100% perfect.. :-)

    This is a dream CLICK AND PRINT printer :-) HEHE :-)

    house.jpg


  • Link to post
    Share on other sites

    Posted · Post your latest print!

    I decided to give this guy a faux bronze finish. Work in progress, elastic bands holding him in place while the glue bonds to the base.


    bronze 01

    bronze 02


  • Link to post
    Share on other sites

    Posted · Post your latest print!

    That looks fantastic, whatever you did for the finish really looks great.

    Ian you need to do the house in LAYWOOD :-P, it looks really nice.

    The prints in the forum are enough to sell the Ultimaker, just send your friends interested in purchasing a printer a link.


  • Link to post
    Share on other sites

    Posted · Post your latest print!

    true... if people want an affordable 3d printer that produces incredible quality.. then say hello to an ultimaker2 :-)


  • Link to post
    Share on other sites

    Posted · Post your latest print!

    Braddock!!! Wow, I am glad you are part of our community!

    Really amazing things you make.

    Can't wait to see what else you can and will bring to the table.

    Congrats on this yet another great print!


  • Link to post
    Share on other sites

    Posted · Post your latest print!

    @braddock: One day... I'll be so happy to read a complete howto how you guys paint these things. I know for you it is "just" something like "I scrambled some stuff I had laying at home and mixed it together", but this is still a closed book for me...

    It looks fantastic. I'd love to see what friends and family would say to a gift that looks like this :)


  • Link to post
    Share on other sites

    Posted · Post your latest print!

    braddock... could you start a new tread on the forum with a few tips on how to paint up your models after printing .... That would be an amazing asset to all of us :-)

    Ian :-)


  • Link to post
    Share on other sites

    Posted · Post your latest print!

    Something a bit more mundane perhaps than my recent prints... a very nice print, I think, but more a fabulous design - Emmett's Harmonic Drive:


    Another print-in-one-piece arrangement like his gear bearing, this printed great, and it works just fine with no clean up, and just a little initial torque to free the gears. The helical teeth keep all the parts locked together, although interestingly the three planetary gears can shift from a straight line to a more L-shaped arrangement without the teeth becoming unmeshed. See wikipedia for a description of Harmonic Drive principles. Darned clever stuff!!

    The input is the central sun gear; that drives the two planets to turn the thin, flexible spline gear against the fixed circular gear. The output is the thicker, fixed top end of the flexible part - the large protruding shaft at the back. Reduction ratio is 94.5 to 1.


    In My last job i have seen a 30 tons polymer extruder having 5 planetray gears, keeping the middle axis in perfect center position.

    It would be fun to try to alter the model to do this!


  • Link to post
    Share on other sites

    Posted · Post your latest print!

    I decided to give this guy a faux bronze finish. Work in progress, elastic bands holding him in place while the glue bonds to the base.


    Yeah Braddock,

    I'm facinated too, tell us ( if you have not already done so) What is your background?

    Painter/ modelmaker/ artist (obviously artist)?

    And where did you get the knowledge from? It's awesome!


  • Link to post
    Share on other sites

    Posted · Post your latest print!

    Thanks guys, my day job is working for a company called Animal Logic here in Sydney, I'm a CG artist for feature film, here's my IMDB page, though it needs updating.

    http://www.imdb.com/name/nm2364849/

    On the side, I make a bit of Jewellery, again, site needs updating.

    www.braddock.com.au

    All the finishing / painting stuff I'm doing here is just stuff I've picked up from watching youTube vids to be honest! but I'd be happy to share what I know with you guys!

    I'll look at starting a thread on the topic as Ian suggests.


  • Link to post
    Share on other sites

    Posted · Post your latest print!


    westpointsteen

    What did you do yesterday?.....

    well eeuhmmm .... printed 1/4760 piece of a egg.

    hope they keep the Sunny side Up!

    http://projectegg.org/


  • Link to post
    Share on other sites

    Posted · Post your latest print!

    Just came home after work to find the next building design model freshly 3d printed and ready to be used.

    Just clicked a finger on the edge of the glass print bed and the whole thing just came off in my hand.

    No cleaning to do.. no sanding.. just a masterwork of 3D printed PLA... Could some one ask more more... not really.. :-)

    Ian :-)

    designian.jpg


  • Link to post
    Share on other sites

    Posted · Post your latest print!

    What brand PLA is that?


  • Link to post
    Share on other sites

    Posted · Post your latest print!

    @Ian - Fantastisch! And seems to have no warping issues mentioned on the forums so much? How did you do that?


  • Link to post
    Share on other sites

    Posted · Post your latest print!

    the material is colorfabb white.

    I printed at speed 50.. nozzle temp 220... fans 50%... bed heat 50... 75 is too much I think... layer height .1mm... top and bottom thickness 1.2mm

    and after a few hours in the night... a 100% clean, super sharp and what is imporant... SUPER FLAT 3D model !! :-)

    Ian


  • Link to post
    Share on other sites

    Create an account or sign in to comment

    You need to be a member in order to leave a comment

    Create an account

    Sign up for a new account in our community. It's easy!

    Register a new account

    Sign in

    Already have an account? Sign in here.

    Sign In Now

    • Our picks

      • UltiMaker Cura 5.7 stable released
        Cura 5.7 is here and it brings a handy new workflow improvement when using Thingiverse and Cura together, as well as additional capabilities for Method series printers, and a powerful way of sharing print settings using new printer-agnostic project files! Read on to find out about all of these improvements and more. 
         
          • Like
        • 7 replies
      • S-Line Firmware 8.3.0 was released Nov. 20th on the "Latest" firmware branch.
        (Sorry, was out of office when this released)

        This update is for...
        All UltiMaker S series  
        New features
         
        Temperature status. During print preparation, the temperatures of the print cores and build plate will be shown on the display. This gives a better indication of the progress and remaining wait time. Save log files in paused state. It is now possible to save the printer's log files to USB if the currently active print job is paused. Previously, the Dump logs to USB option was only enabled if the printer was in idle state. Confirm print removal via Digital Factory. If the printer is connected to the Digital Factory, it is now possible to confirm the removal of a previous print job via the Digital Factory interface. This is useful in situations where the build plate is clear, but the operator forgot to select Confirm removal on the printer’s display. Visit this page for more information about this feature.
          • Like
        • 0 replies
    ×
    ×
    • Create New...