

Fast n dirty:
Cufflinks!
Mark 1:

Mark 2:

Yeah!

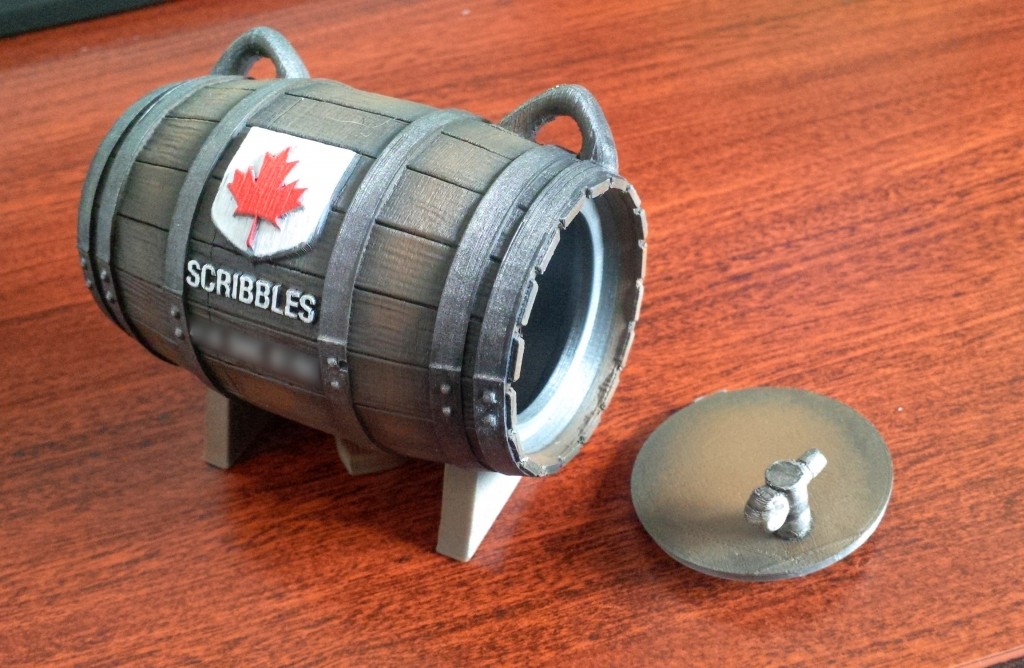
Made a couple of Dog barrels for clients this weekend. They wanted it larger and their nationalities customized on it. Also made a stand.
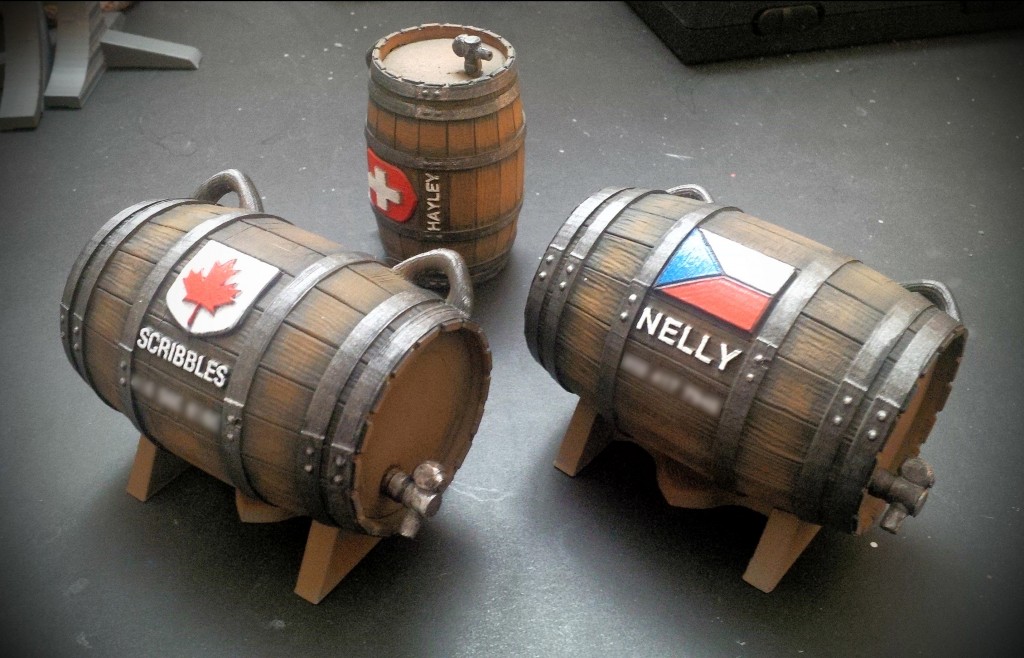
The hayley one in the back was the original. I think I like them the bigger size. Though I'm sure my dog would disagree.
beautiful print !!
did you do the barrels as a single piece or two parts laid down flat on the bed ?
Ian :-)
Yes,the pictures..I got used to the internet speeds here in Switzerland and I don't pay attention to what I upload!
Anyway, next time I'll resize them first..
It is a recording dummy head that help to make binaural recording which lets say simulate the human hearing.
Hide away I hope you don't mean the cap. The head has to be closed and filled with absorption material in order, 1st not to resonate like all hollow stuff do and 2nd The sound must reach the microphones only through the ear canal.
Long story short it has to be as close to a human head as possible.. which means closed.
Yes I did.. you can see the other pictures in the album. Although I'm not happy with the finish where the support was touching the model. It's impossible to remove all the support structure.
This explains alot, thank you 
And nice to see an UM used for this kind of project
(what is the project by the way? Research of some kind within the field of acoustics?)
Next obvious and interesting question would of course be if the resulting plastic head is "good enough" at representing a human head? How are the resoults so far?
Would it eg. be even better to print a skull as the inner part, place it in a slightly larger printed mold, and then fill the gap with silicone, (or that ballistics gel stuff they use all the time on shows like mythbusters)?
first paint coat before I go to sleep!

(I made a mess of the paint job btw, my skills in painting are just not up to a "braddock/Valcrow level" But at least I'm proud. I made it, and its got 4 downloads already!
But how on earth can I couple youmagine to this forum?
Cheers!
Nothing fancy or highly creative on the photos..
Pretty impressive machine this UM2!
Its my 5th print on the machine and im trying to get it dialed in. Actually there has been little to do and quality of the prints exceeded my expectations. There is still few things what I am trying to improve, but not sure is it reasonable or even possible.
Have to check out first, most of the forum posts and ask later if answers not found :wink:


Casing cover for one of my electronics project. On the middle is place for 2.2" tft screen.
For next i think I will print larger version with 4.3 inch touchscreen see how it goes.
But before that I have to print on off great designs by
IRobertI
To see If i can get rid off one of my questions :grin:
BR
Arska
beautiful print !!
did you do the barrels as a single piece or two parts laid down flat on the bed ?
Ian :smile:
Thanks,
It's actually 5 parts, the Barrel standing upright, bottom cap, top cap, spout and lock that attaches to the spout. This is needed to make sure the spout turns the locking mechanism properly. The tolerances are really great, for the bottom cap, I just kinda squeeze the sides in until it's flush and it's more solid than any kind of glue. When locked there is no play between the lid and the sides. It just feels like a solid piece if you don't know it opens.
first paint coat before I go to sleep!
(I made a mess of the paint job btw, my skills in painting are just not up to a "braddock/Valcrow level" But at least I'm proud. I made it, and its got 4 downloads already!
But how on earth can I couple youmagine to this forum?
Cheers!
Looks like chocolate! I wasn't huge into painting my prints before, but once I started it kinda opens up a whole new world of possibilities.
You should try thinning your paints a bit, it looks a tad goopy. You'll get much better results, but it'll take longer.
But how on earth can I couple youmagine to this forum?
Cheers!
Click on your name in the upper right of the screen, find the "settings" word and click on it, find the "Signature" tab near the left hand side of your screen. type in everything after the colon in this sentence: YouMagineUser='lennart-bruggink'
Now surround the text with brackets so the beginning and end read [YouM...ink']. I noticed you put a period (.) in your actual name, but the hyperlink to your name has a dash (-) https://www.youmagine.com/users/lennart-bruggink
Edit, I had to edit this as the forum generated your youmagine profile and not the text.
@Lennart Bruggink is there a specific reason you used supports that did not make contact with your base? I think you could get a better finish if you used supports that didn't extrude from other parts of your structure. Also, how did you generate the supports? Thanks for posting the finished painted pictures!
Just finished printing a set of Reptar XY blocks in Colorfabb XT for my UM1. Picture is desaturated because the white balance is f-ed up and it's 3 in the morning so I don't feel like fixing it.

I had a bit of a problem though... These were printed on freshly cleaned glass and even with a room temp bed they were a complete bitch to get off the platform (maybe I should've tossed it out into the snow for a while instead). I finally managed to get them off, destroying one block in the process, but was left with quite a bit of residue from the skirts. I heated the bed up to 80+C to soften it a bit and after scraping a while I got the majority off. However, some parts would not come off no matter what. I think this stuff actually tore away the surface of the glass :eek: Looks like this stuff aint screwing around when it comes to sticking... jeebus. I guess this side of the glass will be reserved for XT in the future.
In this first picture you can see residue on the right with scrape marks and in the center is the messed up glass.


Wow. that's pretty intense that it can tear off the surface of the glass... And I thought tape tearing was bothersome.
At least the whole thing didn't shatter on you, I thought glass shattered when it was compromised like that.
On the upside.. pretty nice lookin prints.
i know its a stupid question but did you leave the glass with the residue soaking in warm water for a while and then try to remove ?
Iv got some heavy stuff off that way.
Ian :-)
Thanks for the warning... I wanted to try XT for sometime.
to be honest. i printed with XT with no specal setup and it worked brilliantly for me... so I dont see the reason for people to be worried about using it....
Just go for 60° C bed temperature and a little glue (pritt stick). Then you are fine, the part will remove really easy after it's cooled down.
IRobertl
i had the same thing posted pictures long time ago in another thread, my glass was pulled away and was left on the bottom of my print using XT bed temp 60 23 hour print.

it looks like the material is on the glass but it is not all the areas are sunken...
Edit: i did not use glue stick looking back at my thread..
did anyone ever chemically explain how glue stick at 60 degrees burned into glass ??
Hi Ian
No unfortunately, still a mystery and has put me off getting any more XT.
here was my original thread http://umforum.ultimaker.com/index.php?/topic/3455-um2-glass-bed-meltdistorted/
@ Lennart
It's the blue.
It's for a research I'm doing for acoustics in architecture.
Today I did my first test recordings..It still need a lot of adjustments and reprints.
When I'll have a lot of free time I'll test your idea with the skull inside a hollow head!!
I usually set my bed temp around 60c to 65c...
bed temp reading
My latest overnight print is a box for an electronics module which includes a 15mm square cutout.
The UM2 printed this perfectly without any supports.
I'm Impressed!

very nice ! :smile:
how fast did you print ? the over hang on the large opening is very nice !
Ian :smile:
@Lennart Bruggink is there a specific reason you used supports that did not make contact with your base? I think you could get a better finish if you used supports that didn't extrude from other parts of your structure. Also, how did you generate the supports? Thanks for posting the finished painted pictures!
Yeah, well mainly I do not know how to generate good supports that go outside of the model. ( that this is written in bold is a way of saying that i love to get somome help in that!). In any way I did it in the Chogath I printed, but cant remember how I did it( probably because I was randomly clicking at that time).
I've noticed that the meshmixer supports were too close to the model so I had to use filler, But I think it came out nicely.
It is btw not finished. If you look carefully, there are some grey patches. Maybe on my next print I'll try the tip for diluting paint.
Click on your name in the upper right of the screen, find the "settings" word and click on it, find the "Signature" tab near the left hand side of your screen. type in everything after the colon in this sentence: YouMagineUser='lennart-bruggink'
Now surround the text with brackets so the beginning and end read [YouM...ink']. I noticed you put a period (.) in your actual name, but the hyperlink to your name has a dash (-) https://www.youmagine.com/users/lennart-bruggink
Edit, I had to edit this as the forum generated your youmagine profile and not the text.
Lets check if it works!
Edit:; works!
I think this stuff actually tore away the surface of the glass :eek: .
Wow, I wanted to like your post but I felt sad for you so I didn't.
But Damn, I think NASA would be interested in this type of adhesion;)
@ Lennart
It's the blue.
Thanksies!
Cheers!

ArunC posted a topic in UltiMaker Cura,

.thumb.jpeg.0b7a05eafc09add17b8338efde5852e9.jpeg)
Dustin posted a topic in Firmware,


Recommended Posts
Top Posters In This Topic
362
282
221
179
Popular Days
Jan 5
30
May 12
26
Jan 13
23
May 1
22
Top Posters In This Topic
ian 362 posts
cloakfiend 282 posts
skint 221 posts
SandervG 179 posts
Popular Days
Jan 5 2014
30 posts
May 12 2014
26 posts
Jan 13 2014
23 posts
May 1 2014
22 posts
Popular Posts
kmanstudios
Took me forever to do this. And it is still rougher than I would have liked. 3D concept rendering: Finished piece:
kmanstudios
I just finished this. It was a multi-part print for ease of painting. Some of it I am not sure what happened...but hey, it is purty....And, I am unanimous in that ? Test Render Parts
gr5
Bath interferometers. I have made about 20 of these for people who use them to test their telescope mirrors. They are amazingly accurate and can do better than a $40,000 Zygo PSI optical tester. Th
Posted Images
lennart-bruggink 3
Thanks!
I added the Rabbit on Youmagine, But I do not know if It is properly linked. How can I set My posts to show the Youmagine stuff? Remember, the design is without meshmixer.
as for the box, the presser thingy clicked a lot, and the strands were too thin. When i noticed I set the temperature to build plate 67°C and extruder to 232°C ( from 220). I don't know, I'm positive I can get it better, but I don't have enough material left;) at least no "trial material"(I consider my Colorfabb materials the better ones). Also, the window was open and it is cold in the Netherlands.
edit: i almost always use brim. I find that it is nice to see if the pla adheres or not and if there are any problems.
Cheers!
Link to post
Share on other sites