

I like the Swiss national emblem 
Well done!

what would be really cool is a version for the irish dogs... a half empthy Guinness glas with beer dripping out ... ummmmmmmm WUF WUF !! ;-)
Ian :-)
The Swiss do make some fine stuff. 
She hasn't ran with it yet so it hasn't smacked her in the nose yet... but when I walk her, the leash connects to that part as well so it just ends up dangling by the side. kinda works out. But yeah, it should be attached higher up in the thicker ring... it just hurts my fingers so much.. those metal keyrings need a redesign.
How on earth do you guys paint something like that..... I really like what i see,but don't have a qlue as where to start painting my own prints like that....
it just hurts my fingers so much.. those metal keyrings need a redesign.
Already done and since this particular design was done by Swedes I have to link it: http://www.drosselmeyer.se/ (click the center image "Freekey"). I have no connection to them and it's probably overpriced as f**k, but there ya go hehe.
edit: This bloody forum software is retarded. What kind of programmer can't autoparse URLs properly in the year 2013!? It's ridiculous...
How on earth do you guys paint something like that..... I really like what i see,but don't have a qlue as where to start painting my own prints like that....
It's not really that hard. I started painting prints only a few months ago from old model paints I found. The hardest part is starting because it seems daunting. The more detailed your model is the easier it is too, which is why I displaced some wood grain onto the barrel. Once the relief detail is there, you can just paint the base colour, then randomly splotch on really watered down paints willy nilly and it'll kinda flow into the right places.
Already done and since this particular design was done by Swedes I have to link it: http://www.drosselmeyer.se/ (click the center image "Freekey"). I have no connection to them and it's probably overpriced as f**k, but there ya go hehe.
edit: This bloody forum software is retarded. What kind of programmer can't autoparse URLs properly in the year 2013!? It's ridiculous...
Ohh. those are nice.. they don't even list a price though so I'm sure it's out of my price range.
Actually it's only like $5 US. Which is lord knows how many thousand percent more than generic split ring keychain, but not actually astronomical in absolute terms.
Amazon sells them too...
On an other subject, but still playing with light, I have tried to print a small medal. It came out a bit like watercolor painting, and I really like the result with the light behind.

The original model is really thin and is 12cm wide. I have scaled it down to 5cm to the diameter in Cura so the actual thickness of the building has also been decreased from the original design (around 0.8mm thickness for the front tower, nearly 0mm for the back). Even the cloud on tho is clearly visible.
This printer is amazing!
Love it. Here's something similar that I printed - lithographs:
Ohh the swiss barrel is really good ! Is it possible to share the editable file (for changing the name) ???? I so want to print the same for my Neuchatel's Dog !
On an other subject, but still playing with light, I have tried to print a small medal. It came out a bit like watercolor painting, and I really like the result with the light behind.
The original model is really thin and is 12cm wide. I have scaled it down to 5cm to the diameter in Cura so the actual thickness of the building has also been decreased from the original design (around 0.8mm thickness for the front tower, nearly 0mm for the back). Even the cloud on tho is clearly visible.
This printer is amazing!
How do you guys print these?
I tried printing a self designed coin some time ago.
Printed it laying flat, but found that all the raised individual details resulted in a lot for travels and it ended up being of really poor quality despite the printer being nicely tuned and printing other objects nicely...
I had to do a bit of cleaning after the print between most of the raised details, but the small parts to remove were hardly connected to the real design, so they were easy to remove (I use a sharp knive as a lever).
The main issue with this accuracy of details is to check if what you're about to remove isn't actually part of the print.
But the light from behind also helps a lot to smooth the details. You don't see much the watercolor effect for instance.
Otherwise, I simply used the "high" auto setting in Cura, but I'm sure that the "normal" would have done a very similar job as well. Fine-tuning the parameters could probably improve the initial quality of the print.
Alright... Does the coin have a lot of individual "hilltops", i.e. areas where the printhead needs to travel to without extruding?
The coin I did went fine as long as the printhead could just keep moving around and extrude.. but when it got heigh enough that it needed to print the highest points of detail (the hilltops I'm referring to) it all went to crap...
Yes, there are a lot of "hilltops". And as the outside circle is nearly as high as the highest part of the building, I had to remove quite a lot of "travel crap". But I found these to be fairly simple to identify/remove after a bit of practice. They pop-up easily when I use a knive as a lever.
I had to remove quite a lot of "travel crap".
I call that "stringing".
I can usually get stringing down to zero if I print very very slow (20mm/sec), cold (190C) and turn on retraction to 4.5mm with both the expert retraction settings set to 0mm. Although some filaments still string a little bit no matter what but these are very fine hairs. Layer height might matter also - not sure. For small parts like this coin you need as much fan as possible (100%).
I made a little clamp for some cheap flexline that I bought for a project. I had a bit of an accident while thinking when I ordered it so mounting it became an issue. And because I some sickness which makes me hate mounting anything in a way that doesn't let me take it apart again I came up with this.
The two little blocks goes around the flexline and then I put the clamp on top. By tightening the screw I clamp the holder to the table and squeeze the two blocks together at the same time. Loosen the screw and it all falls apart in case I need to change something. Turned out there was a little bit too much clearance in the blocks so I can swivel the line around quite easily but I think I like it that way. The hole in the back is for routing out cables.


I designed a box;

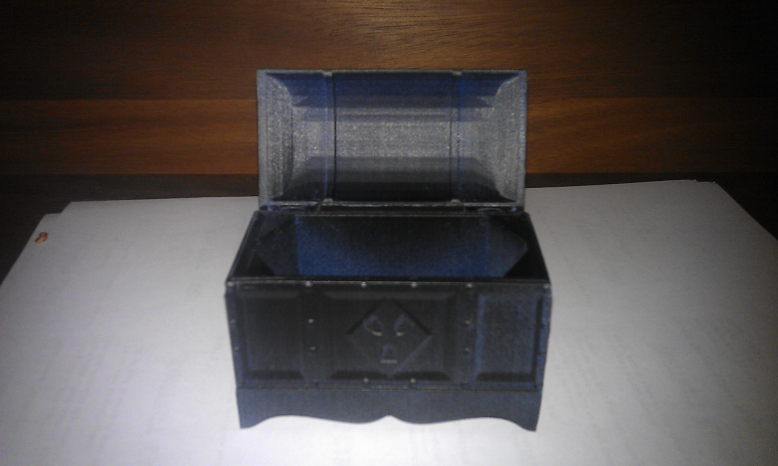
Prints in one piece, sideways. Was good challenge designing the hinge. 
(more of my prints can be seen in the gallery here; http://randomreviewshow.com)
you designed and printed a very nice box !! :-)
Cheers, quite proud of it.
Currently working on a small inset for it that will let it store 3DS games (or just SD cards).
After a lot of printing hours I got this!


With Christmas coming up it was time for a new thing for the nephews. They still like money so that's what they're getting. Last years little puzzle didn't last long so I hope this will take a minute or two at least. I tried to put in "traps" to get them stuck and missing the right exits, who knows if it'll work hehe.

@BaasB That figure looks fantastic!! How do you do it?
After a lot of printing hours I got this!
Goe bezig Baas!
What is the size and where did you find the model?

ArunC posted a topic in UltiMaker Cura,

.thumb.jpeg.0b7a05eafc09add17b8338efde5852e9.jpeg)
Dustin posted a topic in Firmware,


Recommended Posts
Top Posters In This Topic
362
282
221
179
Popular Days
Jan 5
30
May 12
26
Jan 13
23
May 1
22
Top Posters In This Topic
ian 362 posts
cloakfiend 282 posts
skint 221 posts
SandervG 179 posts
Popular Days
Jan 5 2014
30 posts
May 12 2014
26 posts
Jan 13 2014
23 posts
May 1 2014
22 posts
Popular Posts
kmanstudios
Took me forever to do this. And it is still rougher than I would have liked. 3D concept rendering: Finished piece:
kmanstudios
I just finished this. It was a multi-part print for ease of painting. Some of it I am not sure what happened...but hey, it is purty....And, I am unanimous in that ? Test Render Parts
gr5
Bath interferometers. I have made about 20 of these for people who use them to test their telescope mirrors. They are amazingly accurate and can do better than a $40,000 Zygo PSI optical tester. Th
Posted Images
SandervG 1,521
haha funny print and it came out great with your paintjob.
Did you take her for a walk already? I could imagine it bumping in her face when she runs?
Maybe connect it closer to her collar.
Link to post
Share on other sites