

Umo/umo-+ also would have more problems. The shafts on um2 are different height (the thin x/y). That's why I designed the Beyond Slideblocks to use the longer um2 shafts and get the central x/y as on um2. Is a tiny difference that makes a world for the head changer since it leaves more room for the lateral move and clip.
yes, that would be smart, but will be very expensive: new board €357, 2 times um2 upgrade €955... it is easier to buy a um3 then..
umo+ will have the same problem with the size of the printhead..
more fun to adapt the umo dual upgrade I have already, this means only adding magnets, fan and something clever to put it all together..
Well um3 is 3k. Umo is 800 umo+ 1000€. The upgrade kit is 400 (all without vat). So... there's a leap of money there. For 800-900€ you could mod a umo/umo+ to print like a um2+ with magnetic changer. You save a full 1k euros..

I have a stupid question to those who designed this upgrade : what about the electronic plate of the Ultimaker 2+? Is it foreseen already to support a second head, both with XY, fan etc and a second extruder? Can we have some details about this subject?

Please accept my apologies. Deleted comment reflected old information. See the video below instead.
Edited by GuestFactual correction

foehnsturm 969
I have a stupid question to those who designed this upgrade : what about the electronic plate of the Ultimaker 2+? Is it foreseen already to support a second head, both with XY, fan etc and a second extruder? Can we have some details about this subject?
Up to now, Ultimaker might change this in the future, the UM2(+) electronics already feature the required 5th stepper driver, 3rd temp sensor input and heater output. Only the fans (printhead, part cooling) have to be connected in parallel.
Single extrusion remains unchanged, for dual extrusion the additional head will be picked up and parked again every layer. This is all handled by firmware.
Edited by Guest
I have a stupid question to those who designed this upgrade : what about the electronic plate of the Ultimaker 2+? Is it foreseen already to support a second head, both with XY, fan etc and a second extruder? Can we have some details about this subject?
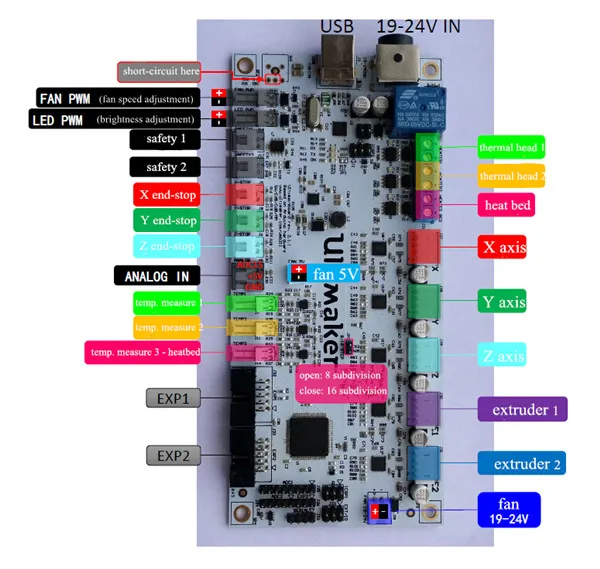
Here's a random pic of the Ultimaker 2 Mainboard from some Alibaba seller:
https://sc01.alicdn.com/kf/HTB1NfSoFVXXXXXvXVXXq6xXFXXX0/220554104/HTB1NfSoFVXXXXXvXVXXq6xXFXXX0.jpg
On the right you see "extruder 2", "thermal head 2" and on the left "temp measure 2", that's the temp sensor, head heating and the extruder motor output for the 2nd extruder.
foehnsturm 969
Maybe a short video is worth a thousand words.
https://www.youtube.com/watch?v=https://youtu.be/viX_WLRqxYM
Edited by Guest-
 5
5

Maybe a short video is worth a thousand words.
Thank you for all the informations and the picture of the electronic plate. This is incredible, this video shows well the move of the bed when the head is loaded and pushed back in the corner. Thank you for all this details, I become nervous now and I want to learn to program some pieces in cura now. Where can I find the supplemental pieces to print (head supports, park arm, dual spools support etc...)? As a newbie, I think I will have to make several pieces to get one perfect and it will take some time. Or perheaps I should wait a little more and get all the instructions. Be sure I'll do my best to get it work.
Maybe a short video is worth a thousand words.
https://www.youtube.com/watch?v=https://youtu.be/viX_WLRqxYM
Yes, very good. So the new version does not even put the first head back, just picks up the second hanging lower. That's ingeniously simple!
(Just noted that you are from Munich. I live in Regensburg and am working mostly in Munich.)

Great video! So what's the usable print volume (L x W x H) with this setup?

hi
that is also new to me that the 2nd nozzle is just picked up.
here comes the question: how did you solve the oozing problem? by fan and cooling?
is the second print head lower?
your prints are great so there must be a trick.
foehnsturm 969
Again, a picture ...

Single extrusion build volume remains like before.
-
2
foehnsturm 969
(Just noted that you are from Munich. I live in Regensburg and am working mostly in Munich.)
Kurze Nachricht am Tag vorher und Du kannst gerne mal vorbei schauen.
Edited by Guest-
1
foehnsturm 969
hi
that is also new to me that the 2nd nozzle is just picked up.
here comes the question: how did you solve the oozing problem? by fan and cooling?
is the second print head lower?
your prints are great so there must be a trick.
z-offset, temp management like UM3 and a wiping device
any news about the testers? so calm these days.
foehnsturm 969
Well, during the week most of them seem to be quite busy with their daytime work. I expect the first finished upgrades this weekend.
Well, during the week most of them seem to be quite busy with their daytime work. I expect the first finished upgrades this weekend.
Yes, exactly. And waiting for the rest of the deliveries of cables, plugs, crimps, screws.
Well, during the week most of them seem to be quite busy with their daytime work. I expect the first finished upgrades this weekend.
Yes, exactly. And waiting for the rest of the deliveries of cables, plugs, crimps, screws.
I've the magnets and the upgrade kit for ulimaker 2 to 2+. Isn't it enough? Should we get more cables, plugs, crimps, screws?
Edited by GuestNo news? houlàlà, I saw a print made by conny_G, is that some results?

Hi @foehnsturm,
Two questions about the magnets:
In Canada it is harder to find exact metric sizes for magnets (or anything else it seems! :() than imperial/American/standard/whatever. My math says 1/4 inch is 6.35mm and 1/8 inch is 3.175mm. Would 6.35mm x 3.175mm magnets fit your design? Are they close enough for tolerances, etc.? ... Or should I actually push for precise metric dimensions.
Also, how important is the quality of the magnets. Your link, for example says N45. Would N35 be okay or too weak maybe? Would N48 be okay or too strong maybe?
I don't know magnets or your tolerances, so I am just trying to figure out strict I need to be with the specs.
Anyway, thanks very much! 
foehnsturm 969
Hi guys,
Yeah, the conny_G print is one of the first he made with the tool changer. Doesn't look that bad 
I expect some more people to finish the upgrade print the first parts until next week. One of the first results of beta testing was to design a second variant for the dock. The maufacturing tolerances of the UM2 frame (maybe caused by different production lots over the years) are probably too high for a safe click-on mounting.
Imperial sized magnets would work as long as their holding force is in the range of 900 gr. But we would have to modiy the couplings to accomodate the larger diameter. The small difference in height shouldn't be an issue.

SyntaxTerror 344
In Canada it is harder to find exact metric sizes for magnets (or anything else it seems! :() than imperial/American/standard/whatever. My math says 1/4 inch is 6.35mm and 1/8 inch is 3.175mm. Would 6.35mm x 3.175mm magnets fit your design? Are they close enough for tolerances, etc.? ... Or should I actually push for precise metric dimensions.
Minimum orders being what they are, I have overflow. If you want, I could send you a set?
-
Our picks
-

UltiMaker Cura 5.7 stable released
ArunC posted a topic in UltiMaker Cura,
Cura 5.7 is here and it brings a handy new workflow improvement when using Thingiverse and Cura together, as well as additional capabilities for Method series printers, and a powerful way of sharing print settings using new printer-agnostic project files! Read on to find out about all of these improvements and more.
-
-
- 15 replies
.thumb.jpeg.0b7a05eafc09add17b8338efde5852e9.jpeg)
Picked By
MariMakes, -
-
Release Notes: S-Line Firmware 8.3.0 (Latest)
Dustin posted a topic in Firmware,
S-Line Firmware 8.3.0 was released Nov. 20th on the "Latest" firmware branch.
(Sorry, was out of office when this released)
This update is for...
All UltiMaker S series
New features
Temperature status. During print preparation, the temperatures of the print cores and build plate will be shown on the display. This gives a better indication of the progress and remaining wait time. Save log files in paused state. It is now possible to save the printer's log files to USB if the currently active print job is paused. Previously, the Dump logs to USB option was only enabled if the printer was in idle state. Confirm print removal via Digital Factory. If the printer is connected to the Digital Factory, it is now possible to confirm the removal of a previous print job via the Digital Factory interface. This is useful in situations where the build plate is clear, but the operator forgot to select Confirm removal on the printer’s display. Visit this page for more information about this feature.-
-
- 0 replies
Picked By
MariMakes, -
-

.thumb.jpeg.0b7a05eafc09add17b8338efde5852e9.jpeg)
Recommended Posts
Top Posters In This Topic
280
228
170
133
Popular Days
Jul 14
22
Mar 26
19
Feb 13
18
Sep 23
17
Top Posters In This Topic
foehnsturm 280 posts
neotko 228 posts
ultiarjan 170 posts
macua85 133 posts
Popular Days
Jul 14 2015
22 posts
Mar 26 2015
19 posts
Feb 13 2015
18 posts
Sep 23 2015
17 posts
Posted Images
ultiarjan 1,223
I think it would make much more sense to upgrade the UMO to an UM2 head first if you want to make a magnetic changer setup.
Link to post
Share on other sites
peggyb 169
yes, that would be smart, but will be very expensive: new board €357, 2 times um2 upgrade €955... it is easier to buy a um3 then..
umo+ will have the same problem with the size of the printhead..
more fun to adapt the umo dual upgrade I have already, this means only adding magnets, fan and something clever to put it all together..
Link to post
Share on other sites