


lennart-bruggink
-
Posts
143 -
Joined
-
Last visited
Content Type
Forums
Events
3D Prints
Posts posted by lennart-bruggink
-
-
..mother in law....?
the Grinner was the father;)
-
 1
1
-
-
lol friction welding;)

-
thought I'd try something new, I have seen a guy here make a cool ninja style tinkerplay. I got some filament laying around so i'd though id make... a monkey-ish-thing?
my experience, it works great! I only have some general problems with support and ball shapes, but overall im quite pleased with the "tinkerplay" experience.
pic:

anyone else like to share their home made boinicles?
Cheers!
-
1
-
-
Thanks. It's a print. PLA, 200 mm tall, 0.06 layer height. Painted with Citadel Miniature paints.
I would not believe you if I had not seen "the Grinner" of your website in earlier pages of this topic!
it looks SO awesome. look at those teeth!
Love it!
Cheers!
-
I made a silicone mold of the part, and cast it 10 times,
I already made a new mold, that has all 10 parts in one mold.
cool!
what kind of resin do you use?
-
Haven't posted here in a while,
I had an order for a Stargate I haven't made in a long time, and I lost one of the parts molds,
so I thought why not print it and make a new mold

Printed in PLA white

cleaned up the part, made 10 copies (1 extra), in tinted resin.

and painted these in the same paint scheme as the rest of the Stargate.

and whole gate, just to show off

The Stargate is 1 meter (40") in diameter
nice work!
how did you do the resin cast?
cheers!
-
aand a quick n dirty paint


-
small project for yesterday: meshmixer!
anyone else fancy this snipers head on a pike


I should make a cast of it and make lollipops..maybe later;)
ps how do i rotate images within the albums? seen as i have been out for a while all images were lost and someone decided it was a good idea to update the forum.
cheers!
-
heh, looking at the last four posts means i was sort of 50 pages behind..whops;)
-
promo toy robot for comany REC in Russia. 36 sm robot height
again... HOW!
this is massively awesome!
must have taken ages to print on 0.00001 layer height;)
cheers!
-
1
-
-


I helped to print in 3D a wonderful job! Dmitri Dubyaga my friend and Colleges. Meet brotherbear-of-steel, #fallout #falloutstyle he created the 3D model within 14 days. I printed it for 36 hours on 3D printer #ultimaker2 and pla #rec. 5 days later, Dmitry painted by hand with acrylic paints
Love the print!
"in other news" cant wait for fallout 4!
-
I've been working on a Harley Quinn bust with stand recently. I've fixed the hood, removed the support and filled some imperfections. Just lots of priming and sanding to do now!


My word!
This is no ultimaker quality!
this is near SLA quality! what are your setting/material etc?
-
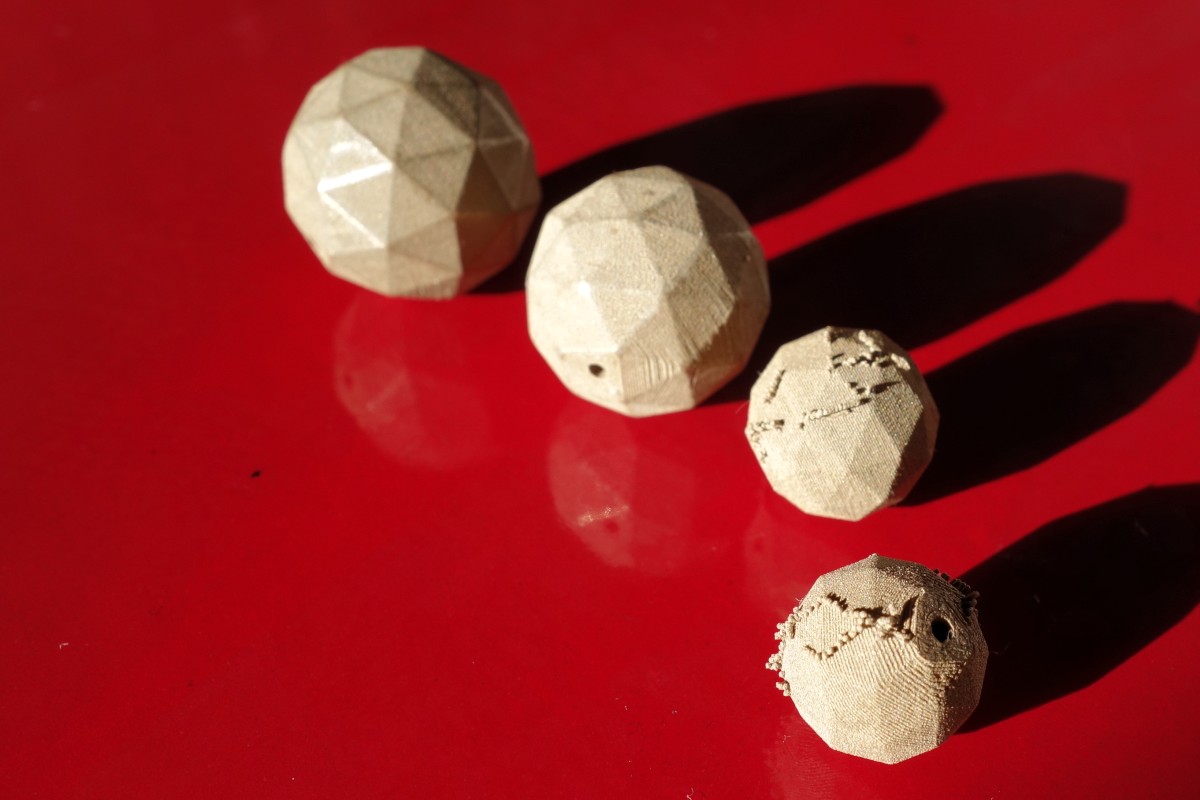
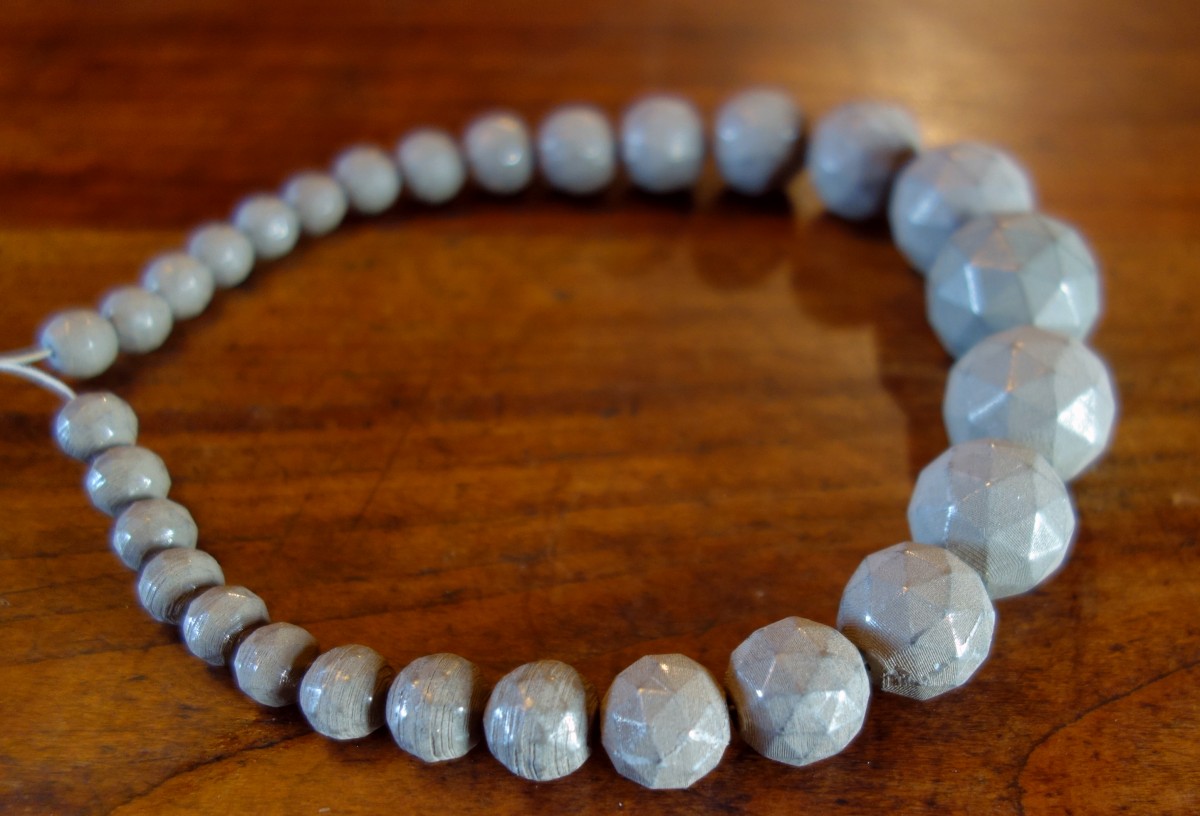
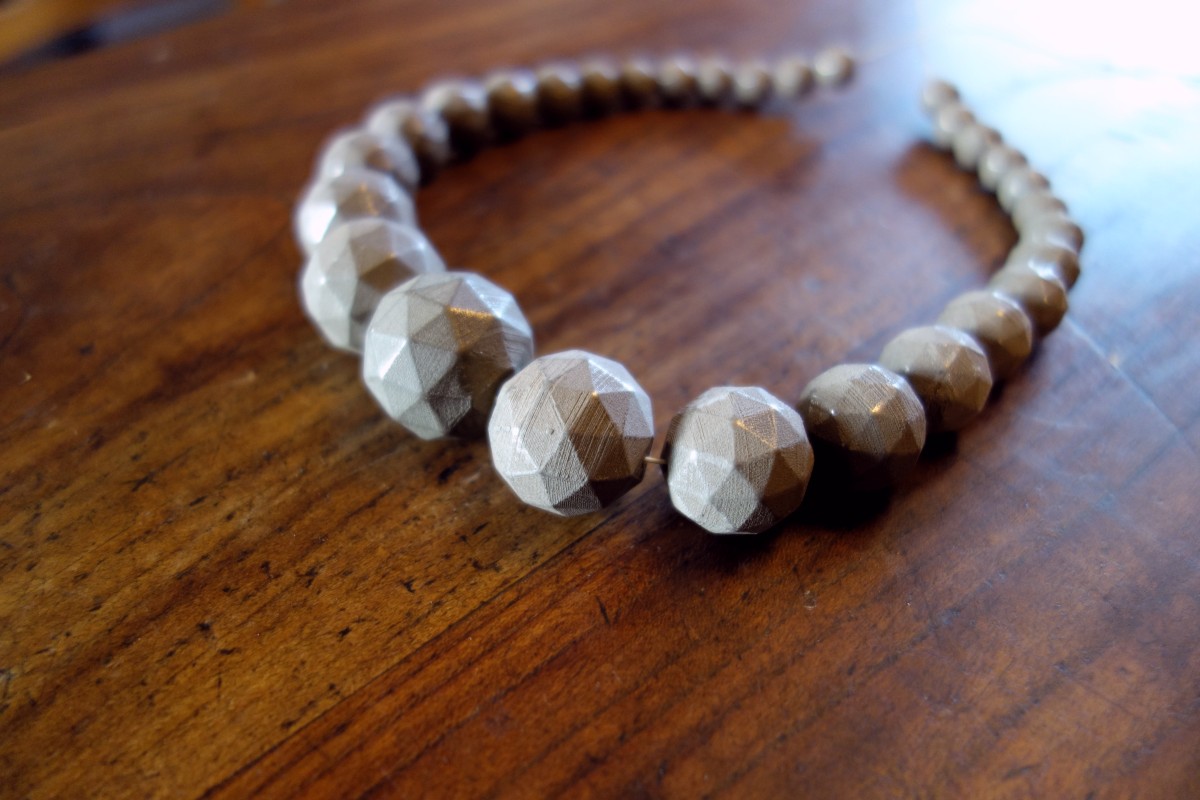
My last print: an icospher collar for my wife. Printed with bronze fill. I didn't sand it because I wanted the printing lines to stay visible and give a more "handmade" style. I polished more the edges and less the faces. Modelled in blender (modeling was quite fast in fact: add an icosphère, add an array modifier with an empty to change the scale and a boolean modifier to make the holes):
Hi Viralata!
Does you wife have problems with her skin when she wear it?
i had printed a ring but it couldnt wear it due to the bronze poisoning.
cheers!
-
You sent tali through the vents didn't you! you monster!
hahahahahahahahahaha
wow caught me off guard!
I guess you know the mass effect series just a little better
-
hi guys( and girls!)
accidently saw this topic
i made the blender file, but i am not a blender guru
this problem i have seen before, the simple deform modifier should have its origin on "Cube"
btw i do a lot with displacement mapping, eg the names on the 3D printed petition http://www.thingiverse.com/joris
if someone starts a new topic i may give some more tips... : )
cheers \ joris
awesome elephant! and a good cause!
i love the idea of multiple printers creating something larger, just like the Egg project
Hello Lennart
I know this coiling issue very well, but I found a workable solution for me. Because I basically every new filament-roll 1 time re-wrap, and that almost since my first 3D printing hour.
Unfortunately, that takes 10 to 15 minutes, but it gives me an almost carefree sleep:-)
Markus
do you mean you unroll and rewrap the new spool? because in your picture it looks like it is a new spool ( i know you cant make a picture of a new spool, but curious nonetheless.) doesn't your spool get tangled up if you only slightly let a "lane"lose tension?
Lennart,
I tried to do a heat treatment to coils and I found out that it is possible to take out the tension by putting the coil into kitchen oven at a temp between 35 and 45 °C for about half an hour. This works fine for me.
I like this! don't invent the wheel, because some nudelguy did it before you;)
Allright, regarding the earlier mass effect print, i printed it again:
support for the arms is a pain though. Just cannot get that properly with MeshMixer and Cura. also what I have issues with is that when I use meshmixer first an cura second, the slicer does not print the intersections. what am I doing wrong?
Showtime! ( or at least intermediate result time!)
Messy and hairy:


and cleaned up:


I am always surprised how well the Ultimaker 2 can print the slope (the "back"in this character print)
even at 0,1 mm.
Anyway,
Cheers!
-
In the meantime Mr bisschof and his schwitzerlandisch friends are awesome to game with;)
-
Hi guys!
@ BaasB, what are your settings?
lovely prints!
I am currenlty having some bad luck with the prints:
this is what it should be (base not drawn)

this is what I managed to produce:

left:
infill too small, thought it stopped printing because of other things
2nd:
try again, only to dischover that for some reason (cura reasons) the top shell was too thin.
3rd:
adapted model, however extreme underextrusion.
4th:
had it with the colorfabb XT for this print (was printing 0.06mm, I dont think xt likes that)
tried with an unknown brand. it was going well, until I went out of bed in the morning and found black spaghetti. supportand legs were knocked over and it was printing in air. The printed legs were really delailed, except for the parts were supports sat. I think meshmixer support was too thin.
5th:
scaled it to be larger( so the support would be larger), and 0.1 mm layer heigth.
in the morning, my filament was in a coil ( the ultimaker "pole"was too thick for the spool to be on) and thus, no extrusion!
I hate the coiling issue, though.It happens with all filament spools i have. I think it could be overcome if the manufactrers would somehow relieve stress in the spools by heating it up after spooling, but that is my first thought only.
I need to think of something of the coiling issue, Ideas anyone?
Stubornness continues, I am now at my sixth try.
It is a rather fragile print though, thats why I am persevering
Cheers!
-
Hi!
nice that the moderators have split it off,
anyway, currently i'm playing different stuff.
Last couple of weeks had a portal multiplayer kick,
but elderscrolls skyrim is one of my favourites.
which reminds me, I do have some models laying around that need printing...
Cheers!
-
For those wondering where the gaming posts went, I split them off into a new thread instead. They were a bit off topic and it'll get more exposure that way I think
You can continue here: http://umforum.ultimaker.com/index.php?/topic/8424-join-the-ultimaker-steam-group/
Thanks for the link!
-
PC guy too. We should start a Steam group
Count me in! Lennie_B
(maybe i'll buy ME3 on pc when there are a lot of people wanting to, however I would need to build all of my upgrades all over..)
Cheers!
-
@lennart, why would you print a figurine in XT? think PLA prints easier, its cheaper, and your going to paint it anyhow ..
Yeah, i only had that stuff laying around. I know
I think I WANT ONE, AND I'M GOING TO HEADBUTT IT ALL DAY!! (I'm playing through ME3 again, after being disappointed by DA:I)
Is the model available somewhere?
Hey if you played ps3, we can do the multiplayer coop sometimes? I Really liked it ( and obviously put a lot of time there). if anyone else is up for it, let me know too;) ( been a while that i have played though.
From his eyes can not hide, the enemy will be found! always and everywhere ... fast like lightning - scout "Mosquito" my author's toy
NO WAY my ultimaker2 can print these!
Can you send me the gcode files? That way I can directly get your print settings!
Teach me master!
he will find your enemies! from dripping out of the ground .. and give on the ass ... combat robot "mole" my author's toy
mand these look SOOOO good!
Cheers!
-
...My background is CGI, and it's lovely to see a physical prop at the end of it...
then you know the pain of getting an awesome model to work for 3d printing;)
I know Dan has had a couple of problems with underextrusion - it seemed to happen more with the preset values than going in and tweaking settings
yeah, the underextrusion issue is IMHO pinpointable to a bad diameter PTFE loader ( had a problem with colorfabb XT running overnight, but not sticking to the buildplate, in the morning there was one big chunk of clear XT between the 4 hole plate and the extruder. I think it went wrong there.
HOWEVER, when i print without retractions, there is no underextrusion. This validates the shape of the pulled out filament, which is a sort of cupped thing. I have already sent a ticket to customer support, but I think they are busy as they have not yet responded. at least I can print;)
Speaking of which:
The prints of yesterday were finished and... sort of.. glued together.
In my opinion it looks nice, but nowhere near perfect. I think I am going to give it a basic paintjob.
Pictures:


What do you guys think?
Cheers!
-
Hi,
Here's what Daniel (who printed them and cleaned them up, and made the CG model of the gun e-mailed me)
"Basically the parts were assembled using Liquid Solvent cement ( Dichloromethane) which melts the parts together, although I did notice the PLA took a while to really harden back up.
Any joins and gaps etc were then filled with two part car body filler.
Everything was then sanded with 100 grit sandpaper. I did use soapy water to speed things up but it took a while for the prints to dry out so its not a time saver but just makes the sanding easier.
Everything was then given a pretty heavy coat of standard filler primer, although this was sprayed from a gun rather than a rattle can.
This was left overnight ad then sanded once more with 240 grit and given a final coat of primer , but this time from a rattle can.
I chose to use cellulose paint rather than a two part paint as cellulose works on evaporation, so the paint shrinks back a bit, which helps keep detail."
thanks for sharing!
it looks awesome!
right now I'm printing a second mass effect character (or at least trying to)


The bottom parts I'm printing tonight, although I still have underextrusion issues.
I hope it will last the night.
Anyway, its my second Mass effect character, so i think i need to paint it better than the last one;)
for now , sleep tight!
cheers!
-
We're clubbed together on an UM2 to produce props for a short fan film we are making.
It's based on a 2000AD comic strip called Strontium Dog, and we took them along to Thought Bubble comic convention at the weekend.
Here are a couple of pics with artist Jock (who was a concept artist on the Dredd movie) and Boo Cook who draws for 2000AD as well.
The gun was printed in about 3 pieces, the helmet... probably about 10.
Dan at Planet Replicas made the model of the blaster in Rhino, and I made the helmet in 3DS Max.
Dan then judged scales and printed them out, assembled them and cleaned them up.
We've had the printer a couple of months and it's been a godsend (a few issues lately with underextrusion, but that's about it)
There are a bunch more pics at the link below.
https://www.facebook.com/strontiumdogfanfilm


Nice Work!
How did you clean the models?
cheers!


Post your latest print!
in What have you made
Posted
AWesome!
I really love mass effect props( and characters)!
btw, a new mass effect gaem has set to be released 2016, and i know some guys from the forums still play ME3 sometimes (including me (LennieB/CH-Lichthammer) also https://ultimaker.com/en/community/view/9424-join-the-ultimaker-steam-group)
Cheers!