


Krasnoyask
-
Posts
35 -
Joined
-
Last visited
-
Days Won
1
Content Type
Forums
Events
3D Prints
Posts posted by Krasnoyask
-
-
My third printer was finally picked up for a refund on the 12/12/16. I do now however have a letter from the supplier for legal proceedings to start as I still have to pay for it.
There's no way I'm paying for a faulty product!
Ultimaker, have a word with your resellers, you say you work hand in hand with them.
Over and out.
-
It's now two weeks on and I still have the third printer.
Yep, it's still packed up in its box from the 28/11/16.
Why? Well, mainly the reseller is hopeless. Luckily (I think) for me they refunded the first printer by mistake and replaced it. I didn't know about the refund until last week, so the printer I have is not my property to use as I do not feel like paying for a faulty printer. I have filed for a refund even though I have had that already, but still the printer sits here, even after the reseller sent an email with a collection time and date on it.
I've been sent a final reminder to pay for a printer that I should no longer have here.
Now I have this all to sort out just because Ultimaker's quality control is a bit off. I could pay for it and get it swapped again, but as it's now four weeks on without a good one I'll just keep my refund that was given by mistake.
-
Hi @Krasnoyask, thanks again for the update. Once again, the printers looks superb but, unfortunately, once again, the quality control leaves room for improvement.
I have sent you a reply on your DM with a possible solution on how to fix this. Perhaps it is something of your interest.
Looking forward hearing from you!
Ps; it appears here that it has been scientifically proven that knocking on wood, throwing salt or even spitting (recommend to do this outside) really helps in undoing a jinx. Perhaps worth checking out these options too

If I do all three will this jinx me more?
I hope not. Reply updated to your message this morning.
Thanks as always, all solutions are of interest.
-
Can't seem to find the Print Sequence in CURA 2.3 with the UM3 selected. Am I missing something? Have two small models loaded as per previous UM2+ builds.

I'm pretty sure that this is something that is not available on the UM3 presently. I'm sure as things evolve in Cura it will be available it the future.
-
On a second thought, it maybe worth checking your print head axis's are square and parallel to start with, as the switch would have worked before shipping. So perhaps shipping has also made it skip a tooth on the belt putting the switch position out just as you are experiencing.
Well worth checking.
-
Hi Ulrik,
There is a option in the calibration menu to reset the core switching position. It's easy to do and all the instructions are easy to follow in the menu.
I believe it's under system/maintenance/calibration/calibrate lift switch.
By the sounds of it this should have you sorted

-
 1
1
-
-
I am still onboard, I'll go down with the ship, or will I be made to walk the plank?
Shall we find out?
Ok, so by now you know my UM3 is my third printer, the replacement for the replacement, and it has problems with the slider blocks, posted late Friday. This was boxed back up Monday not just for the slider blocks but for this as well.

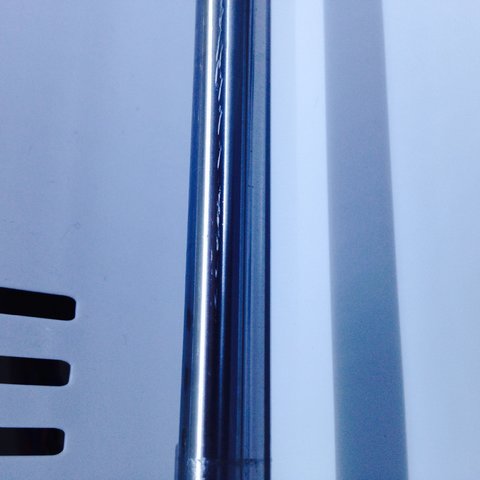
Now this looks like grinder marks from where the ends of the Z axis's were deburred. Hard to photo with my skills, but I can insert them with ease now.
Not good for the longevity for the bearings.
Also the X axis, different story, but also not good for the longevity of the bearings.


If you look you can see scores running down the length of the rail. This is impossible for the printer to create those. So this was done before or at assembly. How hard was it to push that through those bearings? Very, looking at the scoring.
The other rails look good as they did on the other two printers.
Sorry Ultimaker, these are the units I have been sold. It prints so well, perfect for my needs, but I also need longevity.
On a higher note, it's awesome on PET-G, cue sparkle and shine.


The dragon was a test for 0.7mm walls all around, top and bottom. Printed at 15 degrees over the recommended temperature, no cooling fans, 0.3mm layer, no clean up. What you cannot see is how it sparkles in the light as it is moved. Its so glossy it just refeclts the light, it looks like green diamonds. Also this is translucent, but it does not show in the pictures.
I do love you Ultimaker, but my printer sits here boxed up.
I'm not knowing what to do :(
@SandervG I'm jinxed :(
-
Hi Krasnoyask, thank you for your post and thank you for sharing updates. But you are making me regret asking for them
I have just sent you a message, I'm looking forward hearing from you.
If you are still on board, lets solve this for once and for all!
Hi SandervG, reply sent, although it seems more disappeared this end. iPad is not friendly with this interface. Will post again tomorrow if it's not with you. Many thanks.
-
Just to add to the thread - I'm not at all happy with the quality of the machined front panels. The quality isn't great at all. It's this rough all the way around.

I think I've created a tread where us unlucky individuals hangout :( I do feel Ultimaker wants us to be happy with there products, but I do feel you on the quality front, some of the details are just annoying. If I get another replacement, knowing my luck I'll have that issue to face next. I'm not sure if I can be without an UM3, I'm sure I want to be happy with one though.
-
Just got my UM3 under a week ago, and it prints like a charm—the active leveling is just what this printer needed, and the dual extrusion is better than most (more like all) of the machines I've used. I love the new UI—it's minimalist, beautiful, and well-thought out. Quality of prints absolutely blows my mind.
But I spotted the same problem as Krasnoyask—the wire rubbing against the belt.

It's practically a ticking time-bomb—it'll probably print great for a couple of months or so, like nothing is wrong at all... then bang, the belt starts to wear down. Give it another two months, and you'd probably lose all accuracy on the Y-axis. All outside of the warranty. :/
So, I was just curious, and I looked at the files for the UM2, and guess what I found? It has this wire rubbing issue. (just measured this: the clearance from the wall to the belt on the UM3 is 4.5mm, and 3.5mm on the UM2) Now this is weird: I had my UM2 for two years, and nothing happened with the Y belt or the Y limit switch. And the design says that the tolerance is closer on the UM2 than the UM3. Now, I don't have access to the source files of the UM3, so some of the moderators might be able to check for this, but could this be a issue with the design? Or like with Krasnoyask, could this be more quality control issues? Is there a way to fix this, other than taping the wire to the wall? Thanks guys.
Here's a screenshot of the UM2's design:
.thumb.png.3df77e465bae983f4b8ed093307f5fe6.png)
Hi RayvenMaker,
I have to agree with the first part of your post. It's this that makes it a difficult decision to live with it or without it.
I found on the three units I have had that the limit switch wires can just about be pushed away from the belt. The closer you push nearer the switch the better, but please be careful not to break the contacts that the wires are fixed to. I would recommend you check the LED wiring to. Same side, top front left, two of the units I had had the wires rubbing on the aluminium pulley. It's not easy to see, but you will clearly see it if it is rubbing, easily pushed clear.
The parts on this printer are generally very nice, I think if you have a good one you're good. The support team are excellent, I think if Ultimaker are aware of any issues with the earlier units it would only be decent of them to cover it under warranty later. Can anyone from Ultimaker can back this up?
-
Hi @Krasnoyask, thank you for the update!
'The replacement of the replacement, is it good' That is the BIG question we all ask ourselves! I had a short rendezvous with 3DGBIRE just to make sure it is on their radar, and it was so I felt comfortable. They (and we) take service very seriously. I like to think at Ultimaker we look after our customers.
I am very happy to hear this one seems to have made it safely to your home. Now all is left, is an update on those first test prints!

Have a great day, and don't keep us waiting too long
The replacement of the replacement to be replaced?
Assembly or shipping damage?

I looked at boxing this one up this morning, so while I had the packaging I thought I would share with you these


I checked the printer over when I got it and it looked good so I dismissed the broken packaging as just broken packaging. I wasn't sure if it was just the misplaced power cable that coursed the packaging to break at first, but further inspection shows there has been a fairly large impact to the packaging where the rear of the printer sits.
-
You may improve it by switching off combing and adding a z-hop.
Thanks Dim3nsioneer, I have tried these options. I'll design the part different next time. It still turn out functional. Thanks again.
-
Hi bagel-orb,
Ok, thanks, at least I'm not overlooking anything.
-
Auto levelling is just a tool to make printing easier for the masses and away for everyone to have successful prints without the need to keep manually adjusting. The sound is not a fault, it's just a byproduct of auto levelling. All printers with auto levelling do this. I think the Ultimaker steppers are fairly quiet, I still turned auto levelling off though.
@Zwakie, it sounds like you like leveling your build plate manually 8)
-
1
-
-
If it's the same sound as I have you can feel it on the Z axis. Just rest your finger on it gently at the bottom, if its that you will feel it. I
I can feel the ticking in the Z axis. No sounds when just moving the head around. I'm happy I finally am making some progress with this...
This brings on another question: WHY is the Z axis ticking (or at least broadcasting the ticking sound)? I am 100% sure that I leveled the bed very accurately by hand (did that 10+ times, I am getting this ticking sound after every manual leveling).
Maybe @sandervg can enlighten us as to what the UM3 is doing/trying to do here?
I'm sure that Ultimaker wishes to get to the bottom of this, especially if the ONLY way to shut it up is to disable the auto bed-level mechanism. So ultima(ker)tely will come up with a solution I'm sure!
(unlike you I am not going to disable this feature, the ticking sound is not really annoying me)
It's not ticking so much as making a Z axis adjustment, this would be one step you are feeling of the stepper motor. It's just adjusting the build plate height because you have auto level turned on. It doesn't matter how many times you manually level, the sensor will always measure slightly different to your manual leveling.
-
Ok so I may have posted that update to early!
How long have I had this printer? Not long. Two days is it, something like that.
I've only printed during the evening in those two days and now this...
So do I get another one? I thought it was supposed to be third time lucky. Maybe its fourth or fifth tho.
I'm not the only one having this problem.
This is getting to be too much!!!
wow. how the hell did that happen?
that takes some serious force to break it.. just checked all of my printers, none of them have this..
was this like that when you got it? how did it happen?
I'm not sure how or when, this is my third replacement printer in less than a week. Sounds like you've been really lucky with yours. 3DGBIRE checked this one before they sent it out to make sure it had none of the other problems the first two had. To be fair to them it hasn't. I found this last night while I was setting up to profile some PETG. I did check it over when I got this one two days ago and I never noticed it then. I've read that they can be over stressed on assembly or damaged in the post. It looks like more production/assembly problems to me. I won't hear from 3DBGIRE until Monday, so it looks like I've got the weekend to think about where to go with this now. It's good to hear there are people out there that are not having problems. I'm not sure if a fourth one is on the cards, the customer service is great, but from what I've seen this last week it needs to be.
so it was probably like this when you got it?
it's just that that's an injection molded piece. the fact that it broke along that line is just plain weird.. that requires some really high force..
Possibly, maybe it's just opened up and it was there before. Melka has the same issue under his "UM3 stopped midpoint" post. I can see how snapping the rods into place would make it break in exactly that place. I'm guessing the rods should be pushed in from the side, like putting a peg in a hole. Possibly why some are like it and others are not, depending on the assembler or instruction.
-
Hi all,
Is it possible to print each entire outer wall section fully and individually as to avoid all these tool travel paths?

I'm currently printing translucent PETG and the trail left from the nozzle going between the four inner wall sections and the outer wall section on every single wall line is kinda killing its optical appeal.
Am I overlooking something in Cura that allows me to adjust this?
-
If it's the same sound as I have you can feel it on the Z axis. Just rest your finger on it gently at the bottom, if its that you will feel it. If you do try this you put your hand in your printer at your own risk.
To stop mine I manually levelled the print bed, turned auto level to never and it's been silent since. The bed stays nicely level between prints so there's no real need to keep levelling as far as I have seen so far.
Hope this helps
-
1
-
-
Ok so I may have posted that update to early!
How long have I had this printer? Not long. Two days is it, something like that.
I've only printed during the evening in those two days and now this...
So do I get another one? I thought it was supposed to be third time lucky. Maybe its fourth or fifth tho.
I'm not the only one having this problem.
This is getting to be too much!!!
wow. how the hell did that happen?
that takes some serious force to break it.. just checked all of my printers, none of them have this..
was this like that when you got it? how did it happen?
I'm not sure how or when, this is my third replacement printer in less than a week. Sounds like you've been really lucky with yours. 3DGBIRE checked this one before they sent it out to make sure it had none of the other problems the first two had. To be fair to them it hasn't. I found this last night while I was setting up to profile some PETG. I did check it over when I got this one two days ago and I never noticed it then. I've read that they can be over stressed on assembly or damaged in the post. It looks like more production/assembly problems to me. I won't hear from 3DBGIRE until Monday, so it looks like I've got the weekend to think about where to go with this now. It's good to hear there are people out there that are not having problems. I'm not sure if a fourth one is on the cards, the customer service is great, but from what I've seen this last week it needs to be.
-
Ok so I may have posted that update to early!
How long have I had this printer? Not long. Two days is it, something like that.
I've only printed during the evening in those two days and now this...
So do I get another one? I thought it was supposed to be third time lucky. Maybe its fourth or fifth tho.
I'm not the only one having this problem.
This is getting to be too much!!!
You may want to contact your reseller for a replacement. In the meantime I believe a file for the axis holder is on Youmagine that you can print and should tide you over in the meantime.
Thanks Waternut13134, I think the reseller is only going to offer a refund at this point. Luckily 3DGBIRE are fantastic, however another under engineered part from Ultimaker isn't going to last much longer. Unless they release an updated/upgraded part I fear this could be an ongoing problem.
Great tip on a quick fix, much appreciated. I've currently have a cable tie pulling it back together.
I'll be interested to know if Ultimaker have addressed/or are looking at this issue.
-
Ok so I may have posted that update to early!
How long have I had this printer? Not long. Two days is it, something like that.
I've only printed during the evening in those two days and now this...
So do I get another one? I thought it was supposed to be third time lucky. Maybe its fourth or fifth tho.
I'm not the only one having this problem.
This is getting to be too much!!!
-
The test prints.
Having completed a few prints to make sure my future prints all assemble together I can say I am very happy. I did throw a couple of commonly printed items on just to check all was well. First up was the tree frog, set up to print on draft in Cura with the supplied PLA an no support.

You can clearly see every layer start/end point. A few Cura tweeks should minimise this. I wanted to try something that was awesome on the first UM3, cue the fantastic Ultimaker bot.

Seen here before taking along swim, he came out looking awesome just as before. Printed on normal with the same supplied PLA. Being super happy with this I loaded up some Semi Flex. I use this material because it's like self-cling on glass and stops anything from moving. These are for a clamp system, the frog was just a test before the clamp parts where printed.


Two of each item where printed and one was turned upside down so you could see the flat glossy side, the side that sticks. Over all pretty pleased with the way it prints flexables, I would like to try this on a 0.6mm AA core once they become available.
I'm really looking forward to print some transparent PETG on it this weekend. One of the main filaments I'll be using.
To sum all this up...
Ultimate Ultimaker? Check
Awesome customer support? Check
Customer impressed? Check
-
Hi SandervG,
No problem at all, I believed an update was called for. I couldn't be happier with your customer service or the Ultimaker 3 for that matter
-
1
-
-
The replacement for the replacement, is it good?
Firstly I should thank SandervG, I know he would have spent the time and resolved some of the issues I had with the first two printers. Somethings could have been adjusted and made better with his help, so he gets a big thank you for all of his input. Some build quality issues could not have been put right, so I feel replacement was the best route to take.
Lets talk support, not the PVA type the UM3 puts down so awesomely but the other Ultimaker support, the customer support. It's first class! Ok I've had 3 printers now, but it's been within 4 working days. I've waited longer to get a RMA from lesser companies and have then had to pay to sent it back. Waited even longer for them to look at it and send the same thing back with the same problems. So anyone thinking of getting a Ultimaker 3 and have been put off don't be.
So, Ultimaker 3 number 3.
It's looking pretty perfect so far. Even the first one had the odd over tightened screw. The second made me wish I kept the first. I've gotten pretty good at the boxing unboxing routine, hope I don't speak to soon as I'm just setting it up to print, but so far this one stays here
Got to thank 3DGBIRE, they made this all pretty painless.
I'll update after a few prints.
-
2
-


.png.825837b9974fe70e706e3d06efc7f711.png)


Ultimaker 3 quality control issues
in UltiMaker 3D printers
Posted · Edited by Guest
So this is the Ultimaker standard? :(
I know how I feel about it, but that's not important, what is important is you being happy with your purchase.
Have you tried printing the Ultimaker bot on his back with pla support, normal print quality and standard profile settings? I know you have found my thread and there are a couple of pictures on there of the same print.