


colorfabb
-
Posts
80 -
Joined
-
Last visited
Content Type
Forums
Events
3D Prints
Posts posted by colorfabb
-
-
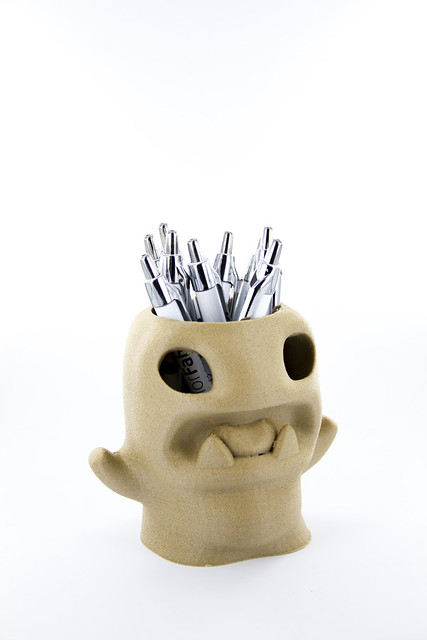
This thing should appeal to some of the Dutchies in the Ultimaker community.

3D Print your own Wie is de Mol? joker! Get the 3d file at: http://www.thingiverse.com/thing:253657
The one in the picture was printed on a Prusa i3, with woodFill fine and sliced at 0,27mm layer height using Kisslicer.
-
woodfill PLA.... you might have won the battle !! but you havent won the war !!
Hi Ian, good that you're not giving up on woodFill
 So let me share some of the things I've discovered about printing with woodFill fine over the last few weeks.
Since a week or so we have a Makerbot Replicator 2 (the PLA machine) and I've been making custom profiles for woodFill. I discovered that woodFill fine seems to print a lot more reliable when printing at rougher layerheights. The my profile for the Makerbot is based on 0.27 mm layerheight, printing at 190C at speeds of about 80 mm/s.
I've been using the same trick for all the Ultimakers, original and Ultimaker 2. Printing at 195-205 C at 0.27 mm layerheight sliced at standard 50mm/s, but usually during a print increased the speed to about 125-150%.
I think the rougher layerheights work better because the fillament isn't staying to long in the hot-zone of the print head. When you're trying to print with 0.1mm layerheight and do not increase the speed the filament will move a lot slower through the hot-zone, which might cause some problems with woodFill.
So my number one tip would be to start at rougher layerheights, such as 0.27mm, find the lowest possible extrusion temperature, 195-205 and try to print at speeds upwards of 50mm/s.
If you really need to print at lower layerheights then I think you should compensate with speed settings, to make sure the filament is still moving through the hot-zone at a decent speed.
-
I have to add that the first 5 to 10 layers are perfectly fine, but it start lifting after that.
And from then, the effect only increases, until touching the carter around the fan.
You could try printing without the active cooling enabled, or at least turned down by a lot. This works fine for me on a ultimaker original with heated bed at 100C.
-
http://www.thingiverse.com/thing:154516
These two pictures illustrate the difference between woodFill fine and woodFill coarse. Both printed with a 0.8mm nozzle, but woodFill fine could also be printed with standard 0.4mm nozzle. Personally I prefer the coarse woodfill

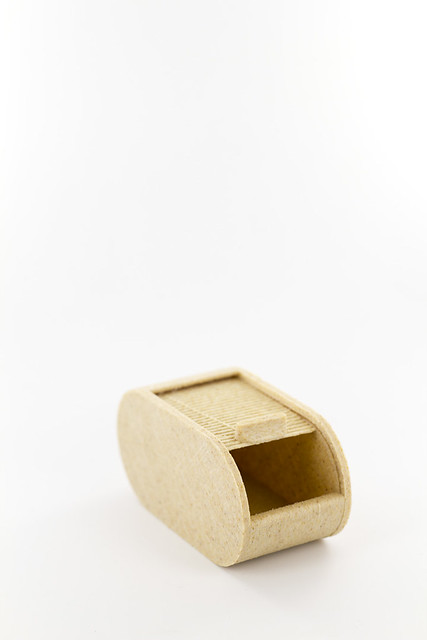
http://www.thingiverse.com/thing:51775
And yes the roll top box really works
-
We did some more testing with our Woodfill filament, this is the 'fine' version which works with 0.4mm nozzles. Printed at 208C, minimal layertime: 8s, 50mm/s (tuned down during print to 68%) and sliced with the latest Cura 13.11. Very pleased with the result! Even the tiny pillars in the top were printed! Except for the very very top which ended up breaking off.
-
I get green oxidation on the brass threads where they are in contact with the aluminium, which I've attributed to some sort of galvanic action.
Hi troy, I've had the threads on the brass turn dark, probably because of PLA that got inbetween the heaterblock and nozzle. I've never seen green oxidation though.
-
Last time I tried to take my nozzle off to fix a clog it took me two hours to get it off...
Interesting to hear that people are having different experiences regarding swapping nozzles. I change nozzles quite often on a few UM's. Just heat it up (220C), use a wrench to hold the heater block and then use a nut driver to gently unscrew the nozzle. When chaning a nozzle on a UM that's been printing with the same nozzle for a long time I do notice it is a bit harder to unscrew the nozzle, never had it break though.
-
The wood filament looks great!
Is it stronger than the laywood filament? I like how it's lighter color. Would be good for making mini furniture.
Yes it's very strong! We've printed an Ultimaker Handle, this is me carying an Ultimaker Dual Extrusion with 2 spools of PLA using the printed handle!
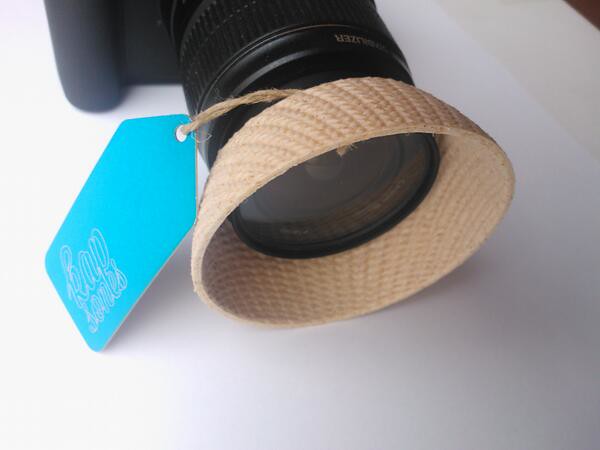
Also printed a lenshood, which feels just as firm as PLA. I've tried this particular lenshood with Laywood first but it came out so soft and rubbery I could turn it inside out! The formulation we're working with hardens immediately, like PLA would.
-
Hi Gijs,
Looks really nice. Does it exhibit the same temp / colour relationship as Laywoo-d3?
Hi Troy, thanks for the reply! It doesn't exhibit the same temp/colour relationship. I've tried printing between 200 and 250 and the color stayed similar.
what about this idea... buy 80 euros worth of this new plastic and get a .08 nozzle free !
Ian :smile:
Hi Ian, good idea! however supplying and having all different kinds of nozzles in stock would be a pain. So how about we deliver some proper free drill bits with the filament? Then you can drill out an old left over nozzle yourself. It's not that difficult
Also, I would like to run some prints with a smaller Nozzle once.
Does anybody have any experience with this?
Hi Sander, thanks for the reply! I have only tried bigger nozzles, up to 1,6mm. As a user of the Ultimaker different nozzles creates lots of poof printinssibilities in terms g strategy. Vases and such are ideal to print with bigger nozzles. And as a for filament producers they can suddenly start creating materials previously not thought of because of the small diameter size.
-
I’ve got a question for the ‘makers’ on this forum. Recently we’ve developed a wood filled filament that doesn’t work with 0.4mm nozzles. But we’ve tested it with 0.8mm nozzle and it works like a charm and it looks spectacular!
Now there's two things we can do. We can adjust our formulation so it works with a .4mm nozzle (but likely lose the aesthetic) or we can see if users are willing to adjust their nozzles so they can print with this material.
The real benefit of printing with our current formulation is that the relatively large wood particles give the prints a real authentic look, something we probably won't get from smaller particles.
What do you guys think about changing nozzles to be able to print other materials?
Cheers,
Gijs
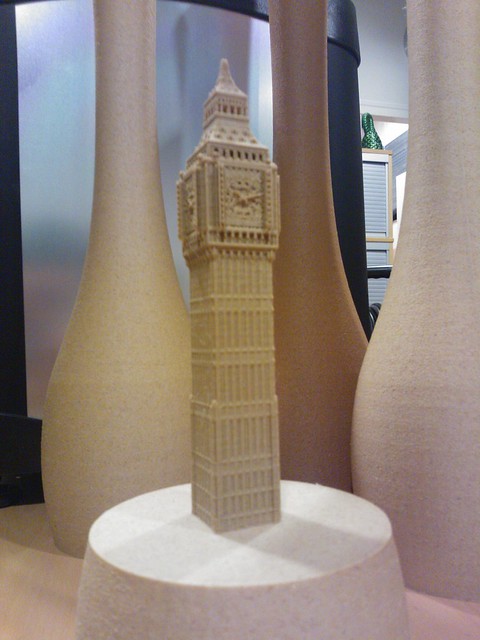
Mayan Coaster by Dizingof
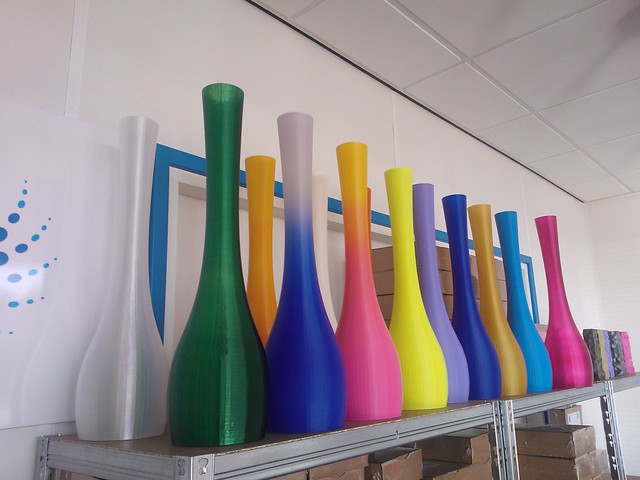
low res hi quality vases - Joris
-
-

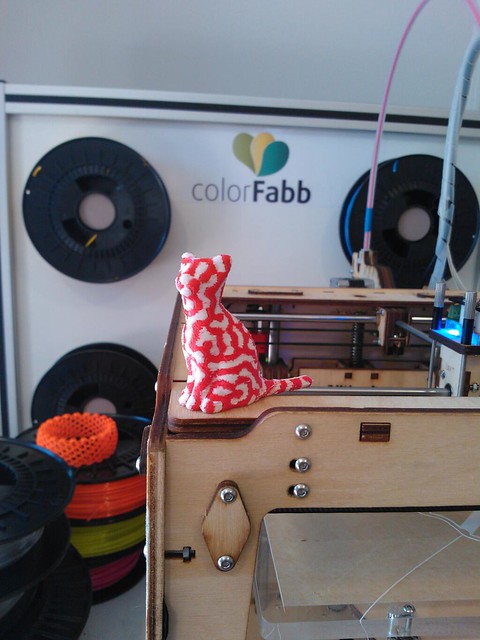
Dual extrusion cat.
model:http://www.thingiverse.com/thing:62536
I did have to remove a few PLA strings but this was easy and not too much work. Very happy with the result!
I wish the photo gallery would also give option for an medium sized picture (640x480) this would be great for the forum.
-
A while back I saw a video by Bernhard Kubicek, which was about printing ColorFabb XT onto PLA.
So now that our Ultimaker is installed with the dual extrusion as well I can finally do some testing with XT as support material for PLA.
First results using cura13.07_support_test2.
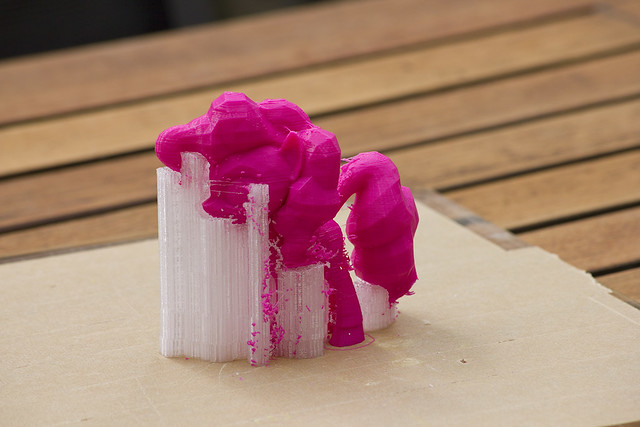
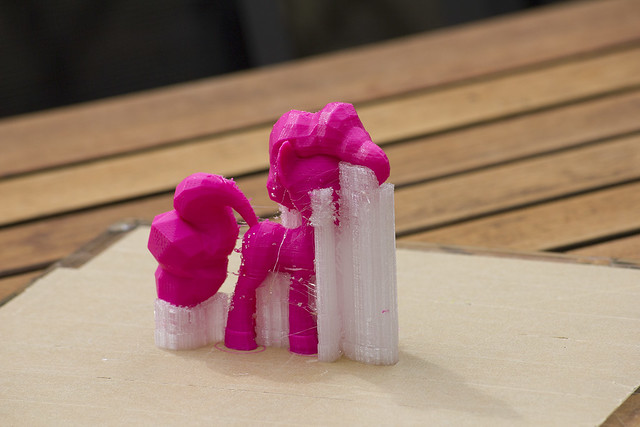
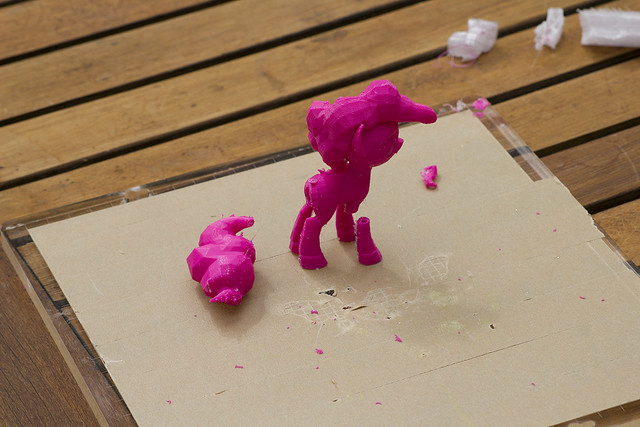
The layer adhesion between PLA and XT is definitely less compared with PLA onto PLA. First attempt was alright, some support parts were hard to remove because the ‘sheathed’ support can make it difficult. That's why some parts of Pinkie Pie did not survive.
I do like the new generated support, seems to generate just the amount of support needed. I was wondering if the ‘sheathed’ support should be an option like in Kisslicer. Using XT I would like the support to be just lines and no wall around it. However using soluble materials I can understand sheathed support is probably better, because it is easily removed anyways. Could the wall around support become an optional feature, daid?
Another thing I was wondering about. Say during a print when the very last layer of support is put down should the support material hot-end switch off? Or is it better to keep it warmish so when it hits the print while traveling over it, it will be less likely to damage it?
-
here is my first print with XT.
Wow! looks very nice. Now put it in the dishwasher!
-
I will try a lower temp, but for now just printing it with ultimaker pla. Besides the stringing I found that the colorfabb PLA/HPA also breaks much faster. Can this have to do with the temperature or is this just a difference between materials?
Hi, if the PLA/PHA breaks much faster then I would guess the bonding between the layers isn't optimal. Perhaps because of slight extrusion problems? or maybe just printing to fast.
For the stringing you can try lowering temperature (if the print speed allows for this), increase travel speed 250 mm/s, increase retraction speed 45 mm/s. You can also experiment with retraction distance.
Looking at your printed part the last bit is probably printed to fast, it looks like the material might have needed a bit more cooling time. So you could also change the minimal layer time to about 8-10 seconds. This should mean the print will be slowed down towards the end, which also means you can drop the temperature by quite a bit.
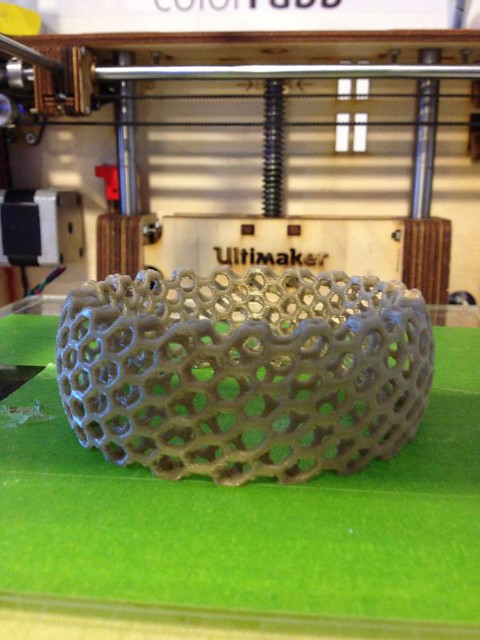
As an example, the bracelet was printed at 20 mm/s at 195 C. We used to print these at the normal temp of 215, but because of lowering the print speed the temperature can be reduced by a lot.
Hope this is helpful.
Gijs
-
The only thing im not sure about is... at the current settings, the glass transparent is coming out a little milky cloudy white....
I would love to get something actually transparent ?
Getting parts to be truely transparent probably isn't possible due to the layering. Printing with relatively thick layers (0.2) I think will look more transparent/shiny, opposed to very thin layer (0,08). The reason, I think, is with thin layers there is a lot more interference for the light to pass through, thus making it less transparent.
Another trick you could try is by increasing the flow to make sure the perimeter lines truely merged together as one. If there is a tiny gap between perimeter lines light will reflect of it differently.
The thing with XT is that it is truely neutral transparent, compared to natural PLA which has an yellowish tint to it. However you won't be printing glass panes with it.
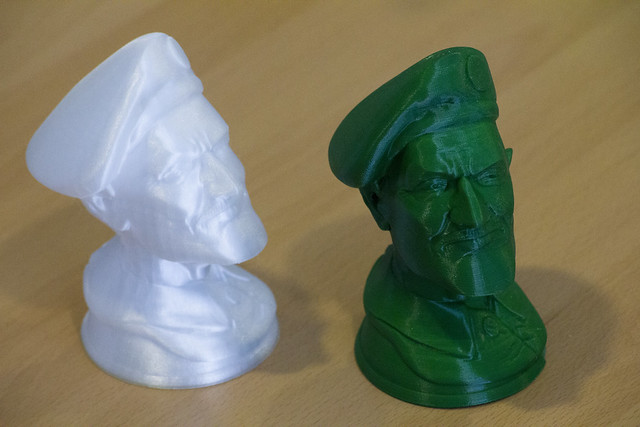
Here is a neat trick with colorfabb_XT (also works on natural PLA). I put a large print in the dishwasher to see how it would cope with a temperature of 70C. When the machine was finished the part had turned a beautiful opaque white, sort of like the slightly transparent white ABS parts.
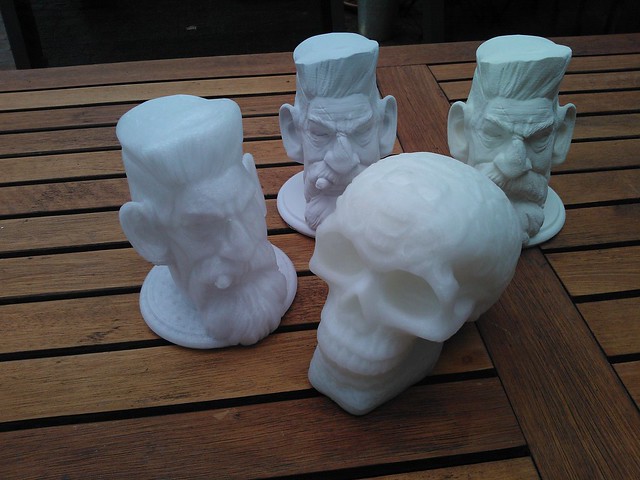
The sceltic skull printed in XT with 70C 'dishwasher' treatment, to its left normal XT, in back ground standard white & blueish white PLA/PHA (printed on Prusa I3)
Just out of frame is the Celtic Skull when it wasn't dishwasher treated, totally different!
I prefer the milky opaque white over the standard white and blueish white PLA/PHA. Something about the slightly opaque look makes it just seem so much better. For one the layering is difficult to see because shadow doesn't really show on the model itself. On te downside the Skull is still leaking a little bit of water, takes a while before it all gets out.
I'm going to put it in the dishwasher again tonight, see if it will turn a bit more white
-
 1
1
-
-
Here is a print I did recently for a friend of mine, http://artbyglee.blogspot.com/ This was printed on my ultimaker at 60 microns. I posted a smaller test version of this a while back, this finished version was printed using cura 13.06
Wooo! Amazing quality. I thought for sure those images were digital renders. What did you do to get a finish like that? Sanding, priming and more sanding and priming?
This is one of my latest print projects.
And massive vases on the Deltatower, about 60cm tall!
-
Nice review Peanudt, thanks for sharing the experience, your prints look very nice!
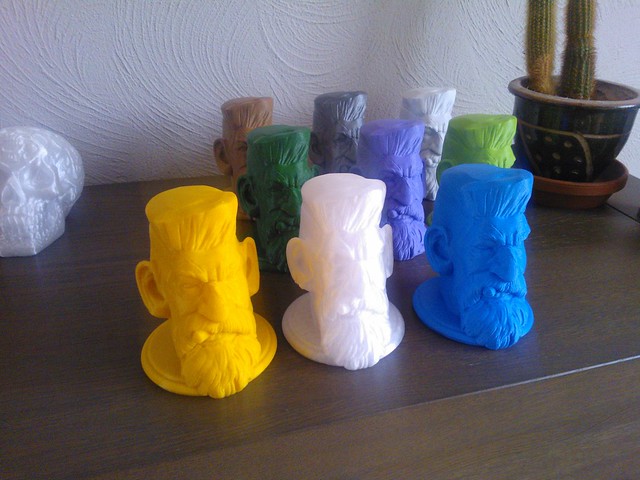
During the presentation at the Ulti-evening a while back we received a request for a rainbow pack, well it's finally here! Yaaay!
We now have a limited supply of 3mm sample packages. One sample pack is a minimum of 400gr of filament divided over 10 random different colors. Which is about 4,5 - 5 meters of filament per color. Should be enough for quite a few small prints to start sampling our material. If someone is interested it's now available in the webshop.
-
Nice model Valcrow! New print project for next week
-
The low-poly version of my softbody cathedral, printed at 0.1mm height, 40mm/s, 14hours. A lot of retractation blobs on the pillars, I'll try to improve that later:
Nice model! Is it possible to keep the pillars as high-poly? and just do the 'canvas' as low-poly? Might look nice too!
-
*..downloading*
.... printing by now? Since slicing is superfast with the new Cura!
-
-
You could also try increasing the travelspeed to about 200 mm/s or even 250mm/s. This is a nice model for calibrating the retraction settings: http://www.thingiverse.com/thing:11846
-
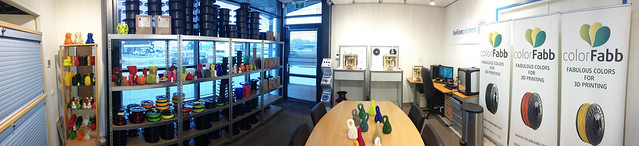
Currently I've got 2 Ultimaker happy corners, I'm super happy!
This is the one at Van Alles Wat Ontwerp, a little design studio I'm running with friends in Eindhoven. We focus quite a bit on 3d printing and just recently signed up to become a 3DHub! www.3dhubs.com
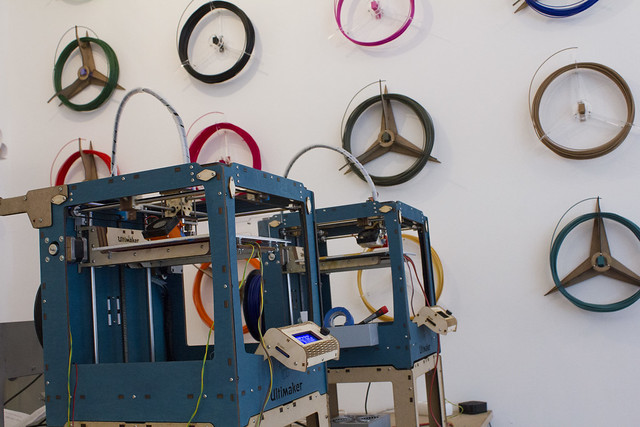
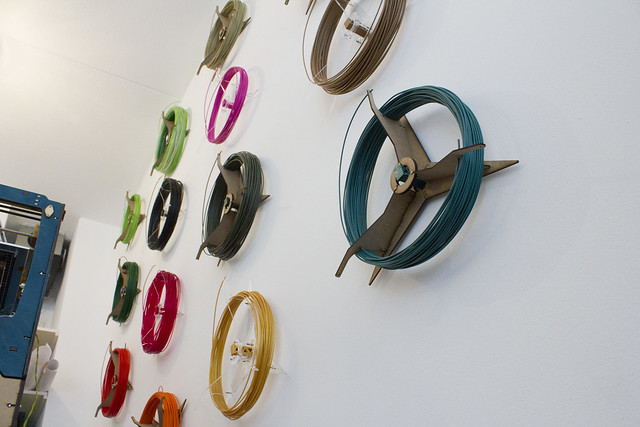
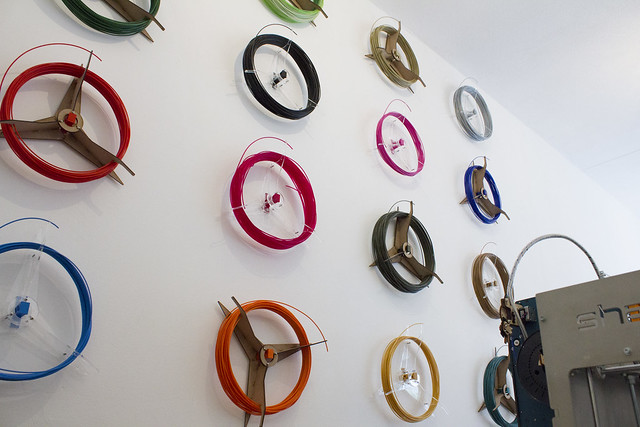
And my other happy corner is ofcourse at ColorFabb HQ. The photo is outdated because the lab got a lot happier with a Delta Tower 3dprinter!
 So let me share some of the things I've discovered about printing with woodFill fine over the last few weeks.

Can your UM2 printer achieve 10mm3/s ??? Test it here...
in UltiMaker 3D printers
Posted
Hi guys,
Lately I've been having issues with one of our Ultimaker 2's and have been searching this forum for answers. So I decided to give this little test a go as well. Just before I started the test I loosened the four threads on the print head a little, I read a few posts back that this worked for another user. It seemed to have worked for us too! The Ultimaker that was having extrusion problems all the time, now is able to print these tests flawless. I used the advised settings, 230C and 100% speed.