


MDA
-
Posts
12 -
Joined
-
Last visited
Content Type
Forums
Events
3D Prints
Everything posted by MDA
-
Sorry Guys, In the meantime I fond the source of the problem above... I created the new ABS material as a copy of improper generic material. As soon as I created the new material using a previous ABS type, everything went well. Sorry for bothering.
-
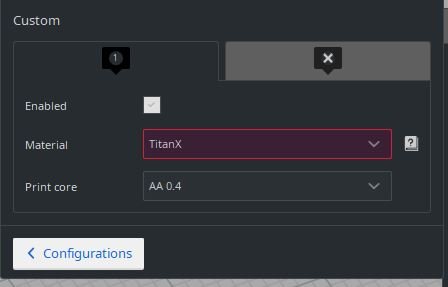
Hi, Although I am not an advanced UM3/Cura user but have made several printouts without serious problems so far. (And also some problematic ones of course...) Now, I wanted to use a new ABS material called Form Futura TitanX but as soon as I uploaded its technical parameters to Cura v4.6.1 as new material and wanted to slice a model in Cura using this filament before printing, I received an error message: "Unable to slice with the current material as it is incompatible with the selected machine or configuration." Together with this blocking, the frame of the material cell in the Prepare Custom window is red. It is strange because as soon as I modify the print core (in the software) from AA to BB, everything is (almost) okay since the yellow frame shows the inadequate (but usable) position. The Generic ABS is fully compatible. (Pls, see attached screen copies.) If I change the core back to AA and filament back to TitanX then slicing will be blocked again. I do not know what the hell could be. The roller and filament loaded into the core 1 (AA) while the core 2 (BB) is empty (I do not need supports for building this part). Could anyone has any tip what the problem could be? Thanks in advance, Attila


-
Hi Johnse, Thanks for your tip above. Your explanation seems to be realistic so I will check it. However, in the mean time, I could solve this problem by modifying the relevant parameter in the firmware: "expected_z_offset_difference" : 1.5, // [mm] Expected Z offset difference between left and right nozzle. "max_allowed_z_offset_difference": 0.7, // [mm] Maximun allowed difference between expected and measured difference between left and right nozzle z offset. I have increased max allowed z offset difference from 0.7 to 1.2mm. After this change, the automatic print bed leveling can run smoothly again. (But I am willing to look after your proposal as well.)
-
I have rechecked that both print cores (0.5 Sapphire nozzle in 3DSolex head and standard BB0.4 head) are seated properly several times. More over, I have also checked the nozzle is installed in the print core thread properly. Additionally, I have run manual leveling several times as well. In spite of these actions above, the error message is the same: "Difference between detected height of both PrintCores exceeds realistic values". I think I would need to adjust the parameter regarding acceptable "realistic value" somewhere. Could you help me, please?
-
Thanks for your practical advises! (But it is a bit strange to me that different nozzle hole diameters need the same material feeding & print core speed parameters...) Anyhow, I will test it. But now I have met a new problem. 😞 As soon as I wanted to use the 3DSolex print core with 0.5mm Sapphire nozzle, the printer (UM3) communicated an error message during active automatic print bed leveling process: "Difference between detected height of both PrintCores exceeds realistic values" (I have not changed the original BB0.4 print core; only print core #1 has been replaced as per above.) Could you help me please where and how I can modify the nozzle position in the menu? Did you have the same problem after installation of your Solex head? Thanks in advance, Attila
-
Hi, Sorry for my newbie question but I cannot find the relevant menu in Cura4 how to adjust the actually used (third party) print cores and/or nozzles. In the "Prepare" section, I can customize the actually used UM3 print cores (both) as 1. Enabled or not, 2. Type of material loaded and 3. Print cores (but only selectable: AA0.25, AA0.4, AA0.8, BB0.4, BB0.8) Alternatively, I found another opportunity for adjusting printer-settings: in "Preferences" --> "Printers" --> "Machine settings" --> "Printer" or "Exrtuder 1" or "Extruder 2" parameter settings. But again, no info regarding print core types and nozzle diameters here. Actually I want to use 3DSolex Hardcore Pro2 print core with 0.5mm Sapphire nozzle (for ColorFabb PA-CF Low Warp carbon filament) and original BB0.4 PVA print core but with 0.5mm nozzle. How and where I need to set these parameters in the Cura4 sw??? It is obvious to me, that the slicing algorithm has to know the nozzle diameter for creating appropriate nozzle hole-centroid trajectory and material feeding speed in extruder... Thanks in advance, Attila
-

UM3 system boot cannot start up (system failure)
MDA replied to MDA's topic in UltiMaker 3D printers
Hello Enigma, I could easily and smoothly repair my UM3 printer this morning (incl. updates and calibrations) based on your focused and efficient help and advises; I really and highly appreciate it!!! The printer works again as nicely as previously did. Thanks again! Attila -
UM3 system boot cannot start up (system failure)
MDA replied to MDA's topic in UltiMaker 3D printers
Thank you for this info above; it seems to be extremely useful and easy to do it! I will test it tomorrow and will report my experiences. But let me have just one more question regarding the quote below: "NOTE: Recovering the Ultimaker 3 firmware will erase all settings, including those set by the factory. Lift switch, bed leveling and XY calibration will have to be redone." I have already done both bed leveling and XY calibration so will be able to redone them. But I have never done lift switch leveling. Is there a description about it somewhere? Brgds, Attila -
Hi, I have an UM3 printer and use it for a year and I could update the firmware as well two times wihout any problem during this period. Even more, I have purchased a special Solex Hardcore head and Ruby Sapphire nozzle for carbon fiber filament and I used it with satisfaction. However, I was not really amazed with the operation of the original extruders, therefore a few weeks ago, I also purchased two DDG Bondtech extruders from Solex. After their hardware installation, according to the installation guide, I needed to modify a few parameters in the UM3 firmware as well. I did it without problem and I could use the printer with these new Bondtech extruders perfectly. And now, the problem arrived here... I have received and applied a Cura sofware update correctly a week ago. It was okay. But I was stupid (...) becasue I have confused Cura software and UM3 firmware: I have also reinstalled the UM3 firmware again with Bondtech parameters (it was not necessary...) and I have failed something during this process. This is why I cannot start UM3 up now; the system boot cannot run. The Ultimaker logo can be seen on the screen permanently and the joystrick next to the screen is blinking colorfully (green and blue) but nothing happens. The system cannot stand up and the main menu is not available. It was my fault, it is clear but I am in panic at the moment... May I start up the system from an USB stick somehow as external source of system files (similarly to the Windows PC)? If yes, how I can find system files or how I can do it? Could anyone help me, please? Thanks in advance, Attila
-
Sorry for my newbie question: what is "github" where I should need to report this bug?
-
Thanks for your help guys very much! I think it can be a sw bug of new Cura version indeed because I can see the live view of the built-in camera in real time without any problem if I connect to UM3 printer directly via LAN from my browser using its IP-address. But if I want to see the working space of the printer via Cura's Monitor page, I will see just still images. Thanks again, Attila
-
Hi, Where can I find the access to the live view of the built-in camera of the Ultimaker 3 in Cura 4.0.0? I could use this feature in the previous versions but I cannot not find this link to the camera in Cura v4.0.0. (There is photo camera icon in the "Monitor" screen but that is just a still image.) Thanks in advance, Attila


