


rewolff
-
Posts
102 -
Joined
-
Last visited
Content Type
Forums
Events
3D Prints
Posts posted by rewolff
-
-
We baked the PLA before printing.
We have the impression that trapped water boils in the hot end (Duh!) and causes some springyness in the system: the water-vapor can be compressed. So during extruding you sometimes hear a pop of hot gasses de-pressurising. So baking the PLA means the whole system is stiffer. So when the extruder motor stops, extrusion stops quickly afterwards. While with some hot water in the extrusion unit, the gas will expand and push out some more plastic.
-
Ok. Downloaded. Will check it out tomorrow.
Currently printing an electronics box 10x11 cm, no manual intervention on the first layer. Let's hope it finishes by itself. :-)
-
search on thingiverse for "belt tensioner ultimaker" You're bound to find a few options.... that you can print yourself!
If you're using replicator-g, there is the models menu that has builtin-upgrades for your ultimaker including the tensioners.
-
Hmm. Weird!
mIne does red outer wall, green inner wall.....
(I often have just one wall-line, so I usually only see red). And when I do have the second layer enabled, it's green and on the inside...)
-
We've had the "translucent" PLA come out a bit milky:

However we've now baked the PLA at 100-110 C for 90 minutes and now it comes out much clearer:
Is this the best performance we can expect for jumps, or do we need to find even better settigns?
-
http://prive.bitwizard.nl/tl6.avi
Venus' bottom is not flat. :-(
(Yeah, that's a quality you like in real women...)
-
Bertho, I'd now be interested in the force applied by the extruder to the hot end. Can you figure out a way to measure the force that the bowden exerts on the clamp? e.g. remove the gray plastic bolt from the plastic, and put something else in so that you can measure the force there...
-
Whoa! 3mm? That clip is at most 1mm thick.. Why do you need 3mm?
Push the bowden in as deep as necessary, now use anything that will work to push the clip upwards.
Now angle the clip such that it touches the wood and the white clip with the two ends, and that you can push in the middle. It should slide under while you push and lower the side you're pushing on.
When you get it on, and have it positioned correctly (measure that 8mm accurately!!!) make a full rotation with the bowden before printing. With a bit of luck, that will prevent it from slipping in the future.
Make sure you don't do this before you've verified that it's sticking out properly.
-
For even better results (the doublesided tape sometimes melts too much, maybe depends on your brand) you can place some capton tape on it. Sticky side up.
-
The software I'm using is "cura". (to complete the cycle ... :-) "I'm not sure if you're familiar with that. It's apparently not recommended by ultimaker support". :-) )
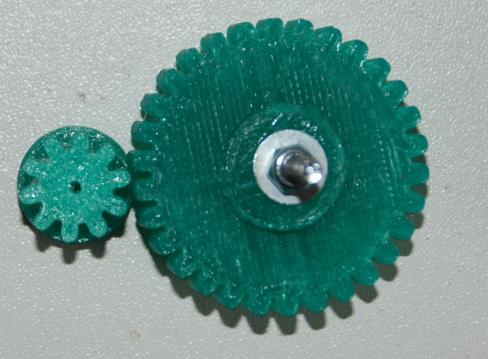
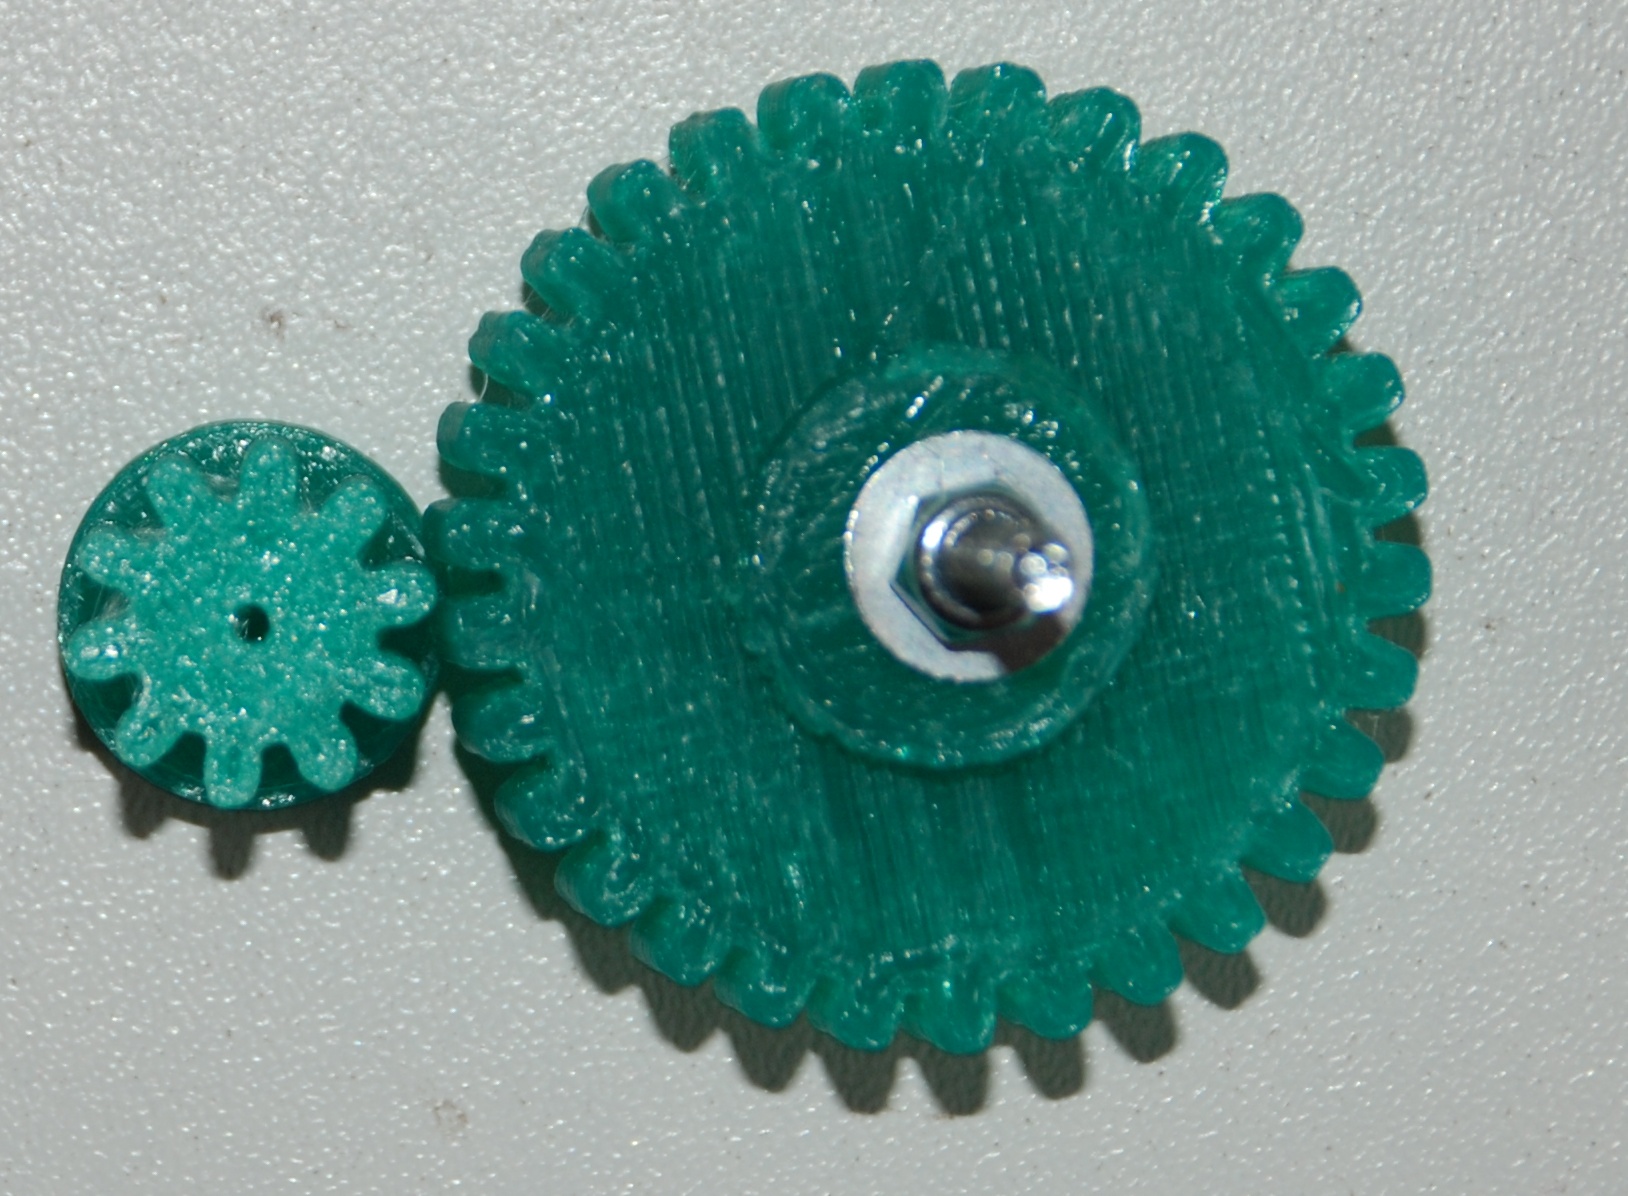
I'm using the gears from
http://www.thingiverse.com/thing:1339
. I don't think I can enter "clearance" there.
I have now managed to get one size larger to work. 250 pitch instead of the 200 I had originally. However I'm still interested in how to make them smaller. I've made a 3 times 3:1 reduction, for a 27x reduction. This is still too fast. Apparently I'd rather have say 6:1 reduction each step. That means the primary gear needs to be as small as possible for the secondary to stay "reasonable size".
-
I was thinking: Why not measure the force the bowden tube is exerting on the feeder mechanism? That means it doesn't need to move along with the head.
When the force becomes to big, one of the following is going on:
* you're moving too close to the bed.
* You're moving too fast.
* your nozzle is clogged.
* you have a plug in your print-head.
-
And its quite possible that the range of adjustment for the feeder isn't quite large enough to adjust for 1.7mm filament.
You'd want something like a 2mm ID tube. But that's unlikely to be 6mm outer diameter. So you'll get 4mm. Next you'll have to change the clamps everywhere.
I'd say internet-order your filament well in advance so that you have it on time.
-
OK. The black lever is the "quick release" for the feeder mechanism. rotate it upward and then PULL it upward through the slot. Now the "pressure block" can rotate out of the way so that you can manually insert or retract filament.
In the down position, the mechanism is "ready for printing".
Do not lower the lever beyond horizontal. That could cause damage to the feeder mechanism.
As I said: it looks as if your printbed is too low. Go to the wiki and find the section about adjusting the Z limit switch.
Make sure the head is cold, and adjust it so that the head is exactly touching the platform when the switch goes.
When you're close, you can adjust the platform height by turning on the four screws that level the platform.
Cancel the print before the first layer finishes, and take a picture before you take it off the platform. The yellow is PLA, I'm assuming?
-
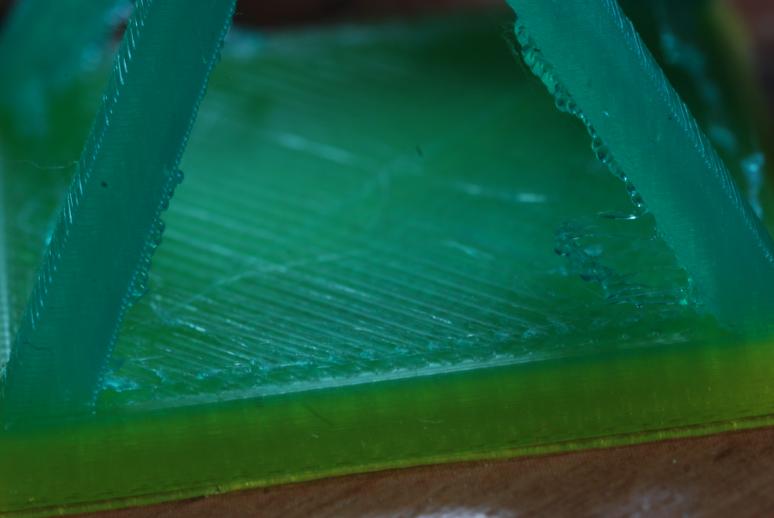
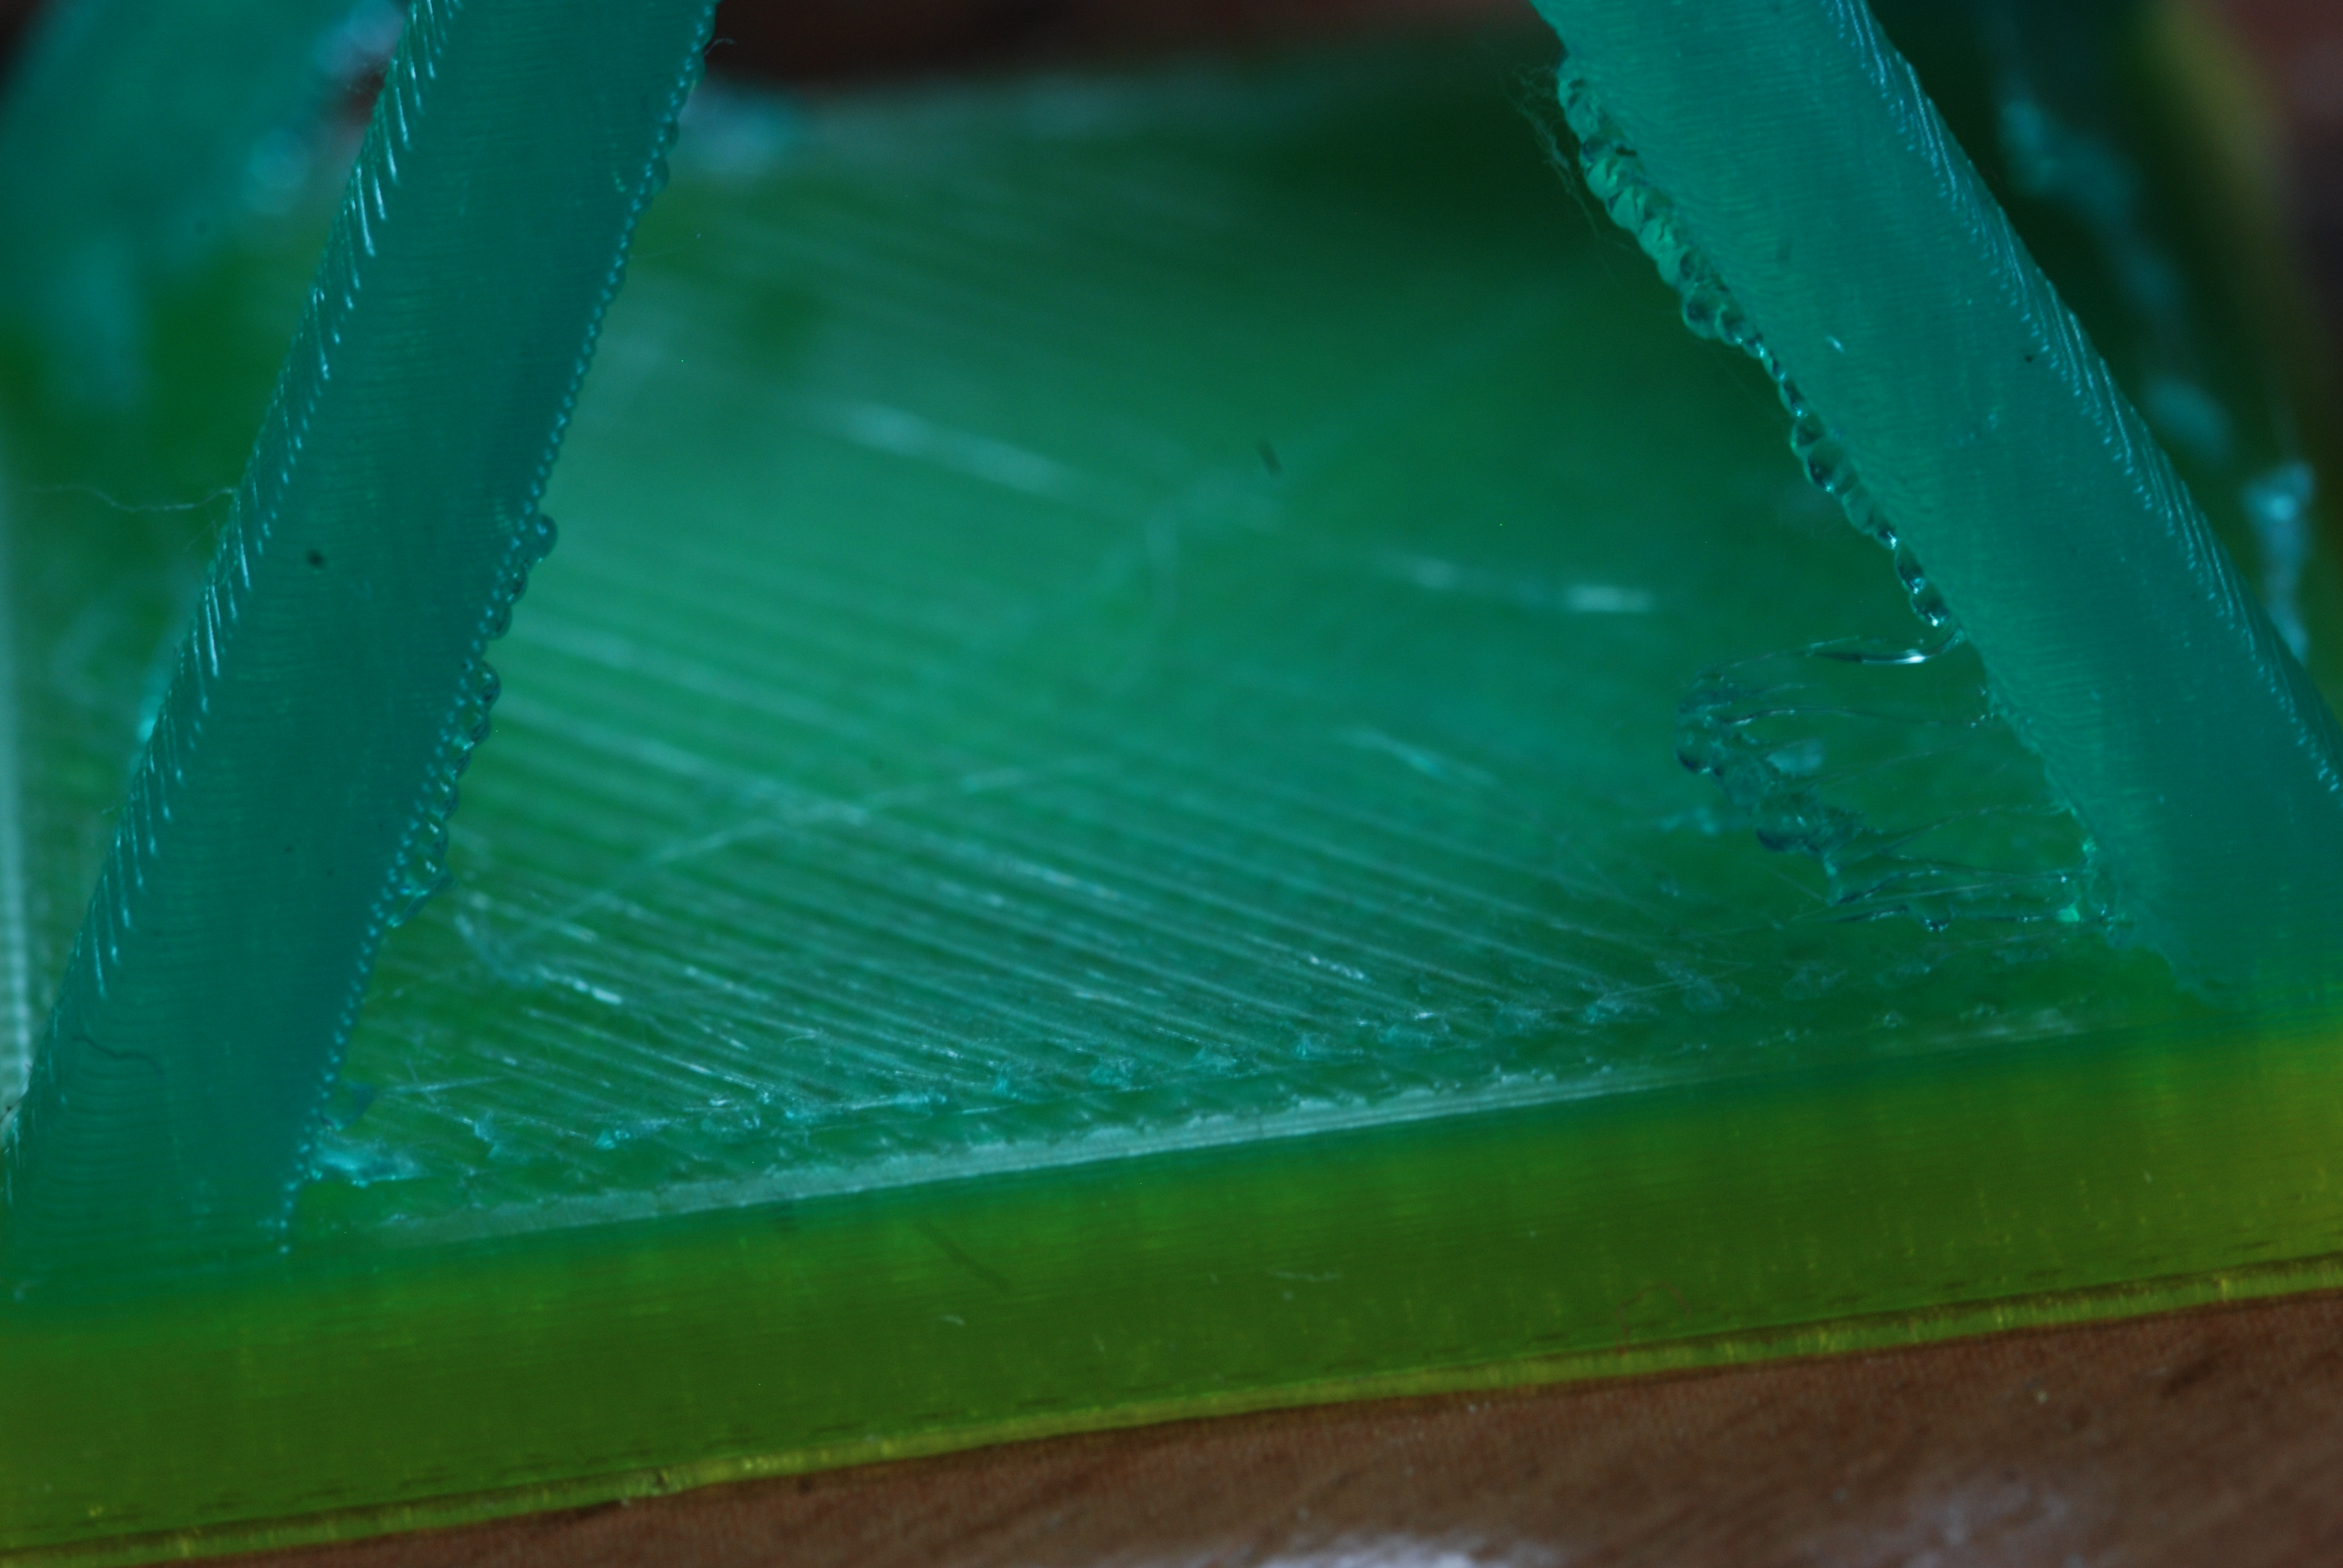
I'm trying to make a few gears.
Now it's just testing, but the gears don't fit.
It seems as if my outer edges are always offset to the outside a bit. Any ideas as to why this would happen?
(click for larger version)
Any ideas on how to improve this?
I'm printing with a single outer border, and 100% infill with PLA at 235 degrees.... (a bit high, but it works, I'm a bit hesitant to change that..).
[update]
-
That giraffe looks like a fun print. However it's not easy. Try a 20mm cube first.
I'm guessing that your printbed is too low.
Configure your slicer to issue a few "skirt" loops. The filament that comes out should be flattened and stick to the printbed
-
FYI,
I've printed a "tube" of 118 mm inner diameter (should fit OVER something that we measured as), and it came out 116. About 2% error.
Then I printed an L shape with 100 mm between the surfaces (on the same side). That measured up as 99.8. only 0.2% error. It might be that it's overflowing my edges.
The L-shape comes out bent: The PLA shrinks a bit.
-
We've been trying to clean out the the clogging of the nozzle by pushing small electric wires up the nozzle.
-
If the X and Y motors can do 250 mm/sec, why can't the Z-motor?
The answer is that the Z-motor has a different "transmission chain". For a revolution of the X motor, the extrusion head moves 10 teeth at 2.5mm per tooth or 25mm.
The Z axis is different. For a full revolution of the motor, the platform moves down one thread on the big driveshaft. I haven't measured it, but it's about 2 or 3mm.
But if the X motor can do 250 mm/s, it will be doing 10 revolutions per second. So why can't the Z-motor do 10 revs/sec? That would come to 20-30 mm/sec for the Z axis. That would be useful to reduce the blobs tenfold... :-)
I can understand that when it has to push the platform up it can't achieve such high speeds. So I'd be happy having it limited to 5mm/sec in the Z- direction, but a limit of 30 in the Z+ might be useful....
-
What he's saying is that the estimated amount of material changes when he modifies the speed setting in the "settings" menu before slicing.
I too have a question about the amount of material: How accurate is this supposed to be? I was thinking: Very accurate. But I'm still getting objects that are significantly lighter than expected.
-
Yeah! I had expected a "I uploaded it to thingiverse:
http://www.thingiverse.com/thing:26094
" note from you here. Either I missed it (*), or it isn't here. I found that note on google groups just now and then a simple search on thingiverse came up with the proper thing.
(*) Sometimes I look with my nose as they say in Dutch. :-)
-
About the fan shroud: I think it wouldn't be a bad idea for Ultimaker to put a standard set of DIY (or PIY, print it yourself) deluxe part files on the website, include it in the assembly instructions (which could use a thorough update by the way, wiring and several parts not matching current shipping machine...).
There is an "ultimaker upgrades" menu in "replicator-g". It comes with the program! No need to download separately!
-
Yes, that might work. But when you have a good clog and your feeder is capable of a good push, then you might strip the threads. Then there is nothing left that you can do. Now after damaging the end of the bowden tube, we can cut off a short piece and try to continue to print.1) Screw the bowden tube directly into the nozzle assembly. Pretty much everyone is having the "plug" problem, and there are way too many opportunities for that tube to slip upwards and allow the plug to form. Screwing it in solves that problem entirely, since the tube is no longer held by friction but by leverage (threads), which is much stronger.How about widening the bowden tube to 4mm at the end, and have a 4.5-3.8mm tapered end sticking out of the brass tube. Now screw a clamp down onto the tube. You won't compress the tube ID because of the brass inside, and you get a perfect grip.
I agree that the large hot zone causes problems. But there is also the problem that you need some time to get the plastic to melt. So will the smaller hot-zone be capable enough to melt large amounts of plastic for fast prints?2) Smaller hot zone. One of the primary reasons why ooze is so hard to get rid of is the fact that the UM hot zone is too long. Molten plastic stays in the nozzle even after retraction and results in dripping. A shorter hot zone allows the retraction of filament to have more effect on the pressure at the nozzle tip.I think the quality issues we're seeing with fast prints are mostly due to the arduino not being fast enough to do things perfectly at the higher speeds. If I have time, I'll try to see what happens if I hook it onto an FPGA....
Sometimes a blob from the test-extrusion at the beginning gets caught somewhere inside the buildarea. Sometimes the object curls up during printing. This causes the extruder head to bump into the object. If that causes me to loose an extruder head, that'd be very expensive.4) Thin-walled heat isolator. The arcol hot end has this. Basically, a portion of the heater barrel is turned down so the metal is very thin. This forms a bottleneck for the heat and prevents heat from spreading upwards towards the PEEK insulator. Yes it does make the nozzle a bit more fragile but I think controlling heat is very important. This also helps to make the hot zone smaller and thus makes retraction a bit more effective. -
I can't find the STL files for the parts... Am I missing something? I'm still waiting for the bearings but I like to have things ready for when they do arrive.
-
Not everybody is able to "read" gcode.
In cura, slice the model, and then use the up/down buttons to view each layer. Scroll to the ones near the top of the windows and see what is intended.....

Feed motor "stammer" - loss of extrustrion
in UltiMaker 3D printers
Posted
If it isn't missing steps, it should grind a hole in the filament. Do you get that? If it gets too much resistance near the hot end, this will happen.
Open up the clamp and push by hand. 2-3kgf should be enough to get a snaking extrusion out of your hot end.
If you're afraid about the curl, take the spool and turn it around on it's axis. Not the one where it normally turns on. If that doesn't fix it, it's less than one turn, and won't do any harm.