toilet-ovule-add
-
Posts
35 -
Joined
-
Last visited
Content Type
Forums
Events
3D Prints
Everything posted by toilet-ovule-add
-
Do you mean 'it can not' ? What kind of bed do you use ? Glass or Pei ? When using a glass printing bed using a PVA glue stick can help. I personally print on an aluminium PEI plate which I clean using nail remover (aceton). Images (photos) may help determining the issue
-
 Hi, In a 3d design I have parts which need support. Only when adding a support for these parts, the support material does touch but the design itself. When printing with PVA or White breakaway the support material does not sufficiently stick to the PLA of the design and therefore printing of the overhanging parts do fail. A simplified design I now use to test the support material printing is attached. This should be printed between the build plate and the sphere. Has anyone tips how to improve the stickiness of support material with the PLA ? Fantastic Densor-11.stl
 -
PVA Layers not bonding strong enough
toilet-ovule-add replied to toilet-ovule-add's topic in Improve your 3D prints
I use Ultimaker Tough PLA, use the adviced temperature of 210 and 215 for the first layer Think p-kimberley did point me in the right direction which is contamination of the printing material by support material. I am now revising the design, making testprints of parts of the design and then if all seems ok print it once again in full with an ooze shield and remove the support printing in the holes. -
How to pre-heat printing bed using G-code
toilet-ovule-add replied to toilet-ovule-add's topic in Improve your 3D prints
Ultimaker 3, firmware 5.2.11.20190503 with Cura 4.5.0 Ok, i thought i had the correct documentation Marlin so probably referenced the wrong Git repo. Suggestion for a better link ? Nope, have printed on glass and find it really in-productive. Spent to many hours resolving adhesion and warping issues which all vanished after installing the PEI coated aluminium plate. Think so, i have to deal with it 🙁. Now start a print, abort it after calibration is done and then start the job again. -
PVA Layers not bonding strong enough
toilet-ovule-add replied to toilet-ovule-add's topic in Improve your 3D prints
I always print small test pieces, but in the end it has to come together. There is where it failed here. In the next full print i will try to use an ooze shield, to prevent contamination of the print by the support material. Will also try to prevent printing support material in the holes by changing the support overhang angle. If that fails i will see if i can print as simple clip in the holes which can be removed easily afterwards. Thanks -
How to pre-heat printing bed using G-code
toilet-ovule-add replied to toilet-ovule-add's topic in Improve your 3D prints
The bed and hotend are already pre-heated when using Cura. The issue is that the bed needs to warm through due to the thickness of the aluminium plate. Using the Marlin firmware documentation as a reference i tried the following by setting the initial build plate higher than the desired temperatur and then wait till the temperature of the build plate is cooled down back to the desired temperature. M117 Heating up PEI Plate M140 S80 M190 S{print_bed_temperature} Unfortunately, the message "Heating up PEI Plate" is shown with "Press to Continue" , but then immediately starts printing. -
PVA Layers not bonding strong enough
toilet-ovule-add replied to toilet-ovule-add's topic in Improve your 3D prints
@p-kimberley Ah contamination, did not expect this to be the issue. Wil try to use the support blocker at the position of these holes. -
I am working on a prototype which has holes for leds. These holes are dimensioned in such that some pressure is needed to get en keep them in place. The rim wherein the leds are placed is 4mm thick. In most places i am able to push in the leds without issues, but at other locations the layers are separating after pushing in the leds. Material is Ultimaker Tough PLA, printing temperature 200c. What is the best approach to increase the layer bonding ?


-
How to pre-heat printing bed using G-code
toilet-ovule-add replied to toilet-ovule-add's topic in Improve your 3D prints
And that is exactly what i tried with the gcode instruction ` G4 P120000` -
Instead of the default glass plate i am now using a PEI coated aluminium plate instead for almost a year now. It saves me a lot of trouble with adhesion and warping which i had when printing on glass. There is only one small issue when initially heating the bed. The surface temperature of the bed lags behind when initially heating the bed . Therefore printing the first layer after a cold start sometimes fails due to adhesion issues (yes i know... read on) caused by a to low temperature of the surface of the printing bed. When i pre-heat the bed (manually) for some minutes before starting a new job resolves the issue. So tried some Start G-code to heat the bed and wait 2 minutes before actually continue to print the first layer M117 Warming up PEI Plate M190 S{print_bed_temperature} G4 P120000 For some reason the message is shown, but shortly hereafter the first layer is being printed. Is this actually possible ? Set a display message, set the print bed temperature and wait a few minutes before starting the first layer ?
-
So have still no reason why they abandoned the aluminium build-plates except the statement that it did not satisfy the companies standards. I bought a custom PEI coated aluminium plate from clever3d.de and this is really working well. Object (PLA/PVA en TPU) stick perfectly while printing without any preparation for the plate. When cooled down, the object can be taken of the plate without any noticeable force. No warping 😀.
-
Strange they left the feature it in the software for the Ultimaker 3
-
Hi, I recently bought an aluminium PEI coated printing bed from clever3d. Since i am changing from a glass printing bed to the PEI bed i noticed the specified printing bed in Cura. I tried to find any configuration in Cura where i could add a printing bed type with a specific configuration (e.g. temperature) for specific materials. Is it possible to specify a custom printing bed in Cura with it's own dedicated settings or is the only available printing bed "glass"?

-
(Tough) PLA residue when removing
toilet-ovule-add replied to toilet-ovule-add's topic in Improve your 3D prints
Ok, Tried the glue stick the past 24 hours. To get a smooth surface i dissolved the glue with some drops of water to spread the glue evenly. After printing the object came of easily. There was some warping on the edges and PLA did not bond perfectly everywhere, e.g. at the lower end of the ' ä ' and at some places in the WiFi symbol. Probably due to the fact that the glue was not spread evenly? Also you can clearly see the water pattern at the surface. So will try the salt method next to see if it makes a difference.
-
(Tough) PLA residue when removing
toilet-ovule-add replied to toilet-ovule-add's topic in Improve your 3D prints
Why should the glass not be clean enough? Badly cleaned glass prevents proper bonding, i got the opposite result. It seems that Tough PLA sticks better than normal PLA and as good as ABS. With 'normal' PLA the designs do come off easily. Always clean the glass plate with some water and ammonia, with constant results. Also used a PVA raft many times, but to get the smoothest surface on one side of the print decided this time to print straight on the glass. Will retry the print now with some glue and a damp cloth to distribute the glue evenly. -
(Tough) PLA residue when removing
toilet-ovule-add replied to toilet-ovule-add's topic in Improve your 3D prints
Hmmmmm.... It was impossible to remove the residue, due to the fact there was no residue on the plate. Seemed that the tough PLA was stronger than the glass. The residue was on the print and not on the glass. Glass residue... The glass plate chipped, another lesson learned. Tough PLA is almost as strong as ABS and the same rule seems to apply here. Will use the other side of the glass and try again with a thin layer of glue. Also see thread; -
To get a smoother surface on a printed object i changed the initial layer height and flow when printing the shown lid of a small box. After printing i removed the glass plate and inspected the lid's top layer, and it was perfectly smooth. The lid was sticking like glue, so cooled the glass plate to shrink the glass to cause some tension between the printed object and the glass plate. This worked perfect, the printed lid came loos, but kept stinking on one place, and it seemed if ice-crystals were formed at that location. After waiting 30 mins to get the temperature change back to room temperature the crystals were still there and the printed lid was still sticking like glue at a small part of the object. After applying some force it came loose, but with some damage. A transparant residue (PLA?) remained on the glass plate where the printed lid was damaged. The damaged part of the printed lid was also slightly thicker than the remaining smooth surface. Can anyone tell what that residue can be ? Are there better ways to remove a tough PLA printed object ? Damaged printed part and residue on glassplate Hard to see on the picture, but lower printed lid is much smoother the upper initial printed lid. Cheers, Peter Extra Fine Tradfri Lid.curaprofile


-
And it came out perfect now. No elephant foot and lifting corners, (almost) perfect. Additionally i keept the door of the closet the printer stands in slightly opened to lower the environment temperature. Thx for all the replies!

-
Ok, checked it again to be sure, z-axis is clean and slightly greased, all belts have the correct tension (on both sides). I do not get this. Which dimensions are you referring at, the dimensions of the printed model ? I am now running a new test print with a lowered build plate temperature (55c) and a temperature of 60c for the initial layer. A PVA raft is printed to see if this together prevents the elephant foot and retraction from the build plate at the corners of the model. So far so good...

-
The upper surface was indeed the side against the build plate. There are two points where it flairs out, at the build plate side and on the other side of the main plate. The legs/feet are straight. I currently use Cura 3.5.1. I have never printed this object with an other version of Cura, it is my first concept print. I used the standard 'Extra Fine' profile. Yup, also issues with any of these would affect not only the first and last layer. Yes more people are suggesting it, but the print sticks fine, only the corners seem to retract/melt from the build plate. Sorry, do not understand this. What should i measure ? It is a rectangle shaped box, where the retraction occurs on all four corners.
-
I always cleaned my glass with a drop of water and and some drops of ammonia. Rub this out with a paper towel till you feel a lot of resistance and the plate is dry. Ammonia removes fat much better than alcohol. Never have had the elephant foot issue and the flow on the top layer. See the attached photo of the frame which is printed in the orientation as shown. Printed about 10 of these frames successfully with the same printer and enclosure. Will try the horizontal expansion setting next time, and see if this will help.

-
Smithy, Thanks for your reply. As mentioned i use the cura default settings and have printed directly on glass and on a raft (PVA), so bed temperature is indeed 60 degrees. Never use(d) glue and have never had the need for it. The whole model sticks like glue (no pun intended) on the bed, only the corners of the object seem to pull up or melt. The printer is placed in a cabinet with moisture absorbers so no issue with cold airflows. If printing in a fully enclosed environment is not a good idea, then why did ultimaker sell enclosures in the past ? The enclosure is about 10 times the size of the printer so the environment gets warm, but not hot. If the outside temperature issue the whole model would have been affected. De layers between the lowest and highest are perfectly straight. Cheers, Peter
-
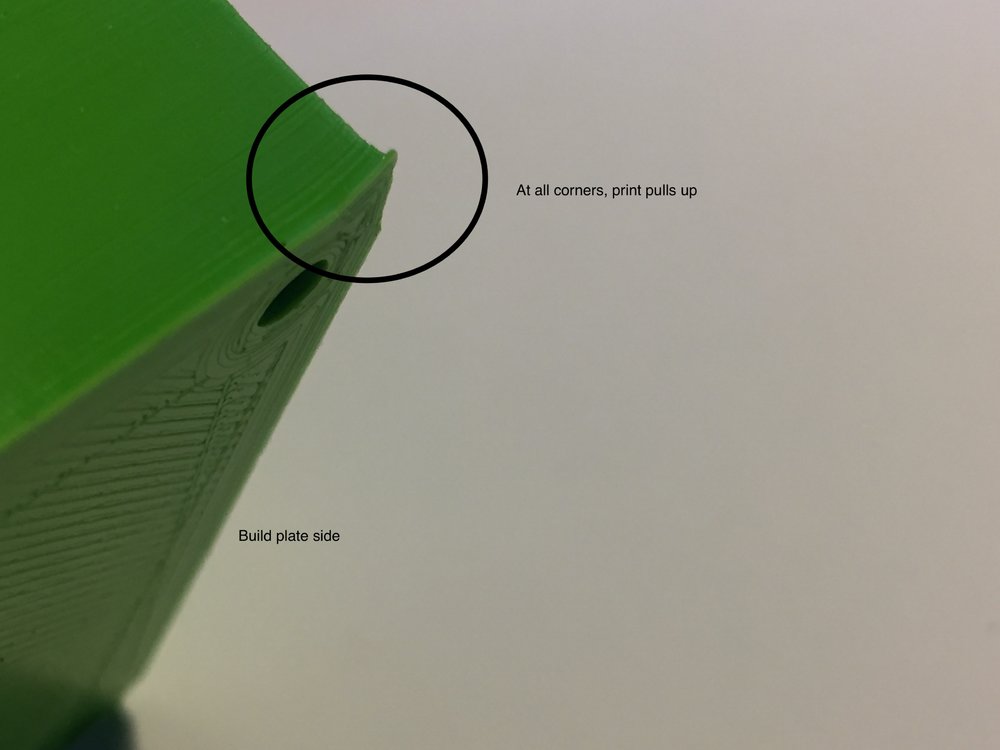
Hi, I am having some issues with PLA which i have not had before. When printing with the UM3 and Cura default settings (Fine) the prints on the build plate side and top layer seem to flow out a bit. Also the corners of the object are pulling up. Printed object is sticking well on the build-plate. Is this related to the build plate temperature? Making a raft (PVA) or skirt (PVA) do not solve the issue. Any tips or hints ?


-
Although the PVA was dry and most of the time the flow from the printhead seemed ok, it did some hot and cold pulls using PLA. After some time there came small black parts came free. Ran it multiple times till it couldn't get anymore out. See if this helps.
-
Would be worth wile trying out if only the PVA would irregularly stick to the plate. But it also sometimes does not stick to other PVA layers. Will try out to make a PVA raft the next attempt and see if i get a more stable PVA support structure then.