


Torgeir
-
Posts
1,248 -
Joined
-
Last visited
-
Days Won
26
Content Type
Forums
Events
3D Prints
Posts posted by Torgeir
-
-
Hi bmeehan19,
What you assume here sounds quite right, -however, this approach should normally not destroy your PCB... So was this really what happen???
OK., anyway you should measure the input voltage to the FET, the voltage from PG5 into the resistor R54. This voltage should be at lo stage, less than 0.4 volt (approx). If this is true your FET Q1 needs to be replaced. You could also short the R57 right across the resistor -and NOT to any convenient ground point around -but across the resistor itself. If the light goes out, your processor is to be blamed -or changed...
When you indicate this is the problem, you sure have an electronics background...
So go on and do this test and please report back.
Thanks.
Torgeir.
-
Hi Folks,
I've also seen this problem in the very beginning, but I made a shim of "post it labels" (cut exactly to fit) and this is what I'm using in my printer. It never come loose anymore. You may select a type of paper with less thickness, this to avoid to hi tension, as this can make the black sliding unit to crack -like it's seen on some of the first generation UM3.
Thanks.
Torgeir.
-
Hi foehnstrum,
I'll been following this tread for a "loong" time and must say; this is the most valuable "gift" to the Community I've ever seen in here (IMO).
The print we see here is as perfect as it could be in the important places, the blades of the propeller. Very impressive! "I'm talking about the Mark 2 print!"
Thanks for sharing all this with us.
Torgeir.
-
Hi Herman,
Just had a look at your model, at first I thought it was good, but when I went close in to the model I found some problem..
Well, -to be able to have a model perfectly sliced by Cura the model have to be a whole solid body. Your model have some parts around that's not properly connected together, so Cura will see different object and cannot slice it properly.
Your model have to be "joined" as one part.
Good luck.
Thanks.
Torgeir.
-
Hi mtm4ck,
I have two HP laptop, one Pavilion G4 with an AMD Radeon HD 7670M and the other one an old HP/Compaq 6910p.
Both of them is running Cura 2.5 (the best version so far of this new generation of Cura IMO), as with all the other versions there have been some issues. The "one" I've had problem with is the old Cura setup files, "somehow" those are not always compatible with next new version of Cura. If you have had old versions of Cura installed, you'll need to delete the (sometime hidden) Cura setup files, or just rename the directory/catalog for those files.
Another strange thing with HP (my experience), is that; if you go into the "setup" in your computer, you'll see a HP name instead of the real"AMD Radeon" display"processor". So upgrade of those drivers has to be done at HP's web site.
Well, you probably did that??
Just my 5 p.
Thanks
Torgeir.
-
Hi womacki,
My pleasure!
Great job you've done there.

Thanks for reporting back.
Torgeir.
-
Hi neotko,
This was really interesting -and you're a true experimenter!!!
The Schott company is a real high end supplier of all kind of special glass.
Great info!
Thanks.
And a happy weekend.
Torgeir.
-
 1
1
-
-
Hi Max,
This looks like you have to much play in the linear bearing(s) in the extruder unit.
To inspect this, (the printer do not have to be switched on) hold the extruder from above with your left hand to prevent it move, then use your right hand from below grab the lo part of the extruder without touching the wiring on the reverse side of it. Now try to move the extruder at this place forward/aft for the Y axis to see if there is any play. Do the same thing right/left (the X axis).
If there is to much play here, you will see clear opening in first layers..
This is a test to be repeated in different positions for the extruder, as such play can be related to spesific positions..
OK. Good Luck.
Thanks
Torgeir.
Edit: The four sliding bearing on the 4 X 8 mm shafts may also cause such error, but same procedure will cover those as well. For those bearing (inside each of the four black sliding blocks), you can also feel play when moving those block (carefully) up and down, much forces must not be used here.
-
Hi TAGood827,
Welcome in here.
You already got good info from SyntaxTerror, but here's some more good news.I found this crimping tool (very good quality) from China, where most of this stuff come from these days..
Have a look here:
https://www.aliexpress.com/snapshot/7332700156.html?orderId=72901719139774&productId=32506636704
I bought this one, as I built my "UM2" (customised) and can advice this dealer and the tool for the connector used on the printer.
I've been working for many years with such tools and say; 16.50 USD for this one is less than 10 % of the price offered from our dealers in Europe or US.
Good luck.
Thanks.
Torgeir.
-
1
-
-
Hi bastienb,
Sorry to hear that, but sure if you're depending of the printer that's the best way to go.
Good luck and please report back the findings.
Thanks.
Torgeir.
-
Hi bastienb,
Yesterday I could not find an examples of how my first layer look like, but here it is:
First view is from the inner side of the printer, observe the reverse side of the extruder head.
This is first layer with brim and the color of the filament is black! Also you can see how the transparency changes due to bed offset.
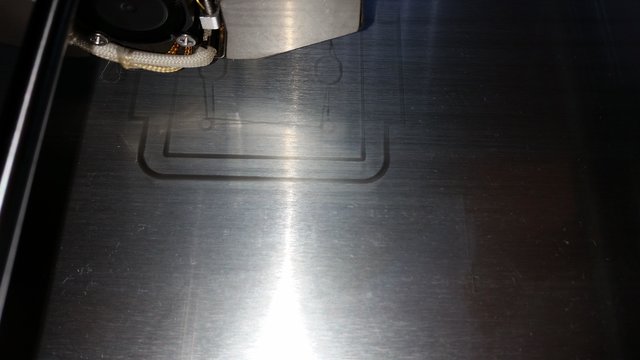
This next picture is the same print seen from the front side into the printer and still first layer. The bed addition is excellent, no need for glue here.

Then a picture of the second layer.

And finally a picture of the object being printed, (a new belt gearbox for my printer).
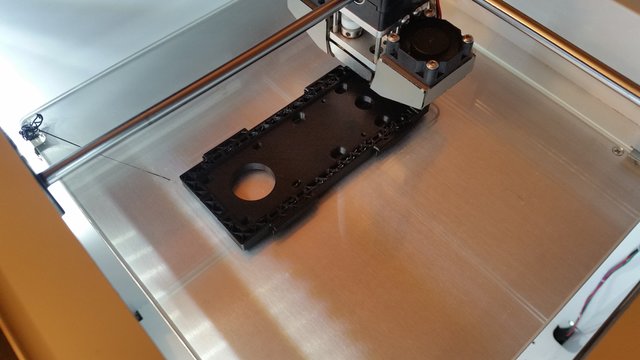
Well, this is the way I'm doing it and now I'd never seen any object come loose from the bed, however, for parts with small footage -glue is a must..
Thanks.
Torgeir.
-
Hi bastienb,
Great, you still have much to much filament flow..
Even if I wish it was the knurled wheel, I have to say it's not bad at all..
What I now think is that when you had trouble feeding the 1.75 nozzles, the feed rate is brought sky high somehow, maybe the feed needed to be increased in order to get enough flow to avoid under extrusion that time? Then the problem with to lo retraction, nozzle leak/sip etc.
A factory reset will bring back the original default setting, then check your filament type, size, temp and nozzle size. That's all, I'll think..
Cross my fingers..
Thanks.
Torgeir.
Oh.. forgot one thing. When adjusted this close, my method, make sure that the initial layer height is 0.15 mm (not 0.3 as Cura 2.5.0 use as default.)
-
Hi mrpasquale970,
Welcome in here.
You find all Cura versions here:
https://ultimaker.com/en/products/cura-software/list
Thanks.
Torgeir.
-
Hi bastienb,
As I followed this tread, -but cant help, think we will need to think over again this issue..
I've learned that you've changed nozzles at both of your two UM2+ about same time? Right..
The thing is, at that time you introduced this problem with one of your printer, the other one printed as good as before and had no problem.
As this tread went on for some time, you also reported that the second printer also started to print as your first “problem printer” had been doing for some time.
OK. I thought this; what other parts might suffer very much due to this reduced nozzle size? To me the answer is the bowden tube and the knurled wheel itself..
Sure we know that you changed the bowden tube, so..
I'll know that this knurled wheel can take a lot of «punches», but can it survive spinning through «plastic filament» for some «a long?» time without any issue? (Cause it will always spin under such condition and it's amazing that this actually worked as well as it did for sometime.)
Did you check the sharpness of the small pyramids on the knurled wheel? It should be easy to compare the sharpness with your finger over the area the filament is tracking vs. on the sides of this area. You should feel the «bite» of the tip of the pyramids..
As you now are equipped with this new “super efficient” heat block, your extrusion seems to be very good, but to me -the feeder is not! Could it be that the feeder is still spinning due to this extraordinary issue from before, could it have spinning issues in both, forward and retraction direction as it is now?
I'll ask this because your print with the new heath block really extrude lots of filament during movements in between first layer layout, when placing holes, squares etc. Of c. studied your latest pictures a lot.
About the level adjustment, you really have to adjust it “some” closer to the bed. As an example, I do not use a standard (0.12 mm) 80 g paper for height adjustment, but a paper meant for those cashier printers and this paper is about 0.07 mm. Adjust so you just feel that the paper is close and barley touching. Do this very carefully and double check.. It is very easy to turn the adjustment wheel when pushing down to confirm first point (even a few click without noticing it), meaning it can be to high or to low at the first point.
When printing first layer, -even black filament can be kind of transparent! As the glass bed can be some uneven, the nozzle tip may squeeze out a “very tiny” layer here and there due to this issue..
But when you'll success here, your prints objects first layer will be as a mirror, yes you will not feel any strings of the printing on this side with your finger nail if this is done right.
(Bed cleaning is mandatory for this setup, hot water -as hot as your fingers can take and mild soap should do the trick.)
Last thing, did you print some others print object that said your printer setting will be override?
If such things happened, your basic printer setting can be corrupted and you may need to do a “factory reset”.
OK. Good luck.
Thanks.
Torgeir.
-
Hi RetromanIE,
This video is good for analysis. What we can hear here is a slamming shaft (twice), so either one of the across shafts (forward or after, or even both) may have to much play and is slamming to the end stop (the two pulleys inside the printer meting the bearings in each side of the side cover).
You can actually check all four shafts by trying to put them in from the outside and then try to push them out from the inside, you should just be able to feel a little play not very much as you have here..
You'll need to loose the two set screw on the double pulley on the "after across" shaft, push the shaft in from the outside L/H aft. While holding the shaft in this position with the fingertip (don't press hard, it will be the other pulley that preventing the shaft to go further), on the inside of the printer push the double pulley toward the wall, re tight the set screw's but not very tight at this moment, as you might have to readjust. Now try to move the shaft out/in along shaft, there should be "just" a little play sometimes hard to feel -so pay attention to this little detail. When this is done, then tightening the two set screw. It might be good/smart to check the pulley set screws tightening on the other end of the shaft at this time..
Note: Do not turn the pulley when it is loose just push it along shaft.
The same adjustment process can be used on the forward across shaft as well, but on this shaft there is only two pulleys.
(It is important to note that, this is not any kind of calibration but just an adjustment to cope with a single play. There is tools and setup for such demand.)
PS. By listening to the sound of the belt on your printer when moved manually, I'll think your belt is to tight.
The hex tool to be used on the set screw here is 1.5 mm.
OK. Good luck.
Thanks.
Torgeir.
-
Hi womacki,
Great.. The resistance when pulling out the filament at 90 deg. C. is normal, because the filament is switched from soft liquid toward solid. This will glue remaining filament residues collected up inside the nozzle. When removing the filament at 90 deg. C. this will be visible on the removed tip end as other colored filaments, or rest from previous used stuff built up inside the nozzle unit. Sometimes this method is needed to be repeated until the removed filament tip is clean and without dents.
The two side fans normally start up after the first layer is done, with or without a brim or skirt. Those fans are cooling the filament when extruded to the object in order to avoid soft plastic inaccurately placed. The third fan one on the back will start when the printer is turned on and stay on as long as the printer is switched on, and this should be true for your standard UM2. This fan is very important for the functionality of the hot end feeding.
Make sure you have spare couplers, they need to be changed from time to time..
Does your printer still skip?
You never told us the kind of filament you're using and print temperature..
OK. Good luck with your printer and printing.
Thanks.
Torgeir.
-
Hi womacki,
Ok. 1250 mA is the default value so this is ok. When going higher than this the motor will be hotter..
The total running time can be found under the maintenance menu, then to advanced menu and roll down to the second last (i'll think) "running time"..
You probably have to high friction in the extruder, can be residue of other filament type stuck in the nozzle preventing proper feed.
Here is a method to clean the nozzle, but follow every steps carefully.
https://ultimaker.com/en/resources/19510-how-to-apply-atomic-method
Or maybe a faulty coupler, the white (Teflon) device isolating heat block from the cold side. This coupler tend to shrink on the hot side over time (less inner diameter) and this prevent easy feed of the filament.
Also note that the fan on the back of the extruder need to work/running properly, this fan prevent hot melted filament to "crawl" upward into the cold part of the extruder. If this happened, the filament will be very much restricted to move through here.
OK. You now should have something to check out.
Lets hear hows going.
Good luck.
Thanks.
Torgeir.
-
Hi womacki,
Welcome in here!
I've seen your first posting about this (when I looked at your profile), so I'll know you have an Ultimaker 2..
You also have tried to variate the nozzle temperature without any success, right?
Well, there is a few thing to check here, first go into maintenance menu, then select advanced setting, roll down the menu and find motion setting. At the very end you'll find a setting; Current E (the electrical current to feed the feeder motor with), check that this current is set to minimum 1200 mA (milli Ampere).
What you have is a stepper that is skipping, -as we say. This is happening if the energy (the torque) the stepper motor can do, is set to low and the filament inside the bowden tube is compressed and act as a spring and pushes back the stepper motor when it come to it's limit. So the skip back is not normal, -but it is a kind of protection and your feeder motor would not suffer..
Next question to ask is, how many printing hour does your printer have?
Ok. Let us know how this go before next step.
Thanks.
Torgeir.
-
No, a Bondtech would not help here. This problem is made due to high compression of the filament and it is actually working as a compressed spring. When there is a retract there is still feed from the nozzle due to the compression effect. This is why your print have all this issues. High friction in the nozzle decrease flow and make the pressure rice at the input of the extruder. So more feeding pressure here would not help.
Edit. ops did not saw your answer neotko.
Thanks.
Torgeir.
-
1
-
-
Hi Aiden_Pearce,
What you describe here is a typical error to be expected sooner or later. The bed heater and the bed heath sensor wiring is moving every times the bed is mowed, so this wires will break at some time. Move the bed a half way up, then move the wires a little to see if the error MSG. show up at the display. There is two places that's the wires are more prone to break, this is close to the bed "strain release" clamp and at the place where the wires enter the printer. This is a weak point of the printer and should be the first place to check for such an error.
The same is true for the wiring going to the extruder head and this one suffer much more due to high intense movements.
So to conclude here, this is the first places to expect this type of error.
Thanks.
Torgeir.
-
Hi rwig,
As amedee says, you'll need a hex tool (set) metric and 1.5 mm for this set screw.
Thanks.
Torgeir.
-
Hi RetromanIE,
There is four 8 mm shafts (or rods) that the pulley are installed into.
We also have the two 6 mm shaft in the "middle" moving the extruder around the bed.
When you said locked in, do you mean the two in the middle locked into the black colored sliding block's. Those two bars should be locked by the friction in the traces/cutout for the bar in the sliding block. It should hold it quite good..
If you mean the 8 mm rotating shafts, they are hold in place by the pulleys. If the shafts can be moved/have play in out (alongside the shaft), this can make noise.
Do you have play on the shaft itself, or only at the pulley(s)?
Do you have play on the extruder unit? There should be no play here, if there is play this will make noise and sometimes also amplified by resonance in the stainless steel fan housing.
Thanks.
Torgeir.
-
Hi rwig,
Why not use locktite blue, this will allow you to change the knurled wheel if needed and this is the "glue" that's meant to lock a "set screw".
Thanks.
Torgeir.
-
1
-
-
Hi Skippy7,
I've been following this topics a little and have some experience with this latter video. The "amplified" noise is due to the resonant frequency for the fan housing that's on your printer. When you make this first layer, at lo speed during 45 degree and 135 degree movement the tiny stainless steel plates on the housing go into resonance.
I used aluminum tape to dampening the plates and to directing the air from the right fan more precisely toward the printing object. The real improvement here was when I printed Laberns fan housing and started using this on my printer. No resonance anymore.
However, your main problem is still there, so I think if you remove the X-axis stepper motor and then try to move the extruder all the way back and forth to see if there is any noise then..
I'll think you might have a bad bearing on the rotating inner Y-axis l/H side as you suggested.
A picture of this corner would be interesting to see.
Anyway, good luck with your fault finding.
Thanks,
Torgeir.


odd temp sensor bed error
in UltiMaker Cura
Posted
Hi Lance,
Two weeks ago I've changed the "24" VDC master relay on the main board (UM2). This relay can make lots of troubles and give all the warnings related to the "power" users of 24 VDC and those are: All of the stepper motors, and all three heater's (three if you have a Mark 2). There is actually no warning telling you that the 24 VDC (from the master relay) is missing, this could be a good thing to add into next generation hardware/firmware..
The thing is that if this relay starting to arching (voltage is dropping over a certain time), any of those warnings can shows up due to a missing or interupting 24 VDC and such warning is actually false and misleading.. As I had this problem, got all kind of "strange" warning until I realized all of them had a common power source and all of them was powered via the 24 VDC relay.
The funny thing is this; one day when feeding the filament using the advanced menu I could have an error saying: X or Y end stop error and then the firmware halted with an error number I cant remember, but..
Later on, this one;
ERROR - STOPPED
Heater error
Go to:
ultimaker.com/ERØ3
The printer may be switched off, then on again and may work for some time, but you will sooner or later have a total failure of this relay that have to be changed.
As I had to go to KL (Kuala Lumpur) for a week, I used this opportunity to search for this kind of relay.
I found two brand of this relay type:
1) SRD-05VDC-SL-C Blue colored plastic housing (Brand name Songle)
2) HK3FF-DC5V-SHG Black colored plastic housing (Brand name HUI KE)
The coil voltage is 5 VDC and contacts current is 10 A at 30VDC
However, I've also found that this same relay (the one with the blue colored plastic housing) is used in the Arduino relay modules, so this migt be handy to know for someone..
So to a little warning; this relay is not that easy to remove without damaging the PCB track. Here you will need some special skills and tools – now you're warned!
I made some pictures of the repair, if of interest I'll add them here.
Well, just my 5p.
Good luck.
Thanks
Torgeir.