Jump to content

Ultimaker - Windmill


3Dimensionen

Recommended Posts

Posted · Ultimaker - Windmill

Hey Community,

wir haben versucht, die Windmill von Ultimaker zu drucken und erleben immer wieder Schiffbruch. Stets an derselben Stelle. Im letzten oberen Drittel. Egal welche Einstellungen wir vornehmen, das Bauteil beginnt immer zu "vibrieren" und somit sinkt folglich die Qualität der einzelnen Layer. Sogar mit Stützmaterial gelingt kein wirklich suberer Druck. Unsere UM² sind stark modifiziert (alle billigen Bauteile gegen teure und hochwertige Komponenten getauscht) und unter anderem mit den BondTech Feedern ausgestattet.

Hat jemand von Euch dieses Bauteil schon gedruckt? Uns interessiert dann Eure Qualität und Eure Einstellungen in der Slicer Software (Cura oder Simplify3D).

[media-thumb=10021][media=10023]

[/media][/media-thumb]

Danke schon mal im Voraus für Eure Hilfen und Meinungen.

Lg

Der Peter

Happy Printing

  • Link to post
    Share on other sites

    Posted · Ultimaker - Windmill

    I'm gonna take a wild guess and assume this is about print settings. Sorry I can't type german or dutch? I dunno...

    Anyways, these are the settings I've had success with:

    Layer Height 0.15mm

    Shell thickness .8

    Fill: Top/bottom thickness 0.6

    Fill density: 0

    Print speed 40mm/s

    No support

    nozzle 0.4

    Initial layer thickness 0

    Travel speed 170

    Bottom layer speed 15

    All other advance speed values: 0

    minimum layer time 10

    Here's the catch though. While the above prints better for a visual model, it makes it too heavy... Ideally you print with 0.4 perimeter, and hollow (even better on 0.25). But it is much more difficult to get a good print.
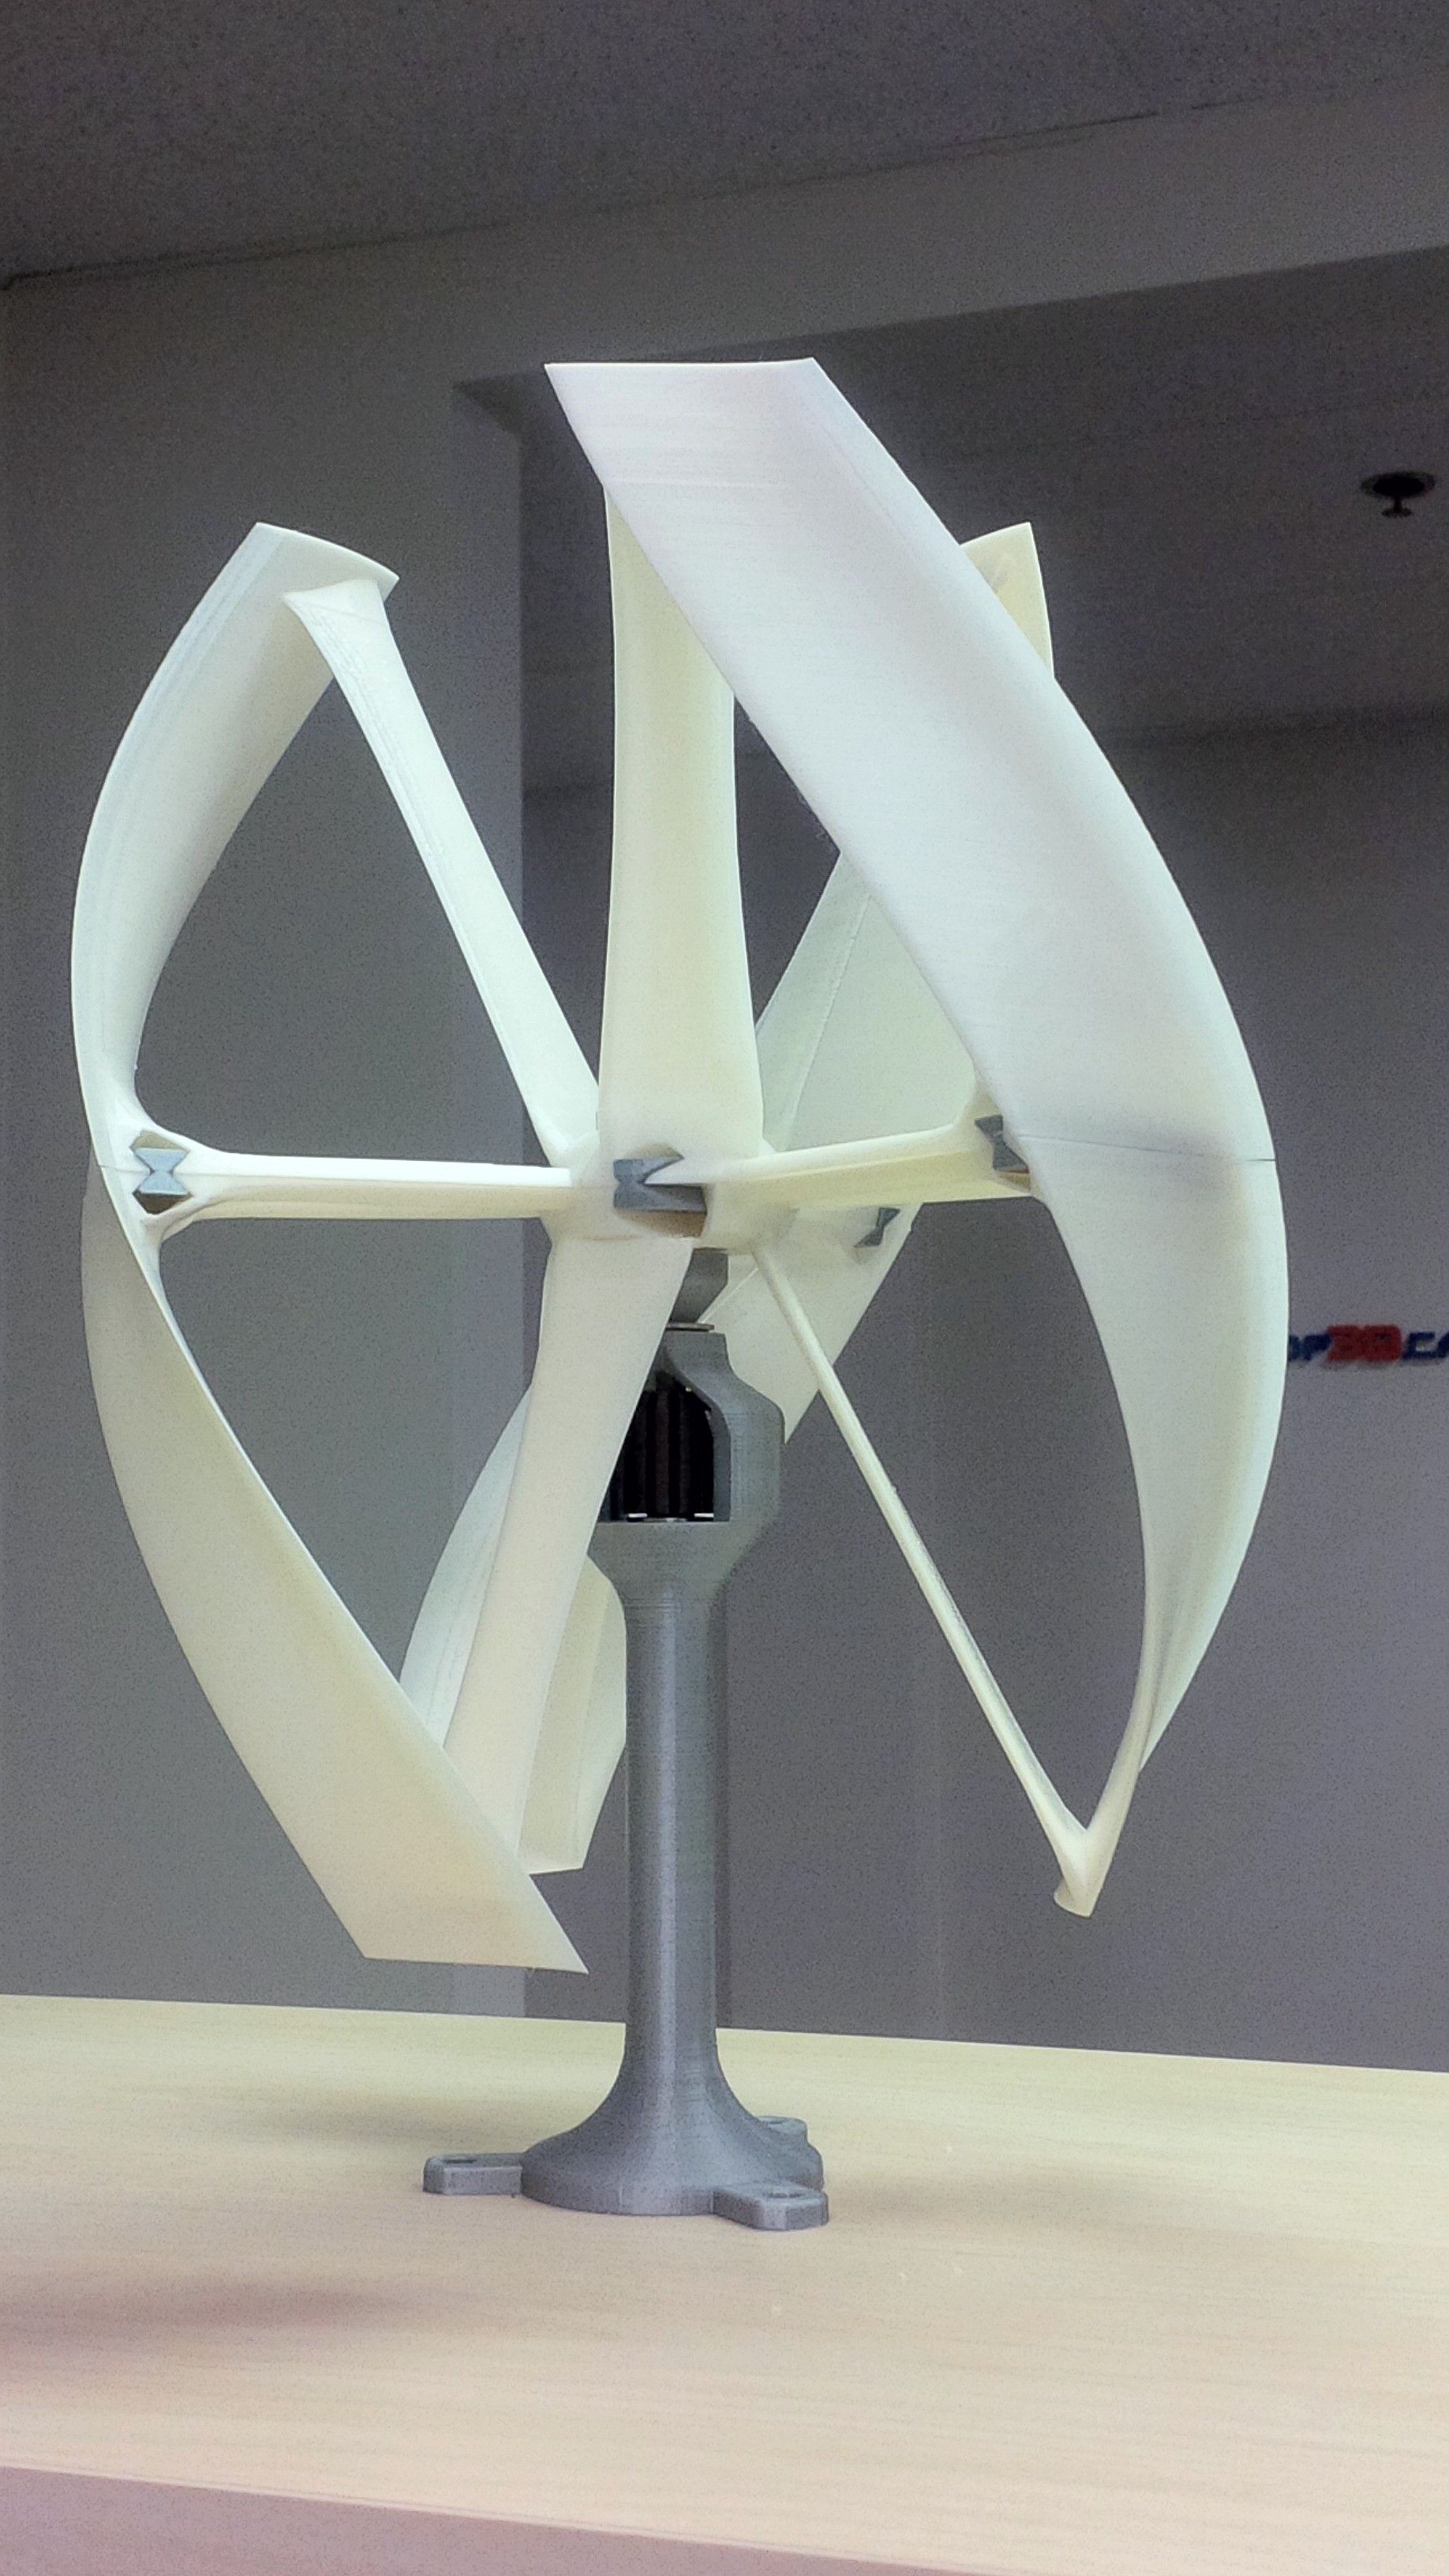
    Obligatory picture.

    IMG_20151208_183100_edit.jpg

    • Like 1
    Link to post
    Share on other sites

    Posted · Ultimaker - Windmill

    Hallo Peter,

    hast du einen Link zur STL-Datei?

    Wenn der Druck nicht ewig dauert, lasse ich ihn mal durchlaufen ;)

    Gruß

    Harry


    Harry,

    Du findest das Teil auf der Ultimaker Homepage.

    Bin mal gespannt auf Deine Rückmeldung.

    LG

    Peter

  • Link to post
    Share on other sites

    Posted · Ultimaker - Windmill

    Harry,

    das Teil hat es in sich. Bisher haben wir noch keinen sauberen Druck zu Stande gebracht und es soll ein Ausstellungsstück geben. Trotz der BondTech Feeder, die ja nun wirklich einen gleichmäßigen Filamentvorschub gewährleisten und den OlssonBlocks, will das Teil nicht richtig gelingen. Selbst mit Stützstrukturen nicht. Die z-Achse macht wohl die Probleme, obgleich wir die auch schon gelagert haben.

    Lg

    Der Peter

  • Link to post
    Share on other sites

    Posted · Ultimaker - Windmill

    Peter, hab heute auch schon etwas getestet, aber bei mir stimmt was nicht mehr.

    Kannst ja mal bei dir nachschauen, vielleicht hast du auch so ein Problem.

    Der Bowdenzug bewegt sich in den Klemmungen (etwas im Extruder und viel im Bondtech) hin und her beim Rückzug!

    Vielleicht hilft dir das weiter.

    Gruss

    Harry

  • Link to post
    Share on other sites

    Posted · Ultimaker - Windmill

    Moin Harry,

    hast Du die Bowdentube mit den blauen Teilchen am BondTech fixiert? Das muss sein, denn sonst, wie Du es beschreibst, wackelt die ganze Schose.

    Lg

    Der Peter

  • Link to post
    Share on other sites

    Posted · Ultimaker - Windmill

    Hi Peter,

    hier jetzt mein Ergebnis

    Gedruckt mit 40mm/s mit den Temperaturen 210/60 Layer 0,15

    Bilder schnell im Drucker gemacht ohne Änderungen am Teil, so sieht der Rohdruck aus.

    So begann es, aber leider noch mit Problem.

    WBild1.thumb.jpg.0bf6aefce6c5f6c33d9488108c8637b3.jpg

    WBild2.thumb.jpg.7e5ee4fb3c018abdaea55b5e37ffd212.jpg

    WBild3.thumb.jpg.1a96c0b67f4621c5ccde66359a6ecefb.jpg

    WBild4.thumb.jpg.0b0845142f527565c6b7b273c367a2f4.jpg

    Versuch mit geänderter Bowdenhalterung

    WBild5.thumb.jpg.72a872381ff360532353e899dff6448c.jpg

    Neustart und den Nacht-Durchlauf gemacht, das kam dann raus.

    WBild6.thumb.jpg.40f7eb7e430009e4dd88caa5f45f5c90.jpg

    WBild7.thumb.jpg.74496b0ccf488bd68bce3d5ee9687c44.jpg

    WBild8.thumb.jpg.8464361948cd52196a61c1c9bcb2cb4a.jpg

    WBild9.thumb.jpg.94568169264c1ab0e477bd5bc074031a.jpg

    WBild10.thumb.jpg.5d58eb11144ac66960a99df98b424db8.jpg

    WBild11.thumb.jpg.9ae8338b6039be1ab9a1effc358fef8b.jpg

    WBild12.thumb.jpg.169886c205c595ef2f10e6c43add9e44.jpg

    WBild13.thumb.jpg.c551ba71ca58fe2659cfece9d602602f.jpg

    Ich denke, auf den Bilder erkennt man etwas, mußte etwas gasgeben, weil ich jetzt dann zur Arbeit muss.

    Bis später :)

    WBild1.thumb.jpg.0bf6aefce6c5f6c33d9488108c8637b3.jpg

    WBild2.thumb.jpg.7e5ee4fb3c018abdaea55b5e37ffd212.jpg

    WBild3.thumb.jpg.1a96c0b67f4621c5ccde66359a6ecefb.jpg

    WBild4.thumb.jpg.0b0845142f527565c6b7b273c367a2f4.jpg

    WBild5.thumb.jpg.72a872381ff360532353e899dff6448c.jpg

    WBild6.thumb.jpg.40f7eb7e430009e4dd88caa5f45f5c90.jpg

    WBild7.thumb.jpg.74496b0ccf488bd68bce3d5ee9687c44.jpg

    WBild8.thumb.jpg.8464361948cd52196a61c1c9bcb2cb4a.jpg

    WBild9.thumb.jpg.94568169264c1ab0e477bd5bc074031a.jpg

    WBild10.thumb.jpg.5d58eb11144ac66960a99df98b424db8.jpg

    WBild11.thumb.jpg.9ae8338b6039be1ab9a1effc358fef8b.jpg

    WBild12.thumb.jpg.169886c205c595ef2f10e6c43add9e44.jpg

    WBild13.thumb.jpg.c551ba71ca58fe2659cfece9d602602f.jpg

  • Link to post
    Share on other sites

    Create an account or sign in to comment

    You need to be a member in order to leave a comment

    Create an account

    Sign up for a new account in our community. It's easy!

    Register a new account

    Sign in

    Already have an account? Sign in here.

    Sign In Now
    • Our picks

      • UltiMaker Cura 5.7 stable released
        Cura 5.7 is here and it brings a handy new workflow improvement when using Thingiverse and Cura together, as well as additional capabilities for Method series printers, and a powerful way of sharing print settings using new printer-agnostic project files! Read on to find out about all of these improvements and more. 
         
          • Like
        • 18 replies
      • S-Line Firmware 8.3.0 was released Nov. 20th on the "Latest" firmware branch.
        (Sorry, was out of office when this released)

        This update is for...
        All UltiMaker S series  
        New features
         
        Temperature status. During print preparation, the temperatures of the print cores and build plate will be shown on the display. This gives a better indication of the progress and remaining wait time. Save log files in paused state. It is now possible to save the printer's log files to USB if the currently active print job is paused. Previously, the Dump logs to USB option was only enabled if the printer was in idle state. Confirm print removal via Digital Factory. If the printer is connected to the Digital Factory, it is now possible to confirm the removal of a previous print job via the Digital Factory interface. This is useful in situations where the build plate is clear, but the operator forgot to select Confirm removal on the printer’s display. Visit this page for more information about this feature.
          • Like
        • 0 replies
    ×
    ×
    • Create New...