


LePaul
-
Posts
2,072 -
Joined
-
Last visited
-
Days Won
17
Content Type
Forums
Events
3D Prints
Posts posted by LePaul
-
-
If anything needs a hack!
I love that logo, as my printer comes together day by day, I am looking forward to adding some paint to make it stand out more...
...then I assembled my Ulticontroller and noticed it will cover it up!
What mods have others done to keep our little friend visible?

-
You're 200 miles away...so don't be surprised if we get frustrated and offer to meet at Fenway LOL
Our belts sound fine...I guess we're being over cautious.
We are also finding that the comments at the bottom of the Wiki are very helpful too. Other builders have observed directions that were in reverse, etc. Hopefully the Ultimaker guys will review those spots for clarity
The platform went together pretty well for me..asides having oily hands from the bearing packaging...then trying to work those wood pieces around...but, it seems to be OK. We shall see
-
Okay, that makes sense...hopefully one of the Ultimaker guys will reply as well to confirm that!
-
You say use either cable....but make sure you use the right one....that's a contradiction
Let me sum it up ... 2 connections, 3 connertors on the cable...I was thinking perhaps it is this way if you go to dual extruders (which I have the option kit...but not using it right off)
-
We made really good progress tonight, my co-worker took over on the mounting of the print head to the XY axes We have them in but we watched the video over and over again on the wiki and not sure what's "tight" or not
We also haven't tightened the pulleys into place yet (set screws) as we aren't entirely sure how far they should be from the caps
So, we are at this point (step 9 ) http://wiki.ultimaker.com/Ultimaker_rev.4_assembly:_Extrusion_head
Any tips you can share?
Thank you!
-
Right, when I looked at my cable, then the wiki, I have....
Female Blue Purple
Male Red/Yellow/Black
Male Green/Orange/Brown
On the print head, I have that three-prong female plug, then the male red/black fan plug
What's #3? And what should go where?
-
-
So ...at some point this cpu fan will plug into something....working on the feeder now
-
Is that where the CPU fan plugs into?
The CPU fan plug has two prongs...
Been going thru the Wiki thinking we missed a step...but haven't figured this out?
-
Meant to ask...are people using plastic panels for the openings to seal it off (i.e. like the Replicator 2) ?
-
Well I'm not sure you can rule it out simply because the particle size is the same for a different object/item
This is a good question for a scientist
I do know that ABS fumes are downright nasty. I know some parts I have bought for my R2 came from a gent who laser cuts the pieces. That burnt smell reeks for quite some time, to the point I threw it away.
There's a lot of info on the dangers of various plastics and since we are "cooking" these to the melting point, it'll be interesting to see what the results are for other plastics like Delrin or Nylon materials.
That said, I'm not planning to suit up like Darth Vader (yet)...but I am thinking about proper ventilation...and wondering how that might affect how the prints come out (cooling)
-
Locally? This website is worldwide (I'm in the United States)
-
This is the part I will be working on tonight
Alignment and calibration has me a little worried
I resume on step http://wiki.ultimaker.com/Ultimaker_rev.4_assembly:_Extrusion_head%C2%A0%C2%A0%20,%20Mounting%20the%20XY%20to%20the%20frame
Any tips or tricks appreciated!
-
Hi Sander,
The Wiki didn't mention how far the screw should go in, mine got really tight half way in but I was able to get it almost all the way in.
Thanks for the info on the extruder alignment. Eventually a second one will go in as I bought that option. But for now, as you advised, I will stick with one, get some experience with the Ultimaker and upgrade to that later.
-
I don't know either
-
Ok, so it wont other anything being oriented the way it is? I wasn't sure if cooling shroud would be cooked being so close to the thrmo-wire stuff
-
Follow up questions...
Does it matter which direction the aluminum block points?

From all the moving around, twisting around building it, that's sort of where the aluminum block has wound up. Do I need to twist is around to be positioned elsewhere?
-
If I may suggest an edit to the Wiki...
Route the CPU fan wires first, once the other wires are in there, good luck getting that plug connector to fit thru!
-
Mine doesn't go all the way in...should it?
-
The steps to place the pulleys on the RIGHT side were backwards. It wanted you to place pulley, belt to other axis, place pully for the other belt...which you couldnt do, since placing the pulley blocks the way!
I had to blink a few times to figure out what needed to be done...place pulley, slide to rear for attachment to moor, place place pulley, loop in opposite axis belt, then another pulley for the remaining belt. Then go back, loosen motor, get belt over pulley
Now I am at the blocks/sliders I think I got it all correct, tho I keep looking at how they tip down/up with nothing in them.


-
Replaced all the set screws as advised in the wiki (and read here too)
Everything is loose for now.
Just happy my brain "clicked" on this. Moving on!
-
Now THAT should be in the Wiki!
Explains a lot...if anything, verifies stuff too.
See above...think, based on the directions and what I saw in your video..looks right
-
I'll do that, thanks
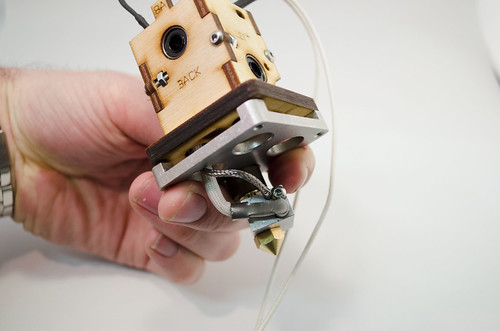
Here's some progress from the evening
Funny what a fresh pot of coffee can do.
How's this look?


-
Yes, GR5, the video (from 2011) is one thing, seeing stills of how it should appear from side to side, another


3 prong white (female) block on extruder
in Coffee corner
Posted
Mastory, please stop replying Nothing you say is helpful :roll:
You didn't know the answer until GR5 posted, then you comment I need to follow directions, its very clear.