


nick-foley
-
Posts
496 -
Joined
-
Last visited
Content Type
Forums
Events
3D Prints
Posts posted by nick-foley
-
-
Worth noting - if you cancel the auto support generation while it is calculating the initial supports, meshmixer crashes. It seems to have an autorecover though.
-
Similarly, you can use "Offset Surface" on all of the external surfaces, with a 0mm offset (Or whatever you want your gap to be), and then use "Thicken Surface" on that copied surface to create a solid shell around your object.
-
My crossflow fans don't work with the pwm - they are just off, or on at 255.
-
Yeah, I generally agree. With the right laminar duct an axial fan could surely be made to work well, but I like the crossflow fan because of how perfectly suited the output is with no additional modifications.
-
YEahhhh!! That did it. Working now. Thanks!
-
I am! My prints keep getting better and better. I will try to post some photos over the next few days.
-
ls -l /dev/SOBILonganreturns the correct stuff.
My .yaml files seem correct, based on the examples you posted above.
This is my octoPrintStart file. I've tried commenting out the VIRTUALENV_HOME lines and it doesn't seem to change anything.
#!/bin/sh
OCTOPRINT_HOME=/home/pi/OctoPrint
VIRTUALENV_HOME=/home/pi/oprint

# start the webui (hashed out to run two printers)
#$OCTOPRINT_HOME/run --daemon start
#$VIRTUALENV_HOME/bin/python $OCTOPRINT_HOME/run --daemon start

# added to run two printers:
$OCTOPRINT_HOME/run -c /home/pi/.octoprint/SOBILongan.yaml --daemon start --pid /tmp/SOBILongan.pid
$OCTOPRINT_HOME/run -c /home/pi/.octoprint/SOBIRambutan.yaml --daemon start --pid /tmp/SOBIRambutan.pid
#$VIRTUALENV_HOME/bin/python $OCTOPRINT_HOME/run -c /home/pi/.octoprint/SOBILongan.yaml --daemon start --pid /tmp/SOBILongan.pid
#$VIRTUALENV_HOME/bin/python $OCTOPRINT_HOME/run -c /home/pi/.octoprint/SOBIRambutan.yaml --daemon start --pid /tmp/SOBIRambutan.pid -
Last night, I eliminated the remaining component of my horizontal banding. It was, as Daid had suggested, coming from uneven extrusion rates due to inadequate compression of the extruder spring. I increased this by a few turns and the surface quality of the prints went up significantly. I'll do side-by-side tests with photos sometime in the next few days when I have more time.
-
Robert's filament dust wiper is great. In terms of simplicity+functionality I think it's the best thing I've ever downloaded from Thingiverse.
-
Thanks! I feel like I'm closer. It's still not working, though. I created the .yaml files and put them in .octoprint, and added lines which run them to the octoprint-start file...... but web interface still just loads for my old (single) printer. I can tell because the names I defined for the new printers are not being used. Questions:
- Do I need to do any command line stuff to initiate this updated start script?
- My octoprint-start file has some other stuff in it - a few similar lines with VIRTUALEN added in them. My octoprint install came from the pre-loaded SD card image at http://www.gitiverse.com/octopi/. Do I need to comment anything out? Do I need to put the new lines in a specific location?
- How am I supposed to access the specific printers from the browser? I set them on port 5001 and 5002... does that mean I use 192.168.1.127:5001 and 192.168.1.127:5002? Neither of those work. Do I need to forward them through my router or something?
-
The butterfly mount does away with the aluminum plate because it uses an entirely different hotend - the E3D or a J-head, I believe. I don't think you could eliminate the aluminum plate unless part of your new print head wasn't 3D printed - the PEEK just gets too hot.
I am in the process of switching my printers to the http://www.thingiverse.com/thing:208346t I designed, as the thing is super lightweight and has yet to require any maintenance after 200 some hours of fairly aggressive printing.
-
Which is exactly what I'm trying to do, by following the instructions in post #7. What's the secret? Do I just need to add the line referenced in your link: ~/oprint/bin/python ~/OctoPrint/run --daemon start --port 5001 --pid /tmp/octoprint2 --basedir ~/.octoprint2
-
Doesn't seem like you can access anything related to having multiple printers via the web interface.
What is the structure for adding multiple printers to this config.yaml file? The instructions above make it seem like each printer needs its own config.yaml file. What do those files end up getting named in that case?
-
That's all about Raspbian setup, now let's prepare OctoPrint as well.
Having more printers, we have to create and setup a configuration file (config.yaml like) for each. Among many other options, here are the ones that we are interested in, as an example for Huxy1 above:
serial:
# Instead of Huxy1, use a name for your printer
port: /dev/Huxy1
# Default is false, but configuring it to true will do the job, well, not really always
autoconnect: true
# Instead of Hux, use you specific prefix
additionalPorts:
- /dev/Hux
server:
# Use a different port number for each printer
port: 5001
appearance:
# Give each of your printer a suggestive name that will appear in the title and navigation bars
name: Huxy 1
# Customize the color of the navigation bar (limited choice of colors)
color: blue
Obviously, there many other options that deserve some attention, but these are part of other interesting features of OctoPrint.
After each configuration file has been defined, start the corresponding http daemon (or restart it, if already made the configuration for automatic startup).
There is one more step, to create a quick link (favorite) to each printer in the preferred browser.
Assuming that RPi will be a dedicated print server, you'll have to configure automatic startup of all http daemons. This and many other useful setup and configuration instructions are available on OctoPrint wiki pages.
^ This is where I get lost. Where do I put this configuration file? What do I do with it when it's created? I have both printers connected, and can connect to one or the other through Octoprint if I choose ACM0 or ACM1 when connecting. Would love a little more help. Thanks!!!
-
I don't think any of the above is true. You could certainly sterilize the components of the machine, and you could probably even create a sterile build environment which the machine printed in.
There are also plenty of PLA producers who are more than willing to give you all the details of how they produce their filament, and would probably even be willing to produce a few Kg that were made custom to your spec. if you felt it warranted.
You could also just purchase your own pure PLA pellets direct from Natureworks or Diamond Age and extrude your own sterilized, controlled, filament if you had the desire.
I don't know anything about PLA degradation though.
-
Yeah, that orientaiton is correct. The overhangs are all easily printable in the model I referenced, but the walls are thin enough on the bearing mounts that if they are allowed to, they will warp slightly when printing. When the bridging finally happens at the top of the bearing mount, they will be slightly ovalized. With the membrane in place they are structurally rigid at all points prior to the bridging.
-
Also, sidenote, but if I was trying to print that oval structure you're doing, I would probably just fill the entire inner volume with a 1mm wide "membrane" and then cut it away with an xacto after the print finished. Like the caps I put over the bearing holes to keep the thin walls perfectly aligned here:
http://www.thingiverse.com/thing:208346
It's fast to generate and probably pretty quick to print, comparatively speaking. Poke a few holes in it if your part is large to speed it up and save material.
-
Arrrghhhhhh! the UI and behavior of Meshmixer is so bad that I almost can't use it. Once you leave the support-creation tool, all of your preferences are reset, and you can't add any more support without letting it try to auto-generate a new batch of support on top of your original support. Great job, team. Also the fact that most of the sliders don't snap to integer values and have wayyy too many decimals sucks. 5.2413 layers? Useful. (I guess these were all things mentioned in the initial writeup of this tool, but they hurt a lot more when you understand what they mean...)
Autodesk might have put a shiny wrapper on this turd... and there might be a sweet nugget of gold inside this turd... but for now anyone who wants to get at that Meshmixer gold is going to have to wade through some sh*t.
(Useful tip, though - under "View" > "Navigation Mode", you can change to "123D" which gives you pan, zoom, and rotate controls all as much more standard mouseclicks instead of mouse+keyboard.)
-
Also thought backlash. The massive shift around the screw bosses could be due to the reversal of the travel direction from CC to CCW around those regions.
-
Thanks! My prints were on a UM1. That oval looks printable... I think I'd add some more support to those sides and put less in the middle though. The moment when a long, thin, unsupported span bridges with another is always a point where things shift, because the first layer that successfully bridges will probably contract or get slightly bumped, pulling all of the previous layers slightly out of alignment with the following layers that get put down.
-
Here are some photos from the print I was working on yesterday:
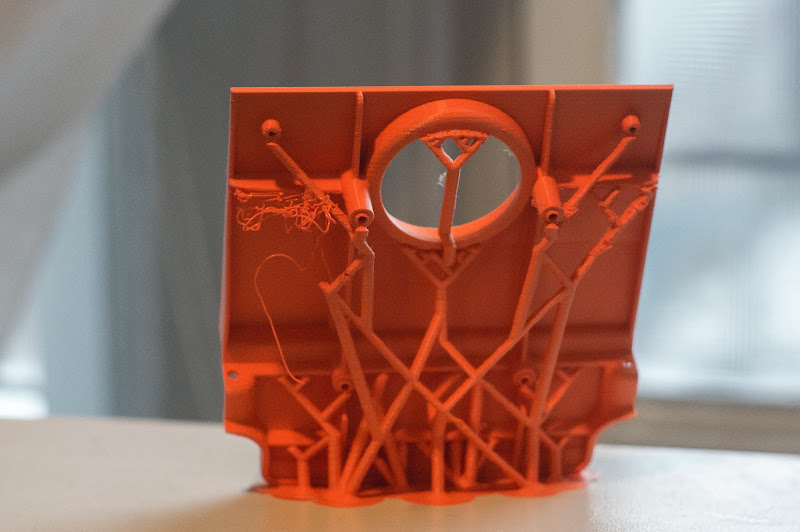
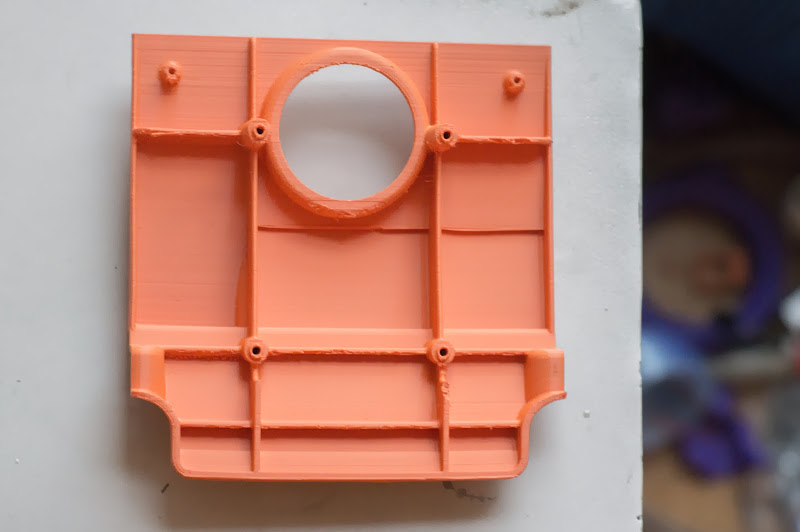
Support removed:
General thoughts:
- There's a ton of potential here. I couldn't print this successfully with Cura support - all of the ribs and bosses of the part meant that the support was impossible to remove. The finished quality surprised me with Meshmixer supports.
- Support material is extremely easy to remove. I was breaking it off easily by hand, and then one of the broken columns cut my thumb quite badly. Switched to needle nose pliers after that...
- It is very critical that your support branches are well supported themselves. As you can see in the print, some of mine broke loose, and many others almost did. This negatively impacted print quality because the build platform was constantly being knocked around as the nozzle hit various wobbling support branches.
- The fact that Meshmixer doesn't output properly booleaned STL files is also another rough edge. It means you need to keep "Combine Everything" turned on in Cura, which added some weird filled areas to this print.
- Make sure Meshmixer doesn't auto generate any support in places you can't remove it - like the inside of screw bosses, or in tiny corners.
- It's unfortunate that these support creating features are hidden in a back corner of Meshmixer and don't have their own program dedicated to them. The tools, while extremely useful, are very unfinished and neglected. The auto generation isn't very smart, and once the supports have been added, they can't be modified. Many sliders aren't exactly self-explanatory and apart from illuminarti's write-up on his blog, there is zero documentation about the support features and the interface to create them.
-
Cool. Doing another print with 3mm supports now, which definitely seem good. I also just read the part about Meshmixer not properly booleaning the support structures (and thus needing to keep "Combine Everything - A" checked in Cura) which is probably why my 1.6mm struts were breaking - they had massive holes wherever they touched. It was hard to notice with the 1.6mm supports, but was very clear with the 3mm supports...
-
Playing around with this now, seems like a great solution for a lot of prints. Your tutorial was very helpful in figuring out the UI and support process. Thanks!
One thing I'm noticing right off the bat is that the meshmixer default of 1.6mm diameter columns is much too small, and several of the columns have broken in the print I have going right now. Will post more when I get it figured out a little better.
(Also wish there were a way to edit supports after generating them - to change the diameter, for example. Is there? Seems like the answer is no, from the forums.)
-
Should be compatible with makergear nozzles, But I haven't confirmed that myself.
Feature request: Pause
in UltiMaker Cura
Posted
Yeah I think it's a stretch to say that the current implementation of pause is a "feature"... more like "ruin your print" setting, due to the oozing and melting that commences as soon as you hit pause. It should instead cause a retraction, cool the nozzle somewhat, and move the head off of the print.