


DidierKlein
-
Posts
5,804 -
Joined
-
Last visited
-
Days Won
33
Content Type
Forums
Events
3D Prints
Posts posted by DidierKlein
-
-
J'ai pas encore tester le nylon, ça ne saurait tarder.
Apparement l'avantage du Nylon par rapport au PLA (et même a l'ABS) c'est la solidité et la résistance a la température plus haute
-
Version Française :mrgreen:
Bonjour a tous,
Je viens juste de finir l'installation d'Octoprint sur un Raspberry Pi pour utiliser mon Ultimaker 2 à distance. J'ai suivi les informations données sur plusieurs sites donc je me suis dit autant rassembler tout ça pour éviter a d'autres de perdre du temps.
La plupart des infos sont trouvables sur le net.
De quoi avez vous besoin?
Un raspberry Pi:
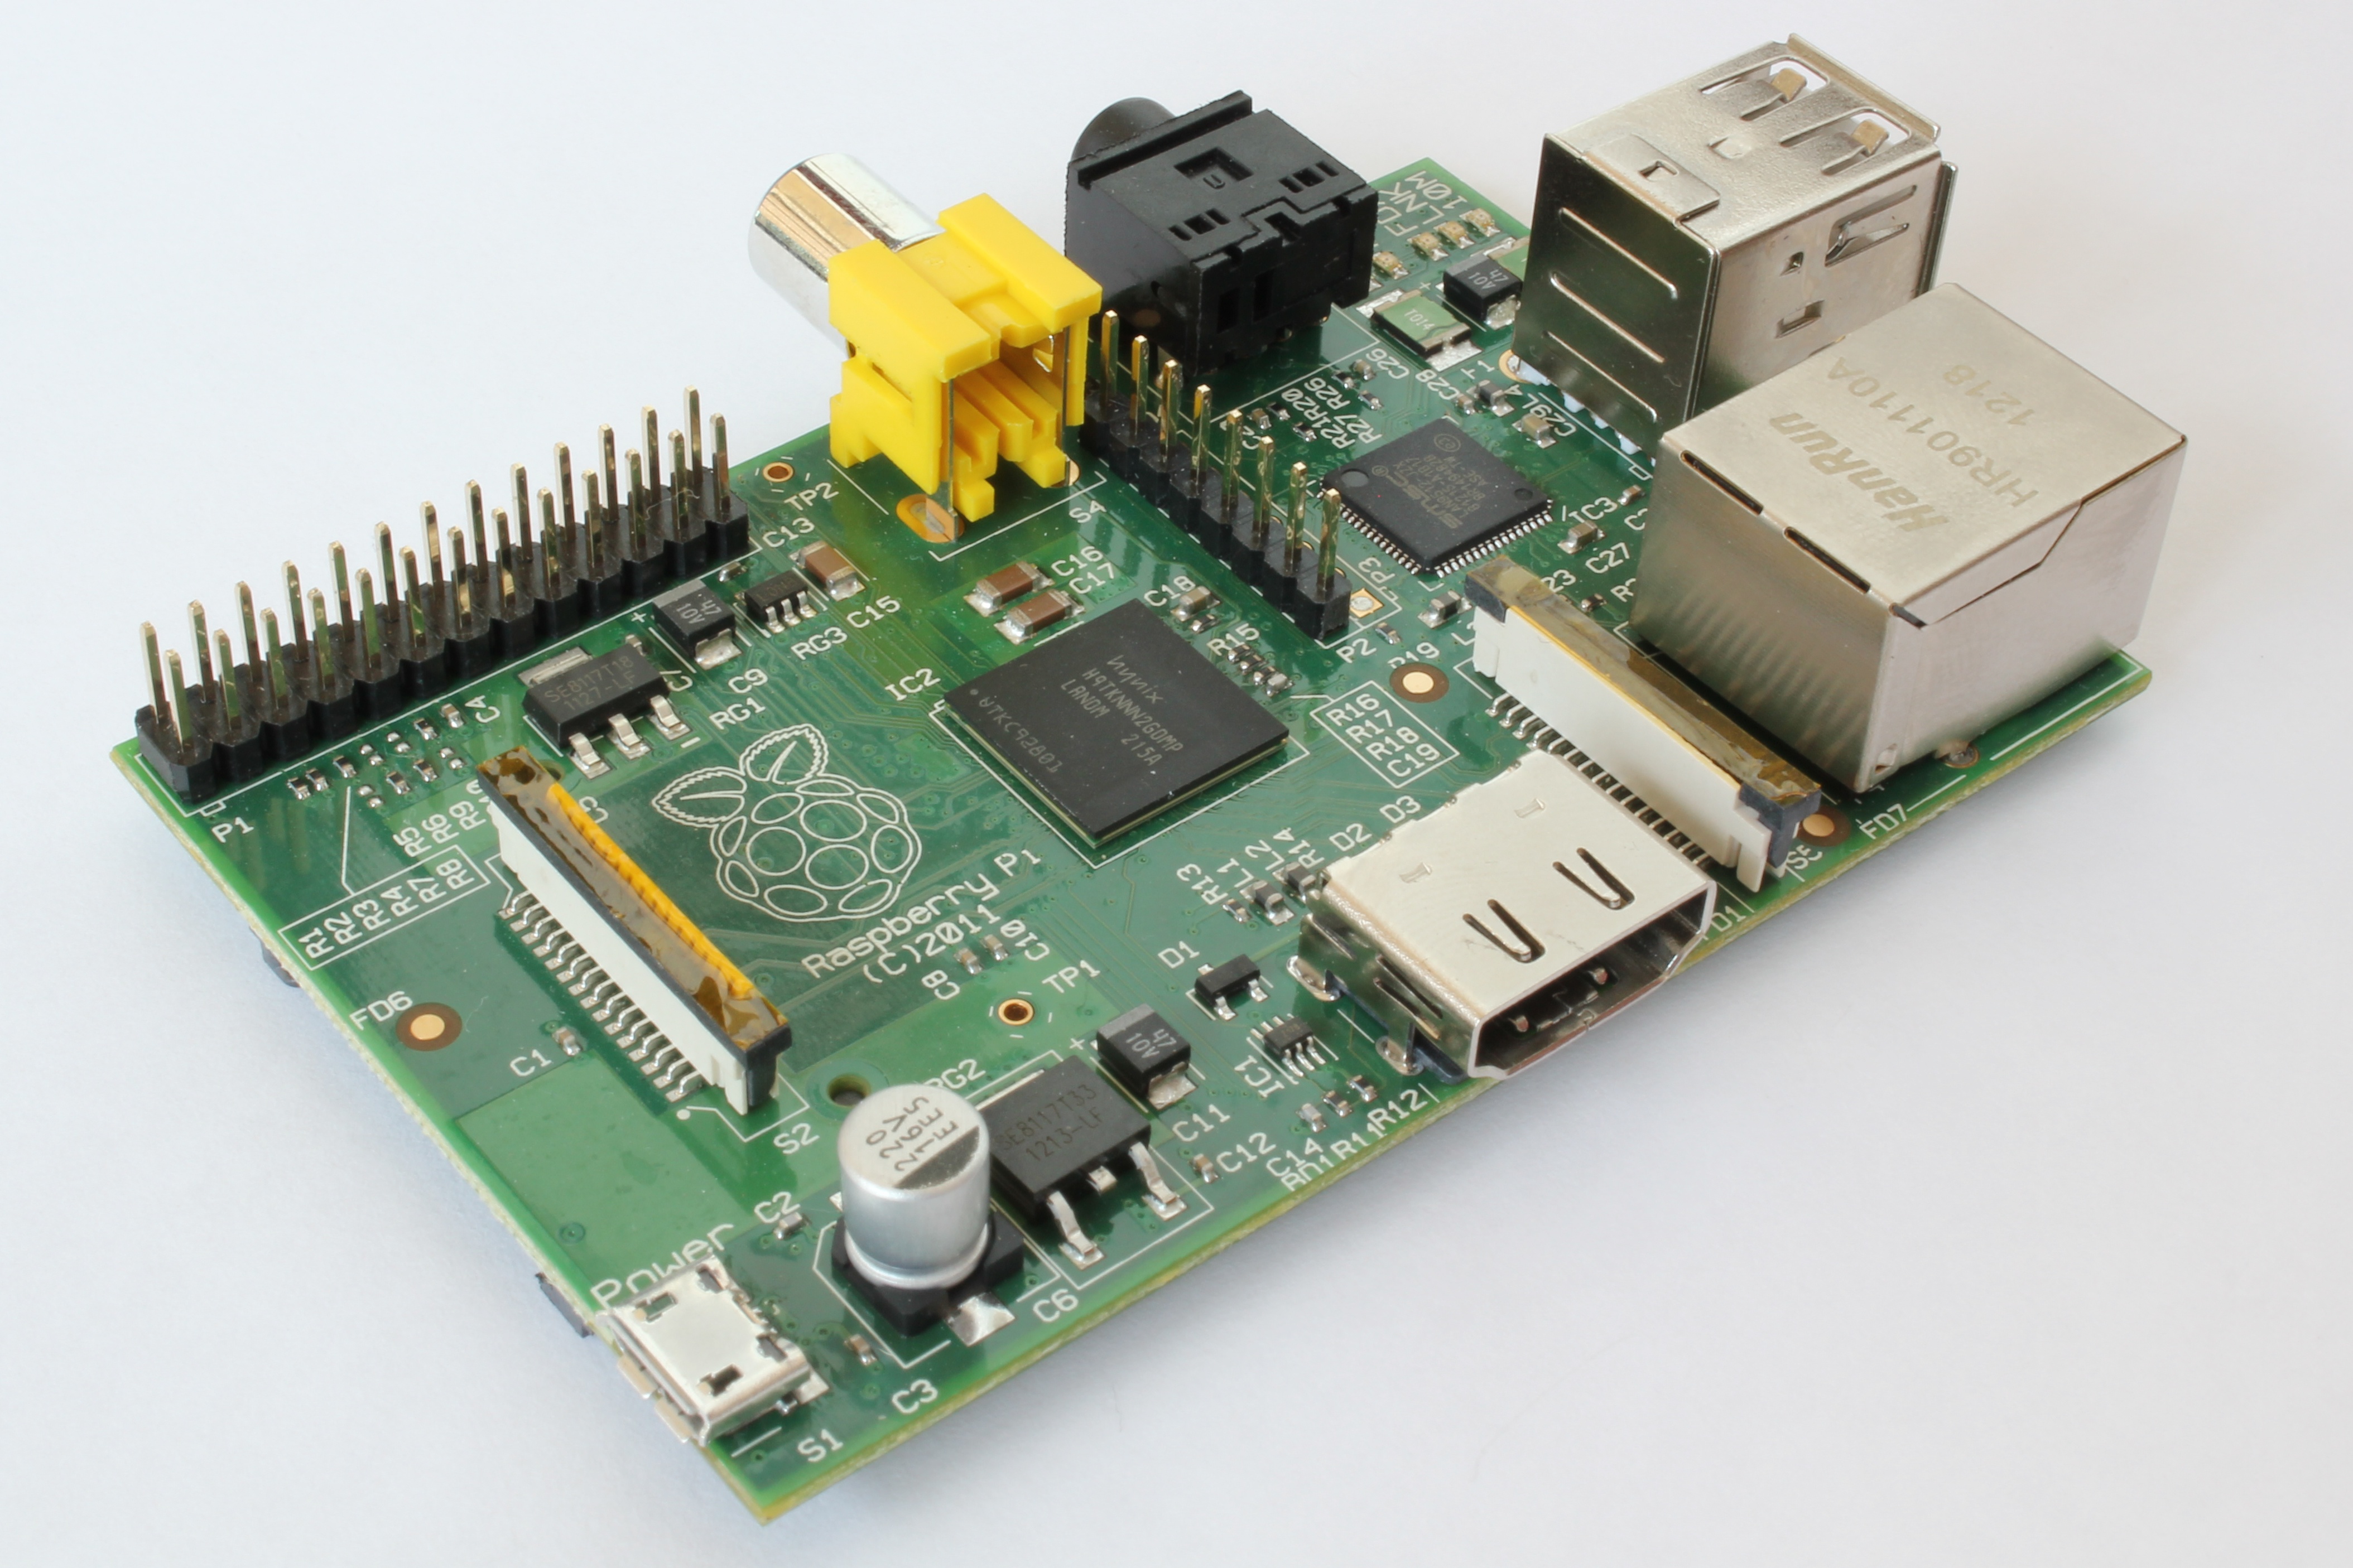
Le Raspberry Pi est un ordinateur low cost de la taille d'une carte de crédit qui se branche sur un moniteur de pc ou sur une TV
Je recommande de prendre le modèle B car il a deux ports USB qui sont nécessaire si on veut l'utiliser en WIFI
Plus d'infos ici: http://www.raspberrypi.org/help/what-is-a-raspberry-pi/
Alimentation:
Le Raspberry est alimenté via un cable mini-usb. Perso j'utilise les alimentations équivalentes a celles pour charger les smartphone ici je pense que 1000mA est suffisant
Dongle Wi-fi:
Dans le cas ou il n'y a pas de cable ethernet disponible a proximité de l'imprimante. Liste des clés usb approuvée pour le raspberry:
http://elinux.org/RPi_USB_Wi-Fi_Adapters
Carte SD:
Le Raspberry pi a besoin d'un système d'exploitation pour fonctionner il est installé sur une carte SD. Pour OctoPi il faut au minimum 4gb (perso j'ai pris une de 8gb)
WebCam (optionnel):
Pour le streaming des impressions, très pratique quand on veut surveiller a distance. Il y a également la possibilité de faire des vidéos timelapse automatiquement.
Person j'ai pris la RaspiCam (http://www.raspberrypi.org/product/camera-module/) elle est très petite et on peut imprimer un boitier pour celle ci
Liste des webcams compatible: http://elinux.org/RPi_USB_Webcams
Boitier (optionnel):
Soit tu l'achètes soit tu l'imprimes, y en a plein sur thingiverse.
Installation:
Il y a plusieurs possibilités pour installer octoprint sur un raspberry. La plus simple d'après moi c'est de prendre l'installation OctoPi qui contient tout ce qu'il faut.
1. Télécharge l'image ici: http://docstech.net/OctoPiMirror/
Prendre la dernière version stable.
2. Une fois téléchargée décompressé le fichier zip pour extraire le fichier img.
3. Insérer la carte SD dans le lecteur de carte et vérifier qu'une lettre lui a été assignée.
4. Il faut un logiciel pour flasher l'OS sur la carte SD j'ai utilisé: http://sourceforge.net/projects/win32diskimager
5. Extraire le contenu et executer l'utilitaire Win32DiskImager (il faudrat peut etre l'exécuter en administrateur (clic droit Run as Administrator)
6. Selectionner l'image extraite au dessus.
7. Selectionner la lettre du lecteur de carte comme destination. Attention de bien selectionner le bon lecteur, dans le cas contraire vous pouvez formater votre disque dur.
8. Cliquer sur "Write" et attendre que l'écriture se termine.
9. Sortir de l'utilitaire et ejecter la carte
10. Vous êtes maintenant prêt a utiliser votre Raspberry Pi.
Dans Windows il semblera que la carte n'a qu'un tout petit peu de données écrites environ 55 à 75 MB. Ceci est du au fait que la plupart de l'espace de la carte est utilisée pour le systême d'exploitation et que ce n'est pas visible par Windows. Si vous ne voyez pas de répertoire avec des fichiers comme kernel.img il se peut que la copie n'aies pas fonctionnée correctement.
Source: http://elinux.org/RPi_Easy_SD_Card_Setup
Premier démarrage:
Insérer la carte SD, un clavier usb et connecter le raspberry a un moniteur (j'ai utilisé ma télé comme il y a une sortie HDMI sur le raspberry). Connecter l'alimentation le raspberry devrait booter.
A cette étape j'ai eu un menu (je n'ai pas de screenshot) ou on peut choisir différentes options, l'une d'elle était quelque chose comme "boot directly to desktop" que j'ai choisie.
Je ne suis pas certain que c'était ce que je devais faire mais comme je n'ai pas trouvé d'infos en plus...
Une fois ceci fait l'OS a booté et le bureau c'est affiché. Malheureusement pour moi je n'ai pas réussi a utiliser la souris usb (je ne sais pas pourquoi mais l'os ne bootait plus quand je la connectais) c'est moche parceque je devais configurer mon wifi pour le mettre sur mon imprimante.
Donc il est probable que les étapes suivantes ne soit pas nécessaire mais comme j'ai eu un peu de mal je me suis dit autant partager...
Ceci peut probablement etre fait en SSH pour les plus geeks d'entres vous.
[Edit]
Configure le wifi en SSH (en anglais)
http://www.howtogeek.com/167425/how-to-setup-wi-fi-on-your-raspberry-pi-via-the-command-line/
Installer le remote desktop sur le raspberry (optionnel):
1. Insérer un cable ethernet et rebooter le pi (j'ai du déconnecter l'alim)
2. Télécharger Putty: http://www.chiark.greenend.org.uk/~sgtatham/putty/
Il y a plein de paramètres qu'on peut mettre dans putty mais les seules paramètre important sont l'adresse ip du Pi et SSH (a cocher):

Cliquer sur Open et PuTTY va ouvrir une fenêtre terminal, se connecter au Pi, et attendre le login. Pour se logguer:
user: pi
password: raspberry

2.1 Télécharger le client TightVnc pour se connecter a distance depuis windows: http://www.tightvnc.com/download.php
3. Installer tightVncServer sur le raspberry:
A cette étape j'ai eu des problèmes supplémentaires quand j'essayais d'installer les package sur le pi j'avais l'erreur suivante:
Something wicked happened resolving blablabla (name of the mirror).
Pour résoudre ceci:
Editer /etc/resolv.conf (taper: sudo nano /etc/resolv.conf dans la fenetre putty) et ajouter les DNS publique de google comme ci:
nameserver 8.8.8.8
nameserver 8.8.4.4
Une fois ceci fais, installer tightvncServer:
sudo apt-get install tightvncserver
Cette commande va télécharger et déployer les fichier, il va demander une confirmation, taper Y. Une fois l'installation terminée, démarrer le serveur:
tightvncserver

Il va demander un mot de passe pour l'accès. On peut laisser tomber la partie en read-only.
4. Se connecter à distance au bureau du raspberry
Maintenant que le serveur est lancer, connectons nous.
Lancer le TightVNC viewer que nous avons télécharger plus haut et entrer l'adresse ip du PI suivi de :1 comme ceci:

Voici notre récompense:

5. Configurer le Wifi
Cliquer sur 'wifi config' et configurer.
Utiliser OctoPrint
Maintenant que j'avais enfin mon raspberry connecter en wifi je pouvais le connecter sur mon Ultimaker 2.
Il suffit de connecter le cable usb fourni avec l'imprimante sur le port usb du PI.
Pour y accéder:
Si on utilise Windows il faut installer “Bonjour for Windows” (http://support.apple.com/kb/DL999) ou alors on tape juste l'ip.
Pour se connecter a l'Ultimaker 2 il faut mettre le baudrate à 250000.
On peut ensuite uploader son gcode directement sur octoprint et observer la magie depuis son navigateur
Il faut changer le 'gcode flavour' de UltiGCode à reprap dans Cura pour que ça fonctionne (File -> Machine Settings).
J'ai fait tout ça hier et si ça peut aider quelqu'un a moins galérer que moi ^^
Ca a l'air sympa OctoPrint, on peut monitorer les température visualiser le gcode et vérifier la webcam aussi.
Il est également possible de rendre Octoprint accessible de partout mais je ne l'ai pas fait car j'ai peur de me gourer et de la rendre accessible a n'importe qui. Pour la rendre accessible de partout j'ai installer TeamViewer sur mon pc qui doit rester du coup allumer si je veux monitorer. On peut s'y connecter avec un smartphone si on veut ou depuis un autre pc.
J'espère que ce petit tuto aidera. Toutes suggestions, remarques ou insultes sont les bienvenues

-
 1
1
-
-
Non en Belgique ^^
Je vais le traduire si tu veux je vais créer un nouveau sujet pour ce faire

-
Bonjour,
Pour le moment ce n'est pas possible directement. C'est en cours de développement il me semble pour mi-2014.
Il y a possibilité d'imprimer en plusieurs couleurs mais ca implique un changement de filament et ce n'est pas des plus simple a mettre en place (il faut le faire manuellement)
-
I also managed to get a very little part of the glass plate come off.
This happened because the print was really stuck to the bed and i had to pull it off with a lot of force. Main cause for me was not letting the print cool down enough. I now have no trouble as i wait enough the print just pops off the plate.
I now use the other side of the plate
My guess is that high temp for the buildplate can make the print stick to much and that using some tools to take the print off may damage the print. I never printed in ABS maybe it needs more cooling?
-
J'ai fait un ptit tuto (en anglais) pour l'installation ou j'ai un peu galérer quand meme:
http://umforum.ultimaker.com/index.php?/topic/5181-installing-octoprint-for-the-ultimaker-2/
Sinon c'est plutot pas mal, j'ai pas encore pu beaucoup regarder mais j'arrive a controler a distance et ça c'est sympa.
-
French version: http://umforum.ultimaker.com/index.php?/topic/5184-installation-doctoprint-pour-lultimaker-2/
Hi all,
I just finished installing OctoPrint on a Raspberry Pi to use my Ultimaker 2 remotely. I've done this by following a couple of steps found on the internet so I'll just give you a step by step on how to install it for the Ultimaker 2.
Most of the stuff can be found around the web.
What do you need?
A raspberry Pi:
The Raspberry Pi is a low cost, credit-card sized computer that plugs into a computer monitor or TV, and uses a standard keyboard and mouse. It is a capable little device that enables people of all ages to explore computing, and to learn how to program in languages like Scratch and Python. It’s capable of doing everything you’d expect a desktop computer to do, from browsing the internet and playing high-definition video, to making spreadsheets, word-processing, and playing games.
I'd recommend buying the model B as it has two usb ports which are necessary if you want to make it wireless.
more info here: http://www.raspberrypi.org/help/what-is-a-raspberry-pi/
Power supply:
Raspberry are powered by a mini-usb cable. I personnaly use a power supply equivalent to those used for charging smartphones. 1000mA is enough.
Wi-fi dongle:
In case you don't have an ethernet cable available near your printer. You can find a list of dongles that are prooved to work here: http://elinux.org/RPi_USB_Wi-Fi_Adapters
Sd Card:
Raspberry pi needs an OS to work, it's installed on a SD card. For the OctoPi distribution you need at least a 4gb Card.
WebCam (optionnal):
For streaming videos of your prints, very usefull when monitoring from a remote destination. You can also automatically do some timelapse videos of your prints.
Personnaly i bought a RaspiCam (http://www.raspberrypi.org/product/camera-module/) it's very small and you can print a case for it.
List of compatible webcams: http://elinux.org/RPi_USB_Webcams
Case:
You can either buy one or print it yourself, there are a lot of cases on thingiverse.
Installing:
There are various ways for installing octoprint on a raspberry. The easiest is installing the OctoPi distribution which has all you need.
1. Download the image here: http://docstech.net/OctoPiMirror/
Take the last stable version.
2. Once downloaded extract the img file from the zip.
3. Insert the SD card into your SD card reader and check what drive letter it was assigned. You can easily see the drive letter (for example G:) by looking in the left column of Windows Explorer. You can use the SD Card slot (if you have one) or a cheap Adapter in a USB slot.
4. You will need a software to flash the SD Card with OctoPi: i used http://sourceforge.net/projects/win32diskimager
5. Extract the executable from the zip file and run the Win32DiskImager utility; you may need to run the utility as Administrator! Right-click on the file, and select 'Run as Administrator'
6. Select the image file you extracted above.
7. Select the drive letter of the SD card in the device box. Be careful to select the correct drive; if you get the wrong one you can destroy your data on the computer's hard disk! If you are using an SD Card slot in your computer (if you have one) and can't see the drive in the Win32DiskImager window, try using a cheap Adapter in a USB slot.
8. Click Write and wait for the write to complete.
9. Exit the imager and eject the SD card.
10. You are now ready to plug the card into your Raspberry Pi.
In Windows, the SD card will appear only to have a fairly small size once written - about 55 to 75 MB. This is because most of the card has a partition that is formatted for the Linux operating system that the Raspberry Pi uses which is not visible in Windows. If you don't see this small directory with files such as kernel.img then the copy may not have worked correctly.
Source of explanation: http://elinux.org/RPi_Easy_SD_Card_Setup
First Run:
Insert the SD Card in the raspberry, plug in a usb keyboard, connect the raspberry to a monitor (i used my TV as the Raspberry has an HDMI output). Connect the power supply. The raspberry should boot.
At this step i got a menu (sorry i don't have the screenshot) where you choose from different options. One of them was to boot directly to the os desktop (which i selected).
I'm not sure if this is what i was supposed to do as the OctoPi page has no information between flashing the SD card an using OctoPrint.
Once this was done the OS booted and i got the desktop displayed. Unfortunately for me i wasn't able to use my usb mouse (not sure why) the os wouldn't boot when i plugged it in. I needed to configure my Wifi access and this is why i had to be able to use the raspberry desktop.
Probably the following steps are optionnal if you have more luck than me but i thought it could be usefull to share this.
This can probably be done all using SSH for the most geeks of you ^^
[Edit]
How to configure wifi in SSH:
http://www.howtogeek.com/167425/how-to-setup-wi-fi-on-your-raspberry-pi-via-the-command-line/
Set up remote desktop on the raspberry (optionnal):
1. Plug in an Ethernet Cable and reboot the Pi (i had to unplug the power supply).
2. Download Putty: http://www.chiark.greenend.org.uk/~sgtatham/putty/
There are a lot of settings you can mess with in PuTTY, but we only need to worry about a single thing to connect to our Pi. On the main Session interface, just type in the IP address of your Pi and select SSH below it:
Hit Open at the bottom and PuTTY will launch a terminal window for you, connect to your Pi, and prompt you to log in. Go ahead and log in with:
user: pi
password: raspberry
Remote command line access is awesome, but so is having access to the desktop for GUI-focused activities. Let’s bring the powers of the command line and the powers of the desktop together.
Although we’ve been referring to it as “remote desktop” to this point, the tool we’re actually installing is known as Virtual Network Computing (VNC)—iterations of which many are familiar with such as RealVNC and TightVNC. For this tutorial, we’ll be installing TightVNC on the Pi.
Download TightVnc here: http://www.tightvnc.com/download.php
3. Install tightVncServer on the raspberry:
At this step i had some more troubles ^^ when trying to install the package i had the folling error:
Something wicked happened resolving blablabla (name of the mirror).
To resolve this do the following:
Edit your /etc/resolv.conf (type: sudo nano /etc/resolv.conf in your putty window) and add the google public DNS addresses like this:.
nameserver 8.8.8.8
nameserver 8.8.4.4
Once this is done install the tightvncServer:
sudo apt-get install tightvncserver
This will download and unpack the installation files; when prompted to continue press Y. After the installation is complete, you’ll be returned to the prompt. You can start the VNC one of two ways. Simply running the command for the server like so:
tightvncserver
Will prompt you enter a password to access your VNC desktop—as seen in the screenshot above. The password needs to be 4-8 characters long. Once you confirm the password, you will be prompted to set a view-only password (you can opt out of the step, as we did).
4. Connect remotely to the raspberry desktop
Now that we have the VNC server up and running, let’s connect into it from our remote desktop. Fire up TightVNC viewer on your computer and plug in the IP address of the Raspberry Pi unit followed by :1 like so:
And here’s our reward for successfully configuring our VNC server—a nice full screen view of our remote Raspberry Pi unit:
5. Set up Wifi
Just click on the wifi config icon and configure your wifi.
Source of explanation: http://www.howtogeek.com/141157/how-to-configure-your-raspberry-pi-for-remote-shell-desktop-and-file-transfer/all/
Use OctoPrint
Now that i finally made my raspberry connect with wifi I could connect it to my Ultimaker 2.
Simply plug in the usb that is delivered with your printer.
You should be able to access it at http://octopi.local –
If you are running Windows, you might need to install “Bonjour for Windows” http://support.apple.com/kb/DL999 first for this to work – or alternatively at its regular IP.
To connect with an Ultimaker 2 set the baudrate to 250000
You can then upload your gcode directly to octoprint and watch all the magic in your web browser.
You'll need to set the gcode flavour to reprap in Cura for this to work (File -> Machine Settings).
I've done all of this yesterday so i thought i would share all this if it can help someone.
Octoprint looks very nice and usefull you can monitor your prints with the gcode visualizer or check your webcam to see if everything is ok.
It is possible to make your OctoPrint available from everywhere but i didn't do this, i don't want to make it possible for anyone to access my beloved ultimaker if i mess something up in the configuration.
Anyway to access it i installed teamviewer on my pc (which has then to stay connected while i'm away and need monitoring), i then access to octoprint remotely by connecting to my pc. It can even be done with your smartphone.
Hope that this little tutorial will help. Any more advices, remarks or insults are appreciated
-
2
-
-
I have print this awesome box twice now it's a great gift (evil laugh).
I've just checked on the pictures i did of the first i printed, i have the same stuff but i can only spot it on the lid. I don't have the boxes as i gifted them, but i'll probably print it again.
-
Glad to see that deliveries are speeding up
It's a long time to wait but you quickly forget the frustration of waiting once you receive your fantastic printer
-
Je n'ai pas d'expérience avec eux mais il me semble qu'un membre qui fréquente la partie francophone a déjà commandé chez eux et que ça c'est bien passé.
Pour commander l'um2 il y aussi imakr qui visiblement a un délais plutot court
-
We, geeks are really lazy ^^, but it's true you get used to the button to save directly to the sd card in cura so why not. Just one or two clicks more and this is done by the octoprint web interface ^^
-
I'd say it depends on the size of the broken filament.
It happens to me most of the time when i change filament, usually there's a little "blob" of filament that stays in the feeder. I was afraid first time but i tried to put in the new filament as if nothing was in the feeder. And the new filament simply pushed the blob all the way down to the extruder.
As a matter a fact i had this little blob for my first filament load (out of the box) and i had no problems
-
Isn't this already possible with octoprint? (I should test it tonight if i have time)
You can upload gcode directly via the web interface (even directly to the printer SD) from what i saw on the website
-
Hi,
Have you tried printing with Brim?
What is the first layer height?
-
Yep i love it too.
Just being curious (sorry for being off topic). But what was your involvement in the movies you have in your professional part?
For selling your models i don't see many alternatives other than the usual shapeways or sculpteo stuff. My guess is that you probably have to be active on the most used sites to make yourself a name and then sell your stuff directly.
Other than that i don't know if selling on ebay or amazon (i believe they have (or will have)) a 3d printed stuff category. Of course the objects you would sell printed should be your creations i guess.
I don't really know how selling STL files ready for printing works but you probably have the risk that someone pays for it and shares the files via torrent or other websites (why not thingiverse?)
-
C'est celui que j'utilise depuis quelques semaines.
Il est pas mal je trouve, facile a prendre en main, des fois il faut un peu chipoter pour arriver a faire ce qu'on veut mais en général il a répondu a mes exigences.
-
Ah oui donc bien prévu pour l'impression ^^
Ca peut servir a quoi? je vois dans le descriptif, circuit imprimé mais a part ça?
-
Jamais entendu parler de ça... tu as des liens?
-
Hi all, I tried the nice Chocolate Brown Color from colorfabb.
Printed the awesome and well known zombie hunter bust (scaled down to 30%).
Layer height: 0.08
Speed: 30mm/s
Temp: 210°c
Bed: 60°c
Infill: 10%


I wasn't there to check the print, i'm not sure if i had some under-extrusion or not as there as some small lines at the lower part.
Except that it looks awesome, lines are mostly not visible, the details are great, i must try to print it bigger when i have time. It's really a nice thing to print as the STL is very much detailed.
-
Wow that looks extreme ^^
Been doing some workout too for a couple of weeks (more than 2 years without moving my lazy ass).
Hopefully i'll get some amazing results as this:

I already managed to loose about 5kg which is good i guess. It's just hard to not eat all i want and to run a couple of times a week.
-
I received some PLA from colorfabb this weekend. Fluorescent Pink, Chocolate Brown and Black.
I've only tested the pink and Black.
Correct me if i'm wrong:
It's seems that the temperature must be not to high? I had good results at around 200°c - 210°c.
The bed temp of 60°c seems to high also as the bottom of the piece seems to melt a bit. I tried 50°c but i had some sticking to the glass issues. 55°c seems to be better.
I don't think i found the correct settings for the moment but overall i like the quality of the filament, it also seems to be better for post-processing. If you cut a bit the color stays more uniform i think.
-
Hi all,
Received some colorfabb filament this weekend it's very nice.
I only have pics from the fluorescent pink for the moment but i have some black and some chocolate brown also.
The marvin from 3dhubs which is not so easy to print

Here's the elephant by lefabshop which i like to print:


The pink elephant met my ultimaker blue elephant...

He found the pink elephant so fabulous he couldn't resist

Sorry for the kids watching this ^^
-
As quiet as a laptop? Not mine... the rear fan is very noisy, i thought it was normal but if you tell me that it should be very low then i might have a similar problem too.
It almost sounds like a small vaccum cleaner.
I will have a look at the screws. I don't hear more noise when the side fan are on.
-


Installation d'Octoprint pour l'Ultimaker 2
in Français
Posted
Je l'ai commandée directement chez rs-components mais il faut un numéro de TVA pour pouvoir commander chez eux