


personal-drones
-
Posts
257 -
Joined
-
Last visited
Content Type
Forums
Events
3D Prints
Posts posted by personal-drones
-
-
You need to carefully re-level your bed. Then in cura, set bottom/top thickness to at least 0.8-1. Decrease the speed to 40. Increase infill to 25. If you do all this you should get much better results, then you can work it from there.
-
Here is the video:
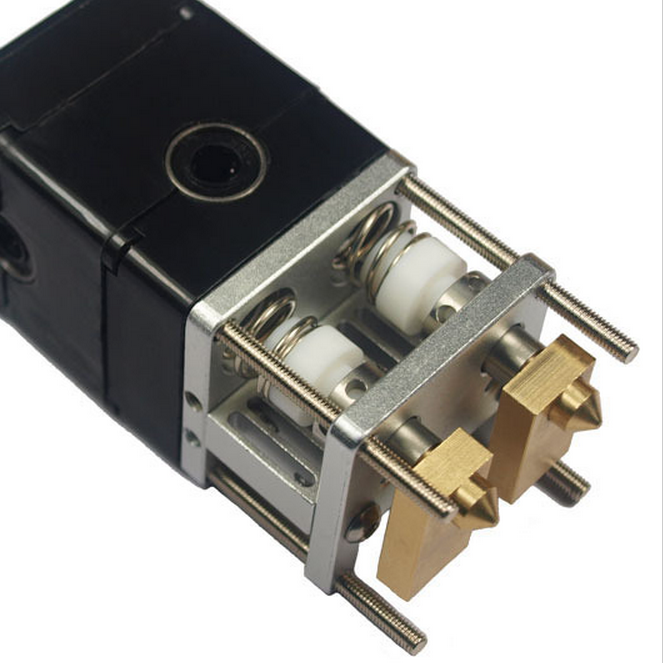
It's all correct except that removal of the "center" fan is not required for replacing the teflon spacer.
Take care, on re-assembly, not "pinch" any wires within the head and to not tighten too much the main long 4 screws (the ones you can tighten manually through the black knobs) as I hear it is not needed and not good.
-
They are available in the store. However buying this from the store will take ages to deliver, may I suggest you look at an USA reseller.
Replacing is very easy, there is a youtube video on how to disassemble the head (will now look for it for you). Really easy, anyone can do it with a little care.
This is my teflon spacer story: http://umforum.ultimaker.com/index.php?/topic/9320-is-this-teflon-coupler-gone/
-
May I suggest you replace your teflon coupler? The atomic pulls helped me (and indeed they are a good practice), but the new teflon coupler solved the problem for good.
I've printed perfectly for many months on my UM2. Suddenly, I started getting severe under extrusion that looks identical to the photos at the start of this thread. Figuring the nozzle was clogged, I performed the atomic cleaning several times until it came out clean. I started up another print and it was still under extruding. Thought maybe the first atomic cleaning wasn't enough, so I repeated several more rounds. I then did it again adjusting the temps so I got the perfect, clean cone shaped end when I pulled it out (85C rather than 90C did the trick for my colorFabb filament.) It still under extrudes. I disassembled the feed mechanism and cleaned it out. Put it back together and it does the same thing. Last, I updated Cura and the firmware to the very latest and it still under extrudes. I can push filament through the tube easily, so it's not binding there. I'm stumped at this point and have resorted to using Kisslicer with my CubeX Trio to slowwwly print a big object I need. My UM2 is sitting broken and idle for the first time since I got it over a year ago. When I would have this sort of problem on my UM1, I would unscrew the nozzle and hold it in the flame on my gas stove for a few minutes using pliers. This would eliminate anything inside the nozzle and get it going perfectly again. I can't do that on this machine. Any ideas?
-
Here I saved $44 ($22 each number) on new house numbers for my house
Well if you choose some gold plated numbers to start with, you could have saved much much more than just 44$.

-
 1
1
-
-
Get a new teflon asap

2 Pictures of the bottom:
-
Bernard merci pour ce post. Est ce que tu as un link pour les aiguilles?
Je n'ai pas testé l'ABS, je n'ai eu que des problèmes et ne l'utilise plus.
Mais, pareil, ça n'apportera rien.
Le PLA comme l'ABS une fois imprimé, a son aspect final, contrairement aux métaux, dont l'aspect change totalement.
Pour les aiguilles, elles font 10mm x 1,5, un côté plat, et un coté légèrement pointu (plutôt chanfreiné).
65 euros H.T. le kilo soit 78 TTC, c'est de l'inox....
Elles ont toutes la même couleur, c'est le flash et le bois de la table qui donne une autre couleur à certaines.
-
At less than 150$ and free shipping, I am not sure why everyone is complaining about the lack of a dual extruder

-
-
What about doing a test in which you control the temperature through the printer directly. To me it looks like the temperature is too high. Wonder if using the reprap gcode could be the issue here. At 210° I can print the ultimaker blue with no issues. True that it is not one of the nicest PLAs around, but still, something is wrong with your prints. I have quite nice pieces printed with the "default" blue filament.
-
Not to my knowledge. What the slicer does is to compute the model, layer by layer, no way around this.
The thing is, if you first printed one peak, then "go down" and start printing the second peak, the head could run into the first peak and knock the model down.
You can indeed print two different models sequentially on the same plate, first one, then the other, but this is another story.
(sorry for my poor english...)
I wonder whether it is necessary to print layer by layer from bottom to up for one model using cura.
For example, when print one model with two peak, is it possible to print one peak after finishing the other peak?
I have googled, but I didn't find answer...
-
They analyzed the hot end design, found problems and are now making some improvements before they let the package through.
My guess is that the customs officers have never seen anything quite like it! .. ("Mua-ha-ha...")
-
Bonjour Alain, les photos dans l'article representent des objects mal imprimes. C'est ce que tu pourrait avoir juste au debut, sans aucune experience. Ca prend quelque jours pour devenir familier avec les parametres d'impression, mais avec un minimum d'experience tu peut avoir des resultats superbes.
C'est une imprimante super, je la conseille vivement. Du solide.
Bonus: une communite ouverte et amicale. Tu ne va pas rester seul avec tes problems, si tu en aura.
-
Dovresti verificare che le cinghie di trasmissione corte, quelle nella parte posteriore della macchina, siano ben tese.
-
May I suggest you try layer height 0.1, print speed 30, bed temp 55, temperature 205
HI guys!
thanks for your help, I'm now trying to print with an Ultimaker blue filament and I still have the same problems, so there is something wrong in my settings and not with the material itself.
To give you a better idea:
layer height: 0.2
shell thickness: 0.8
bottom/top thickness: 1.2
density: 20
print speed: 40
initial layer thickness: 0.2
travel speed: 150
The fans are working 100% and the temperature now is 200
have a good monday!
-
I would try to move it as far left as possible, minus 1.3mm
Next time I tried, I moved the model in cura as far left as I could get away with. No more clunk, but the model printed was missing a little bit at the max X position. I figure the discrepancy to be about 1.3 mm
-
Got Ballistol and applied as you indicate.
Funny that as soon as I applied it, the printer became a tad more silent. Some little noises just disappeared.
Thanks for sharing the Ballistol info, most useful
yes! No oil on Z axis, only the supplied grease, sparingly!
Ballistol is cheap.
The "preserving" effect has, as rightly mentioned, not much of an impact for our current use,
it only helps documenting that it is totally non-aggressive, which does have an impact..
Correct like JonnyBishof writes, pouring oil is better, but Ballistol is more commonly available
on a spray, which is why it is important to SPRAY ONTO KLEENEX first, then wipe rods.
Do not apply to the Z axis, the rear vertical screw, since sewing machine oil, Ballistol or whatever
will be to "dry" and have a too thin film for the Z axis screw.
And yes, I mean no, I do not get any commission from the 100 year old Ballistol company,
and one small can will last you until you have an Ultimaker X.
-
I would level after the wine, calibration will be better
That's a very good idea!
-
Hello, sure, I am on the waiting list to get one from the next batch
However honestly I would not buy an "Extended" if there were no improvements at all with the Hot End. Then I would wait to see what the UM3 line will have to offer. We shall wait and see I guess.
Also if you are interested in changing nozzle sizes easily then this topic maybe of interest to you.
-
I am looking with interest at the extended. I am particularly interested in the increment in the Z axis.
However I am really worried about the underextrusion issues of the UM2. Will these be fixed/addressed in the new UM2 models? Or will those be the very same, with the teflon connector issues, the "fake" double holes extruder alluminum support piece (and consequent non optimal usage of the fans airflows) etc?
Can we expect to see at least the release of a single extruder optimized hot end upgrade for the current UM2, that would fix the above mentioned issues?
Will I be able to change nozzle size easily?
I really love my UM2, however it has known issues that I would love to see addressed "officially", before I buy another one.
-
Shnick very glad we nailed it down so quickly.
Also good to hear drilling worked, thank you for the update.
I decided to take the problem into my both hands and restored the inner diameter of the teflon spacer with the help of a power drill. After that I checked if the filament passes through the object and it went nice and smooth.
I reassembled the parts (here I had some problems because the spacing between parts was a little bit different before, but I double checked everything. Then I calibrated the bed inserted some material and started to print something small to see how it goes. Surprise surprise everything went very good. The problem is solved hopefully for a long time from now.
I still have a question though, anyone knows what kind of material is the teflon spacer made of? I am thinking to remake this part out of a textolite to see if it works better and doesn't change its shape due temperature.
To conclude, thank you all for your advice and especially to Personal Drones.
-
Well I went for a new one now. I must say it is so much hassle to deal with, or just fear underextrusion all the time, that I am just happy to replace it if this solves the problems for good for the next 340 hours of print
Just as a note, I had a teflon piece that looked exactly like yours, and I actually ended up using a deburing tool to ever so slightly cut off that burnt ring. Then I reassembled the extrude head and now it is working fine.
Don't know if thats worth a shot or if you just went for another one.
-
Thanks for posting a follow up, definitely interested in your investigation.
> I will check it tomorrow and let you know.
-
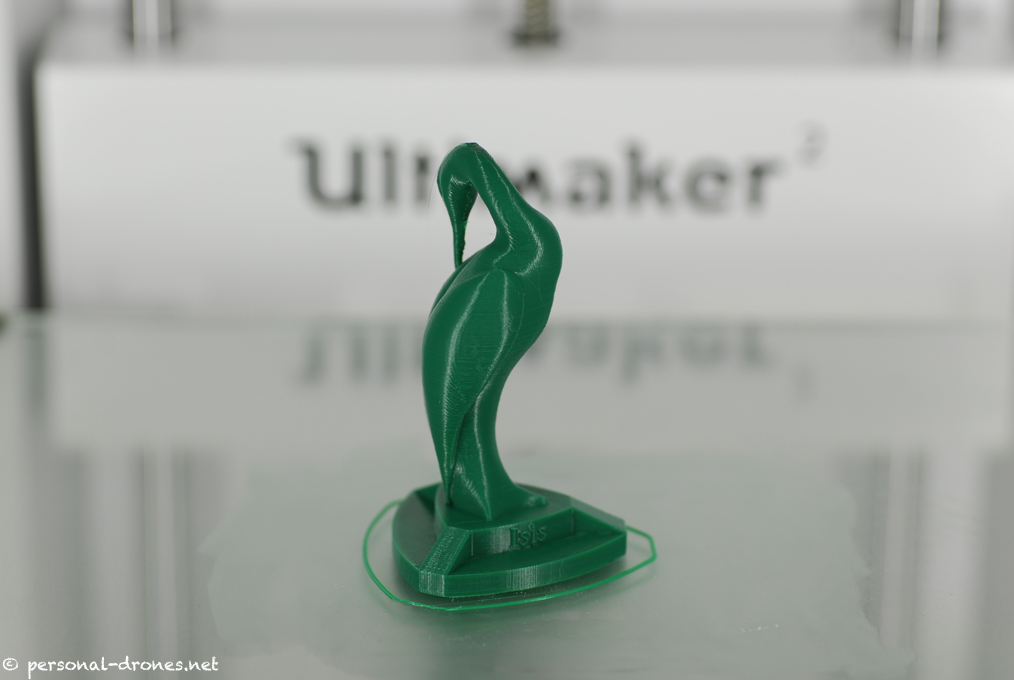
Thank you TD, yes I also love this vase. This print is 30cm tall.
Scaled up one of those: http://www.thingiverse.com/thing:481259
1.5x, cut in half with netfabb basic.
Cheers!
Glad it's working for you again PD. Seems like results will vary, I got around 500 on mine before it needed replacement.
The vase looks great!


Cura bug
in Français
Posted
As tu essaye d'effacer l'imprimante et de la creer a nouveau? Peut etre le profil est corrompu?