

valcrow
-
Posts
732 -
Joined
-
Last visited
-
Days Won
4
Content Type
Forums
Events
3D Prints
Posts posted by valcrow
-
-
But the small third fan also rotates not, be seen in the video!
Ah someone sees it too! not just me. This will cause many problems. Ensured print failures after about 2-5 minutes.
-
I can't tell in your video, but it kinda looks like the 3rd (back fan) isn't running. If this fan isn't on, it would for sure be the source of all your problems.
*edit* oh, I just saw the end of the video. I agree with Neotko, your bowden doesn't appear to be in all the way slotting into the PTFE. (but do check the back fan too)
-
 1
1
-
-
1) Close up the gap on top the extruder - when you drop that blue clip in there (which isnt very hard to do) it so difficult to get out.
2) Make all the tiny screws on the extruder self-retaining, so that when you unscrew them they don't fall off.
3) Encase the PTFE coupler in a heat resistant material so it doesn't touch the hot metal parts, so you dont need to replace it as often. Or better yet just make it from ceramic.
I think your 1 and 2 is caused by 3. And 3 is solved more or less in the + version. Buy the TFM + metal spacer kit and you won't need to change out that PTFE for a LOOONNG time.
-
I'm sorry but your post is a little hard to follow.
From what I gather,
-You're trying to print nylon
-The print is coming off the buildplate after printing a brim.
-Your guy is writing custom gcode? or just slicing your object?
-Did he design your object/gcode? Is what you're trying to print an actual 3D model sliced into Gcode? or something else more experimental?
If you're having 'sticking' issues on the glass bed, you should try using blue tape cleaned with alcohol.
Lastly if you post pictures of your failures, it will help people here to diagnose the issues you are having.
-
Well the old UM2 feeder was good at printing air.
Lol, I think I'm the only one who has actually grown to love the old feeder. I don't want to upgrade!....then again gimme time, it only takes a few click sounds to get me angry.
The + feeder is better in every way! Not that the old feeder isn't good, but its not that good compared to the new one. I think the only 2 positive things I can say about the old feeder compared to the new one is it's smaller, and it 'sounds' more advanced. Sometimes the new one makes this weird rattley plastic noise as it feeds.
-
1
-
-
@Dim3nsioneer - thanks. I'll contact shop3D.ca and see if they have the grub screw I'm missing.
Oh hey! that's you! we just sent you an e-mail we have one at the store for you free.
-
I agree, I missed the pop-up as well and it scaled my model maybe 5%-6%, enough for me not to notice while printing but when I assembled I thought I got my model wrong. Spent 20 hrs printing, and a few more trying to trouble shoot my tolerances which had no issue :/ Only noticed during assembly of the full thing.
I don't think autoscale does anyone any favors, the fact that the object turns grey when unsaleable is enough to prompt people to scale their objects down in the direction they choose or re-design.
-
1
-
-
I been mostly failing getting the first layer to print good, what is been doing is making like gaps in the first layer then I had issue not filling between the lines, I increased the layer width and kept the layer height same, but only failing anything under 100 micron at 100 micron the printer works great, I still have to get use to it I guess I know its not the printer fault but just getting used to simplify3d with ultimaker together I used it for flashforge and Airwolf, and I have cube pro (which I hate so much)
I don't know about S3D but it sounds like you need to raise your bed a little bit (untighten each leveling screw about 1/3-1/2 turn. The lines on the first layer should certainly be touching without fudging of the settings.
-
2
-
-
Vancouver has a steam clock, so how about a steam powered UM3

Just leave some nylon out on a humid day for a while. Bam! steam powered UM.

-
This is usually caused by a failed print like you suggested, often because the print did not stick onto the buildplate adequately. I would aim to re-level your buildplate a bit closer. (after you clean your head). This is usually NOT caused by leaking, but actually by the head getting clogged and the material running upwards into the heater block.
This should not be ignored or allowed to 'seal' itself. The heat from the nozzle block will run off into the material and into the fan shroud and continuously drip into your print as well.
To clean the material off your heater block, heat up your nozzle to 90C via maintenance -> advance -> heatup nozzle. When it hits 90 wait a few minutes and then take off the fan shroud. You need to unscrew the 2 screws on either side of the shroud above each fan that goes into the head housing.
Once you do that take off the fan shroud by pulling it downwards. It maybe a bit sticky since the material may be stuck onto it. Sometimes it's easier to remove the nozzle first. (this can be done at 90C with the proper hex nut.
At 90C, the material should be soft enough that you should be able to peel off the gunk that's around your heater block as a whole piece. If it requires too much force, heat up the nozzle another 10 degrees.
Once removed you should be able to put everything back together and it'll be as good as new, cleaner even, its like a waxing for your nozzle.
.Once you get the bed nicely leveled this problem rarely happens.
-
I usually aim for 15 hr prints before I leave the office, so when I get in, I have a shiney new thing waiting for me. 20 hrs is no problem.
-
This happens once in a while. Don't panic!
. Just heat up the nozzle to around 90-100 and let it sit for a few minutes. Once the PLA is soft-ish, just pull it away with pliers, it should come off clean (on occasion cleaner than before) If it's too hard increase the temperature a little bit, but once you get near the nozzle, drop it back down to 90. Any higher and you will get a mess.-
1
-
-
You need the NEW cura, 2.1.x not the 15.04 ones.
-
Wow this was a while ago, so not even a 2+. The 2+ is easily capable of producing as good if not better results. than these.
I print almost exclusively under 150 microns. Only in weird cases will I go greater (if its transparent material)
The general settings I use are:
210C +-10 degrees depending on layer height and speed.
60C bed
45mm/s
Really nothing all that special. How are your prints failing? maybe there is an underlying problem somewhere, I'm quite confident that a new UM2+ is able to produce these results out of the box.
Here's some 0.06 prints
In my experience,
0.04mm is even better quality (sorry no photo for now)
0.03mm and under, the quality actually starts to degrade compared to 0.04. But this could be due to my temperature not being correspondingly lower.
What slicer you use? can you please share your settings? I recently got Ultimaker 2+ and I use simplify3d yet I am still not had a successful print with simplify 3d under 150 micron.
I use colorfabb PLA
-
Due to the lifting being so localized it looks like the glass may not be super clean. If you touch the glass, sometimes your finger oils can get on the surface and prevent your print from sticking in sections. If you find it not sticking to certain small spots on the bed, try really cleaning the glass well with some rubbing/isopropyl alcohol and it should be back to normal.
I would also level it just a touch closer, maybe 1/8 - 1/4 turn loosen each level screw.
Also that first layer looks huge. I usually have more success with smaller than 0.3mm 1st layers. or at least equal to my layer height.
-
1
-
-
If you are using cura 15.4.x (and it looks like you are from the supports) try getting the new Cura 2.1.x There is a boatload more options for supports and the autogeneration is MUCH better. Anything with supports I now slice with 2.1 and anything without 15.4 (because the layer view is still faster).
In Cura 2.1, you are able to make support "top skin" which will reduce the density of supports you'll need by placing a thicker layer on top of your infill before the object.
Another useful difference is you can choose the method of support generation, From Zigzag lines to conical supports. Give 2.1 a go and see if it solves your issues!
-
We use UPS's on a regular basis for the printers. Can't let those 40 hr print timelapses fail or we loose days!
we found 2x 2's with heated beds and 1x go is the limit before the UPS starts to whine.
Which is the longest failed print you've ever experienced? For any reason, not only power loss.
(this question goes for everyone)
I've had one of these guys fail at 40 hours (46 hr print)
 Support fell over causing a big X shift.
This one was a 36 ish hour one. (Not really that huge (in volume) but layer height was like 0.09)
Eventually I had to re-do it with a bigger nozzle to drop the time down. Failed because of support design flaw (me)
 But final print was quite pretty.
I've had a few airplane parts fail too, which are like 60 micron prints at the full EXT size. 30ish hour prints again. So biggest print fails are usually around 32-40 I would say.
BUT! I have to say since the UM2+ came out. much less fails at the longer prints that are the printers fault.
-
3
-
-
The best way to swap a board is usually just to have them sit side by side and swap the wires one at a time. No thinking, no mistakes!
-
1
-
-
We use UPS's on a regular basis for the printers. Can't let those 40 hr print timelapses fail or we loose days!
we found 2x 2's with heated beds and 1x go is the limit before the UPS starts to whine.
-
1
-
-
Check the settings in Cura, if you're using 15.x in the advance tab check to see that the infill speed is NOT set significantly higher than your standard print speed. The faster speed at the normal temperature can cause underextrusion.
Cura had the default infill speed at 85 for some reason for the longest time so printing at 210C on large parts will cause problems.
Also if you want alternating layers for infill, set your infill to 25% or higher and you will get alternating parallel lines that are 2x as tight instead of squares.
Alternatively, downloading the new CURA 2.1.x, you can choose the method of infill.
Also, great to see an UMO.
your acrylic board is superbly clean for being 5yrs old.-
1
-
-
You can have dimensional accuracy AND a good squish by changing the "initial layer height" value to 0. (which will use your current layer height) Level it really well during the first layer and you will get a squish and a consistent layer height with the rest of your print without the weird elephants foot style expansion.
-
1
-
-
Why no fans?
Nylon is very prone to warping. Fans make the warping an even bigger problem by cooling the part non-uniformally. Paired with the fact that it doesn't stick that well to the plate, you could easily cause it to pull off the printbed simply having the fans on. Same with ABS prints.
-
1
-
-
 Nobody would have thought this could happen in the homeland of Ultimaker
 That bridge looks familiar
-
I Pm'ed ya. Thanks, We're all things Canadian & Ultimaker.
We do stock almost all parts though.
Hi again,
Ever consider stocking the I2K thing from 3dsolex?
It seems that with that + tinkergnome, printing polycarb and/or PEEK at 270-300 should be possible without an all metal hot end. Especially now that the PTFE connector is now TFM.
Or maybe stocking that kind of stuff is not possible/interesting, or there is not enough interest?
You can get those from us, we just don't list them because they aren't in a large demand in Canada. But we already stock things from them like the olsson block, so if you want something, send sales(at)shop3d.ca an e-mail with what you'd like and we can get it for you local.


Carbon Fiber Reinforced Plastics?
in Materials & profiles
Posted
The filament type of carbon fiber has very small strands in it. It DOES make the material stiffer, but also makes it have bad layer adhesion. So it's not necessarily tougher, but stiffer if you're looking for that type of property.
You may be thinking of the printer that can print a layer of nylon and then outline it with carbon fiber wire. This DOES apparently make it much stiffer and stronger than nylon itself, but requires a special printer called the markforged.
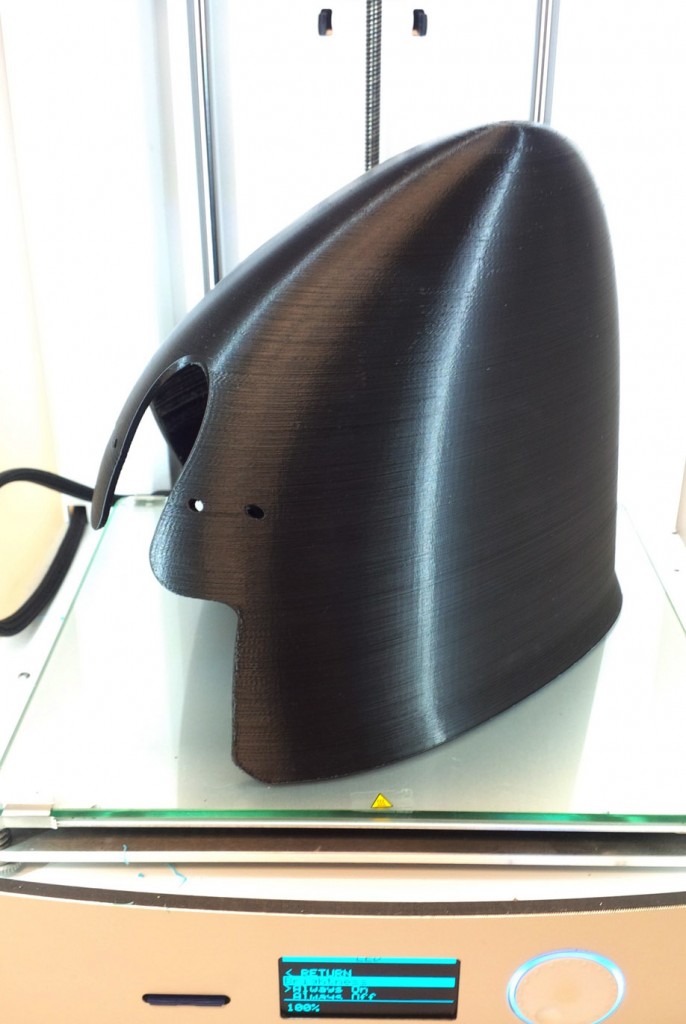
Here's a Carbon fiber knife handle I recently printed. It feels really nice and has a really unique finish.