


aaronalai
-
Posts
470 -
Joined
-
Last visited
Content Type
Forums
Events
3D Prints
Posts posted by aaronalai
-
-
Lololol, Photoshop is like an alien to me; I can do only the very basic of things in it.
-
I'm not exactly sure how you did your piece Nicolinux, but if you extrude this shape leaving a little connected:

You should be good to go.
-
Shoot I was just going to offer to do that!

Well plarp, anyway to make the piece work in cura, you need to make a small fillet connection between the two pieces.
-
Did you try your Fix Horrible settings? I know if I have a small hole Extensive Stitching tries to fill it up, it may potentially try to fill that small gap between your two pieces. Even if it did though, it doesn't look like there would be a very stable mate between the two larger pieces; or maybe it just looks that way.
-
LOL Ian, you should write the UM2 manual!
-
Looks great! I had not clue what a Hobbed Bolt was until I started reading about the tantillus.
-
Awesome! I've never understood patience like this guy exhibits, this is part of the reason I'm buying a printer; so IT can carefully construct all the frusturating complex shapes.
-
There's another problem with Loctite: The usual stuff (242 as well as 243 I believe) simply doesn't work with stainless steel (according to the datasheet it should reach 25% strength after a considerable amount of time). It won't harden even after 12 hours of curing time because it just doesn't cure around passive materials such as stainless steel.
Dipping bolts in loctite is easy, dipping the setscrews however, is a different task. As you suddenly have to put in loctite and insert the setscrew while the pulley is already in the machine, which is significant more difficult.
Very good points, it looks like the torque wrench is the way to go; it's nice to know the UM team has something up their sleeve.
-
Thanks for the details! It would be interesting to see if others can reproduce the same results. Just making sure, but the x-axis is temp and the y-axis is mm/s right? Also, illuminarti, your calibration cup is a really great idea. I'm going to be revisiting these posts when I get my UM2, they seem like fantastic reference points to test for a well calibrated machine.
-
-
Thanks for the advice! I appreciate all the pictures, I think there needs to be some official troubleshooting guide or video or something for the UM2; it seems like there are still a few common issues.
I got my bearings the other day and just need the printer now :-P.
Also, I read the assembly guide for the Tantillus and am even more interested in it now.
-
In professional assembling one usually avoids using loctite due to the time it takes to apply it. It means additional assembly time which results in a higher price of the product.
I agree, but I've seen people simply just dip the bolt into blue loctite and then insert; you don't need much. The extra step adds a few seconds which at most would accumulate to a couple of minutes of additional built time in an ideal situation. I thinks it's kind of a grey area as to whether or not it is financially worth it in the long run to deal with the few who have problems as a function of loose bolts and set screws or to add a few extra minutes to each build.
They are really expensive. We looked into that when we noticed there where problems with the pulleys going lose. But price wise it's not feasible.
I think they are using torque wrenches now to assemble the machines, as tests show that properly screwed down pulleys hold as well as the ones with loctite. And we're looking into slightly different pulleys that have less problems with vibrations.
Great to hear; will you keep us posted on this? I think something to address the loose bolts and set screws would prevent a lot of minor issues. Also could you potentially provide the torque settings for maintenance?
-
Hey Chrisp, I've been following the other 10 page thread with Nicolinux's stuff and I see many different ways to remove clogs, I suppose it's contingent upon the severity of the clog. I am wondering for your common clogs, like when switching to orange PLA what method do you use? Is it the one where you cool the print head to something like 90C and yank the filament out of the bowden tube? Great thread BTW!
-
I just wanted to say that I have learned a lot from this thread, and that I really appreciate the hard work everyone is putting in to help out fellow Ultimakers. This forum is reason enough to purchase an Ultimaker 1 or 2.
-
Yes, to retain the capacity to take the thing apart I would use blue
http://www.loctiteproducts.com/p/10/15/t_lkr_blue/overview/Loctite-Threadlocker-Blue-242.htm
-
After reading the forums for a couple of weeks, I was wondering why Loctite isn't being used in assembly. It seems like the bolts and set screws, especially the set screws, are susceptible to vibrations during shipping. I understand Loctite can negatively interact with plastic, but it seems like the places where it could be used would be very helpful.
-
-
This is pretty cool, I didn't know sites like this existed; the price doesn't seem unreasonable considering the investment it would take to get good digitization of larger things like a person. We have a ROMER coordinate measure machines at work with a freakin laser scanner head, when it's not being used for experimentation I'm totally going to scan away, anyway that thing was something like 100k. Also, it takes a while to render the digitizations and do some touch-ups so I suppose you are also paying for someone else's time. Thanks for the post.
-
Exactly! If I would have to design a printer I would start with your idea. It's the most straightforward approach to provide an optimum thermal situation.
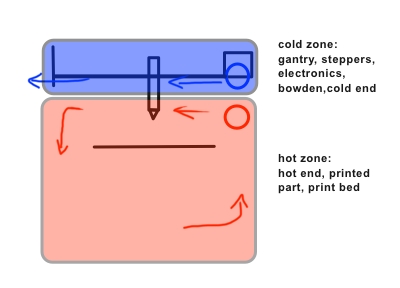
Has anyone rotated their printer 180 degrees so the device is upside down? I can see a few problems with this like bridging creating hanging bits that would hit the printer head. I ask because in some regards I think this would be the easiest way to retain the heat in the printer in the correct areas of the printer. Keeping cool air at the "bottom" of the printer separated from the hot air at the "top" as a function of the differences in their densities. Probably not worth the hassle though, but an interesting thought.
-
@foehnstrum, I'm glad you think the idea is worth a second look! I was thinking about it in the shower, which is were all my best ideas have been born.
@gadgetfreak nice find, I'm looking forward to the android version. Although my UM2 hasn't shipped, I'm still interested in implementing something like this for it. Although I am definitely interested in how well it performs out of the box without any modifications. I melted my old K-thermal probe for my multimeter in an old project, and ordered this bad boy as a replacement http://www.amazon.com/gp/product/B0084JQL1Q/ref=oh_details_o00_s00_i00?ie=UTF8&psc=1 with a really long probe http://www.amazon.com/gp/product/B00D8337YW/ref=oh_details_o00_s00_i01?ie=UTF8&psc=1 I figured this should help me take accurate point readings throughout the inside of the UM2 while making simultaneous comparisons to the outside.
I also snagged myself a small crossflow fan for testing purposes, this one measures about 1.75 inches thick and 5 inches long in its current housing; but the internals are all removable and I think I can redesign a more slim case if I can't squeeze it into the UM2 as is. Just got to wait until that printer ships!
-
Just wow, I always find myself surprised to see the cool things people are doing with their UMs!
-
Woah I missed a ton of awesome posts today at work! It's pretty cool how you can print your children toys, and that they will grow up with it so much apart of their lives.
-
Hello, I was playing around with the newest version of Cura 14.01 (downloaded today), and noticed that when I switch from "print all at once" to "print one at a time" or vice versa the layers view does not update to reflect these changes. I'm not sure if the printer will go ahead and print the way you selected or print via what the layers view is describing, as I don't have my printer yet and have no way of testing it :smile:
-
I used all of my Likes for the day, but I really like the print! Glad to see things are improving significantly :smile:
Just shameless product placement isn't
in Coffee corner
Posted
Lolololol :mrgreen: Ian we are totally going to hang out if I ever go to Germany!
Also, I need to learn to at least sort of read German; all the cool 3d printing books seem to be in German, blarp.