


anon4321
-
Posts
914 -
Joined
-
Last visited
-
Days Won
1
Content Type
Forums
Events
3D Prints
Posts posted by anon4321
-
-
Just FYI, I believe both the UM1 and UM2 drive the heater (and steppers) at 19V. That and the easy of wiring without switching firmware or adding the 4.7k that would be required for a thermistor is the reason I asked.
-
Okay anon i will try it this week probably
 did u use supports from Cura? Maybe i'll try supports from meshmixer because i went back to Cura 14.1 that doesn't have the awesome lines support.
I used Cura with support. One issue with this print and cura is that I couldn't find a way to elevate the print so one round always has a flat spot as the first non-support part that touches the bed. With Cura, you can bury but as far as I know not "float" a print like completely on top of support.
-
I agree on the new thread per month with the "Monthly Challenge: Month/Year" pattern.
-
Is there any loss of performance or reliability with using the UM1 alu block and heater and thermocouple?
-
cool someone changed the thread title.
Thank you to the person that did!
-
I tend to get wrong advice so others might weight in on this...
If as suggested above, the jumpers seem correct. Is it possible that you selected the wrong machine type in Cura and then updated the firmware to UM2?
I believe one difference in the motion system between the to is that while the XY axes have the same steps/mm, the UM2 has a different Z steps/mm.
-
I'll render my opinion. (opinions are like buttholes, everyone has one and they all stink). I don't see this thread going anywhere useful.
I think both sides are misreading the tone and intent. I think the best way to have handled would have been to provide instructions for opening a request in a more formal fashion. Seems like that would be the github tracker.
So everyone one should calm down.
;-)
-
Some defect trackers have the ability to vote on the importance of a bug or new feature. At least with that, you make the larger number happier.
In the end though, it's up to the active developers and their sponsor (if any, such as UM) to determine what is addressed.
-
I have a heated bed on my UM1 so it would be interesting to see how well someone like you (Didier) can do...
-
Ok, yeah after laying out my suggested schedule, Monthly seems more appropriate.
Is there a way for me the rename the thread?
If not , can a moderator do it?
-
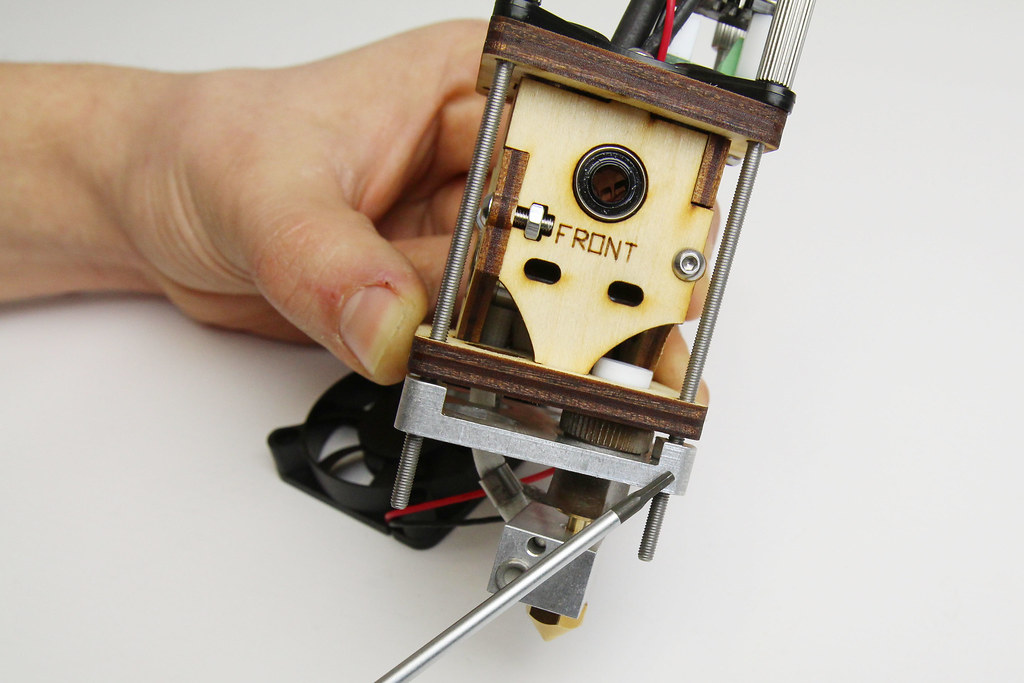
See steps 22-26 here: http://wiki.ultimaker.com/Ultimaker_rev.4_assembly:_Extrusion_head
And this pic:
-
Now that you mentioned it, I didn't pull the retainer up. Just push the Bowden down with the retainer IN THE DOWN position. Then tighten the screws. As the screws are tightened, the retainer will rise into the position where it clamps the Bowden tube with a little preload.
Sorry, I've been trying to help but I have been giving bad advice instead.
Thanks for catching it illiminarti.
-
I believe what Mr. Foley is referring to is the following (I just did it today!) assuming you have a UM1 -
Basically, unscrew the four long bolts about
3-4mm2-3mm. The two on the left hold the fan on using nuts which might prevent you from unscrewing those. Loosen the two nuts under the fan shroud.Next, while supporting the head assembly with one hand, pull the slack generated by loosening the long bolts down by pulling the aluminum heatsink plate at the bottom of the head. Make sure the heater block and heat break insert moves down with the alu plate.
Basically you are lengthening the distance from the top plywood to the place with the Bowden tube seats in the heat break.
Next, push the Bowden retainer part down.
Then feed
3-4mm2-3mm more of the Bowden tube in the head so that is seats firmly into the plastic heat break connected to the heater block.Now, while applying pressure to keep the Bowden tube seated firmly in the heat break, pull the Bowden retainer up and put the clip in.Finally, slowly tighten the four long screws back up bring the alu plate up those
3-4mm2-3mm. Tighten a little on one bolt, then the next then the next and so on.As you tighten you should notice the Bowden retainer rising as the extra
3-4mm2-3mm of tube you push in is being pushed back out. As it rises, it is clamping on the tube with significant force.The retainer will almost rise to a point that the clip doesn't do much as the tube is preloading the retainer upwards forcing it into the locked position.
Install the clip but you will see that it isn't serving much purpose.
-
There doesn't seem to be a lot of interest in this but if it picks up, I suggest two polls. One that nominates the model so people can vote for the more interesting one and one that declares the winning.
I think to should work something like: first week people nominate the models. Then at the end of the week, people vote (or during) but voting closes at say two days after the weekends. Then there is a week of printing after which two days of voting for the best result.
However, again doesn't seem like there is much interest. Too bad there isn't some way to award the winner something of value.
-
Do you think a weekly "print this" challenge would be interesting, informative and/or fun?
Ideally, someone would nominate a hard to print model and people would attempt to print it documenting ALL settings they used and the printer and filament used.
The idea is to get some of the vast experience hard core 3d printer owners have out in the open so we can understand the tweaking people.
The challenge should be something relatively hard to print and preferably small. The best print solution should maximize the quality of the result in the minimal amount of time with the minimal amount of post-printing processing or clean up.
For example, I tried printing the model below tweaking the support, temp, bed temp and a bunch of stuff. The big issues are getting it to stick to glass (I have a UM1 + self made heated bed + glass) and getting the surface quality of "underside" good because of the support required.
http://www.thingiverse.com/thing:323448
I resorted to sanding the result which is disappointing and unsatisfying. Some of the overhang is a bit screwy.
Anyone want to have a go?
-
Sorry I should have indicated that it is a UM1. The bed is self made (Jason HK's)
I do have a multimeter. I might just give in and buy an Non-Contact Infrared Thermometer. I need to calibrate my soldering iron anyway...
-
After sitting overnight, when I turn the printer on, the temps reported by the printer are
extruder 41 and bed 21. The room temp is about 22.
Is the extruder reading more accurate at hotter temps or is there an issue with the temp sensor in the extruder and will this cause problems during printing?
Unfortunately, I have no way to measure the temps directly.
-
The UM1 firmware update problem appears fixed in the latest RC.
-
Barnacules figured out that if you turn over a can of "PC duster" and use the liquid to drastically cool the parts, they will come off easier.
However, be careful on glass. I suspect if you supercool a small area on the glass, that small area will contract causing stress in the surrounding glass and possibly cracking it or worse shattering it.
-
I wonder if the combination of the rubber belts and alu pulleys plus the nonconductive panels form a small Van de Graaff generator? Or could the belts be rubbing on the side panels?
Either way, increasing the humidity in the room would help.
-
I think this one is the pseudo-official one: https://www.youmagine.com/designs/ultimaker-robot
-
LOTR is immediately where my mind went...
-
There is temp recommendations from taulman. http://taulman3d.com/t-glase-features.html but they imply that a heated bed is needed.
-
Won't the plastic melt if the tip is hot? I understand the desire to not scratch the tip but I often abort prints when the level looks like it needs to be adjusted and I wouldn't want to wait for the extruder to cool before adjusting.
 did u use supports from Cura? Maybe i'll try supports from meshmixer because i went back to Cura 14.1 that doesn't have the awesome lines support.
Monthly challenge?
in Coffee corner
Posted
I played with raft in the latest RC on another part that had a large flat bottom. I had problems separating it from the part so it didn't occur to me to try it.
If you look at the pics at the thingiverse link of the object being printed, it looks like it is slightly "floated" on top of support.