Jump to content
UltiMaker Community of 3D Printing Experts

Colorfabb XT-CF20 sticking to nozzle


Recommended Posts

Posted · Colorfabb XT-CF20 sticking to nozzle

Hey guys,

I'm almost through a spool of Colorfabb XT-CF20 mainly printing small parts. Today I had a 3D Hubs order with some big parts that took up to 6h printing time. I always noticed the blob of filament on the nozzle while printing with XT-CF20 but it never turned into a problem until now.

The blob only grows while printing and when it becomes to big it drop right in the print. When the head passes again it crashes into this blob resulting in the motor skipping steps. Ruining the print, offcource.

I've read about this problem on the internet and also hear on the forum, but I've never found a clear solution for it, if there even is one? I've tried printing slower, different temps, retraction,... Nothing helped.

I have an E3D Hardened steel nozzle, 0.4mm. Would a 0.6mm make any difference?

Are there people that do not have this issue, what are your settings?

Thanks allot in advance, I'm desperate...

Andreas

  • Link to post
    Share on other sites

    • 2 months later...
    Posted (edited) · Colorfabb XT-CF20 sticking to nozzle

    General recommendations:  print slow and hot, no fans, enable retraction, set retraction distance to 0.0mm and z-hop to around 0.25mm.

    Use tape on your print surface!

    Edit:  re-level the bed after every 20m printed or so if you're doing 0.1mm or 0.2mm layers, print in the smallest amount of layers possible, and print with the smallest surface area as the first layer if there won't be significant overhang problems.

    If a part you're printing is going to take up more than 20m material in one go and you can't figure out a good enough way to break it up into smaller parts, then consider going with an alternate route such as CNC and/or injection molding.

    Edit #2, regarding cool-head lift:  only use it as a testing measure to see if it'll need to be activated.  If it does need to be activated, then use a tower with enough surface area so cool-head lift isn't required.  Otherwise, your print will likely fail.  The minimal reliable extrusion for my purposes is around 1.2mm^3/s with about 20 seconds between layers.

    Edited by Guest
  • Link to post
    Share on other sites

    Posted (edited) · Colorfabb XT-CF20 sticking to nozzle

    General recommendations:  print slow and hot, no fans, enable retraction, set retraction distance to 0.0mm and z-hop to around 0.25mm.

    Use tape on your print surface!


    Tape for CFXT? Colorfabb inly early versions did use blue tape. For example Formfutura CF does work with blue tape.

    Edited by Guest
  • Link to post
    Share on other sites

    Posted · Colorfabb XT-CF20 sticking to nozzle

    According to everything I've ever read about CF printing, you need a steel .6-1.0 nozzle to avoid extremely rapid wear of the nozzle, if for no other reason. Do some web search on the stuff, and you will find an image of a brass nozzle worn to useless after printing 250g of CF filament.

    Wiping the nozzle with some silicone lube may also help, by keeping the blob from sticking to the nozzle.

  • Link to post
    Share on other sites

    Posted (edited) · Colorfabb XT-CF20 sticking to nozzle

    I've printed a few hundred meters of the CF-20.  My E3D stainless steel 0.4mm and 0.8mm are still working well enough.

    I use blue tape, because I print slow and hot enough that the material will pull the glass up off of the print bed.

    Edited by Guest
  • Link to post
    Share on other sites

    Posted (edited) · Colorfabb XT-CF20 sticking to nozzle

    No tape needed, but i use a liberal layer of glue stick anytime i work with XT to avoid glass damage.

    @GummyBearBandit: I am running a test of nozzle wear right now, and the 0.5mm stainless nozzle i used to print about 0.5kg (~65m) is about 0.3mm shorter than before the test. This has also lead to that the outer diameter of the shoulder is doubled which in combination with a shorter channel does significantly alter printing performance.

    Edited by Guest
  • Link to post
    Share on other sites

    Posted (edited) · Colorfabb XT-CF20 sticking to nozzle

    Oh, yeah, I definitely have to re-level the bed after every 20m printed or so.  My parts are still finishing up well enough, though.

    Are you also going to test hardened steel, different manufacturer's sizes, and printing methods?

    I'm going to add a few more general recommendations to my original reply.

    Edit:  I guess for the glue vs. tape debate...use tape, and if the first layer of material goes down well enough, then you probably have nothing to worry about - as long as you're careful about doing touch-up while printing is in progress.  Or use a liberal amount of glue without tape if you're still having trouble sticking the first layer and don't mind possible glass damage.

    Edited by Guest
  • Link to post
    Share on other sites

    Posted (edited) · Colorfabb XT-CF20 sticking to nozzle

    @GummyBearBandit: I just hate peeling blue tape from my prints when they stick too well... makes for ugly bottom surfaces :/

    Right now i am only comparing the Olsson brass and stainless nozzles to the new Olsson Ruby nozzle, for the Olsson ruby website, i have gotten reports of that the hardened nozzles also will also wear in time, but it will require longer time and more material, and i have limited amounts of both time and XT-CF20 to do this :p

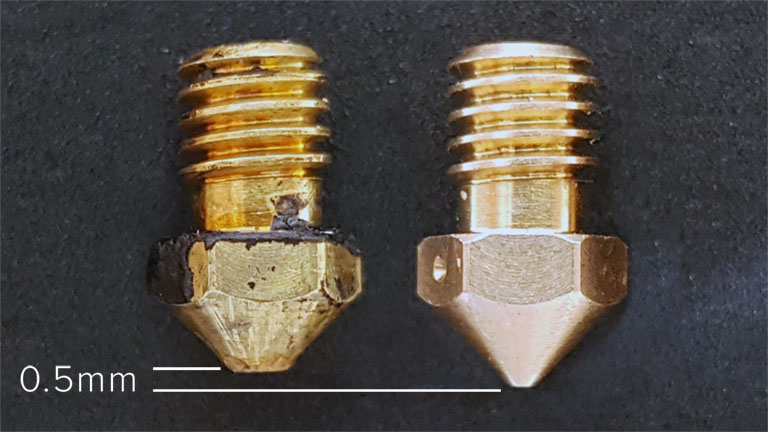
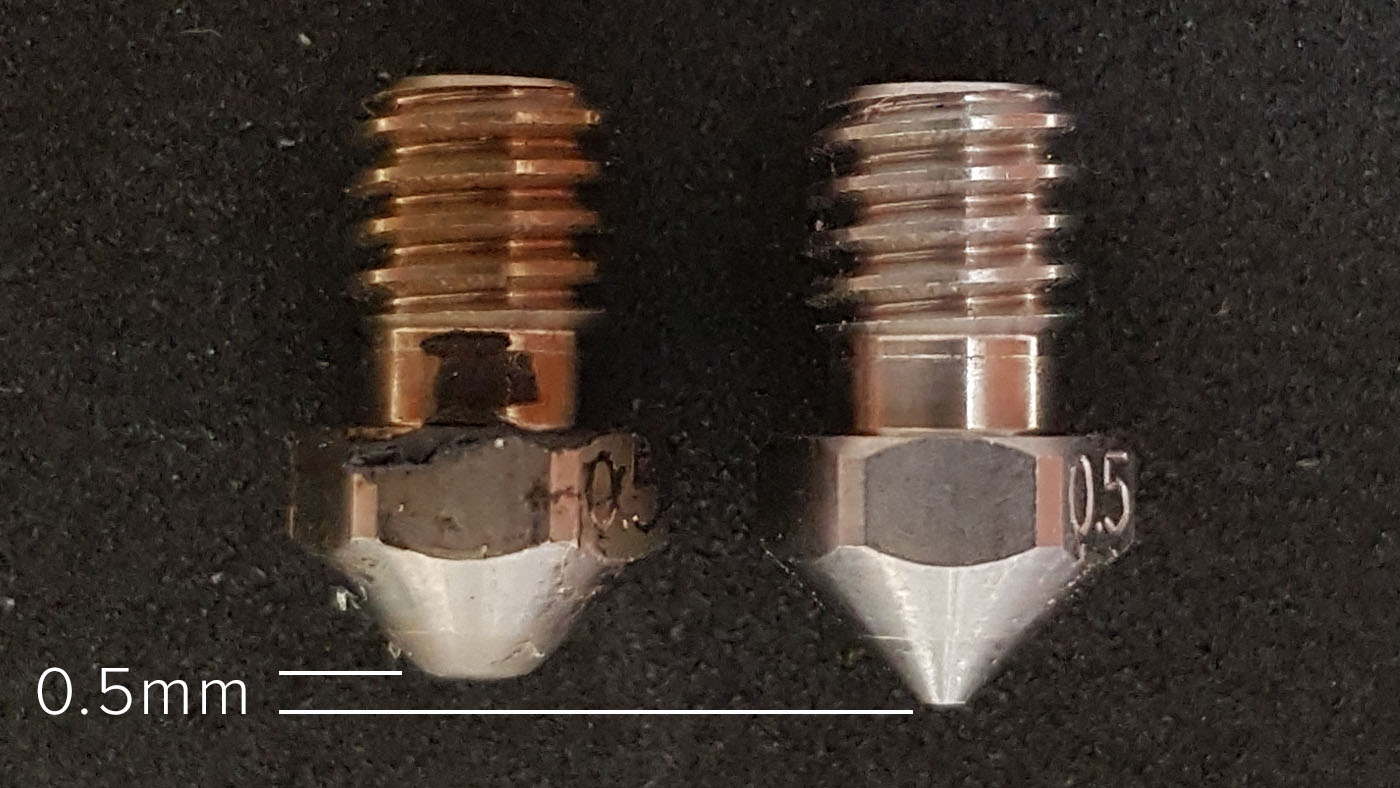
    I can report that printing XT-CF20 with a brass nozzle wore it down 0.5mm in 300 grams, and for the stainless steel one it took 1000g to do the same amount of 0.5mm wear, so the stainless nozzles lasts about 3 times as long as the brass, but it also came with the need to print 5-10C hotter wich can affect your print quality.

    Brass-300g-webb-2.jpg

    300g Colorfabb XT-CF20

    Stainless-1000g-2.jpg

    1000g Colorfabb XT-CF20

    @Neotko still has the record for printing most carbon filled filament with a ruby nozzle, about 8kg of the stuff, and no wear was even visible in a microscope, that was pretty impressive :-)

    Edited by Guest
    • Like 2
    Link to post
    Share on other sites

    Posted · Colorfabb XT-CF20 sticking to nozzle


    @Meduza Oh, wow! That Ruby nozzle looks very impressive, almost badass even! Yeah, steel can't compare to that.

  • Link to post
    Share on other sites

    Create an account or sign in to comment

    You need to be a member in order to leave a comment

    Create an account

    Sign up for a new account in our community. It's easy!

    Register a new account

    Sign in

    Already have an account? Sign in here.

    Sign In Now
    • Our picks

      • UltiMaker Cura 5.3 stable released
        In this stable release, Cura 5.3 achieves yet another huge leap forward in 3D printing thanks to material interlocking! As well as introducing an expanded recommended print settings menu and lots of print quality improvements. Not to mention, a whole bunch of new printer profiles for non-UltiMaker printers!
          • Thanks
          • Like
        • 22 replies
      • Here it is. The new UltiMaker S7
        The UltiMaker S7 is built on the success of the UltiMaker S5 and its design decisions were heavily based on feedback from customers.
         
         
        So what’s new?
        The obvious change is the S7’s height. It now includes an integrated Air Manager. This filters the exhaust air of every print and also improves build temperature stability. To further enclose the build chamber the S7 only has one magnetically latched door.
         
        The build stack has also been completely redesigned. A PEI-coated flexible steel build plate makes a big difference to productivity. Not only do you not need tools to pop a printed part off. But we also don’t recommend using or adhesion structures for UltiMaker materials (except PC, because...it’s PC). Along with that, 4 pins and 25 magnets make it easy to replace the flex plate perfectly – even with one hand.
         
        The re-engineered print head has an inductive sensor which reduces noise when probing the build plate. This effectively makes it much harder to not achieve a perfect first layer, improving overall print success. We also reversed the front fan direction (fewer plastic hairs, less maintenance), made the print core door magnets stronger, and add a sensor that helps avoid flooding.


        The UltiMaker S7 also includes quality of life improvements:
        Reliable bed tilt compensation (no more thumbscrews) 2.4 and 5 GHz Wi-Fi A 1080p camera (mounted higher for a better view) Compatibility with 280+ Marketplace materials Compatibility with S5 project files (no reslicing needed) And a whole lot more  
        Curious to see the S7 in action?
        We’re hosting a free tech demo on February 7.
        It will be live and you can ask any questions to our CTO, Miguel Calvo.
        Register here for the Webinar
          • Like
        • 18 replies
      • UltiMaker Cura Alpha 🎄 Tree Support Spotlight 🎄
        Are you a fan of tree support, but dislike the removal process and the amount of filament it uses? Then we would like to invite you to try this special release of UltiMaker Cura. Brought to you by our special community contributor @thomasrahm
         
        We generated a special version of Cura 5.2 called 5.3.0 Alpha + Xmas. The only changes we introduced compared to UltiMaker Cura 5.2.1 are those which are needed for the new supports. So keep in mind, this is not a sneak peek for Cura 5.3 (there are some really cool new features coming up) but a spotlight release highlighting this new version of tree supports.  
          • Like
        • 22 replies
    ×
    ×
    • Create New...