Jump to content

E3D @ UMO


ataraxis

Recommended Posts

Posted (edited) · E3D @ UMO

Hi there, long time no see!


My printer is a bit old now, especially the hotend is worn off since it is still the first (and only) nozzle and PTFE thingy.

I would prefer to replace the whole thing instead of buying a new original one,


I like the E3D v6, but I am not really sure if it fits the UMO since they don't have any 18/19V versions.


My electronics (mainboard) is still the one from the UMO, my PSU is the 24V one which is supplied with the heated bed.

So in theory there is 24V available somewhere on the heated-bed board.


Furthermore they use another thermocouple, right?


Any thoughts? Thanks!


I know that this topic was already discussed several times but mostly for the UMO+ or without any consent.


Edited by ataraxis
  • Link to post
    Share on other sites

    Hi! Oh man, really long time no see...


    Converting the whole UMO to 24v isnt a big deal - there needs just one part to be replaced by a recom mosfet(.), but in a hurry, I cant find the forum entry right now.


    Further there are also postings of successfull e3d upgrades existing, but would an um2head be also an option?

  • Link to post
    Share on other sites

    Posted (edited) · E3D @ UMO

    Hey drayson!


    Is this was you are referring to?


    Another way would be to replace the electronics by RAMPS, right? hum...

    But on both ways I would have to buy the amplifier board or use their K-type sensor... I would really prefer the Pt100.


    @amedee reported somewhere that the original heating block fits the E3D nozzle and the upper metal parts,

    so instead of replacing everything I could just replace those two things and buy a fitting 18.5V fan.


    The `um2head` would also be an option, sure, even Ubis, Merlin and the others are :)

    I just want to get rid off the old hot-end where I cannot even buy a single nozzle anymore.


    Cheers!


    Edited by ataraxis
  • Link to post
    Share on other sites

    I am still using my old UMO (one of the first batches) with the 1.5.3 electronics ;)
    I bought some time ago a 1.5.7 board in case the old one would die with my mods, but it is rock solid...


    What I have made on this printer (in that order):

    • E3D v6 hot end -- worked OK, but slow to reach 280°C with 19V
    • Replaced the Thermocouple by a PT100 + E3D amplifier (Had temp readings instability at some PWM fan speeds)
    • Upgrade to 24V (by just changing the 12V step down regulator)

    (I think I have a post for each of these steps)


    Re. the nozzle / heating blocks they are all using the same threads, except the very old UMO ones (The old hot-end without PFTE coupler)


    If you don't need to print hot (less than 240°C), there is nothing wrong with the UMO hot-end, just use Olsson or E3 nozzles instead of the stock UMO ones.

  • Link to post
    Share on other sites

    Posted (edited) · E3D @ UMO

    Perfect amedee! That's exactly what I was looking for :)


    I will install an e3d nozzles at first to fix it temporary, replace the hotend by an E3D v6 afterwards (using the old heating block)

    and switch to 24V, including PT100 amplifier board and new regulator - as you did - finally. Thanks!


    Btw: Have you used the E3D 24V fan at first? (At step 1) Isn't it too slow @18,5V?

    Edited by ataraxis
  • Link to post
    Share on other sites

    2 hours ago, ataraxis said:

    Btw: Have you used the E3D 24V fan at first? (At step 1) Isn't it too slow @18,5V?


    I had no issue with that -- I can't remember having done a comparison, but these fans are not very linear, I don't think there is a huge difference...

  • Link to post
    Share on other sites

    Posted · E3D @ UMO

    Hum, I have a second HeaterBoard (the one which is supplied with the HeatedBed Update) - couldn't I use that for my E3D (instead of for an heated bed)?


  • Link to post
    Share on other sites

    Most probably...

    Not sure if there is a real benefit though...

  • Link to post
    Share on other sites

    Posted · E3D @ UMO

    You are right, I am going to replace IC1 - as you have shown and adviced here - by a switiching 24V one.

    The original E3D comes with an thermistor instead of an thermocouple/pt100, have you ever used that?

  • Link to post
    Share on other sites

    No I never used the Thermistor...


    I initially used a thermocouple (the E3D one) connected to the UMO amplifier. That worked well, but for some low PWM fan speeds the temperature reading was sometimes unstable (nothing to do with E3D, I had that as well in my original setup)


    I eventually bought an E3D pt100 with their amplifier and that works perfectly.


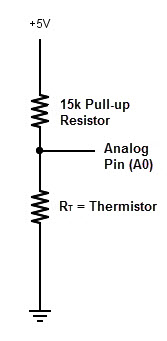
    Thermistor should be OK though -- you will need to add a 4.7K pull-up resistor on the UMO PCB

  • Link to post
    Share on other sites

    Posted (edited) · E3D @ UMO

    Thank you again! ;)


    I guess I have to use an spare analogue pin for the thermistor?

    The E3D documentation says I will have to reconfigure Marlin to "TEMP_SENSOR_0 5" which is "100K thermistor - ATC Semitec 104GT-2 (Used in ParCan) (4.7k pullup)".

    So it should look something like that, right? (4,7 instead)

    52f81bebce395f3a508b456b.jpg


    EDIT:

    Hum, shouldn't it be fine then to simply hook it between TEMP1-3 and TEMP1-1 on the Ultimaker Shield, since - according to the schematic - it is already designed like that:


    image.png

    Edited by ataraxis
  • Link to post
    Share on other sites

    Posted (edited) · E3D @ UMO

    You can just use the same pin, the place for the resistor is foreseen on the pcb (R23 should be the one for the hot end):

    pic-001-2.thumb.jpg.10b952037efba712db233e008d22373a.jpg

    (Note that this is my old 1.5.3 board, new ones are slightly different -- the sensors pinout is changed)

    Edited by amedee
  • Link to post
    Share on other sites

    Posted · E3D @ UMO

    Perfect, everything is done! Thank you very much!

    • Like 1
    Link to post
    Share on other sites

    Posted · E3D @ UMO

    Sorry @ataraxis, havent seen all the postst in here - got no notification...


    Hope everthing worked out as expected ?

  • Link to post
    Share on other sites

    Create an account or sign in to comment

    You need to be a member in order to leave a comment

    Create an account

    Sign up for a new account in our community. It's easy!

    Register a new account

    Sign in

    Already have an account? Sign in here.

    Sign In Now
    • Our picks

      • 🎄✨ Thingiverse Tree Ornament Challenge! ✨🎄
        We've been running a Tree Ornament Challenge with a chance to win an UltiMaker S3 or colorFabb filament.
        Design a 3D printable tree ornament and join our festive challenge on Thingiverse. 🎁✨


        📆 Submission Deadline: December 22
        🏷️Tag your designs with Holidays2023

        Click here to join and check out the over 300 other amazing designs

        How to Enter
        Design an Ornament
        Create a 3D printable tree ornament that captures the magic of the winter season. Think snowflakes, sleighs, reindeer, cozy mittens, or anything that embodies the joy of the holidays. Upload to Thingiverse
        Share your masterpiece on Thingiverse and add the tag Holidays2023. Don't forget to include a captivating description and images that showcase your design from different angles. Submit by December 22
        All entries must be submitted by December 22nd to be eligible for consideration.
          Entering a new design
         
        Entering an existing design
         
         
        Winning designs should:
        Be original Creations
        Your designs should be original works, avoiding the use of others' intellectual property without permission. Include STL Files
        Each submission must include at least one STL file for 3D printing. Showcase a Completed Print
        Provide at least one photograph featuring a completed print of your design. Include Documentation
        Share the creative journey! Include documentation of your design process, giving us a peek behind the scenes. For example, show a screenshot of the model in your design program. Use the Tag Holidays2023.
        Use this tag to ensure your entry is counted in the Tree Ornament Challenge. Be submitted after October 1st, 2023
        Ensure your design was uploaded to Thingiverse after October 1st, 2023. Adhere to Submission Guidelines and Terms of Service
        Make sure your submission aligns with our guidelines and Thingiverse's Terms of Service.  
        Good luck 🎉
        • 1 reply
      • S-Line Firmware 8.3.0 was released Nov. 20th on the "Latest" firmware branch.
        (Sorry, was out of office when this released)

        This update is for...
        All UltiMaker S series  
        New features
         
        Temperature status. During print preparation, the temperatures of the print cores and build plate will be shown on the display. This gives a better indication of the progress and remaining wait time. Save log files in paused state. It is now possible to save the printer's log files to USB if the currently active print job is paused. Previously, the Dump logs to USB option was only enabled if the printer was in idle state. Confirm print removal via Digital Factory. If the printer is connected to the Digital Factory, it is now possible to confirm the removal of a previous print job via the Digital Factory interface. This is useful in situations where the build plate is clear, but the operator forgot to select Confirm removal on the printer’s display. Visit this page for more information about this feature.
          • Like
        • 0 replies
      • Ultimaker Cura 5.6 stable released
        Cura now supports Method series printers!
         
        A year after the merger of Ultimaker and MakerBotQQ, we have unlocked the ability for users of our Method series printers to slice files using UltiMaker Cura. As of this release, users can find profiles for our Method and Method XL printers, as well as material profiles for ABS-R, ABS-CF, and RapidRinse. Meaning it’s now possible to use either Cura or the existing cloud-slicing software CloudPrint when printing with these printers or materials
        • 13 replies
    ×
    ×
    • Create New...