Jump to content

Advice on issues with first prints


peanudt

Recommended Posts

Posted · Advice on issues with first prints

Hi all,

got my Ultimaker up and running. Below some pictures of my first prints showing some issues I want to get rid off. Hopefully I can get some advice on the settings I should experiment with.

Vase

  • [*]Using latest version Cura[*]Temp: 200C[*]Print Speed: 70 mm/s, went back to 50 mm/s for upper 4 cm[*]Wall: 0,8[*]Layer height: 0,1

Foto550-HXVK7EZL.jpg

Foto550-VSRLFVOX.jpg

Things to solve:

1: Tried to slow down, but the holes still appeared in some layers (pic 1)

2: Stringing, already pulled some treads out, so on the picture it is not a spider web anymore (pic 2)

3: Blobs on the walls (pic 1). These appear on all sides in the middle of the axes plaines (front, back,left,right)

4: You can see a pattern of small diagonal squares. Is that normal?

Handle

After checking the belts and leveling the bed (can slide a piece of paper underneath the print head with a little bit of friction) I printed the handle below.


  • [*]Using latest version Cura[*]Temp: 210C[*]Print Speed: 50 mm/s[*]Wall: 1,2[*]Infill: 40%[*]Layer height: 0,2


Foto550-SYUPNVBD.jpg

Foto550-JBBKICPV.jpg

Issues:

1. Some layers show gaps (pic 1). The infill pattern looks fine (nice lines, connects to edges)

2. The top layer is horrible in some places. The upper layer could be peeled off easily. The pattern is not overlapping, but consists of separate lines of filament.

Advice is more than welcome.

  • Link to post
    Share on other sites

    Posted · Advice on issues with first prints

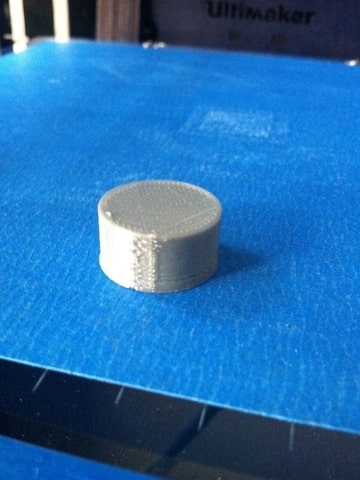
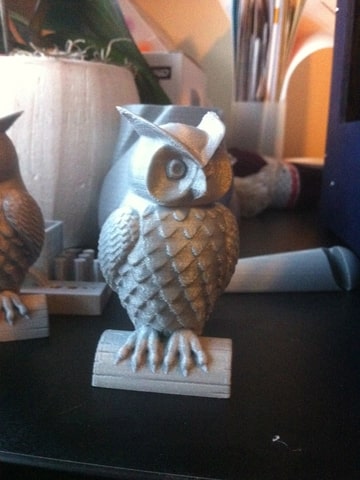
    That last picture - that's pretty bad.

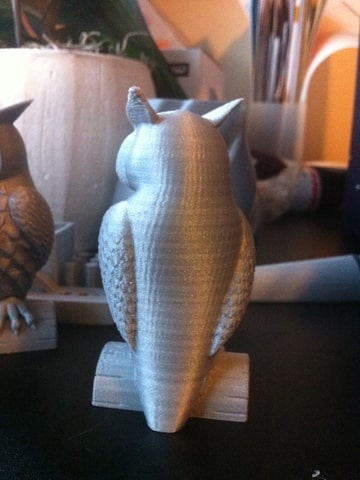
    I can see that your belts are loose as you can see there are two lines close together followed by a gap, then two lines again. This is probably due to the short belts being loose. Here is an explanation:

    http://umforum.ultimaker.com/index.php?/topic/1872-some-calibration-photographs/?p=14474

    However, that's not the main problem. There is not enough filament getting laid in there. Strange. Is the feeder screw tight? It should be compressed to about 11 to 11.5 mm. The feeder should be able to pull about 22 pounds force with no load (no pressure) at the print head. You might want to test this by pulling back on the filament.

    You could increase "flow" at the UC. Not sure this is a good solution. Could it be that you set the filament diameter to 3mm in cura yet your actual filament diameter is less - around 3.9mm? This would only reduce infill by 2.5% yet you appear to have 50% underfill.

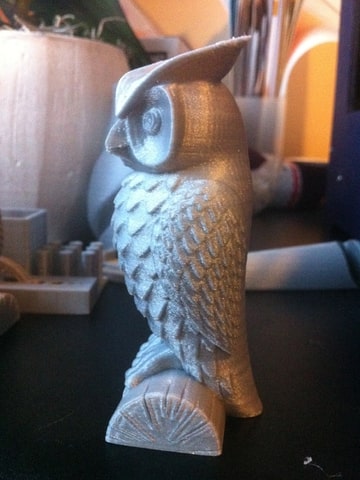
    Maybe your nozzle got clogged near the end of the print? Some dust or wood chips might have gotten in there.

    Maybe you don't have the fan on? With the fan off, sometimes the nozzle messes up the layer below because it hasn't had time to harden.

    That's all I can think of. It sure looks strange. Like the feeder stopped feeding filament. Or the nozzle got jammed.


  • Link to post
    Share on other sites

    Posted · Advice on issues with first prints

    Yeah I had the same issues 2 days ago, some parts were just not getting enough fill. The feeding mechanism was making cracking sounds, so I checked it out. Turns out I actually had some screws in the feeding mechanism way too tight, causing the wheel (with the bearing in it) to not being able to move. Eventually I loosened up that part, and made sure the feeder screw was nice and tight (but not too tight ofcourse)

    I think you should first check your feeding mechanism, do a test print, and see if the filament sometimes stops going into the extruder. Once your feeder is okay, check your filament diameter in Cura, and maybe set the flow% to 110 percent to see if that helps.

    Good luck!


  • Link to post
    Share on other sites

    Posted · Advice on issues with first prints

    Thanks Gr5. I did some research and it appears to be a combination of multiple causes.

    Adjusting the filament diameter appears to solve most of the issues. I measured 2,85mm, however when I change it to 2,8 the infill and top-layer of the sample prints look good.

    Furthermore when printing at 75mm/s I should set the temperature at 220C, otherwise it sometimes under extrudes. In the picture below you can see that in the first few layers at 210 are showing some gaps. Rest was printed at 220C.

    Third cause: the filament was slipping sometimes. I disassembled the clamp and noticed that the part that puts pressure on the bold with the bearing could not freely move. The nut placed in between the parts did not fit properly so when you put all parts on top of each other, it is a bit wider in the middle. A small file did the trick.

    Furthermore I think I tightened the screw before putting in the filament.......

    Foto-WJCDI88H.jpg

    On the sides of the circle there are no visual signs of backlash (I will try the vase again later), but where the printer head holds to move the z-axis it forms a small blob. Will try you're suggestion of experimenting with temperature and speed as proposed in another topic about the z-seam.


  • Link to post
    Share on other sites

    Posted · Advice on issues with first prints

    Hi guys (and girls),

    tried some owls and the results are improving.....

    Foto550-E8UZVECV.jpg

    Foto550-JRS6I8DH.jpg

    Foto550-RYAW86V7.jpg

    Left:

    speed 50 mm/s, layer 0,2mm, Temp 230C, Flow 104, infill 15%

    Middle:

    speed 100 mm/s, layer 0,2mm, Temp 230C, Flow 104, infill 15%

    Right:

    speed 50mm/s, infill speed 100mm/s, layer 0,1mm, Temp 230C, Flow 104, infill 10%

    Left owl shows a good result. Some imperfections on the smooth surfaces and some problem with overlap on the chest. Any tips on fine-tuning?

    The speed for the second owl was too high. Many imperfections on the wings, chest and head. Must slow down the speed of the perimeters. For the infill the speed is not an issue though.

    The right owl has the best result with very little imperfections. Nevertheless the ears were not as clean and nicely defined as the other prints. The printer slowed down and dragged a bit through the material. Probably related to the minimal layer time, but that I need to experiment with.

    Next stop:

    - lose the imperfections

    - experiment with the flow and temperature (now 230C and flow of 104 gives good results)

    - get some more colors/types of filament :-P


  • Link to post
    Share on other sites

    Posted · Advice on issues with first prints

    Those owls are starting to look pretty nice!

    Bear in mind that the natural variation of most filament is going to vary the flow by +/- 4% or so over the course of the print (assuming a 2.85mm filament that varies between 2.8 and 2.9mm - and thats pretty good for most filaments). And that you will also experience up to 10-20% reduction in flow the faster you print. So I wouldn't worry too much about fine tuning the flow percentage as you try to refine your prints - at least not yet - changes of just a few percent are going to get drowned out by everything else that's changing. Once you have the right filament diameter dialed in, you should be good to go, with just the caveat that when printing really high volumes/sec you might want to up it a bit.

    It's always a good idea to think in terms of total flow volume per second when fine tuning your prints. The higher the volume, the greater the pressure in the head, and hence the more likely you are to have blobbing on pauses, and run into under-extrusion and jamming problems.

    The problem with the middle print is not necessarily the (linear) speed per se, but the fact that you are also using a coarser layer height. You might still get good results printing at 100mm/s with a 0.1mm layer height - since that's half the volume per second, and so lower pressures.

    Other things to consider are the skin thickness that you are using - that can affect the volume per second, if the skin thickness isn't an exact multiple of nozzle size, and also effects the way in which overhangs and sloping top surfaces fill in - and also the minimum layer time: you need to make sure that there is enough time for the layers to cool. Generally two or three loops is good for something like this (so skin thickness = 0.8mm), and you will want to make sure that each layer gets between 3.5 and 7 seconds to cool, depending on your layer thickness - thicker layers = longer.

    As an experiment, you might try printing the owls with just loops, and zero infill. It'll print quicker, and probably still be quite strong.


  • Link to post
    Share on other sites

    Posted · Advice on issues with first prints

    Thnx Illuminarti,

    Controlling the flow makes sense. Will have a go at 100mm/s with a 0,1 layer height and play around with the infill.

    Great articles on your website by the way.

  • Link to post
    Share on other sites

    Posted · Advice on issues with first prints

    Hi all,

    here's a new owl with the following settings:

    speed 100 mm/s, layer 0,1mm, Temp 230C, Flow 104, infill 0%, wall 1,2mm (3 loops), nozzle 0,4mm

    Foto-UELX4KKR.jpg

    Foto-IXRDAYPP.jpg

    Foto-QRRVFQL7.jpg

    The result is very good.

    Flow: layer 0,1 x nozzle 0,4 x speed 100 = 4

    Comparison with previously printed owls:

    Left: 0,2 x 0,4 x 50 = 4

    Middle: 0,2 x 0,4 x 100 = 8

    Right: 0,1 x 0,4 x 50 = 2

    Some very little imperfections due to some backlash. I noticed that it happened in some layers, where the start of a new loop is in a specific place. However after a few layers the starting point shifted again and the backlash was gone in that location.

    Are belt tensioners any good for a new machine? Will also have a look at the resonance of the desk and tighten the short belts again.

    The ears however needed some cleaning up, because of oozing (min. layer time 5 seconds). Read something about a plugin for this issue, but is it possible to run plugins in Cura 13.06.5 (OSX)?

    Compared to the other owls the quality of the finish is even better than the right owl in my previous post. And yes, it was a much faster print (100mm/s and no infill). The thicker wall (and lack of infill) resulted in a smooth finish. Thnx for the tips Illuminarti.

    Just for fun a miniature version of the Stratum vase (great design and a nice tune during the print).

    Foto-GHTVA8QG.jpg


  • Link to post
    Share on other sites

    Posted · Advice on issues with first prints

    That's looking really nice! I tried printing one as well this weekend... 10cm high, 0.06mm layers.

    9293672098_23eb96f571.jpg

    I set it to 3.5s minimum layer time, which gave me an effective print speed of about 75mm/s - I got a little bit of blobbing on the underside of the bottom feathers, so I slowed it down to 80% of that - 60mm/s - and the rest turned out really nicely.

    I tried using the 'Cool Head Lift' option in Cura, which seemed to work out ok. I stepped away at the critical bit of the print (D'oh!!) but I ended up with one ear looking pretty much perfect and the other one pretty good but with some stringing hanging off it that needed to be cut away, and so left the surface a little marked (but probably still better than if the head had just hung around over the print for a long time).


  • Link to post
    Share on other sites

    Posted · Advice on issues with first prints

    Are belt tensioners any good for a new machine? Will also have a look at the resonance of the desk and tighten the short belts again.


    Your belts might be tight enough but this video shows you how to measure the tension and how to adjust:


  • Link to post
    Share on other sites

    Posted · Advice on issues with first prints

    These prints are looking very nice! I am still having issues with my prints coming loose from the bed and curling when I try to just use the blue tape wiped down with isopropyl alcohol. I might have to try using photo mount spray adhesive lightly again.


  • Link to post
    Share on other sites

    Posted · Advice on issues with first prints

    3DGuy - is the print coming loose from the tape, or does the tape leave the bed? I'd be interested to know what's different about your set up, because I pretty much never get any kind of bottom layer curling with PLA, even when printing large things. The print sticks very, very, well.

    Do you know what strength the alcohol is? In my local store they sell 70-something % and 91% solutions, and I use the latter. I also use fresh, genuine Scotch 9020 tape for almost every print. But I use 6" wide tape, which I think helps a lot in terms of both ease of use, and not having the tape peel up at the edges.


  • Link to post
    Share on other sites

    Posted · Advice on issues with first prints

    The print is coming loose from the tape. The alcohol is 91% solution. Scotch 9020, or 2090?

    I have an even bigger issue now. The hot-end was leaking a viscous black fluid onto my prints so I followed the instructions in the wiki to remove the PLA and run some ABS through the hot-end. So the black fluid has stopped but now nothing will extrude through the hot-end. I have tried to heat the hot-end to 245-250 and push some PLA through but it has not worked.


  • Link to post
    Share on other sites

    Posted · Advice on issues with first prints

    If you decide to remove the nozzle be careful as many people have broken theirs - it's more delicate than you might expect. Make sure you get it nice and hot before unscrewing it and be gentle.


  • Link to post
    Share on other sites

    Posted · Advice on issues with first prints

    Yeah, I guess I mean 2090. :-) (It's been a low-caffeine morning so far...)

    That's weird, because the one problem I absolutely never have is the PLA coming off the tape. Maybe your bed needs to be fractionally higher, so that the first layer is making better contact with the tape?

    Heat the hot end to 260 and let it sit for just a few mins, so the heat has some time to permeate. Then try putting in the PLA again, and turn the extruder gear by hand, slowly, to try and push through whatever is causing the blockage.

    If that fails, then maybe you will need to disassemble it. As George noted, be careful with it, it's fairly fragile.


  • Link to post
    Share on other sites

    Posted · Advice on issues with first prints

    Heat the hot end to 260 and let it sit for just a few mins, so the heat has some time to permeate. Then try putting in the PLA again, and turn the extruder gear by hand, slowly, to try and push through whatever is causing the blockage.

    If that fails, then maybe you will need to disassemble it. As George noted, be careful with it, it's fairly fragile.


    I will give it a try. It figures that the first and only time I try ABS to stop the black sludge from coming out the hot-end and messing up my prints it clogs the print-head. How do people print with ABS? Is this just a fluke?


  • Link to post
    Share on other sites

    Posted · Advice on issues with first prints

    Is this just a fluke?


    My guess is dust. I'm guessing most people's nozzle clogs are caused by dust and it needs to be burned out with a flame. I'm guessing your ABS was not in a protective bag and it gathered a tiny amount of dust. Or perhaps your whole room is a dusty environment. But this is just a hypothesis with little evidence to back it up.


  • Link to post
    Share on other sites

    Posted · Advice on issues with first prints

    That did not work either. I guess I will have to try and take it apart.


  • Link to post
    Share on other sites

    Posted · Advice on issues with first prints

    My guess is dust. I'm guessing most people's nozzle clogs are caused by dust and it needs to be burned out with a flame. I'm guessing your ABS was not in a protective bag and it gathered a tiny amount of dust. Or perhaps your whole room is a dusty environment. But this is just a hypothesis with little evidence to back it up.


    The ABS just arrived yesterday afternoon and I opened it just before putting it into the printer.


  • Link to post
    Share on other sites

    Posted · Advice on issues with first prints

    Yes, there's no particular reason that ABS should cause a problem because of the 250 temperature - as you get above that, you can eventually start to have problems with heat softening the teflon coupler at the end of the bowden... but that shouldn't be happening at 250. I don't do much ABS, but I've recently been printing with Nylon at 265 without any problems.

    When disassembling, you might want to start with the top end of the peek... that doesn't require you to disassemble the block/nozzle. take a look at the end of the bowden tube, and the teflon coupler. While you could have a physical obstruction in the nozzle, I suspect its more likely to be a plug that's formed somewhere at the cooler end of things, or a deformation of the coupler or Bowden that is stopping the filament even getting into the hot part.


  • Link to post
    Share on other sites

    Posted · Advice on issues with first prints

    When disassembling, you might want to start with the top end of the peek... that doesn't require you to disassemble the block/nozzle. take a look at the end of the bowden tube, and the teflon coupler. While you could have a physical obstruction in the nozzle, I suspect its more likely to be a plug that's formed somewhere at the cooler end of things, or a deformation of the coupler or Bowden that is stopping the filament even getting into the hot part.


    Fixed it! It was actually a plug in the nozzle. The plug was a little over 1/4" of White ABS that I used to stop the leaking of plastic from the heater block. I must say it worked really well, blocked the whole dang head, :eek: . I took off the nozzle after heating it to 250 and then while holding the nozzle in needle nose pliers proceeded to heat the nozzle over a candle and used a sewing needle (pin) to work the softened plug out.

    Trying a .06 detail print of one of the calibration blocks as a test print. It is looking really good so far, but now getting what sounds to be bearing noise from the print -head. Fix one issue and find another, good thing I like to trouble shoot and test things, yum, brain candy!


  • Link to post
    Share on other sites

    Create an account or sign in to comment

    You need to be a member in order to leave a comment

    Create an account

    Sign up for a new account in our community. It's easy!

    Register a new account

    Sign in

    Already have an account? Sign in here.

    Sign In Now
    • Our picks

      • UltiMaker Cura 5.7 stable released
        Cura 5.7 is here and it brings a handy new workflow improvement when using Thingiverse and Cura together, as well as additional capabilities for Method series printers, and a powerful way of sharing print settings using new printer-agnostic project files! Read on to find out about all of these improvements and more. 
         
          • Like
        • 18 replies
      • S-Line Firmware 8.3.0 was released Nov. 20th on the "Latest" firmware branch.
        (Sorry, was out of office when this released)

        This update is for...
        All UltiMaker S series  
        New features
         
        Temperature status. During print preparation, the temperatures of the print cores and build plate will be shown on the display. This gives a better indication of the progress and remaining wait time. Save log files in paused state. It is now possible to save the printer's log files to USB if the currently active print job is paused. Previously, the Dump logs to USB option was only enabled if the printer was in idle state. Confirm print removal via Digital Factory. If the printer is connected to the Digital Factory, it is now possible to confirm the removal of a previous print job via the Digital Factory interface. This is useful in situations where the build plate is clear, but the operator forgot to select Confirm removal on the printer’s display. Visit this page for more information about this feature.
          • Like
        • 0 replies
    ×
    ×
    • Create New...