Jump to content

ironing only on top layers?


VicP

Recommended Posts

Posted · ironing only on top layers?

Hi all.

I'm pretty new to 3D printing and I'm currently using a Bibo touch 2.

I have a question about the ironing feature in Cura. I'm using Ultimaker Cura 4.5 at the moment.

I have used this feature as prescribed for smoothing the top layers of prints where I deem it necessary, however, some prints I'm doing where the first layer becomes the top of the model would benefit from ironing as well.

Is it possible to set Cura to iron the first layer of the model, obviously excluding the brim or skirt.

On some designs I'm incorporating logos or lettering in the first .5mm of the print and the first layer can be really difficult to get consistent results for this type of operation without having the inevitable lines showing slightly. I'm thinking that ironing the first layer would help to smooth it out before continuing on to the second layer.

Has anyone got any idea whether it's possible to use ironing for first layers?

Many thanks in advance.

  • Link to post
    Share on other sites

    Posted · ironing only on top layers?

    You can't iron the bottom layer without flipping the part over, right?  I'm confused.


    By default, most profiles have combing set to "all".  Change "combing mode" to "not in skin" and that should make your bottom layer look much better.


  • Link to post
    Share on other sites

    Posted · ironing only on top layers?

    I

    1 hour ago, gr5 said:

    You can't iron the bottom layer without flipping the part over, right?  I'm confused.


    By default, most profiles have combing set to "all".  Change "combing mode" to "not in skin" and that should make your bottom layer look much better.


    I understand that ironing should only work on top layers, but since it is effectively forcing a small amount of extra filament into the previous layer, would this not also force filament into a first layer, reheating it and perhaps helping to smooth out the first layer against the glass to produce an entirely flat first layer with little evidence of lines remaining?

    I will take a look at the combing settings anyway and see if that improves things.

    Thanks for the tip.

  • Link to post
    Share on other sites

    Posted · ironing only on top layers?

    Is the bottom layer also a top layer?  If not then I don't see how that will help.  I guess you need to show a photo.  Maybe you haven't leveled nicely and your bottom layer is underextruded?


  • Link to post
    Share on other sites

    Posted · ironing only on top layers?

    Maybe you issue is underextrusion.  Please post a photo of your parts without ironing.  Underextrusion will cause gaps.  Underextrusion should be fixed some other way.  Maybe you are printing too cold or too fast or your printer is defective in some way (bad feeder? bad hot end?).

  • Link to post
    Share on other sites

    Posted · ironing only on top layers?
    53 minutes ago, gr5 said:

    Is the bottom layer also a top layer?  If not then I don't see how that will help.  I guess you need to show a photo.  Maybe you haven't leveled nicely and your bottom layer is underextruded?


    No, obviously the bottom layer is not a top layer. I'm suggesting that since when a top layer is ironed,  the ironing is pushing more filament into the "previous layer" which it obviously fuses to to create a line free top layer, why would this not also work with a first layer? surely the physics of the operation would be the same for a top layer as indeed any layer in the build and with a first layer at say 0.15mm the heat from ironing would penetrate the first layer since at this stage there is only "one layer", it would fill any gaps and smooth out the first layer before proceeding to the next layer. I understand that you see ironing as adding onto the top of a top layer but is it only the top of a layer that is being effected by ironing, if it's fusing to it, then it must be heating and penetrating the previous layer, no? why not right through a 0.15 or 0.1 or 0.06 first Layer?

    If I could write code, I would give it a go because I think it would work, but I can't, which is why I'm asking or perhaps even suggesting what might be a first layer improvement technique.

    As for levelling extrusion etc, all is working fine. I'm beginning to think that lines being visible is unavoidable. Even when my printed first layer looks glassy flat, I can still see lines no matter what hight settings I use.

    Below is a picture of a print in progress, printing at 0.15mm in ABS without support. The print came out solid and functional.

    Perhaps you could provide a picture of a perfect first layer with no visible lines and then I'll know what to aim for. 😉

    20200621_222514.jpg

  • Link to post
    Share on other sites

    Posted · ironing only on top layers?
    On 6/21/2020 at 4:03 PM, gr5 said:

    You can't iron the bottom layer without flipping the part over, right?  I'm confused.


    By default, most profiles have combing set to "all".  Change "combing mode" to "not in skin" and that should make your bottom layer look much better.


    Ok, I've tried your suggestions, "not in skin". I've also upped the first layer flow to 115% and increased nozzle temperature by 15c. Although there is a slight improvement, lines are still visible.

    Thank you again for your suggestions but I will continue to push for 1st layer ironing with a freind who does write code. It has 2 chances so we shall see. 😁

  • Link to post
    Share on other sites

    Posted · ironing only on top layers?

    Okay - I think you are trying to fix the bottom layer with ironing instead of leveling properly.  Some points:

    1) If you were to print just the first layer and stop the print and cut the part in half so you can see the cross section of each trace - you would notice that the filament is flat where it hits the bed and flat where it hit the nozzle but the sides are rounded.  This can leave a very very tiny gap of air running along the bottom of your part and make lines.  Ironing won't help because that air needs to esacape somehow.


    2) More likely you aren't leveling properly and need to move your nozzle just a tiny bit closer to your bedskirt.png
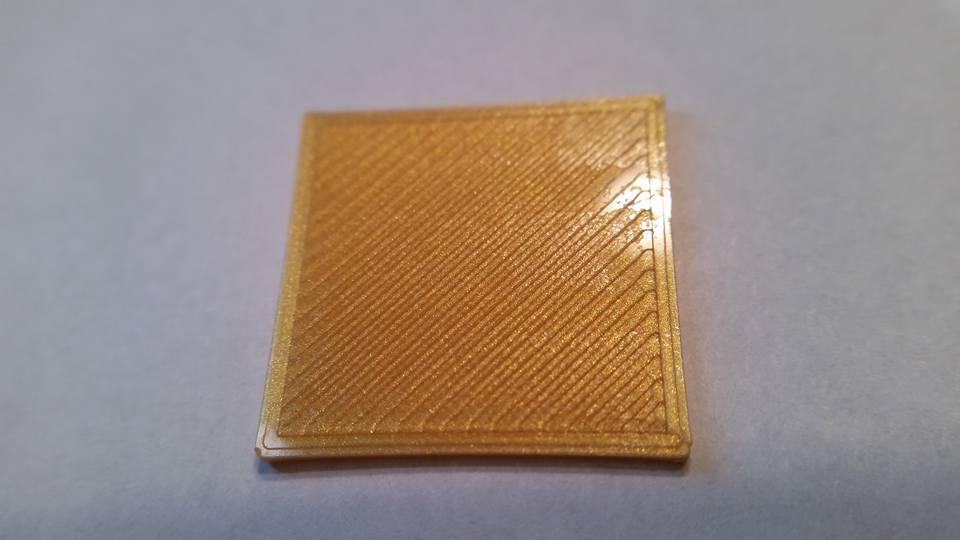
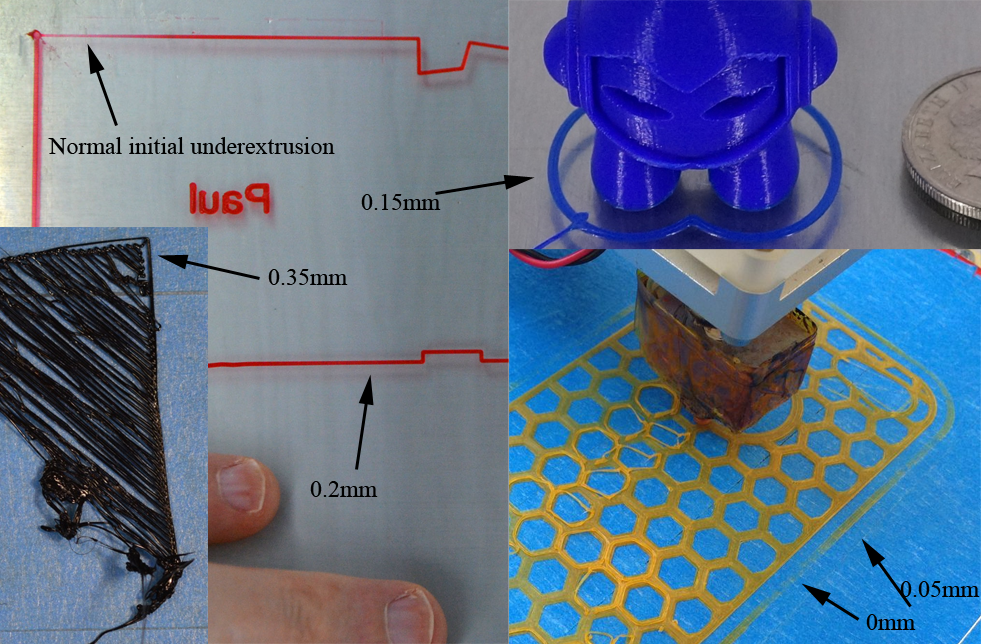
.  here are some photos of perfect bottom layer squish amounts:


  • Link to post
    Share on other sites

    Posted · ironing only on top layers?

    Here is a decent first layer (part flipped over).  I think one can do much better.  I haven't really tried to eliminate these lines but personally, typically they are much better than this.  I suspect that it helps to use a thinner first layer.  Default is 0.3mm in most cura profiles but 0.1mm works just as well or better.layer-height-test-01.jpg

  • Link to post
    Share on other sites

    Posted · ironing only on top layers?

    Okay this is a print I did recently.  I wasn't trying to get a perfect bottom.  This is typical for me.  This was 0.8mm and 0.3mm layers but not sure about first layer.  Probably also 0.3mm.  This is typical of my parts and I usually use 0.4mm nozzle and default first layer.


    I really think if I go 0.1mm bottom layer it will be much better.  Especially if I level tight and make it squish hard.


    2020-06-24 13.07.07.jpg

  • Link to post
    Share on other sites

    Posted · ironing only on top layers?

    Thanks for the photos Gr5.

    It looks like I'm probably getting about the same results as your bottom picture although it's tricky to see it in black.

    This is a print in progress now.

    Printing ABS at 0.15mm with 0.3mm first layer:

    Ideally I would like to print just the first layer at 0.06 and then switch to 0.15mm for subsequent layers.........but i don't know how to do that yet, i guess you'd have to mix profiles somehow?

    20200624_192949.jpg

  • Link to post
    Share on other sites

    Posted (edited) · ironing only on top layers?

    This is the underside of the items plus brim. Same settings as the print in the previous picture except that the above has the bed adjusted slightly closer to the nozzle.

    I think if I go any closer it'll end up scrubbing.

    Just for clarity, the tapered sections showing in the middle of each long item are mostly support.


    20200622_180952.jpg

    Edited by VicP
  • Link to post
    Share on other sites

    Posted · ironing only on top layers?

    "initial layer height" is the setting you want.


    It's easy to find these - the trick is to use the settings search box.  Just above most of the settings is a search box.  Type "layer" into that search box and even hidden settings will show up.  It's important to realize that there is more than one layer height, probably about 7 line widths, maybe 7 speeds, and so on.  Not just one speed.  Not just one layer height setting.  That search box is critical for me.


  • Link to post
    Share on other sites

    Posted (edited) · ironing only on top layers?

    Hi Gr5,

    Thanks for the layer info.

    As you say regarding ironing of the first layer, the trapped air would be a problem, so, what if the lines of the first layer were set to leave a very small gap between the lines of filament, and then the ironing process is offset to travel centred on the gaps, therefore filling and pushing air out as it goes. This I think would produce practically invisible lines in the finished surface.

    Another area that I think would be good is for circular objects where again, the first layer becomes the face side of the print, can be printed in a spiral rather than circles with a step to the next line.

    I've been making centre caps for a freinds alloy wheels (pictured in black ABS) and apart from the steps creating a line from the centre outwards and where cura has skipped part of the circle and come back to it later creating visible circular lines, it would be pretty much ideal as a finished surface that looks almost lathe turned.

    I noticed also on the slice preview that the steps are not shown, instead it appears as a start and stop point for separate individual circles and the resulting radial lines are therefore not shown.

    If it was sliced as a spiral working from the centre outwards and then no steps would be required and when it meets the side wall the flow rate is reduced to fill the tapered gap then I think it would look a lot better.

    I've included a view of the top of the print (bottom picture) which has not been ironed.

    20200701_170550.jpg

    20200701_170519.jpg

    Edited by VicP
  • Link to post
    Share on other sites

    Create an account or sign in to comment

    You need to be a member in order to leave a comment

    Create an account

    Sign up for a new account in our community. It's easy!

    Register a new account

    Sign in

    Already have an account? Sign in here.

    Sign In Now
    • Our picks

      • UltiMaker Cura 5.7 stable released
        Cura 5.7 is here and it brings a handy new workflow improvement when using Thingiverse and Cura together, as well as additional capabilities for Method series printers, and a powerful way of sharing print settings using new printer-agnostic project files! Read on to find out about all of these improvements and more. 
         
          • Like
        • 18 replies
      • S-Line Firmware 8.3.0 was released Nov. 20th on the "Latest" firmware branch.
        (Sorry, was out of office when this released)

        This update is for...
        All UltiMaker S series  
        New features
         
        Temperature status. During print preparation, the temperatures of the print cores and build plate will be shown on the display. This gives a better indication of the progress and remaining wait time. Save log files in paused state. It is now possible to save the printer's log files to USB if the currently active print job is paused. Previously, the Dump logs to USB option was only enabled if the printer was in idle state. Confirm print removal via Digital Factory. If the printer is connected to the Digital Factory, it is now possible to confirm the removal of a previous print job via the Digital Factory interface. This is useful in situations where the build plate is clear, but the operator forgot to select Confirm removal on the printer’s display. Visit this page for more information about this feature.
          • Like
        • 0 replies
    ×
    ×
    • Create New...