Jump to content

Creating a Homemade 3Doodler (3D Printer Pen)


Recommended Posts

Posted · Creating a Homemade 3Doodler (3D Printer Pen)

I am looking to design and build a homemade version of the 3doodler for use at a table at a local science expo. Knowing there is bunch of engineers and, of coarse, the designers of the Ultimaker on these forums, I chose to bring this little project to the Ultimaker forums. So please, if you have any input at all, post it!

I will break down what I am looking for / currently thinking regarding the design of the printer pen.

Extruder:

Considering the fact that I won't have to compensate for variable speed, temp, and layer height, I don't think the use of a stepper motor is required. What hi-torque / low rpm motors do you recommend? As for the actual extruder body, I was planning on using a reprap design.

Nozzle:

Should I just drill a .5mm hole out a bolt and go from there or should I go the machined nozzle and heater block route?

Hot End:

I do think a variable and monitored hot end with a thermistor is required. This will allow me to switch between PLA and ABS. As for monitoring and adjusting the temp, how should I interface that with a computer? Or should I go the soldering iron approach (no thermistor, just a heating device that will stop at a certain point)? I am open to any and all suggestions regarding the hot end. This will be the most difficult part.

Hot End to Cold End Insulation:

Fiberglass wool? Bamboo? Peek? Not sure what the best material to use is. Any ideas for the transition between the extruder and the hot end w/ insulation?

Plastic Filament:

I am currently leaning toward ABS as it has a smaller cooling window and is a bit less brittle than PLA. However, I cannot chose between 1.75 and 3mm filament. 1.75mm is easier to procure for me but 3mm may be more feasible.

I apologize for all of the open-ended questions. I am still in the feasibility check phase and have not yet begun the design process. I thought I'd bring it to the creative Ultimaker forum for ideas before I began. If you think of anything else I did not mention above, please post!


  • Link to post
    Share on other sites

    Posted · Creating a Homemade 3Doodler (3D Printer Pen)

    This may sound kinda stupid, but why would you want to build a 3Doodler clone yourself if you could just get one for the ridiculously low price of 99$ including some filament?

    Unless you are able to construct and produce all the mechanical parts yourself, you're going to pay a LOT more than 99$...

    Do you intend to add some features that the original doesn't have?

    /Edit:

    Imho it would be interesting if you want to make the handpiece considerably smaller. From the pictures of the original I assume that it's quite a big, chunky piece. If it were much smaller, like a regular pencil, it would make it much easier to use. But that's probably quite the challenge because if it weren't, the original would probably be smaller, too...


  • Link to post
    Share on other sites

    Posted · Creating a Homemade 3Doodler (3D Printer Pen)

    Thanks for the feedback. To answer your question, I would not be posting this if I just wanted to go and buy one. The science expo I am attending is to demonstrate to children how an educated individual can use science and publicly accessible technology to create something cool (like the 3D printer pen).


  • Link to post
    Share on other sites

    Posted · Creating a Homemade 3Doodler (3D Printer Pen)

    KISS.

    Just print a proven direct drive extruder from thingiverse, swap out the stepper for a GM3 from solarbotics, wrap the heater block in some rock wool, print an enclosure for the thing that holds a fan, a trigger, a switch, and a battery. Build it around an arduino if you're trying to show kids it's all easy to do.


  • Link to post
    Share on other sites

    Posted · Creating a Homemade 3Doodler (3D Printer Pen)

    What do you need the Arduino for?


  • Link to post
    Share on other sites

    Posted · Creating a Homemade 3Doodler (3D Printer Pen)

    Assigning nozzle temps to a material setting switch maybe?


  • Link to post
    Share on other sites

    Posted · Creating a Homemade 3Doodler (3D Printer Pen)

    You could simplify that into an analog circuitry without the need of an MCU. I guess that's what they use on the 3Doodler, too, because there is no space for an Arduino platform. And the price tag wouldn't be 99$ anymore with the Arduino already taking 30$.

    But, if you use an Arduino or whatever MCU platform, you can have much better control over the heater. In most cases that's probably not necessary, it just depends on what you want to do.

    The analog circuit is actually not much more than some operational amplifier comparing the NTC voltage against the pre-set reference voltages (which resemble for example 200°C) and then switch between "higher than" or "lower than" target value. Connect that output to the heater, put in some hysteresis, and that's it.

    Use a simple switch to select between 2 or 3 reference temperatures..

    /edit:

    About the difficulty level for the electronics:

    I'd classify that as a good project for beginners. You need to know (teach) Ohm's law and some Op-Amp basics. It can all be breadboarded and hand-soldered, no programming skills or good layouting needed.

    If you're not going into detail on the expo, you can just show the kids that there isn't more electronics in there than just about 10 simple parts.


  • Link to post
    Share on other sites

    Posted · Creating a Homemade 3Doodler (3D Printer Pen)

    For temperature control, I am near certain that you could find an IC specifically designed to do the job. Same for the motor control. Both could probably take input from a variable resistors configured to act as a voltage dividers.

    Personally, if I were going to use a micro controller, I would use a PIC. I don't however believe that an Arduino derivative is entirely out of the question. One option is something like the Arduino Micro (~$10). He could also make his own design using an Arduino compatible MCU.


  • Link to post
    Share on other sites

    Posted · Creating a Homemade 3Doodler (3D Printer Pen)

    Additional: One good reason to just go with purpose specific IC instead of MCU, is that you will likely need some chips to control power for the heater and motor anyway. I don't think it will be that much more to just get something that rolls as much as possible into one package.

    At least that was my experience when I went to build a stepper motor driver a while ago. For the price of a suitable MOSFET, I was able to get a stepper motor controller IC with almost everything built in.


  • Link to post
    Share on other sites

    Posted · Creating a Homemade 3Doodler (3D Printer Pen)

    I wouldn't use a stepper motor here at all. A simple geared motor should more than suffice. And you don't need a controller for a DC motor.

    You could use a complete H-bridge driver which would enable you to change the motor direction (necessary if you want to be able to switch colors). But then again you can even control that without the use of any programmable IC.

    It's also cheaper because it's simpler. If you need a week to program and debug the product (usually it takes more even for small projects), then you lose time = money.

    If you have a simple circuit that you just need to put together, you have a simple product that's probably going to work right away. No software bugs, no programming hardware needed.

    But anyways, I think that's too many details for the moment. On this stage of development, you have much more important problems than electronics details...

    Tell me if you need help with the electronics, but consider the major mechanical challenges first - no use making an electronic circuit if you can't make a working mechanical prototype...


  • Link to post
    Share on other sites

    Posted · Creating a Homemade 3Doodler (3D Printer Pen)

    Okay thanks for all of the feedback! I will let you know within a couple weeks whether or not I will go with this project. I do believe I will need a little help with the electrical components as I don't know much about electrical heaters. I believe can manage the motor circuit because I have taken two years of electrical circuit courses, however, input on that subject would not be unwelcome. As for the body of the pen itself, that shouldn't be an issue either as I am a CAD designer. Curious to see how it will turn out if I end up following through with it!


  • Link to post
    Share on other sites

    Posted · Creating a Homemade 3Doodler (3D Printer Pen)

    If I were making a desktop DIY 3Doodler type device then I would likely go for a base unit with a umbilical cord containing a Bowden tube and the wiring for the hotend, thermister and buttons.

    Then on the "Pen/Nozzle" end I would use a very small hot end, maybe a small J Head with a thick PEEK cover/insulator/body with the threads in the inlet for a compression fitting for the Bowden tube, a small cooling fan and encase everything into a custom pen like body (Easy enough to print in 2 halves and screw together, add two buttons for Fast and Slow extrusion with the wiring going back to the base unit and maybe a "Ready" indicator LED.

    For the base station I would use a decent and well tested Bowden tube type extruder system like the Air Tripper or the Mini Extruder from a RepRapPro Mendel, wire it up to a single stepper driver for the extruder and the necessary power control for the hotend and then have it all controlled by a nice and simple Arduino Uno, possibly a Mega or Due.

    Set it up so the two buttons on the "pen" give you fast and slow, have ooze control built in so that when a button is released it retracts some filament, but make this so it can be over ridden by a code change or even a simple push button on the base unit to toggle on or off depending on what you are creating and if you need the feature or not.

    Set the temp up so you can either manually turn it up or down to a custom figure from a Pot or switch/buttons or just have a set of pre set temps programmed and a single button to toggle through with a set of LED's or even a 7 seg display to show which is active.

    There is plenty of code available for an Arduino all over the internet for similar projects (not so much for a printing pen but plenty that the code would be similar for and easy to edit to your own needs.

    Add a 12v PSU and encase all the controls, circuits, wiring and such in a nice laser cut case with the extruder mounted on the outside for easy access and your ready to go.

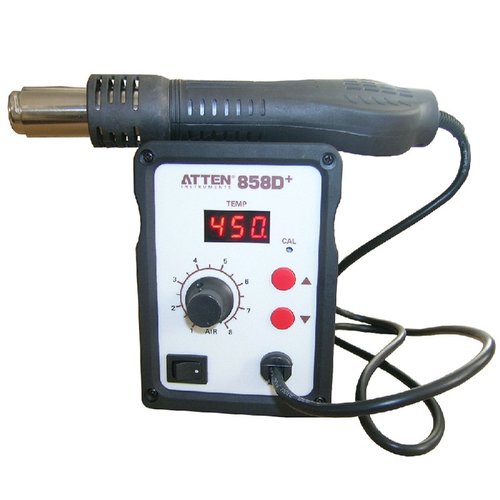
    Just think along the idea of a handheld Hot Air Solder Rework/Reflow Station... Hot-Air-Rework-Station-ATTEN-AT858D-plus.jpg


  • Link to post
    Share on other sites

    Create an account or sign in to comment

    You need to be a member in order to leave a comment

    Create an account

    Sign up for a new account in our community. It's easy!

    Register a new account

    Sign in

    Already have an account? Sign in here.

    Sign In Now
    • Our picks

      • UltiMaker Cura 5.8 beta released
        Another Cura release has arrived and in this 5.8 beta release, the focus is on improving Z seams, as well as completing support for the full Method series of printers by introducing a profile for the UltiMaker Method.
          • Like
        • 1 reply
      • Introducing the UltiMaker Factor 4
        We are happy to announce the next evolution in the UltiMaker 3D printer lineup: the UltiMaker Factor 4 industrial-grade 3D printer, designed to take manufacturing to new levels of efficiency and reliability. Factor 4 is an end-to-end 3D printing solution for light industrial applications
          • Thanks
          • Like
        • 3 replies
    ×
    ×
    • Create New...