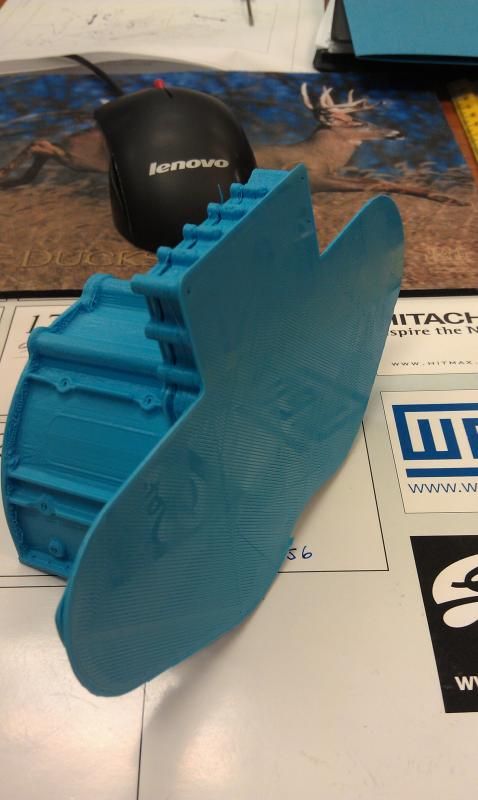
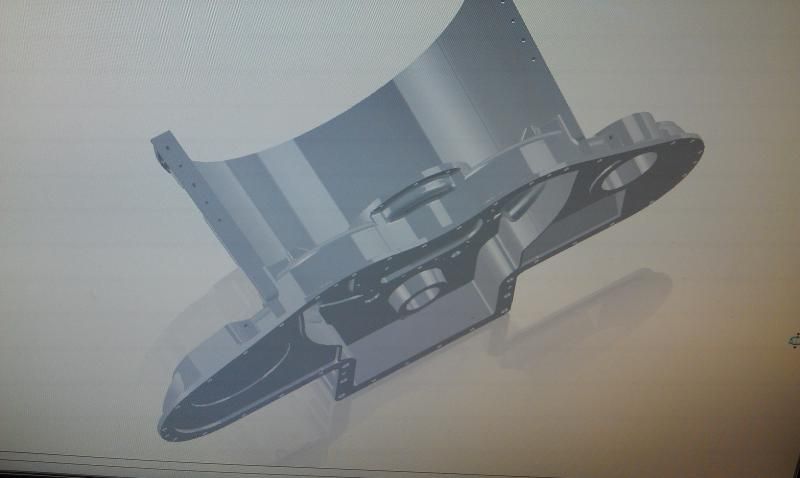
the model displays right in cura? I mean in normal view mode it does show like in your cad? If not the .stl file is already wrong.
if else:
switch to full settings and check that there is not raft enabled under platform adhesion (pick none or brim)
Maybe uncheck all fix horrible modes in the expert settings.
That looks like a raft has been printed, tap it or drill it, is it hollow?
Your model is confusing Cura. If you look at the model in layer view (ALWAYS do this before printing) it should show that it intended to fill in the bottom.
The problem is most likely that you have "Fix horrible type A" checked. Go to expert settings and make sure all of those 4 checkboxes under "fix horrible" are unchecked.
Also look at your model in XRAY view. If you see any red then there is an issue. Look at slice view near any areas that were red in xray view. The "fix horrible" settings try to fix these red areas for you so if you don't have any red areas then you don't want those checked.
To post a picture, go to "gallery" at the top of this page, left side. Click that, then the big blue "upload" button. Then after you are done uploading, make a new post and click "my media" next to smiley.
Linking to external pictures is a bad idea if those websites will stop hosting the picture a few years (or days) from now.
UU, I will try that. Yes type A was checked. I also think my STL file may have issues... I will look at that too.
Thanks!
So I unclicked all the boxes in Fix Horrible and then looked at the layers and it looks like it will plot with the cavety open BUT it also looks like there are holes or sections missing. When I go to normal it looks fine. Will it print the whole model or will the holes in the layers be voids?
Thanks!
Did you look at the part in XRAY view mode? In Cura? Like I said? Any red areas are a potential problem.
It could be that it will print fine because layer view is confusing - it really only shows the current layer and a few layers below well. But if you get to a layer and something isn't shown then it won't print so don't even try it.
You can try different combinations of the fix horrible settings... There are 11 combinations - but never check A and B at the same time as that is meaningless I'm told by Daid, the author.
Or you can fix the cad model. Red areas indicate a "beam of light" passed through an odd number of walls. So you have a double wall in the same place or an interior wall, or a hole in your model where there shouldn't be a hole.
Hi UU, Yes I did look in X-Ray mode and layer. That was VERY helpful. Right now I am looking at the model and I will try a combination of Fix Horrible.
It looks like it will print now with my underside cavity open BUT there appears now to be open areas or surfaces that may not plot...
Thanks!
Bill
If you STL model is perfect then you don't need any of the Fix Horrible settings and they just have the potential to make things worse. But if there are holes or internal walls, then the Fix Horrible settings sometimes can fix the issues.
I have it going now and it is looking WAY better. Thanks!
Xray looked good and the layers are very close so I am plotting. that was a very helpful tip. I did wind up selecting only type A in the Fix horrible........ Without it I still had some open areas. All my red is gone in Xray.
Bill


.thumb.jpeg.0b7a05eafc09add17b8338efde5852e9.jpeg)
Recommended Posts
jonask 0
I think u need a number of minimum posts to add pictures. Maybe google "upload picture", find a picture upload service and post the link here.
I did not quite get what you mean.
As far as i understand it your missing some details / forms und the bottom surface?
Check if the details are not to small
Check if "cut off bottom" in advanced settings in cure is at 0 where it should be
Welcome btw
Link to post
Share on other sites