Jump to content

Did I Burn my UltiController with 24V?


Recommended Posts

Posted · Did I Burn my UltiController with 24V?


Hi guys,


well, we just happen do build the plainplain extension for a heated bed just yesterday:

http://www.formfabrik.ch/leistungen/opensourceprojects.php

it's really a great extension, many thanks to Dominic for building and sending it to us.

here a pic to image the additional base with seperate power supply for the heated bed:

Plainplain_I04.jpg

in the manual it say, : "solder the 24v to the PCB board."

Plainplain_H02.jpg


which i did. when assambly was finished and i turned it on, it worked fine for the first 7 secs. Than it went dark (especally the UltiController) and the 2 LEDs on the both extruders went dark.


So i powered off, unhooked the 24v cable from the power supply an plucked in the regular 19v adapter into the ultimaker.

now the LEDs came on again, but the UltiController only showed a backlight, no more text or interactivity was seen.


so my question: can you imagine, which part i must have blown?

what to replace?

would it make sense to still build in the RECOM R-78C12-1.0 // 1345 ? or is it already to late?


(a great video i found just afterwards: http://umforum.ultimaker.com/index.php?/topic/7462-power-supply-for-ultimaker-1/#entry70903 )


from what i understood, with the RECOM, you can run with both power currencies, with 19v AND 24v... correct?

thanks for your help.

byebye

DruckDuck


  • Link to post
    Share on other sites

    Posted · Did I Burn my UltiController with 24V?

    You have probably (almost certainly) blown the linear 12V regulator discussed in the video you link to, its marked IC1 on your board. You can probably still just replace that... I replaced mine with one of these:

    http://www.ebay.co.uk/sch/i.html?_odkw=12v+dc+buck&_from=R40&_osacat=0&_from=R40&_trksid=p2045573.m570.l1313.TR5.TRC1.A0.H0.Xdc+buck&_nkw=dc+buck&_sacat=0

    Works like a charm, and allows me to draw more from the 12V line (like LED diodes, additional fans etc.)

    That being said, I think you will run into a number of problems with this setup...And frankly, Im a bit surprised to see this semi professional kit suggest simply wireing the heatbed in and adding 24V to the board.

    I think the Ultimaker board says 16-20V... and probably for a reason... Im guessing a number of components could fail at 24V... Other components will definately perform weirdly (like the19V heater in your hotend, the fan attached to said hotend, steppers etc.)...

    The forums and google groups have a ton of discussions on how to do this best, easiest, most elegantly, etc., I suggest looking through those and maybe contacting the guys who made your kit to make them aware of the problem...

  • Link to post
    Share on other sites

    Posted · Did I Burn my UltiController with 24V?

    Thanks for the advice....

    after more reading this very forum here:

    i decided to get a member tsp42 adviced me in this forum:

    i'll combine it with the RECOM R-78C12-1.0 to replace the presumably broken LM7812 "Positive +12v Voltage" Regulator. (maybe it's overbuilding, but i wanne make sure, and a double security sould not be too bad, right?)

    i'll let you know how well it'll work as soon as i received & installed the material.

    byebye me


  • Link to post
    Share on other sites

    Posted · Did I Burn my UltiController with 24V?

    Actually, most of the printer will run fine @ 24V. The three things that have problems with 24V are the regulator as you have discovered, the heater in the hotend and the 12V material cooling fan. Most likely the heater will be OK and you can even modify the firmware to limit the PWM to the heater so it isn't overloadde at the possible loss if power regulation resolution. The fan can easily be replaced with a 24V version like http://www.amazon.com/Brushless-Cooling-40x40x10mm-Sleeve-bearing-Skywalking/dp/B00BIZC6K8/ref=sr_1_fkmr1_1?ie=UTF8&qid=1412877186&sr=8-1-fkmr1&keywords=Skywalking+4010+11+blade%C2%A0

    (check the size, can't remember if the UM1 is using a 40mm or 50mm fan, skywalking makes both sizes in 12 and 24v).


  • Link to post
    Share on other sites

    Posted · Did I Burn my UltiController with 24V?

    Obvirosly i did NOT burn the regulator - sadly... 'cause the problem still persits.

    so: step by step, let me explain...

    i soldered the new RECOM R-78C12-1.0 into place. Looks good,

    20141011_021406.jpg

    now, this didn't change much. After plugging in the 19V transformator: The LED's are still lid, the fans are blowing, the UltiController has it's light blue backlight. But the Ulticontroller is not reacting.

    Than i pluged in a USB Connection to CURA 14.09.

    Funny enought, that the brighness of the display was altered a little bit. Will say, I saw a very short flickering. And from time to time i could see the faint letters in the display saying things like "Ultimaker Ready" in the last row. But the rest of the display was sooo bright, that there was nearly no contrast between the letters and the background. Therefore it was almost impossible to read, and only stayed on the display for a very short time.

    I tried to capture the event in the following foto: (zoom in to see the letters in the UltiController display)

    20141011_023706.jpg

    The laptop could NOT connect via USB. There was no way, that i could establish a connection to the printer.

    Anyone hase a clue, what could be broken? // Should be fixed??

    Any sound advice would be highly appreciated!

    Thanks, guys!

    ..-me-..


  • Link to post
    Share on other sites

    Posted · Did I Burn my UltiController with 24V?

    Sounds like the arduino mega is broken. Sort of makes sense as the arduino is powered by the 12V regulator.

  • Link to post
    Share on other sites

    Posted · Did I Burn my UltiController with 24V?

    @tsp42:

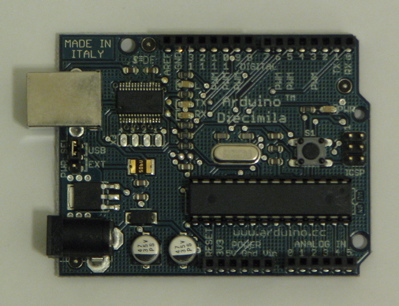
    i've currently not an arduino mega lying around here. but i've got this old arduino diecimilia. just like this:

    ArduinoDiecimila400.jpg

    U think, 1 could connect it as 'a try' to the ultimaker. so to confirm, that the current mega board is broken, before buying a replacement...

    but the io-pins on the longboard of ardino mega are connectet to the ultimaker motherboard. so maybe it woun't connect.

    *have to research first*: what are the nessessary pins for connection and do they fit aligned?

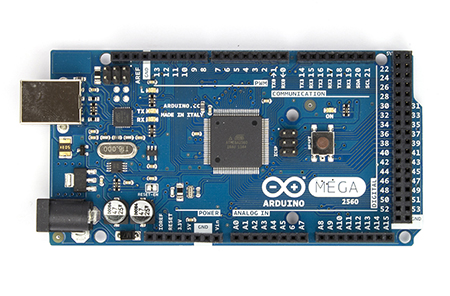
    this is the arduino mega 2560 board i found in the Ultimaker 1.0

    ArduinoMega2560_R3_Front_450px.jpg

    b.t.w.: any1 has by coincidence and old mega-board flying around? wanting to share M; :cool:


  • Link to post
    Share on other sites

    Posted · Did I Burn my UltiController with 24V?

    I'm not sure it would work. Did you try to reflash the arduino MEGA? Else try creating a simple test program in the arduino IDE for testing the different pins on the arduino MEGA.

    Or just buy a cheap arduino MEGA2560 clone. You can get one from €14 at amazon.de


  • Link to post
    Share on other sites

    Create an account or sign in to comment

    You need to be a member in order to leave a comment

    Create an account

    Sign up for a new account in our community. It's easy!

    Register a new account

    Sign in

    Already have an account? Sign in here.

    Sign In Now
    • Our picks

      • UltiMaker Cura 5.7 stable released
        Cura 5.7 is here and it brings a handy new workflow improvement when using Thingiverse and Cura together, as well as additional capabilities for Method series printers, and a powerful way of sharing print settings using new printer-agnostic project files! Read on to find out about all of these improvements and more. 
         
          • Like
        • 18 replies
      • S-Line Firmware 8.3.0 was released Nov. 20th on the "Latest" firmware branch.
        (Sorry, was out of office when this released)

        This update is for...
        All UltiMaker S series  
        New features
         
        Temperature status. During print preparation, the temperatures of the print cores and build plate will be shown on the display. This gives a better indication of the progress and remaining wait time. Save log files in paused state. It is now possible to save the printer's log files to USB if the currently active print job is paused. Previously, the Dump logs to USB option was only enabled if the printer was in idle state. Confirm print removal via Digital Factory. If the printer is connected to the Digital Factory, it is now possible to confirm the removal of a previous print job via the Digital Factory interface. This is useful in situations where the build plate is clear, but the operator forgot to select Confirm removal on the printer’s display. Visit this page for more information about this feature.
          • Like
        • 0 replies
    ×
    ×
    • Create New...