


Stefania Dinea
-
Posts
97 -
Joined
-
Last visited
-
Days Won
3
Content Type
Forums
Events
3D Prints
Everything posted by Stefania Dinea
-
I know but it will print if you place them with the bottom flat on the base plate - however small print speed it recommended like under 70 mm/s — the holes are self supporting so no support requiered - I do recommend a brim. I did it quick and dirty - will share my settings tomorrow 🙂 what UM are you using?? No - the amount of pins should be equal to the amount of prins requiered for the top side. It was said mire as a safety measure in case people were to lazy to count. Check the tolerances 😉
-
Yes, you can just take one piece at a time.
-
I think you should feel free to print exactly how you want them - the A pieces I have claimed are all black - because I am going through one roll at a time - I could have been more creative --- but it was during prototyping phase so I did not put accent on color (also I personally own only black and white at home)
-
Please feel free to use any colors you want -- the community voted for rainbow mode 🙂
-
Thanks, it will be a lot of work, and any help is highly appreciated. Here is the info you asked for: https://3dmeetup.se/ April 27-28, 2019 // Helsingborg, Sweden
-
On the principle of go big or go home - I would like to present to the community my 2019 personal project. EQUILIBRIUM 3D PRINTED PAVILION which will be build by the online 3D printed community in Sweden and also open for international contributors. The pavilion will be assembled on site during the 3D Meet-up Sweden 2019. April 27-28, 2019 // Helsingborg, Sweden General info about the project: The goal is to build a fully modular structure produced entirely on modern desktop 3D-printers. With the help from the 3D community in Sweden and around the world we aim to complete this project and assemble it during the first day of the event. The structure, composed of 216 pieces (72 unique) has a circumference of 3,5 meters and the height comes in at a total of 2,4 meters. The assembly is done through a pin connection system that remains unchanged throughout the entire structure. Each piece has been designed to fit on a printer with a build size of at least 200x200x200mm, but many pieces will surely fit on machines with an even smaller build volume. This means that almost everyone should be able to participate. See below for a quick rundown of the recommended print settings. 0.2mm layer height no support material 2 or 3 outer perimeters 5% infill – triangle pattern material of your choice (PLA is good) color of your choice We’re certain it will look really cool with all different colors once it’s all assembled. For every piece you also NEED to print 4 pins (included in the link). We recommend that you print the pins with a high percentage of infill, if not solid, and a fair amount of outer perimeters as they need to be sturdy. Depending on your settings, a normal piece takes around ~5 hours to print and consumes about 120g of material. Inspiration: I have been talking for over a year of making a 3D printed pavilion ever since I saw the Vulcan Pavilion. What I didn't quite agree with was the use of glue in the assembly - other than that - great idea. If you are considering to join in please do so here: https://3dmeetup.se/community-print/ More details about the process here: https://www.dineadesign.com/2019/01/09/equilibrium/


-
@Alex L they look fantastic - however I don't get the fried chicken/turkey? What is that? :))
-
Hello everyone and Merry Xmas!! What better way to incorporate parametric design learning/teaching and Christmas holiday spirits than some candy cane scripting. Sure it can be done by hand as well but the best way to get a grip on your parametric skills is to use it also for more seasonal holiday spirit and instant satisfaction reward. I have been using 3D printing just before the holidays at work to simulate and engage my colleagues to learn basic parametric design and get a grip on Grasshopper. Here are the results hanging in the little tree. I think it was a very fruitful workshop and I was quite surprised with the results. As an Xmas special freeby for the community I have attached the parametric candy canes I made for this workshop and there are 7 of them. For those of you who want the script and want to see more in detail how this was done you can follow this link https://www.dineadesign.com/2018/12/24/xmas-candy-canes/ -- however here I would keep it more 3D printing related. So to start, import the candy cane you want to print and then select the model and create Ctrl+M to multiply --- make one copy 🙂 Next what you want to do is rotate the Y axis 180 degrees. Select both models and move the models on the Z axis by Z total height /2 in this case = -8 mm Now just print and super glue together and you have yourself a fast printed curly candy cane for your tree. How would you print this? Let me know! CANDY6.stl CANDY1.stl CANDY2.stl CANDY3.stl CANDY4.stl CANDY5.stl CANDY6.stl


-

Ultimaker S5 - one material appears to be empty
Stefania Dinea replied to Stefania Dinea's topic in UltiMaker 3D printers
I got support from our on site ultimaker representative. It was a challenge for them too. We had it with the factory firmare and couldn’t get it to work to the latest, so first we updated to an earlier version of updates - can’t remember which one and then to the latest! -
A personal study/education - I was playing with fast towers prototyping in architecture and came up with this. So I printed it for myself - at home, on my whitewalker (that’s the name of my Ultimaker 3) As you know I was quite busy with work and the blog, but Xmas is comming 🙂 So i am looking forward for that time to design some stuff. However I have a top outfit that is in the making using TPU 95A - works like a charm 🤗🤗🤗 Yes yes - I think I can turn it into a watch :)) Probably the speedy car is going to be placed at 6 🙂 time to go to and from work :))
-
Hello everyone, I have been away for a while being busy with well, work. However, I never had a chance to brag and show some of my work both from work and personal portfolio. Some from the work portfolio is done by myself, some together or exclusively by interns. In case I have not been clear before, I work as an architect for Sweco Architects at the mother ship in Stockholm Sweden. One of my daily tasks for the past two years was to handle the in-house fablab. So here are some photos of the works we have left around in the office - the really cool models always end up with the client (but what is new?) A little preview from work: Personal Portfolio - I use a lot of parametric design and 3D printing to exercise and build up my own skills in my free time - and also to be able to share with the community developments, therefore not implying a client and or her/his secrecy restrictions. Prints from the community such as ultimaker ad thinginverse:


.thumb.jpg.ef4ab583a1dbb5b2136feb582cd818e7.jpg)


-
I am Stefania Dinea, an architect who mixes 3D printing, VR, parametric design and blogging daily and I will share some of my 3D printing tips & tricks with you. This series is my overview about the process and my work-around. Please feel free to comment and add. PREVIOUS POST: THE ARCHITECTURE OF 3D PRINTING - 01 TOPOGRAPHY THE ARCHITECTURE OF 3D PRINTING - 02 MASSING THE ARCHITECTURE OF 3D PRINTING - 03 TOLERANCES AND SNUG FIT THE ARCHITECTURE OF 3D PRINTING - 04 ENTOURAGE THE ARCHITECTURE OF 3D PRINTING - 05 HIGH RESOLUTION BUILDING FACADES THE ARCHITECTURE OF 3D PRINTING - 06 INTERIOR DESIGN THE ARCHITECTURE OF 3D PRINTING - 07 STL EXPORT FROM REVIT THE ARCHITECTURE OF 3D PRINTING - 08 OPTIMIZE BUILD VOLUMETHE ARCHITECTURE OF 3D PRINTING - 09 MATERIAL PROFILES THE ARCHITECTURE OF 3D PRINTING - 10 ARCHICAD Hello, as this series comes to an end I would like to thank you all for the involvement and comments. I will continue to post and comment on the community but not under the umbrella of Architecture for 3d printing. So expect more fun and not so serious posts from me in the future. Here are some topics I have neglected before but not because of their lack of importance but because they never really represented any kind of hassle for me, so I decided to include them in my last post alongside some questions I have received from you. Speed Every filament has their speed recommendations but at the end of the day it's about what you are printing and which quality you want it to be at. Lower speed = higher quality. However when I am printing masses I also go up to 100mm/s considering the outcome quality doesn’t have to be pristine this also applies for when I do test models. If you are not doing an expo model, there is no need to take it at a slow pace. Sometimes you are in a hurry and you do not have time for high quality considering time is of the essence. I have to admit though, I have never altered the standard settings of the PVA. Different nozzles An Ultimaker printer comes with a 0.4 nozzle as standard, however in addition to that you can purchase a 0.25 and a 0.8 nozzle. I recommend that for a better printing you have all of these as AA cores. I used them as follow - the 0.25 for printing small scale such as entourage, 0.4 for generally everything and 0.8 for printing volumes without any details, or 1:1 details, mostly when I am in a hurry. I usually use just the 0.4 nozzle, I find it to be the nozzle to handle it all. The ruby nozzle available for the UM 2 is a wonderful invention for those who use abrasive materials but I have rarely seen it used in our profession except for details in 1:1 scale. Post processing For post processing I have bought a fish tank which acts as a PVA remover, also a mushroom drier to dry the water out of the washed models. I generally don't enjoy using brim just skirt as a setting mostly because I do not enjoy post cleaning the model, which takes about 30 min. Making sure the models come as clean as possible out of the printer is my first priority. One thing I do occasionally is to sand them with some sanding paper and use a lighter to burn off the strings. If you want custom colors I generally recommend spray painting after rather than going through settings and hassle of changing materials. For me that helps. PVA is the greatest invention!! And it works 99% of the cases - some errors do occur as well but I love being able to use that technique so I don’t have to remove supports. Q&A Do you (often) post process your 3D prints, or are they often good to use straight out of the Ultimaker? If you do, what is it that you most often do? I usually use them as they come out of the printer. However sometimes some extra attention is needed. See previous comments. And question-inception, is there perhaps a post-processing technique you would like to apply but are not familiar with yet? A sanding machine ?! I heard there are gadgets that you can lay a model in for sanding. I am not sure for which techniques of printing they are used for but they sound awesome. I just started a new job and we want to exhibit our Revit models as 3D printed models. What do you think we should invest in? Ultimaker 3 or 3Extension? Or do you feel Ultimaker S5 is better suited? Maybe some other suppliers of 3D-printers should be considered? Well, I have personally tested all low end brands and I can tell you for sure cheap comes with the included headaches. The Ultimaker brand usually stands that their products will last a very long time and it never loses the intended purpose. The UM2 is a very reliable and usefull printer. However the biggest complaint in architecture was size, that is why the UM S5 came out in a different format than what we are used to. When you buy a printer for your company then I suggest the latest version available on the market, however if it’s for personal use, then whatever fits your budget.
-
THE ARCHITECTURE OF 3D PRINTING - 10 ARCHICAD
Stefania Dinea replied to Stefania Dinea's topic in Industries
Thanks @SandervG for the shout out, I will probably do the last post over the weekend and include some of my extra tips&tricks. However it would be nice to get more questions, seriously everyone, whatever comes to mind, or even if you know a solution to a frustrating problem you once had and how you solved it ? would be nice to include some of your experiences #sharingiscaring -
THE ARCHITECTURE OF 3D PRINTING - 10 ARCHICAD
Stefania Dinea replied to Stefania Dinea's topic in Industries
Will add that to the Q&A. And @Alex L, my friend Simona, who is the one who put this together, is obviously a tinker too - I will tell her you thought the template file was good - also have to kick her ass into joining the community, since she is also using an Ultimaker at the office. -
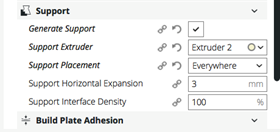
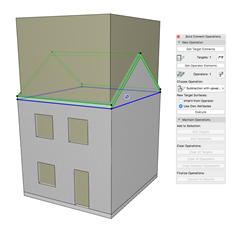
I am Stefania Dinea, an architect who mixes 3D printing, VR, parametric design and blogging daily and I will share some of my 3D printing tips & tricks with you. This series is my overview about the process and my work-around. Please feel free to comment and add. PREVIOUS POST: THE ARCHITECTURE OF 3D PRINTING - 01 TOPOGRAPHY THE ARCHITECTURE OF 3D PRINTING - 02 MASSING THE ARCHITECTURE OF 3D PRINTING - 03 TOLERANCES AND SNUG FIT THE ARCHITECTURE OF 3D PRINTING - 04 ENTOURAGE THE ARCHITECTURE OF 3D PRINTING - 05 HIGH RESOLUTION BUILDING FACADES THE ARCHITECTURE OF 3D PRINTING - 06 INTERIOR DESIGN THE ARCHITECTURE OF 3D PRINTING - 07 STL EXPORT FROM REVIT THE ARCHITECTURE OF 3D PRINTING - 08 OPTIMIZE BUILD VOLUME THE ARCHITECTURE OF 3D PRINTING - 09 MATERIAL PROFILES 10 ARCHICAD As you all well know by now, I am not an Archicad user, however, I do have friends who are avid users, one of them being Simona Halici, an architect who got into 3D printing about a year ago. She also implemented a 3D printing manual within her company and she was nice enough to share it with us. Below I will post extracts from her manual that are relevant to this topic. Preparing a print with Cura https://ultimaker.com/en/resources/52287-how-to-print-with-pva-support View option: - solid view - layer view: always use this so you can see if there are any parts missing or any errors in the model Controls: - Right click – orbit - Hold the scroll button – pan - Left click on the model – activates the modifiers (move, scale, rotate, mirror, assign extruder to model) Custom print setup Profile - Fast (what I recommend using) - Normal (better resolution, suitable for detailed models) - Fine/extra fine (takes too long and is not significantly better than the normal profile) - Custom mode changes : If profile settings have been modified in recommended mode under custom mode, a reset icon will appear to notify the user. Click the icon to show the changes that have been made, and revert back to the default profile settings. Infill - Infil density: 7% is enough for most models - Infill pattern: Grid - Relative positioning of infill patterns: Infill patterns are now positioned relative to the center of loaded models and an offset can be applied to control the infill more precisely and adjust it to preference or strength. Cooling - Always keep this setting on! Support - You don’t need support if there are no overhangs (balconies) or if the overhangs have less than 45 degrees angle - Select which extruder (print core) to use for the support structure - Extruder 1 : print core AA / PLA material - Extruder 2 : print core BB / PVA material - PLA is faster but it is more difficult to remove and it will leave marks in the model - PVA needs to be dissolved in water after the print is finished. depending on the size of the print, it can take a few hours to completely dissolve. Use warm water (but not hot! Otherwise it will deform the plastic) - When using PVA and encountering errors (the support is missing in some parts or it does not adhere well to the PLA) turn the “horizontal expansion” setting on. It will increase the size of the support structure and minimise the risk of adhesion errors but it will also increase the printing time. Build plate Adhesion - “none” if there are many models being printed at the same time and there is not so much space on the buid plate - “brim” to make sure there is no risk of warping. This will create a thin edge at the bottom of the model that you will need to manually remove after the print is done - If warping still occurs, check these solutions: https://ultimaker.com/en/resources/19537-how-to-fix-warping Preparing a 3d model for print - Select a layer combination that hides all details -Filter out the doors, windows and furniture from the 3D view -If you don’t want to show the interior of the building, use the morph tool and draw a surface that covers all the plan of the building. Offset it 100 or 150 mm inside and make a volume from it that fills up all the building. Use element operation tools to modify the morph -The final 3d should not have any holes inside otherwise the print will take longer to finish - If the model contains a large terrain, select the only the area you want to print with a Marquee tool that displays all floors and show it in 3D view - You can adjust the 3d View further by creating a horizontal cutting plane that will remove the bottom part of the terrain (it will save material and make the print faster) Check scale: it needs to fit on the build plate - Use an A3 Master layout in Archicad and create a new layout - Import one of these external drawings directly on the layout: AA.pdf (if you want to print with PLA only) AA_BB.pdf (if the print requires PVA support structure) - Place the plan view of the model you want to print - Adjust the scale of the model in order to fit in the white surface of the drawing. The grey parts are not usable (AA_BB has less printable surface because it using both extruders instead of only one) -Make sure the walls are thick enough to be printed (general rule : the walls should be at least 5 x printing layer height) - From the 3dview - save as StereoLitography file - Set the correct scale - Open the .stl file with Cura Printing with USB ● Place the USB stick in your computer. ● Slice your 3D model in Cura. Ensure that the print core and material configuration in Cura match the configuration on your Ultimaker 3 or change the configuration on your printer to match the settings in Cura. ● Save the print file (.gcode) via the “Save to removable drive” button to the USB stick. ● Eject the USB stick in Cura and remove it from your computer. ● Place the USB stick in the Ultimaker 3 (front side, next to the display). ● Go to Print and select the file you want to print. ● Write on the post-it on the side of the printer the information of the print (meters, grams) so that everyone can check how much material is left ● Once the print is finished, remove the model from the build plate https://ultimaker.com/en/resources/36910-how-to-remove-your-print-from-the-build-plate Add-on files: AA.pdf AA_BB.pdf NEXT BLOG - Q&A As my blog series is coming to an end, and I have enjoyed sharing and structuring the knowledge I have accumulated so far regarding 3D printing in architecture, I will still continue to post tips&tricks as I come across them, but as a final post of the series I will like to make a Q&A. So feel free to drop any questions that I might have missed and I will answer them in the next and final blog, which will be two weeks from now. Until next time, //Stefania


-
THE ARCHITECTURE OF 3D PRINTING - 09 MATERIAL PROFILES
Stefania Dinea replied to Stefania Dinea's topic in Industries
I have to admit I was tought the multiply rule and trick of my settings by someone who was trained by Ultimaker - so it was a sort of chain effect :)) -
I am Stefania Dinea, an architect who mixes 3D printing, VR, parametric design and blogging daily and I will share some of my 3D printing tips & tricks with you. This series is my overview about the process and my work-around. Please feel free to comment and add. PREVIOUS POST: THE ARCHITECTURE OF 3D PRINTING - 01 TOPOGRAPHY THE ARCHITECTURE OF 3D PRINTING - 02 MASSING THE ARCHITECTURE OF 3D PRINTING - 03 TOLERANCES AND SNUG FIT THE ARCHITECTURE OF 3D PRINTING - 04 ENTOURAGE THE ARCHITECTURE OF 3D PRINTING - 05 HIGH RESOLUTION BUILDING FACADES THE ARCHITECTURE OF 3D PRINTING - 06 INTERIOR DESIGN THE ARCHITECTURE OF 3D PRINTING - 07 STL EXPORT FROM REVIT THE ARCHITECTURE OF 3D PRINTING - 08 OPTIMIZE BUILD VOLUME 09 MATERIAL PROFILES In this section I am going to share some of my favorite tips&tricks. It took me over two years to learn that the best material for a printer is the one wearing the manufacturers logo, therefore the best material for an Ultimaker is Ultimaker material. Not only that, but Ultimaker has been nice enough not only to incorporate their own material settings into cura but also some generic settings that may include materials that are not necessarily apart of the Ultimaker family. This scenario allows you to focus on your goal – fast prototyping your idea and not spend to much time and energy on custom settings. However if you are a tinker – cura and the ultimaker machine will allow you to push your imagination into reality – with enough custom settings to break new boundaries. To conclude, when in doubt – go with what works! When handling materials, especially new ones, I do strongly recommend beginning with the recommended settings already found in cura. However, in Architecture I found it most useful to also restrict the type of materials to new adventurers in the field of 3D printing to PLA and PVA (If an UM 3 or higher is available). Personally, I think a UM2 still adds a lot of value to the education side, because it forces a different type of mentality, one that is design altering. Another thing that I like to custom make in cura is tailor my materials, to also include the price, therefore getting a material cost/printed piece and also include the producer and the supplier, so I always know which materials I use with what. First, you begin by downloading the technical data sheet of the material: These are the very useful information such as weight, and also ability to figure out the density of your filament. So, to create a custom new material, you go to Manage Printers> Materials>Create Using the information I already have, it is easy to fill in the info (in this example the cost is fictive) And the result looks something like this: As you can see, when you tweak your materials there are some benefits, not only accurately calculating how much time it needs to complete a job, or how much material, but also it helps prove the point that 3D printing is affordable in terms of material cost. Here are also my general all purpose printing settings (I only use this on UM machines and only when I use PLA) Layer height - 0.2 therefore top bottom thickness should be a multiply of this 0.2*6=1.2 Nozzle 0.4 so wall thickness should be a multiple of that 0.4*3=1.2 I have noticed I can take up the printing speed to 100 mm/s in cases of extreme urgency, which is almost always. I do not prefer to print with brim, but I always want to start my print with a skirt. Till next time. //S


-
Ultimaker S5 - one material appears to be empty
Stefania Dinea replied to Stefania Dinea's topic in UltiMaker 3D printers
yea --- did that - on and off, same issue - just have to update the firmare , after my 30h print is done --- if it will be done --- crossing fingers. -
Ultimaker S5 - one material appears to be empty
Stefania Dinea replied to Stefania Dinea's topic in UltiMaker 3D printers
@Wesley I only started using it recently (went of vacation day after I got it) - so the behaviour did start recently but it is like this technically from the beginning. I did not update the firmware on it since I can't connect it to the web (office policies) and last time I did that I turned mine into a brick (so I am a little sensitive to software updates) - How do I disable the filament detection? -
Hello, So I have this lovely issue with my new UMS5, as I am trying to print on it, it keeps popping up this warning and pauses my print: - this error occurs both with native ultimaker materials and with other brands, - this error occurs both with flow sensor on and off - this error is driving me crazy - this error occurs with full rolls of filament Any tips and tricks are welcomed

-
@kmanstudios It was a very big nerve wrecking experience, now I have a hard time sitting in front of a PC - I will get back to it in no time, since I can’t participate in the contests, I am doing other things. Like this little piece that holds up my rolls of filament.

-
Hello everyone, I have been away from any form of internet connection for a while since I was on vacation but seems I am back just in time to see what you guys have been working on. I am really liking the entries and can't wait to take a close look at them all. As @SandervG said, we will take a look and he will announce the winners in a few days.
-
I am Stefania Dinea, an architect who mixes 3D printing, VR, parametric design and blogging daily and I will share some of my 3D printing tips & tricks with you. This series is my overview about the process and my work-around. Please feel free to comment and add. PREVIOUS POST: THE ARCHITECTURE OF 3D PRINTING - 01 TOPOGRAPHY THE ARCHITECTURE OF 3D PRINTING - 02 MASSING THE ARCHITECTURE OF 3D PRINTING - 03 TOLERANCES AND SNUG FIT THE ARCHITECTURE OF 3D PRINTING - 04 ENTOURAGE THE ARCHITECTURE OF 3D PRINTING - 05 HIGH RESOLUTION BUILDING FACADES THE ARCHITECTURE OF 3D PRINTING - 06 INTERIOR DESIGN THE ARCHITECTURE OF 3D PRINTING - 07 STL EXPORT FROM REVIT 08 OPTIMIZE BUILD VOLUME (Trick for UM3 and UM S5) If you happen to need some extra mm, this build plate is constrained due to the dual extrussion, if you want to switch to single extrusion Cura can help you with that as well. Settings > printer > manage printers Select your printer > Machine settings Change the Number of extruders to 1 (just don't forget to change it back after) Now you will see that you will have more space available on the build plate.


-
@kmanstudios To be clear ( i noticed sometimes I am not so clear) - I was very impressed with your work on your submission - and the outcome - so the daaaamn! Was for that , in lack of a gif :((
-
@kmanstudios I was just very impressed! (Didn’t figure out how you guys post gifs in this post system yet)


.jpg.b0274020dc13a893b1ffa8ece48937c4.jpg)


